
|
ouR escaPOD mods |
Post Reply 
|
Page <1 56789 58> |
| Author |
 Printable Version Printable Version Google Google Delicious Delicious Digg Digg StumbleUpon StumbleUpon Windows Live Windows Live Yahoo Bookmarks Yahoo Bookmarks reddit reddit Facebook Facebook MySpace MySpace Newsvine Newsvine Furl Furl Topic Search Topic Search  Topic Options Topic Options
|
MoPod 
Senior Member 

Joined: 10 Oct 2013 Location: Pittsville, MO Online Status: Offline Posts: 105 |
 Post Options Post Options
 Quote Reply Quote Reply
 Topic: ouR escaPOD mods Topic: ouR escaPOD modsPosted: 06 Sep 2016 at 1:51pm |
The dinette seat sits on the bottom of the slide out, so nothing below it. |
|
|
Bill & Nancy
2015 RPod 179 Previously 2010 RPod 176 2014 Explorer Sport |
|
 |
|
|
jglynn55
Newbie 

Joined: 15 Mar 2016 Location: nashville tn Online Status: Offline Posts: 22 |
Post Options
Quote Reply
Posted: 06 Sep 2016 at 2:53pm |
|
ok thxs
|
|
|
|
|
StephenH
podders Helping podders - pHp

Joined: 29 Nov 2015 Location: Wake Forest, NC Online Status: Offline Posts: 6288 |
Post Options
Quote Reply
Posted: 18 Sep 2016 at 10:27pm |
|
Time for something that isn't so much a mod as a repair. After reading examples of leakage from the rear spoiler, I thought it was time to take a closer look at mine. This was reinforced when finally, after our trip and some events that kept me tied up, I got around to washing the EscaPOD in preparation for waxing and putting the cover on. When I was washing, I noticed water flowing out from under the spoiler at one of the rippled-up sections. If water was coming out, I figured water had to be getting in.
I first visited Camping World and got some sealant. I got both non-self-leveling/non-drip lap sealant. The only Dicor brand one was a single tube of tan. It was in the close-out area. The other I got was self-leveling Dicor white. Apparently, Camping World is closing out the tan in favor of white. This is too bad as tan was what was used on the Pod initially. In another mod post, I'll explain why I wanted the self-leveling sealant also. The first step was to make sure I could safely reach the spoiler's screws. These I removed. It was as Is suspected. A lot of the screws showed significant rust. While I had not noticed any evidence of leakage inside, rusty screws meant that at least some water was getting in by that route. So I also visited my local Lowe's Home Improvement to purchase stainless steel screws. I could not find them with the square drive of the originals but I got the right size to replace the original, rusted screws. 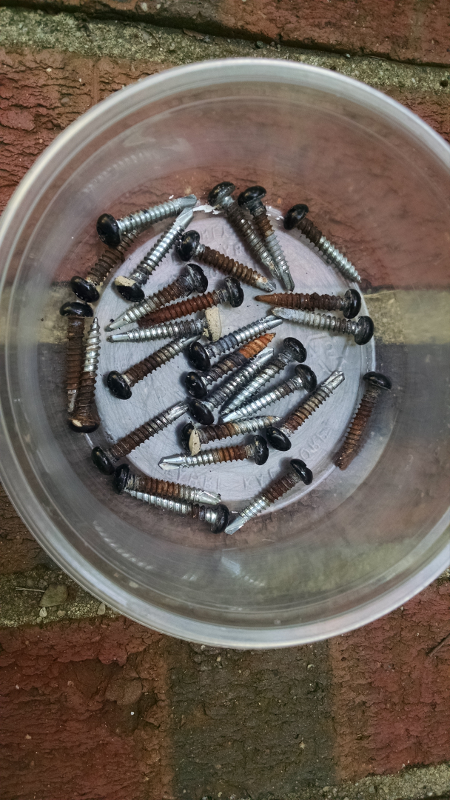 Using a putty knife, I carefully removed the spoiler. I found further confirmation that, while the factory sealed around the edges of the spoiler, no sealant had been applied to the screws or screw holes.  One of the things I was concerned about turned out to not be a problem. I had read that the hole for the wires was not sealed for some Pods. It turns out mine was sealed with a large amount of black RTV sealant. 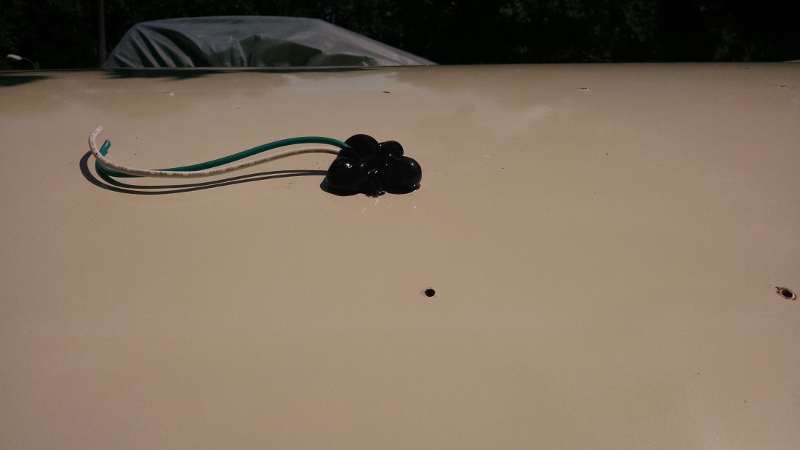 I used a razor scraper and mineral spirits to remove all of the old lap sealant from the roof of the R-Pod. I also removed as much as I could from the spoiler. I then used Denatured Alcohol to wipe both the Pod roof and the spoiler to prepare it for reattaching. I first spliced the wires since I had cut them to remove the spoiler. Then I laid down a bead of the non-self-leveling/non-run lap sealant, making sure I ran it where the screw holes were. I used a couple of short pieces of heavy wire, one at each corner to help me line up the spoiler. Even so, it was difficult as it wanted to keep shifting until I finally got a couple of screws in. The wires definitely helped but second person would have been more helpful. After getting the screws in, I went back and caulked and smoothed around the perimeter of the spoiler, making sure to leave one small gap uncaulked as a weep hole just in case any water did get under the spoiler again. I cleaned up the areas around where the lap sealant had gotten where it should not have been using mineral spirits or denatured alcohol. Why mineral spirits? It does an excellent job of cleaning and does not damage either the fiberglass or the plastic. Denatured alcohol does not do as good a job dissolving and removing the sealant, but it is what Dicor recommends for cleaning old lap sealant before applying new sealant. For that purpose, it works great. I did not get a picture of the finished job as I wanted to get the cover on due to the threat of rain. However, it really is not any different in appearance than it did before. The above pictures tell the important part. |
|
|
StephenH
Happy is the man that findeth wisdom,... ouR escaPOD mods Former RPod 179 Current Cherokee Grey Wolf 24 JS |
|
|
|
|
Patriot Dave
Senior Member
Joined: 06 Feb 2016 Location: LaSalle, Mi. 48 Online Status: Offline Posts: 206 |
Post Options
Quote Reply
Posted: 19 Sep 2016 at 5:01am |
|
Excellent
|
|
|
Dave & Joyce
Never Forget, In God We Trust; This Our National Motto. Member; Patriot Guard Riders, Michigan Chapter Retired; So Every Day is Saturday.... Except Sunday |
|
|
|
|
StephenH
podders Helping podders - pHp
Joined: 29 Nov 2015 Location: Wake Forest, NC Online Status: Offline Posts: 6288 |
Post Options
Quote Reply
Posted: 22 Sep 2016 at 10:04pm |
|
Time for an upgrade. Between trips this summer, I noticed that the tire on the door side had picked up a screw right in the middle of the tread. It had not yet gone flat, so I took it to Discount Tire and it was repaired for free even though I had not purchased the tire from them. That is one thing I like about DT. After our second trip, even though the tires were inflated to the proper pressure, I noticed that the outside parts of the tread were quite worn.
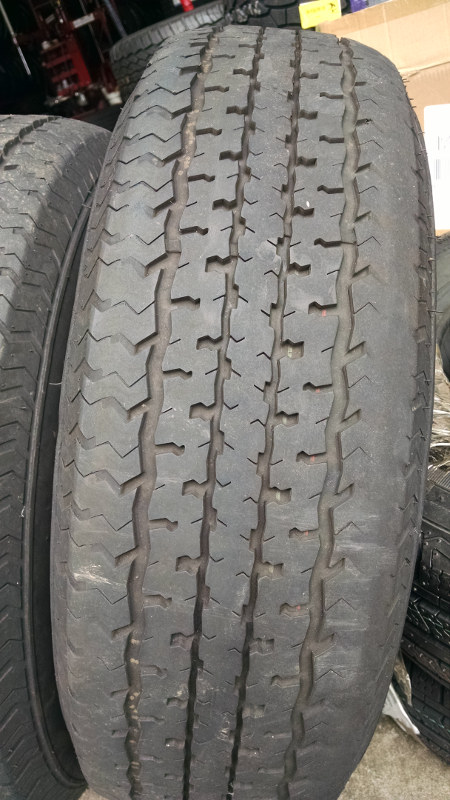 The picture does not really show the wear as well as it can be seen in person. In addition, the other tire, while not showing the same extent of wear, also showed some and had one place which looked like the brake had locked and dragged on one spot, which it hadn't. I did not get a good picture of it, so my description will have to do. In addition, when we were on our last trip, another person commented that the tires looked a bit flat. They had the proper pressure, but Forest River elected to install load range C tires. The problem with load range C is that the RP-179 is by itself not too far away from the maximum rated load for the tires. Once it is loaded, it is really pushing the limit. As I understand it, load range C tires can carry 1,821 lbs or 3,640 lbs for the pair. I expect we are too close to that limit. I wanted something with more capacity. After much searching of different sites, I ended up back at Discount Tire, where I purchased a pair of Carlisle Radial Trail HD ST205/75R14 105M D1 BSB tires. These are load range D and are rated for 2,040 lbs each or 4,080 for the pair. They are mounted and we will be ready for our next long trip. 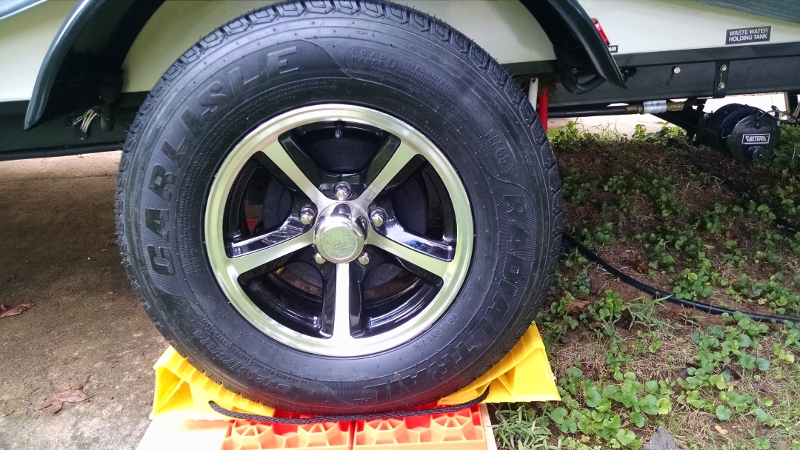 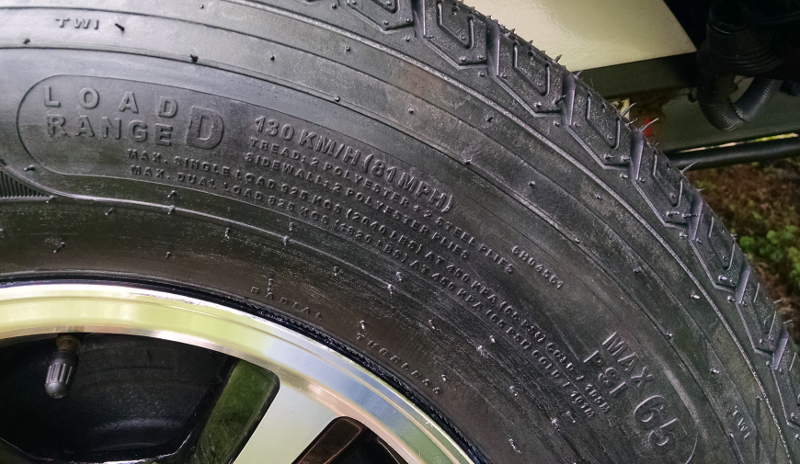 This leads to a question of how to jack up an R-Pod safely. One is not supposed to use the axle for a jack, but the frame has no good place either. I looked at my setup and saw that the axle-to-riser connection was sturdy enough to hold the weight of the trailer. I just needed to figure out a way to use it while avoiding the axle itself. My solution was to make a block which will go around the axle to let the jack lift at the mount without putting pressure on the axle. It is two pieces of 2x6 pressure treated lumber which was left over from another project. These, I glued and screwed together and notched to allow it to go around the axle and the wires that run to the hub that I could not move out of the way easily. I have used this several times now, and it works well with a small floor jack. 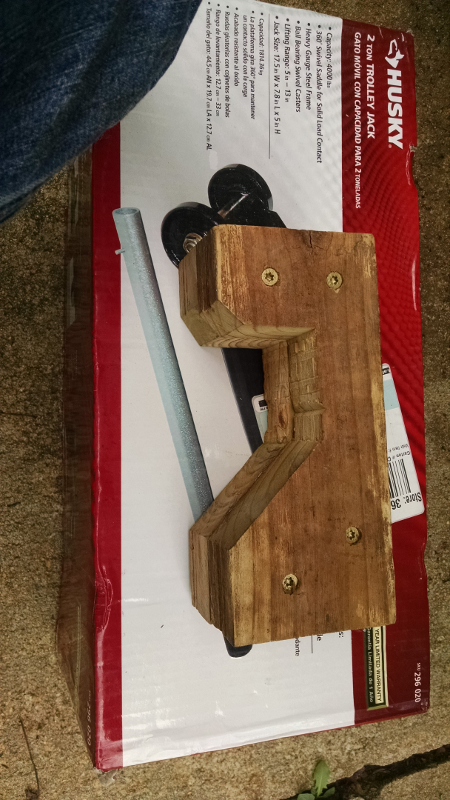 Edit: The sidewall label states the speed capability of these tires as 81 mph (130 km/h), but I will still limit my speed to 60 mph. I'll just feel safer as it also is a higher speed rating than the stock tires. |
|
|
StephenH
Happy is the man that findeth wisdom,... ouR escaPOD mods Former RPod 179 Current Cherokee Grey Wolf 24 JS |
|
|
|
|
Grandpa Hiker
Senior Member

Joined: 04 Jan 2015 Location: Martinsville, V Online Status: Offline Posts: 143 |
Post Options
Quote Reply
Posted: 23 Sep 2016 at 12:39pm |
|
StephenH,
Really like your "jacking block"!! I just added it to my "Gotta Do" list!!
|
|
|
Rob & Becky
2014 Ford Explorer 3.5 SOHC V6 2015 R-179 Pod aka Piddle Pod "Life is not about waiting for the storms to pass, it is about learning to dance in the rain!!" |
|
|
|
|
techntrek
Admin Group - pHp 
Joined: 29 Jul 2009 Location: MD Online Status: Offline Posts: 9059 |
Post Options
Quote Reply
Posted: 23 Sep 2016 at 3:41pm |
|
Nice upgrades. Glad to see the factory is sealing the wire penetration for the spoiler - but c'mon they don't know to seal the screw holes?
|
|
|
|
|
StephenH
podders Helping podders - pHp
Joined: 29 Nov 2015 Location: Wake Forest, NC Online Status: Offline Posts: 6288 |
Post Options
Quote Reply
Posted: 23 Sep 2016 at 3:56pm |
|
That's not the only area where I found screws not properly sealed. The amber porch light was another one as was the AC outlet.
The AC outlet was particularly troubling. Apparently, the hole had been cut too big so that one of the anchors that should have been holding it in place was instead holding onto nothing. I had checked it because the outlet looked crooked. |
|
|
StephenH
Happy is the man that findeth wisdom,... ouR escaPOD mods Former RPod 179 Current Cherokee Grey Wolf 24 JS |
|
|
|
|
StephenH
podders Helping podders - pHp
Joined: 29 Nov 2015 Location: Wake Forest, NC Online Status: Offline Posts: 6288 |
Post Options
Quote Reply
Posted: 23 Sep 2016 at 8:46pm |
|
This one is another upgrade. One time when we were at Camping World, I had the "brilliant" idea to purchase an LED bulb to replace the incandescent bulb in the porch light. They had one that, by the number, would have replaced the bulb. It was flat with a number of LED's on it. Unfortunately, the pins were 90 degrees off of what the fixture had. "No problem" I thought. "I'll just turn the socket so the pins will be in the right place." RIGHT! It did not work, so off to Amazon to order a new fixture.
Lumitronics LED RV Oval Porch Utility Light This one was almost the same as the original fixture with two differences. It came with a cylindrical LED bulb and it lacked the heat shield of the original fixture (not needed since the LED generates much less heat). I had already removed the old fixture and cleaned up the old sealant. I laid down a bead of non-run lap sealant, making sure to seal the 3 screw holes. The old fixture had one screw at each end and an additional one at the top-center. The new fixture did not have a hole where the third screw was in the old fixture. I found out why when I attempted to use just the two holes. The right screw hole had been stripped. Whoever installed the fixture just went ahead and drilled a third hole and put a screw in. I did not care for that. It is another case of lack of attention to detail. I decided to put an anchor in the one hole, so I drilled it out to accept an anchor (one of the one that looks like plastic wings when it is in the package). I finally got that in and got the fixture installed. Again, no picture as it does not look any different. However, the light is nice, and I am waiting until our next trip to see if it performs as well as I expect it will. One other thing: When I took the old fixture off, it had a label on it which stated that it was not for wet locations. What is the outside of the R-Pod if not a wet location, especially when driving at any speed in a rainstorm? There is no real sealing to these fixtures. I made sure to seal around it with the exception of a small gap at the bottom as a weep hole. However, I may fill that in before we take the Pod out again. |
|
|
StephenH
Happy is the man that findeth wisdom,... ouR escaPOD mods Former RPod 179 Current Cherokee Grey Wolf 24 JS |
|
|
|
|
StephenH
podders Helping podders - pHp
Joined: 29 Nov 2015 Location: Wake Forest, NC Online Status: Offline Posts: 6288 |
Post Options
Quote Reply
Posted: 25 Sep 2016 at 9:38pm |
|
On my post on the 18th, I mentioned Dicor Self-Leveling Lap Sealant, and that I would say for what I used it. Well, I don't want to wait until I take the cover off the R-Pod (put on due to threat of rain after just finishing the spoiler re-do noted above). This is what I used it for:
I wanted a vent fan cover for the Fantastic Fan on our RP-179. I had previusly been told that a cover would not fit. I was encouraged though by reading about how others have installed a Fantastic Ultrabreeze Vent Cover. So, at the same time I purchased the lap sealant, I also purchased one of these covers. I got the gray one because it is translucent, not opaque. My test fit showed that it would fit with no problems. I think there may be some variation in placement of the TV antenna and/or vent stack near the fan. In my case, there was no problem, so I installed it. Installation is pretty simple. There are several videos available showing the process. After making sure all the parts were present, I installed the grid per the instructions. I then verified the placement and marked where the slots were. This assisted in locating the appropriate screws which were buried under old lap sealant. I used a putty knife to remove enough to reveal the screw heads, which I removed. I then used the bracket to be installed to mark out its placement. After that, I used a putty knife to remove the old sealant from the area where the bracket needed to sit so that it would be as flush as possible to the frame of the fan and the roof. I followed this up with denatured alcohol. While I was at it, I cleaned the old Dicor sealant all the way around. This is because I noticed some cracking in the sealant on the edge which was toward the front of the R-Pod. Since I was up there, I wanted to make sure there would be no areas where water could penetrate. Once I finished cleaning, I sealed the areas that were cracked. I then put down a bead of Dicor self-leveling sealant along the edges where had cleaned away the old lap sealant for one of the brackets, ensuring to also add sealant to the screw hole. I used one of the included screws to fasten the bracket to the frame. I repeated this with the remaining brackets. I made sure to seal the edges of the old Dicor sealant I had cut as well. The final step was to put the cover on and insert the locking pins. It was then that I found that one of the holes in the bracket's pin was drilled incorrectly. The locking pin would not go through. I ended up drilling that one out so that the pin fit. There was no problem with the other three. This was the only problem I had with installation. I'm glad I had the tools on hand. I would not have wanted to take it back for many reasons, one of which was the fix was easy and it would have left me with an incomplete job with rain threatening. Once I drilled the hole out to the correct size, completing installation was simple. Just put the cover on over the four brackets and insert the locking pins. The finished cover looks good and functions quite well. I can even leave the vent cover open with the R-Pod's Classic Accessories cover installed as the Ultrabreeze prevents the cover from pressing down on the fan's lid.  I don't feel bad about leaving the fan's lid open now. I don't have to worry about rain getting in, even when I don't have the CA cover installed. |
|
|
StephenH
Happy is the man that findeth wisdom,... ouR escaPOD mods Former RPod 179 Current Cherokee Grey Wolf 24 JS |
|
|
|
|
Post Reply
|
Page <1 56789 58> |
| Forum Jump | Forum Permissions You cannot post new topics in this forum You cannot reply to topics in this forum You cannot delete your posts in this forum You cannot edit your posts in this forum You cannot create polls in this forum You cannot vote in polls in this forum |


