
|
ouR escaPOD mods |
Post Reply 
|
Page <1 4950515253 58> |
| Author |
 Printable Version Printable Version Google Google Delicious Delicious Digg Digg StumbleUpon StumbleUpon Windows Live Windows Live Yahoo Bookmarks Yahoo Bookmarks reddit reddit Facebook Facebook MySpace MySpace Newsvine Newsvine Furl Furl Topic Search Topic Search  Topic Options Topic Options
|
|
Shelpod 
Groupie 
Joined: 14 Sep 2015 Location: Arizona Online Status: Offline Posts: 74 |
 Post Options Post Options
 Quote Reply Quote Reply
 Topic: ouR escaPOD mods Topic: ouR escaPOD modsPosted: 28 Sep 2016 at 12:16pm |
|
|
Nice work. That is on my list to do some time soon. So I take it the original drawer slides still worked for the new drawers. That should make it all easier. Thanks for the write-up
|
||
|
Pod: 2013 178
TV: 2014 Explorer Limited with tow package |
||
 |
||
|
Patriot Dave
Senior Member 
Joined: 06 Feb 2016 Location: LaSalle, Mi. 48 Online Status: Offline Posts: 206 |
Post Options
Quote Reply
Posted: 28 Sep 2016 at 5:47am |
|
|
||
|
Dave & Joyce
Never Forget, In God We Trust; This Our National Motto. Member; Patriot Guard Riders, Michigan Chapter Retired; So Every Day is Saturday.... Except Sunday |
||
|
||
|
StephenH
podders Helping podders - pHp

Joined: 29 Nov 2015 Location: Wake Forest, NC Online Status: Offline Posts: 6289 |
Post Options
Quote Reply
Posted: 27 Sep 2016 at 10:24pm |
|
|
One thing that made me scratch my head, wondering what the designers were thinking were the drawers for the RP-179 wardrobe. When I looked, there was easily six inches of wasted space behind the drawers. In addition, the drawers are shallow. There is a big opening and a little drawer. I decided to do something about it.
First a trip to Lowe's again to purchase materials. I got 1/2" birch plywood for the frame and 1/4" birch plywood for the bottom. I cut the framework so that it would retain the same width as the original drawer when finished. I cut the length six inches longer and the height 1-1/2" higher. I cut a notch for the bottom and assembled with glue and used a nailer to fasten the corners. I verified that the drawers were square. Then I sanded them to smooth the edges with 80 grit sandpaper on a power sander followed by 220 grit to smooth it out in preparation for the finish. I used 3 coats of satin polyurethane which I got in the spray can to seal and protect them. I used the old front of the drawer to help guide me for drilling holes to fasten the faceplate. After I got it assembled and the sliders from the old drawer attached, I took it out for a test fit. While the additional 1-1/2" on the sides works well, it didn't work so well for the front and back due to the catch. Only adding 1" to the front and back panels would have worked. Since I have them built, I decided to make a notch for the catch both on the front and back panels. Once I did that, it fit well with just enough space top and bottom to clear the original opening without rubbing. I still need to transfer the faceplate and sliders for the other two drawers. I hope to get that done tomorrow. Until then, here is a picture to show the difference between the old and new drawers. 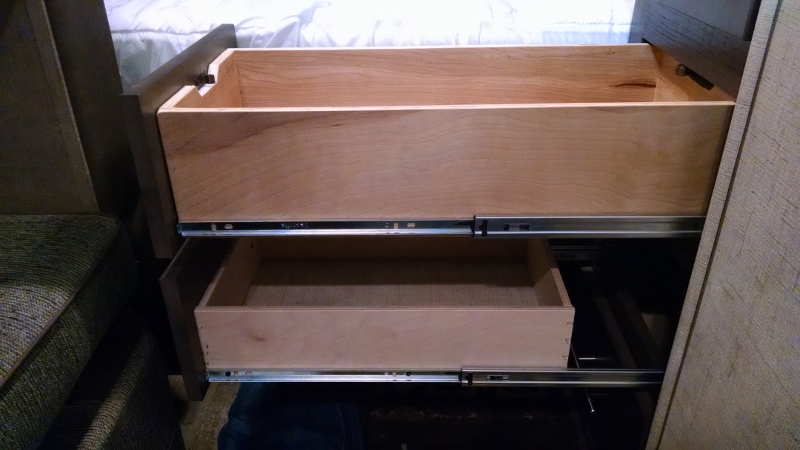 Edit: I would have liked to use the 3/8" plywood like the original drawers, but I could not find 3/8" birch plywood at either Lowe's or Home Depot. The only place I could find 3/8" birch plywood was at our local Michael's store. They would not have had enough to build all three drawers. For anyone interested, I used a table saw to do all of the cuts except the notch for the catch. That was done with a jigsaw and a clean-cut blade. |
||
|
StephenH
Happy is the man that findeth wisdom,... ouR escaPOD mods Former RPod 179 Current Cherokee Grey Wolf 24 JS |
||
|
||
|
Patriot Dave
Senior Member
Joined: 06 Feb 2016 Location: LaSalle, Mi. 48 Online Status: Offline Posts: 206 |
Post Options
Quote Reply
Posted: 26 Sep 2016 at 2:44pm |
|
Thanks Stephen for the tips. I will be installing mine this week......that is if I can get a day or two without rain. |
||
|
Dave & Joyce
Never Forget, In God We Trust; This Our National Motto. Member; Patriot Guard Riders, Michigan Chapter Retired; So Every Day is Saturday.... Except Sunday |
||
|
||
|
StephenH
podders Helping podders - pHp
Joined: 29 Nov 2015 Location: Wake Forest, NC Online Status: Offline Posts: 6289 |
Post Options
Quote Reply
Posted: 26 Sep 2016 at 1:32pm |
|
I only used a partial tube for the Ultrabreeze installation. I did not remove the old sealant all the way around, just where the brackets needed to be. That reduced the amount of sealant needed. I did follow the instructions I saw to clean the area with denatured alcohol. It was surprising the amount of old dirt that came off of the old sealant. Proper preparation should ensure a good seal. |
||
|
StephenH
Happy is the man that findeth wisdom,... ouR escaPOD mods Former RPod 179 Current Cherokee Grey Wolf 24 JS |
||
|
||
|
Patriot Dave
Senior Member
Joined: 06 Feb 2016 Location: LaSalle, Mi. 48 Online Status: Offline Posts: 206 |
Post Options
Quote Reply
Posted: 26 Sep 2016 at 5:32am |
|
|
||
|
Dave & Joyce
Never Forget, In God We Trust; This Our National Motto. Member; Patriot Guard Riders, Michigan Chapter Retired; So Every Day is Saturday.... Except Sunday |
||
|
||
|
StephenH
podders Helping podders - pHp
Joined: 29 Nov 2015 Location: Wake Forest, NC Online Status: Offline Posts: 6289 |
Post Options
Quote Reply
Posted: 25 Sep 2016 at 9:38pm |
|
|
On my post on the 18th, I mentioned Dicor Self-Leveling Lap Sealant, and that I would say for what I used it. Well, I don't want to wait until I take the cover off the R-Pod (put on due to threat of rain after just finishing the spoiler re-do noted above). This is what I used it for:
I wanted a vent fan cover for the Fantastic Fan on our RP-179. I had previusly been told that a cover would not fit. I was encouraged though by reading about how others have installed a Fantastic Ultrabreeze Vent Cover. So, at the same time I purchased the lap sealant, I also purchased one of these covers. I got the gray one because it is translucent, not opaque. My test fit showed that it would fit with no problems. I think there may be some variation in placement of the TV antenna and/or vent stack near the fan. In my case, there was no problem, so I installed it. Installation is pretty simple. There are several videos available showing the process. After making sure all the parts were present, I installed the grid per the instructions. I then verified the placement and marked where the slots were. This assisted in locating the appropriate screws which were buried under old lap sealant. I used a putty knife to remove enough to reveal the screw heads, which I removed. I then used the bracket to be installed to mark out its placement. After that, I used a putty knife to remove the old sealant from the area where the bracket needed to sit so that it would be as flush as possible to the frame of the fan and the roof. I followed this up with denatured alcohol. While I was at it, I cleaned the old Dicor sealant all the way around. This is because I noticed some cracking in the sealant on the edge which was toward the front of the R-Pod. Since I was up there, I wanted to make sure there would be no areas where water could penetrate. Once I finished cleaning, I sealed the areas that were cracked. I then put down a bead of Dicor self-leveling sealant along the edges where had cleaned away the old lap sealant for one of the brackets, ensuring to also add sealant to the screw hole. I used one of the included screws to fasten the bracket to the frame. I repeated this with the remaining brackets. I made sure to seal the edges of the old Dicor sealant I had cut as well. The final step was to put the cover on and insert the locking pins. It was then that I found that one of the holes in the bracket's pin was drilled incorrectly. The locking pin would not go through. I ended up drilling that one out so that the pin fit. There was no problem with the other three. This was the only problem I had with installation. I'm glad I had the tools on hand. I would not have wanted to take it back for many reasons, one of which was the fix was easy and it would have left me with an incomplete job with rain threatening. Once I drilled the hole out to the correct size, completing installation was simple. Just put the cover on over the four brackets and insert the locking pins. The finished cover looks good and functions quite well. I can even leave the vent cover open with the R-Pod's Classic Accessories cover installed as the Ultrabreeze prevents the cover from pressing down on the fan's lid.  I don't feel bad about leaving the fan's lid open now. I don't have to worry about rain getting in, even when I don't have the CA cover installed. |
||
|
StephenH
Happy is the man that findeth wisdom,... ouR escaPOD mods Former RPod 179 Current Cherokee Grey Wolf 24 JS |
||
|
||
|
StephenH
podders Helping podders - pHp
Joined: 29 Nov 2015 Location: Wake Forest, NC Online Status: Offline Posts: 6289 |
Post Options
Quote Reply
Posted: 23 Sep 2016 at 8:46pm |
|
|
This one is another upgrade. One time when we were at Camping World, I had the "brilliant" idea to purchase an LED bulb to replace the incandescent bulb in the porch light. They had one that, by the number, would have replaced the bulb. It was flat with a number of LED's on it. Unfortunately, the pins were 90 degrees off of what the fixture had. "No problem" I thought. "I'll just turn the socket so the pins will be in the right place." RIGHT! It did not work, so off to Amazon to order a new fixture.
Lumitronics LED RV Oval Porch Utility Light This one was almost the same as the original fixture with two differences. It came with a cylindrical LED bulb and it lacked the heat shield of the original fixture (not needed since the LED generates much less heat). I had already removed the old fixture and cleaned up the old sealant. I laid down a bead of non-run lap sealant, making sure to seal the 3 screw holes. The old fixture had one screw at each end and an additional one at the top-center. The new fixture did not have a hole where the third screw was in the old fixture. I found out why when I attempted to use just the two holes. The right screw hole had been stripped. Whoever installed the fixture just went ahead and drilled a third hole and put a screw in. I did not care for that. It is another case of lack of attention to detail. I decided to put an anchor in the one hole, so I drilled it out to accept an anchor (one of the one that looks like plastic wings when it is in the package). I finally got that in and got the fixture installed. Again, no picture as it does not look any different. However, the light is nice, and I am waiting until our next trip to see if it performs as well as I expect it will. One other thing: When I took the old fixture off, it had a label on it which stated that it was not for wet locations. What is the outside of the R-Pod if not a wet location, especially when driving at any speed in a rainstorm? There is no real sealing to these fixtures. I made sure to seal around it with the exception of a small gap at the bottom as a weep hole. However, I may fill that in before we take the Pod out again. |
||
|
StephenH
Happy is the man that findeth wisdom,... ouR escaPOD mods Former RPod 179 Current Cherokee Grey Wolf 24 JS |
||
|
||
|
StephenH
podders Helping podders - pHp
Joined: 29 Nov 2015 Location: Wake Forest, NC Online Status: Offline Posts: 6289 |
Post Options
Quote Reply
Posted: 23 Sep 2016 at 3:56pm |
|
|
That's not the only area where I found screws not properly sealed. The amber porch light was another one as was the AC outlet.
The AC outlet was particularly troubling. Apparently, the hole had been cut too big so that one of the anchors that should have been holding it in place was instead holding onto nothing. I had checked it because the outlet looked crooked. |
||
|
StephenH
Happy is the man that findeth wisdom,... ouR escaPOD mods Former RPod 179 Current Cherokee Grey Wolf 24 JS |
||
|
||
|
techntrek
Admin Group - pHp 
Joined: 29 Jul 2009 Location: MD Online Status: Offline Posts: 9059 |
Post Options
Quote Reply
Posted: 23 Sep 2016 at 3:41pm |
|
|
Nice upgrades. Glad to see the factory is sealing the wire penetration for the spoiler - but c'mon they don't know to seal the screw holes?
|
||
|
||
|
Post Reply
|
Page <1 4950515253 58> |
| Forum Jump | Forum Permissions You cannot post new topics in this forum You cannot reply to topics in this forum You cannot delete your posts in this forum You cannot edit your posts in this forum You cannot create polls in this forum You cannot vote in polls in this forum |


