
|
|
Post Reply 
|
Page <1 89101112 14> |
| Author |
 Printable Version Printable Version Google Google Delicious Delicious Digg Digg StumbleUpon StumbleUpon Windows Live Windows Live Yahoo Bookmarks Yahoo Bookmarks reddit reddit Facebook Facebook MySpace MySpace Newsvine Newsvine Furl Furl Topic Search Topic Search  Topic Options Topic Options
|
Rustler 
Senior Member 

Joined: 07 May 2016 Location: S. Oregon Coast Online Status: Offline Posts: 100 |
 Topic: Connecting a 100 watt solar panel to Zamp port Topic: Connecting a 100 watt solar panel to Zamp portPosted: 31 May 2016 at 12:22am |
|
Thanks. I hope my experience will be of use to other Rpodders.
One addition that I learned from a link supplied by another forum member. Some solar panels have bypass diodes on each cell of a solar panel. If there is shading on one or more cells, the diode will allow passing of an increased amount of current from the non-shaded cells. It's not as good as being without any shade. But it is an improvement. I don't know how many of the newer solar panels have this feature. But I would expect that such an improvement would be clearly advertised if present. Another note - when testing the solar panel I tried using battery power on the refrigerator. It was already cold from using shore power. When I switched to battery operation for the refer. the battery voltage stayed almost constant. So in full sun the solar panel could keep up with refrigerator use. I doubt it could do as well as with propane or 120 VAC. But it's an option.
|
|
|
Russ
2009 Toyota RAV4 V6 w/ tow package 2016 Rpod 171 HRE |
|
 |
|
|
techntrek
Admin Group - pHp 
Joined: 29 Jul 2009 Location: MD Online Status: Offline Posts: 9059 |
Posted: 30 May 2016 at 8:28pm |
|
Nice write-up.
|
|
|
|
|
Rustler
Senior Member
Joined: 07 May 2016 Location: S. Oregon Coast Online Status: Offline Posts: 100 |
Posted: 30 May 2016 at 3:19am |
|
I know this original post is a few years old. But there have been some recent (2016) replies. So I wanted to add my recent experience.
A bit of background - my home has a 4.6 kilowatt grid-tied solar system. When one of the 25 solar panels was showing reduced output the inverter manufacturer said it's not a problem with the inverter, it must be the solar panel. So the solar panel was replaced on warranty, but the problem remained. The defective inverter was replaced, and I ended up with a spare 185 watt, 36 volt solar panel. I wanted to make use of this panel to charge a 100 amp-hour deep cycle battery used to power my telescope at remote sites. The same battery is used to power my Ham radio station during power outages. So I got a Morningstar charge controller - SSMPPT-15L maximum power point tracking. I researched how to wire this all up following the national electric code. A good reference for this is the article Photovoltaic Power Systems
And the 2005 National Electrical Code:
Suggested Practices found on this link: Here are a couple of photos showing my solar charging setup. First is the 100 amp-hour battery with charge controller and DC rated circuit breakers. 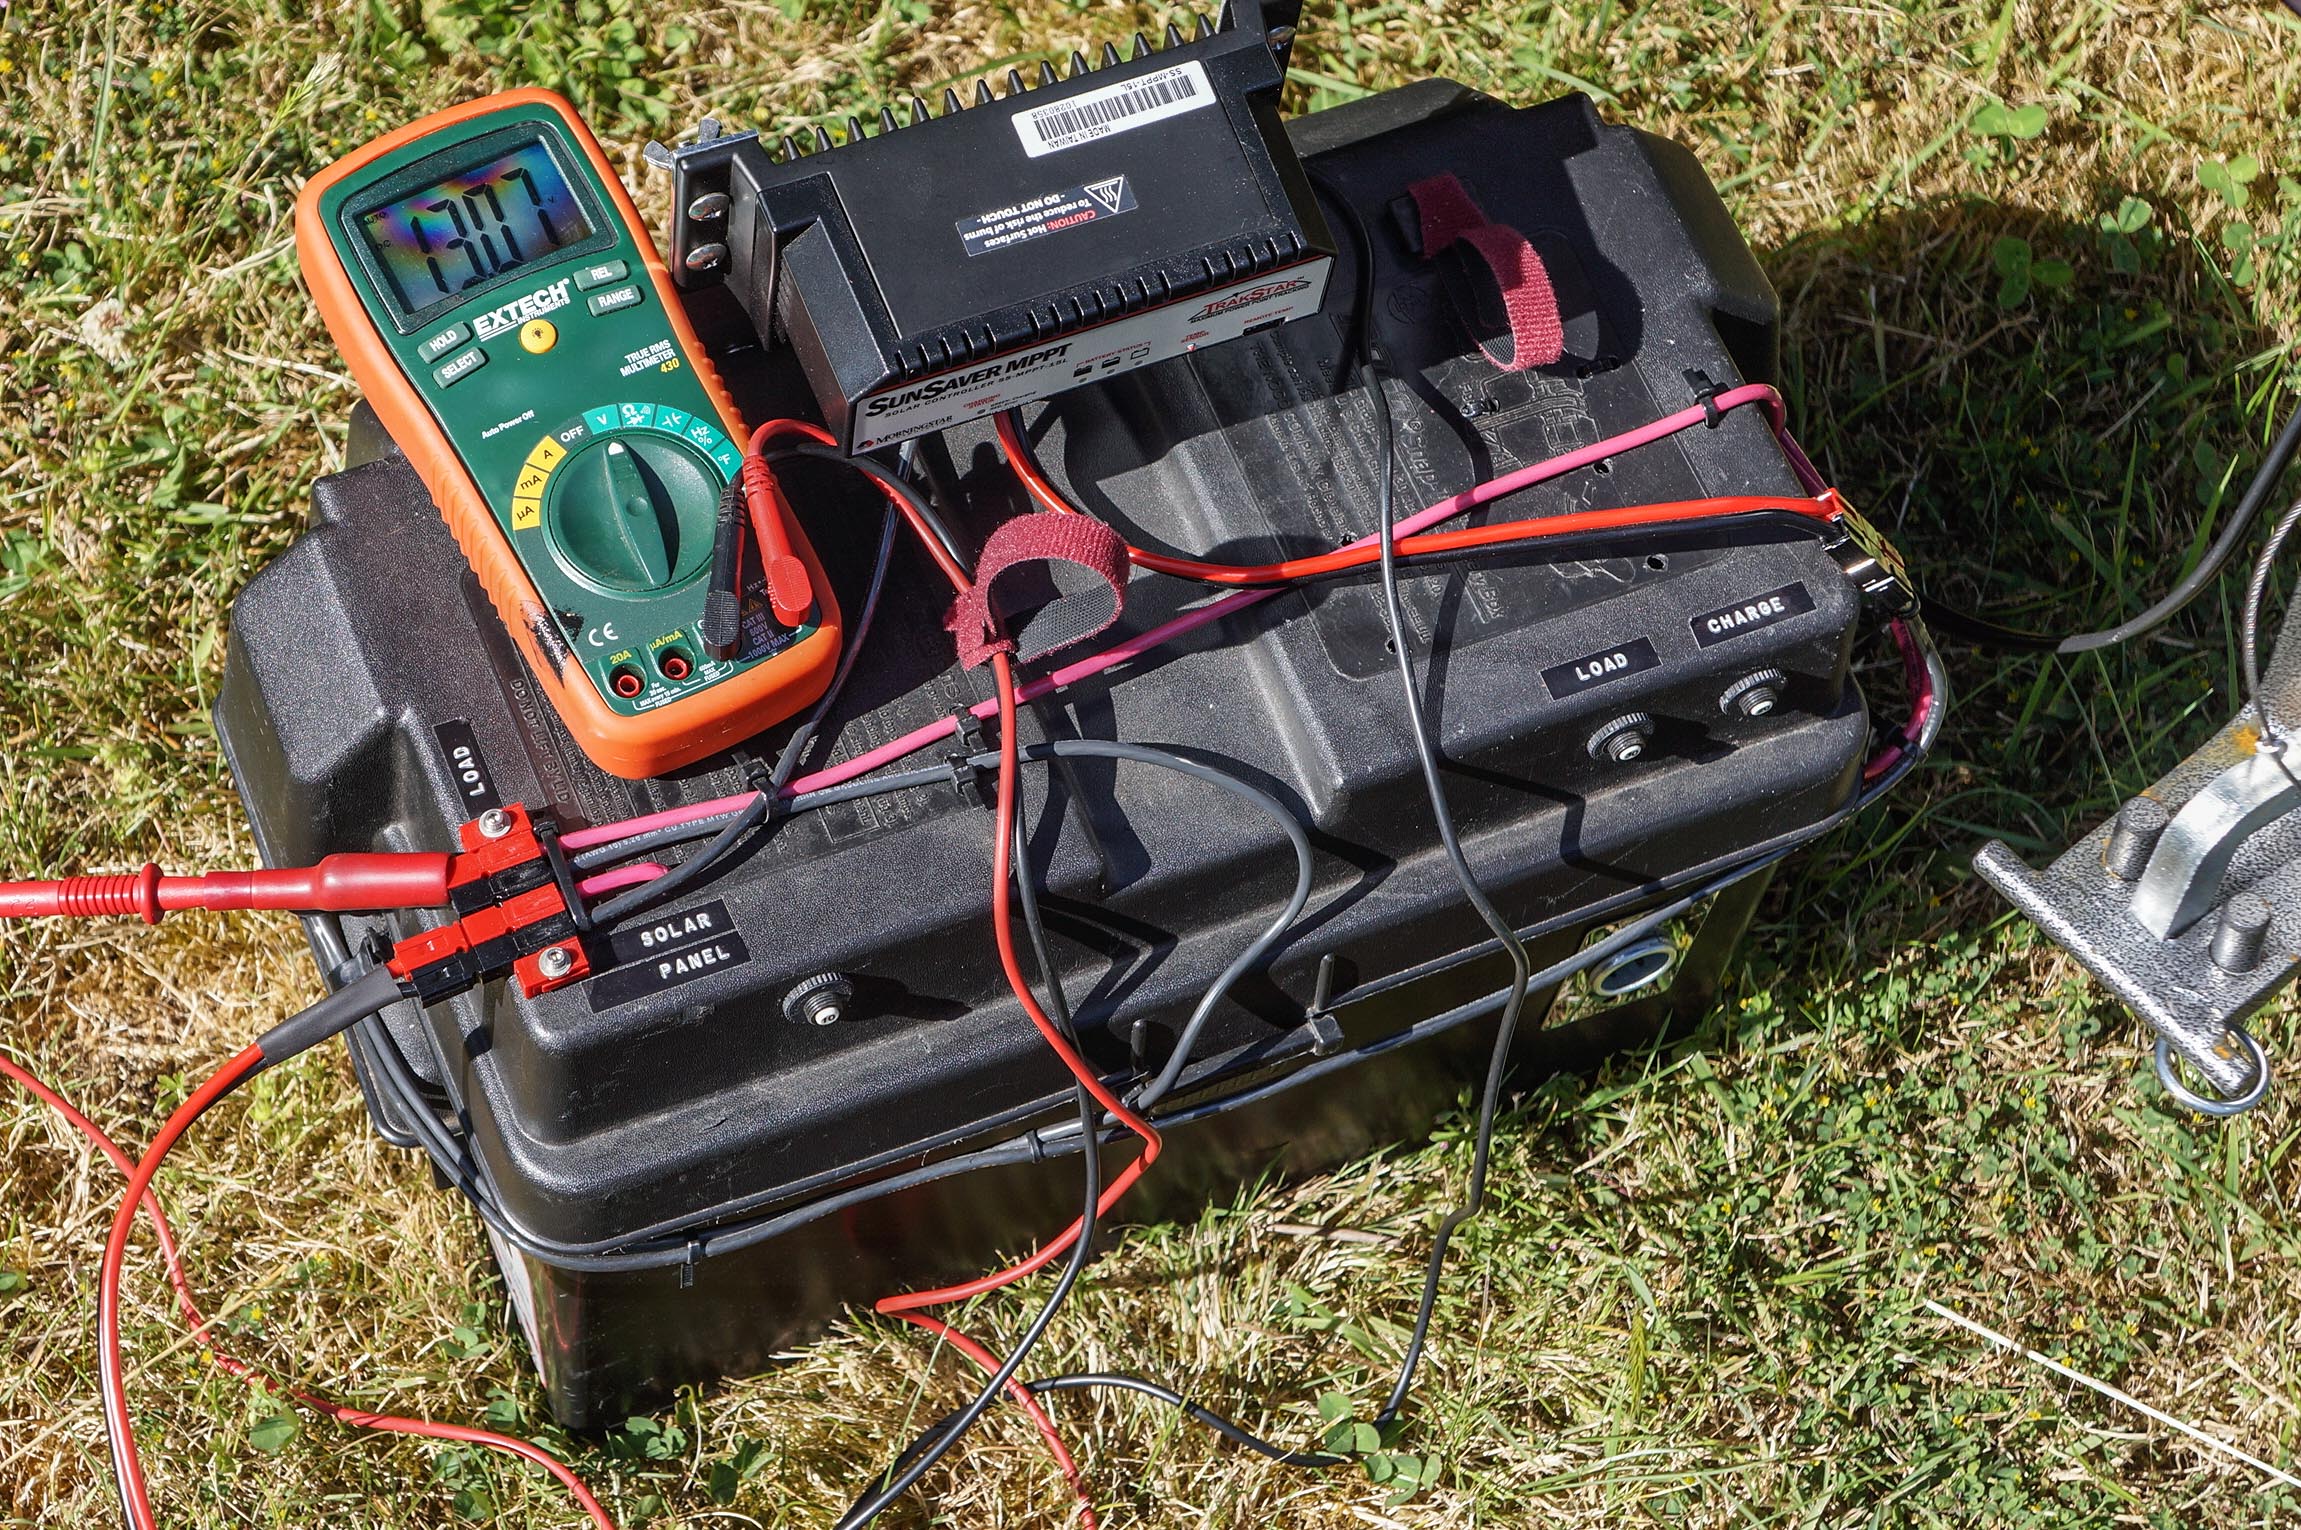 Next is a view of the two batteries with the solar panel attached. 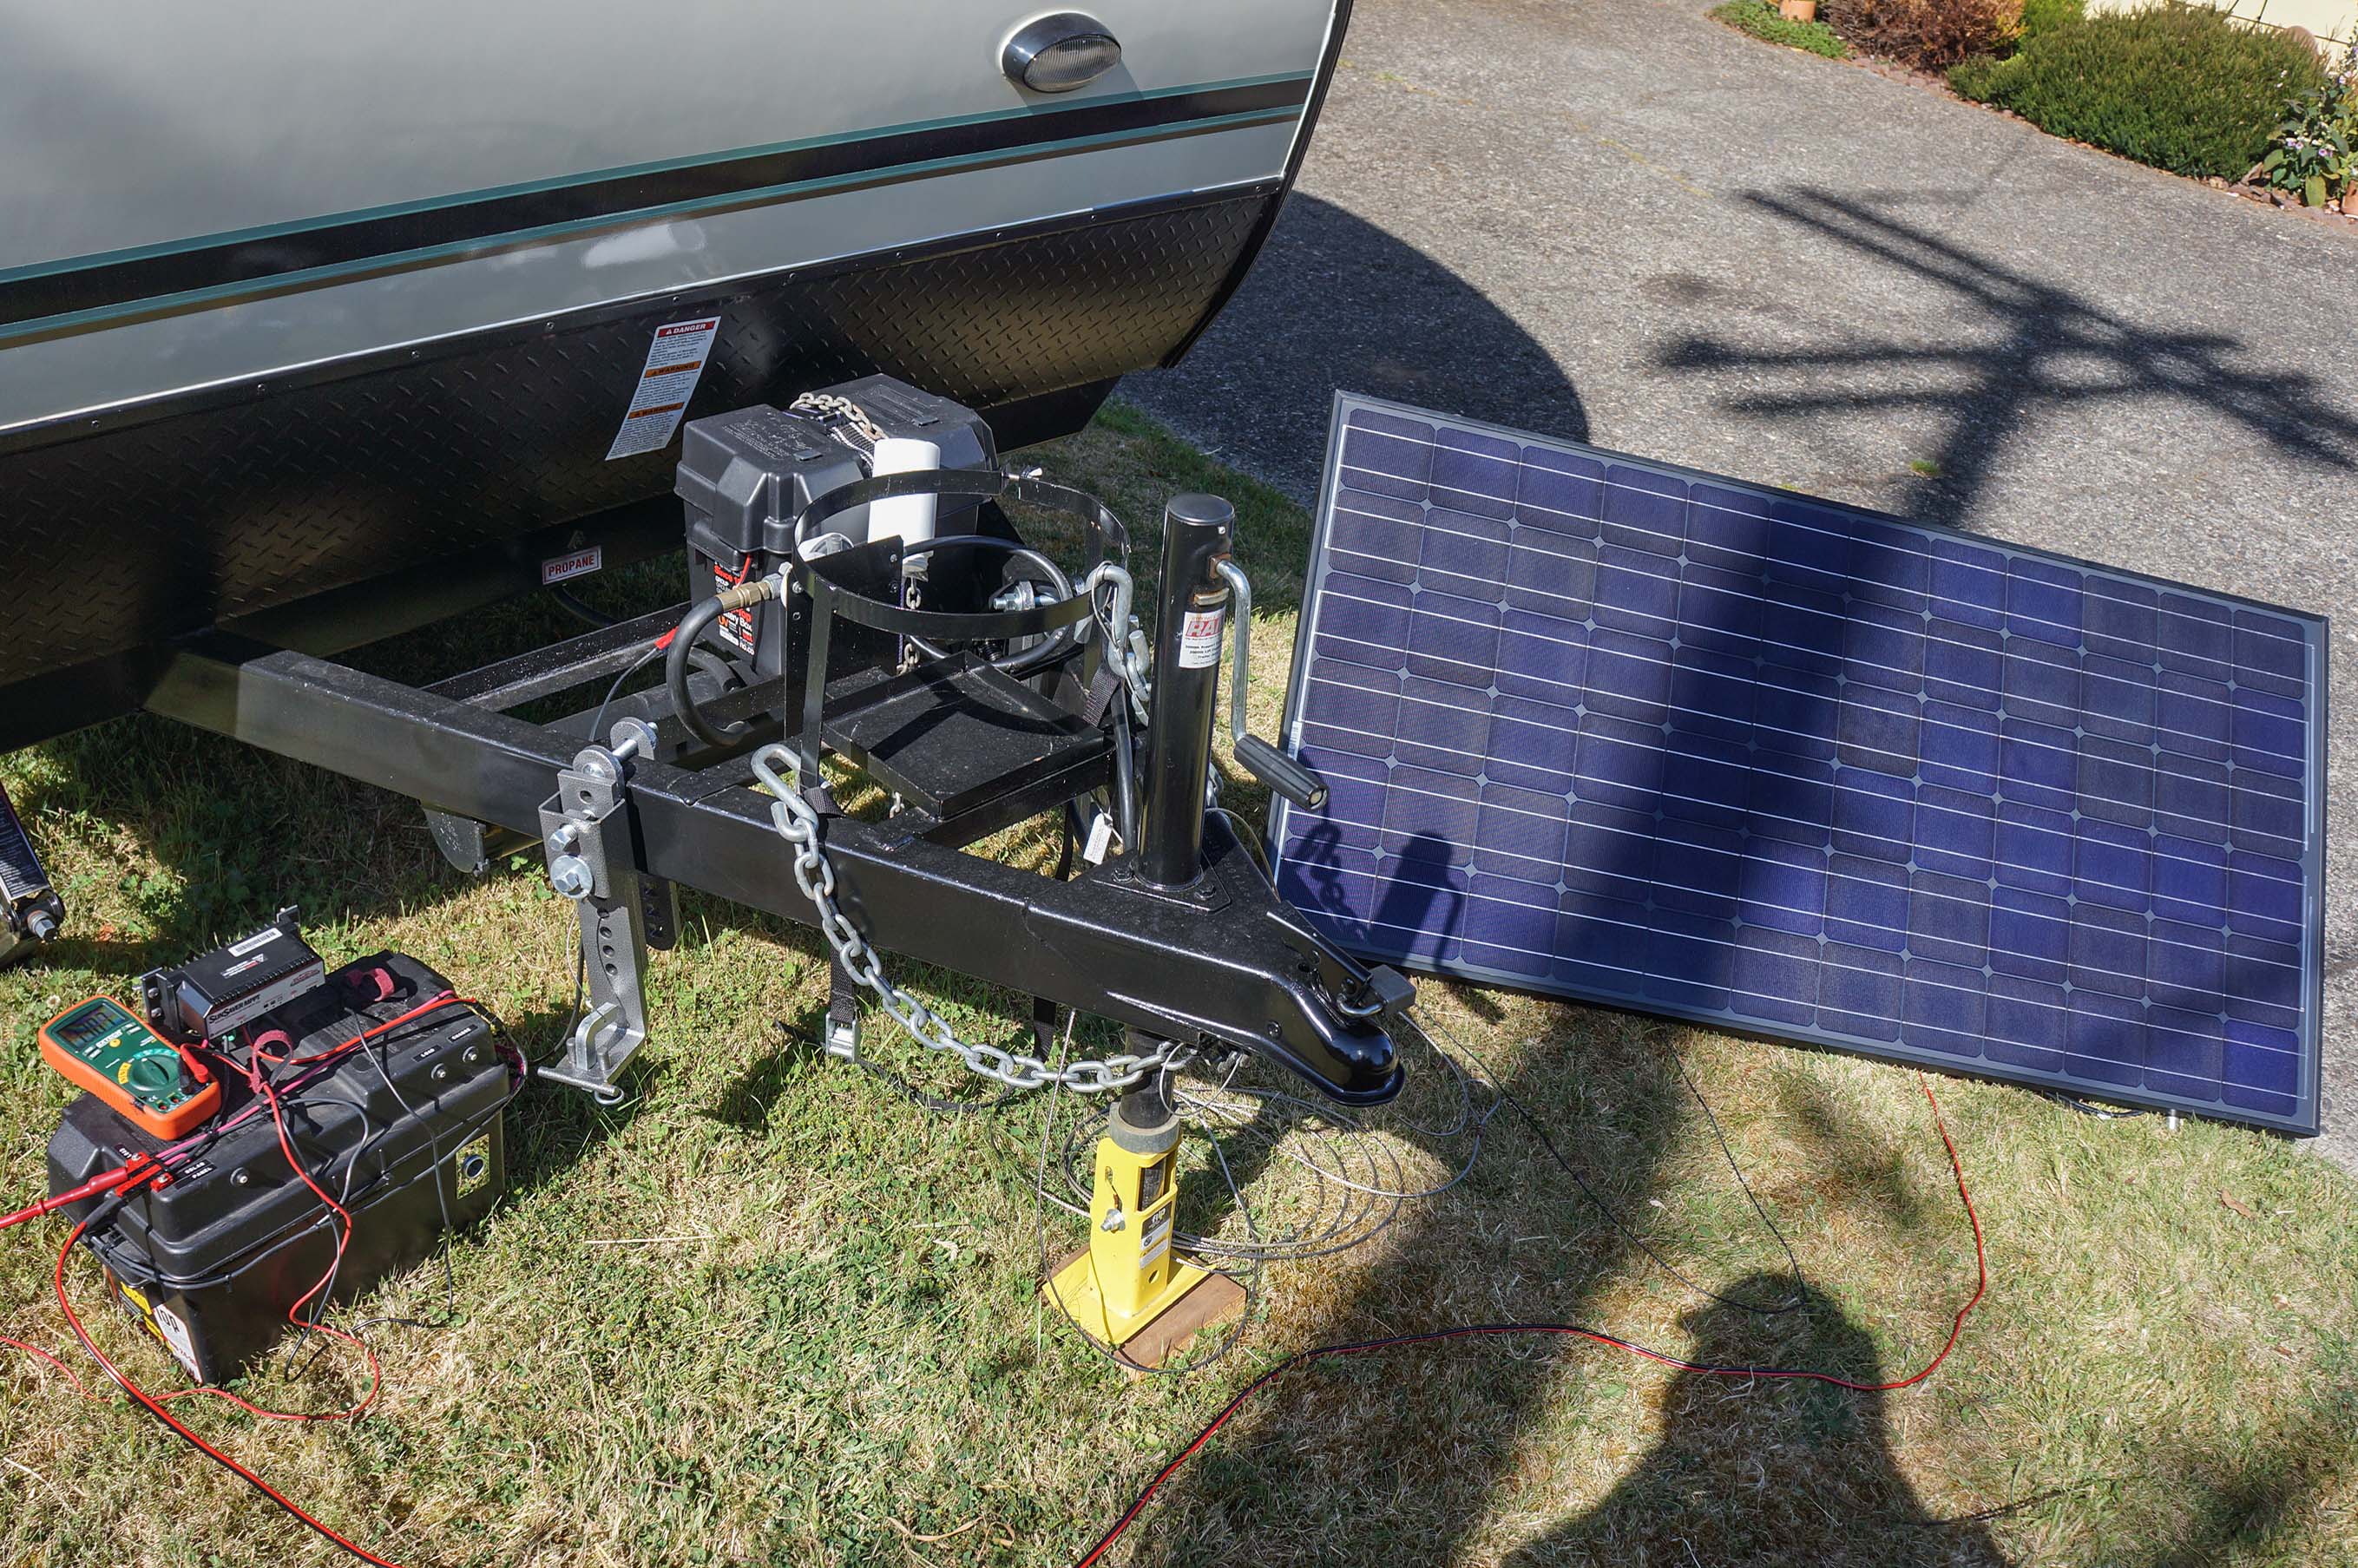 The 72 cells on the panel are wired in series, each producing about 5 amps at 1/2 volt. The volts are additive producing around 36 volts in all. But the current is the same in all of the series wired cells. At the time of the photo the shadow of the power pole is causing the panel to be producing almost no current. If even a single cell is shaded, it will produce very little current, limiting the output of all the rest of the cells in the series. So it's important that a solar panel is not subject to any shade. While this solar panel didn't cost me anything it has some disadvantages compared to the fold-up solar panels some forum members have used. It is rather large (32 x 62 inches) weighing some 37 lbs. I was unable to get it to fit onto the queen bed area of the Rpod 171. I just couldn't maneuver it into that space - walls and ceiling got in the way. But it does fit on the dinette area bed. So I'll use that space for transport of the panel. It will be set up on the south side of the Rpod, connected to the 100 amp-hour battery with charge controller and parallel connected to the Rpod's battery. This will allow me to charge the batteries while using the Fantastic Fan for ventilation during the heat of the day. The fan uses just over 3 amps on high leaving almost 10 amps for battery charging and other loads. I could add another 12-volt fan for increased comfort. While the solar panel was free, I did spend about $220 for the controller - Morningstar SSMPPT-15L. The design of this controller (maximum power point tracking) produces more total power than the cheaper pulse width modulation controllers. Since Zamp doesn't mention that its controller is max. power point tracking, we can assume that it is not. I chose not to attach the solar panel using the Zamp plug on the rear of the trailer. I really don't understand why Forest River chose that location for solar plug-in. This is the point most distant from the battery, requiring a lot of wire to reach the battery. It would make more sense in my mind to have that plugin closer to the battery, say on the curb-side front of the Rpod. In any case the existing location gives a convenient place to plug in another 12-volt load like a fan. I highly recommend using Anderson Powerpole connectors for DC connections. They are vastly superior to the more common cigarette lighter style connections. The latter are best used for low amperage loads - less than 5 amps. Since they have a spring-loaded tip they tend to push themselves out of the plug. In contrast the powerpole design has positive spring pressure which resists being disconnected. In the smallest version they are rated at up to 45 amps. Powerpole connectors are the standard used in emergency Ham radio and in emergency vehicles such as ambulances. One of the best sources for power pole connectors is Powerwerx. Once you get to using powerpoles you'll never go back to other connectors. Even the $40 spent on the crimper is well worth it. The crimped connections are even better than soldering the wires and way faster. Here are the assembly instructions. Another suggestion is to securely anchor your solar panel to avoid problems with wind. I had an experience demonstrating the need for this. I had set up the panel in my yard with it securely tied to a large concrete block. We had some strong winds that night as happens often on the Oregon coast. The next morning I found the solar panel face down on the lawn with the concrete block laying in front of it at the end of the tie down rope. I'm just glad the concrete block didn't land on the solar panel. Now I use a screw-in-ground tethering point - the kind that is used for tethering a pet or perhaps a goat. The solar panel is tightly roped to that secure point to resist any winds. Well this what my experience has been in getting a solar charging system for my Rpod. Any comments or suggestions? |
|
|
Russ
2009 Toyota RAV4 V6 w/ tow package 2016 Rpod 171 HRE |
|
|
|
|
WillThrill
Senior Member

Joined: 04 Jul 2014 Online Status: Offline Posts: 298 |
Posted: 29 May 2016 at 12:17pm |
Yes, anything at all that blocks sunlight from striking the entire panel in a completely unobstructed way will reduce their output. That's why a lot of people who have solar panels around their houses have a fake owl set up very close to them to keep away birds. One good dropping can almost eliminate the output of a panel.
|
|
|
"Not all those who wander are lost." Tolkien
2014 Hood River 177 2005 GMC Envoy XL |
|
|
|
|
sailor323
Senior Member
Joined: 11 Jun 2015 Location: S Central KY Online Status: Offline Posts: 281 |
Posted: 28 May 2016 at 1:23pm |
|
Shade and dirt and debris on the panels have a significant effect on the output of the panels. Even so, if your batteries are fully charged, the panels will produce enough power to keep them topped off.
The permanent mounting option eliminates the (minor) hassle of setting up the panels and taking precautions to prevent theft. I do have the option of tilting one of the panels in order to maximize insolation but I've never taken the trouble. |
|
|
|
|
Don Halas
Senior Member
Joined: 01 Jul 2015 Location: Connecticut Online Status: Offline Posts: 190 |
Posted: 28 May 2016 at 8:43am |
|
Sailor your panels are mounted similarly to what I am considering.
The Pod will be parked in my driveway where the toe side will get southern exposure. It's about 100' from a power source so that requires laying two 50' extensions across the driveway. There are trees near it, but in summer months the pod will get sun most of the day from above. In the winter months, I'll probably have it packed up and battery disconnected, but if I don't the trees have no leaves and I think the slight angle of the solar panel will assure at least some direct sun. I'm planning on starting with one panel, the second will be installed if the initial setup works but not quite optimally. The second panel, like yours would be mounted on the opposite side of the Pod with the intent of making it easier to obtain some solar power without having to position the Pod exclusively for that purpose, or having to move panels around. Again, this is going to be a nice to have for us, not a got to have. I have no desire to have something else to store and pack when travelling and something else to worry about setting up or having to move because of weather or have stolen. The flexible panels appear very capable of being mounted on top of the Pod with VHB tape and perhaps some of the same caulking used on the top of the pod for the other protrusions. Thanks for the insights all. I'll be sure to report more if I approach this. I failed with my install of the 'Lowes shelf', but that's another discussion (and $100 down the toilet). Thanks again. |
|
|
|
|
sailor323
Senior Member
Joined: 11 Jun 2015 Location: S Central KY Online Status: Offline Posts: 281 |
Posted: 27 May 2016 at 2:36pm |
|
I have mounted 2 panels on the roof of our 179. DEtailed description and pix can be found at https://www.facebook.com/groups/56931970807/files/ Look for the one titled "How to installation solar panels on roof.
I did splice into the zamp wires to the battery. Installed a fuse at the battery. Controller is located inside the pod alongside the factory installed monitor for battery, tank levels, etc. uploads/4133/How_To_-_Installation_-_Solar_Panels_on_Roof.pdf To splice into the zamp wires, look under the frame of the pod. Just beneath the point where the zamp plug is located, you will find the flex conduit that houses the wires leading to the battery. Splice into those wires at any point that is convenient. Be aware that the wires are attached to the battery and are HOT. The cost for my entire installation for 280 watts of power was about $700. |
|
|
|
|
WillThrill
Senior Member
Joined: 04 Jul 2014 Online Status: Offline Posts: 298 |
Posted: 27 May 2016 at 11:41am |
I just wanted you to be aware that parking your Pod where the panels will be in the shade will prevent them from charging your battery. If you're primarily doing this to keep them charged at home in the sun, that's totally fine. A 50 watt panel would be more than sufficient for that. Out of curiosity, why do you not want to run an extension cord out to the Pod to keep the battery topped off? With as little current as it would take, you could run 500 ft. of extension cords (100 ft. is $19 at my Lowe's) out to it for less money. You can even get green cords that will blend in with your lawn. This would likely be far cheaper than going solar. Alternatively, you could just take the battery out when you're not using the Pod and leave it on a battery maintainer, which is what I do. Regarding storage, I keep my 100 watt panel stored across the width of the storage area in the rear of our Pod. It's pretty easy to pull it out and plug it into the charge controller mounted on the back wall of the storage area, but I don't keep as much stuff in our storage area as I'm sure many people do.
|
|
|
"Not all those who wander are lost." Tolkien
2014 Hood River 177 2005 GMC Envoy XL |
|
|
|
|
Don Halas
Senior Member
Joined: 01 Jul 2015 Location: Connecticut Online Status: Offline Posts: 190 |
Posted: 26 May 2016 at 3:26pm |
|
Thanks for the observation Will, but you will note a large part of the desire is to keep the battery charged at home. Positioning the panel on the front of the Pod will give it max Southern exposure when it sits in my yard.
Also, I don't want something else to carry and assemble when we camp so I'm not considering movable panels. Also they'd need to be secure in bad weather and possibly stolen. I'd accept the diminished performance with something that should be pretty passive once installed. |
|
|
|
|
WillThrill
Senior Member
Joined: 04 Jul 2014 Online Status: Offline Posts: 298 |
Posted: 26 May 2016 at 3:01pm |
I know that a lot of people do it, especially on motor homes, but mounting solar panels to the roof of your Pod is not necessarily the best strategy for one big reason: shaded panels will produce little to no output. If you're like us and doing most of your camping in the warmer months, you want your Pod itself in the shade. If your panels are on top, your output will either be zero or so little as to not be effective at all in recharging your batteries. That's why, in the OP, I set up the rig so I could easily move the solar panel some distance away from the Pod into the sun. In order to get anything close to 100 watts from a panel rated for that, it needs to be full sun with not even a little bit of shade on the panel.
|
|
|
"Not all those who wander are lost." Tolkien
2014 Hood River 177 2005 GMC Envoy XL |
|
|
|
|
Post Reply
|
Page <1 89101112 14> |
| Forum Jump | Forum Permissions You cannot post new topics in this forum You cannot reply to topics in this forum You cannot delete your posts in this forum You cannot edit your posts in this forum You cannot create polls in this forum You cannot vote in polls in this forum |


 Connecting a 100 watt solar panel to Zamp port
