Connecting a 100 watt solar panel to Zamp port
Printed From: R-pod Owners Forum
Category: R-pod Discussion Forums
Forum Name: Podmods, Maintenance, Tips and Tricks
Forum Discription: Ask maintenance questions, share your podmods (modifications) and helpful tips
URL: http://www.rpod-owners.com/forum_posts.asp?TID=5017
Printed Date: 13 Aug 2025 at 4:46pm
Software Version: Web Wiz Forums 9.64 - http://www.webwizforums.com
Topic: Connecting a 100 watt solar panel to Zamp port
Posted By: WillThrill
Subject: Connecting a 100 watt solar panel to Zamp port
Date Posted: 22 Jul 2014 at 10:04pm
|
I recently purchased a Renogy 100 watt solar panel through Amazon to provide a non-generator power source for dry camping. We love the Yamaha 2400iSHC for running the air conditioner or whatever else we need, but generators aren't the greatest way to recharge batteries if you're using a smart charger (which you should be).
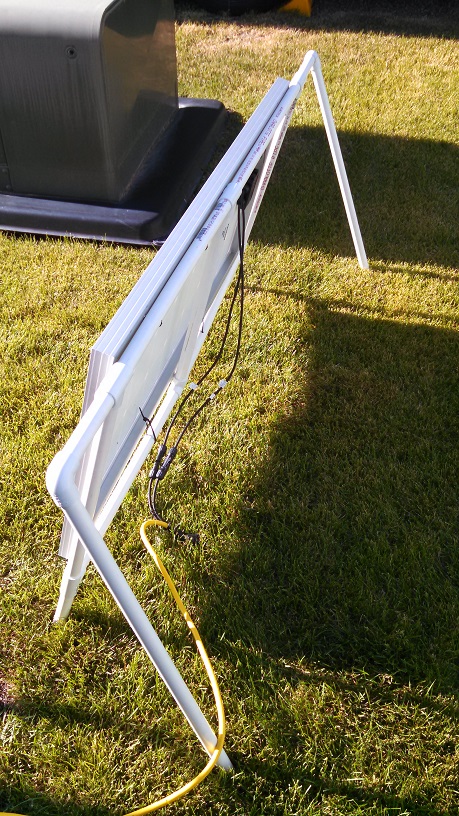
The reason for this is after your batteries reach about 80% state-of-charge (SOC), your smart charger begins stepping down the amperage flowing to the batteries. This is both for battery health and to minimize the use of unnecessary electrical power (for reasons beyond the scope of this post). Since the minimum output that a generator like mine can provide is about 500 watts (1/4 of its continuous rated output), that's about 40 amps of 12 volt current. That's way too much current for recharging batteries for the Pod, and the electrical power that doesn't go into the batteries or get used elsewhere is wasted. However, a solar panel with a smart charge controller (NEVER use a solar trickle charger with a solar panel rated above 15 watts; it will eventually and literally cook your batteries) will do a great job of recharging your batteries from a solar panel. It will step down the current flowing to the batteries as the batteries are recharged, the way it should. So enough about the technical stuff. Here are the pictures! This is my Renogy 100 watt solar panel from Amazon. They're $149.99 and get outstanding reviews. They produce solar power significantly better than older panels and are designed for outdoor use already. I made a little stand for it out of PVC pipe and connectors. I attached the panel to the stand with heavy duty zip ties running through holes drilled through the PVC. I didn't glue in anything yet because I wanted the setup to be flexible. To adjust the tilt of the panel, I just twist the two pipes at the back. 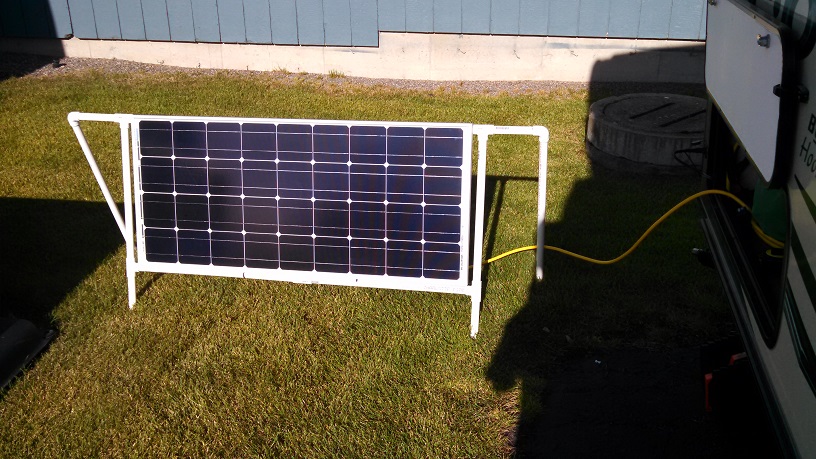
This is a 10 amp Sunforce solar charge controller. It adjusts the current flowing to the batteries depending on their SOC. I screwed it into the back wall of the exterior storage so it wouldn't get bumped around. 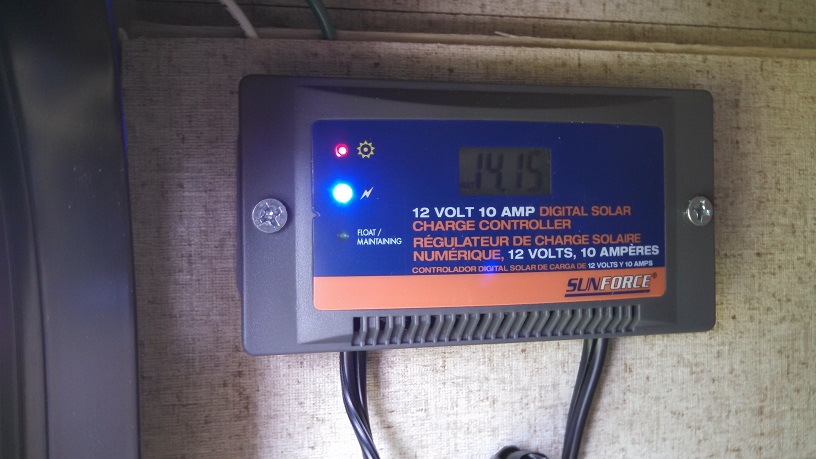
The MC4 connectors provided with the solar panel are only about 18 inches long, far too short to adjust the panel appropriately, and getting extensions are expensive. So I got a 15 foot 12 gauge extension cord so I can move the panel to either side of the Pod easily. Getting a 12 gauge cord is necessary to handle the current coming from the panel. I cut off the ends of the extension cord and connected to the MC4 connectors on the solar panel and the charge controller with wire nut connectors which I then wrapped heavily with electrical tape and two zip ties so they won't be pulled apart. Where the extension cord comes up to the charge controller, I attached the cord to the back wall with zip ties and screws so it won't pull on the charge controller. 
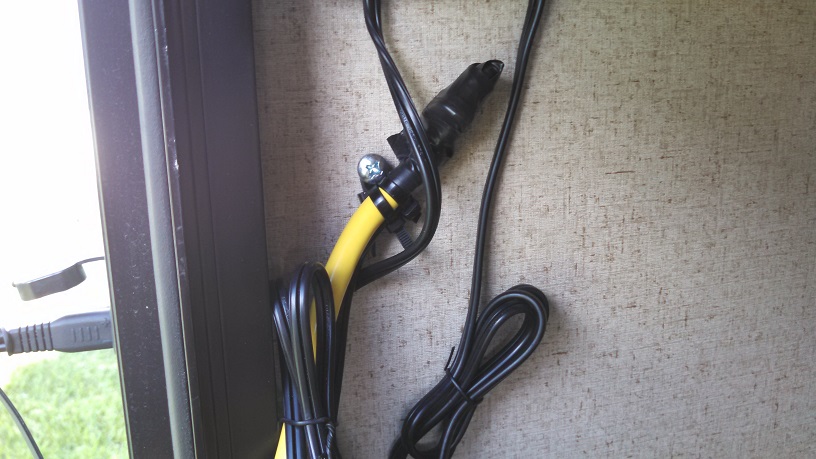
I connect the charge controller to the Zamp port with a Battery Tender ring terminal harness. This already has an inline fuse holder that a 10 amp automotive fuse can be placed into. 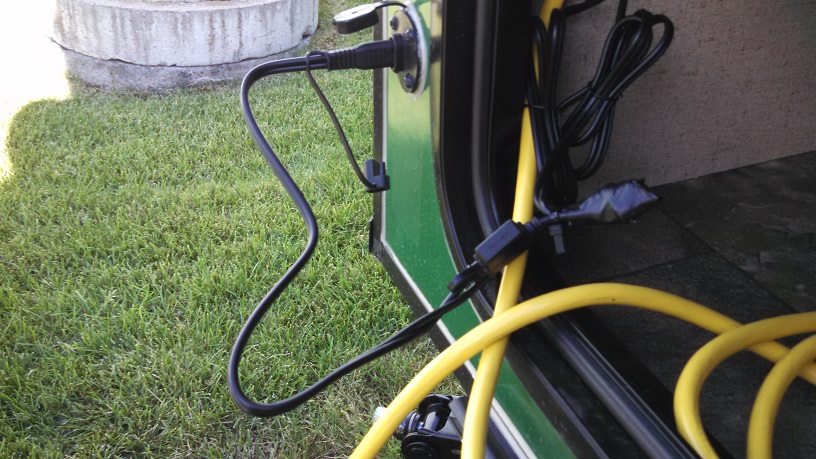
If you have a Pod that doesn't have the Zamp port, you could run 16 gauge (yes, it's sufficient for the amperage and distance) wire under the Pod up to the batteries without much difficulty. But the Zamp port makes this very easy. ------------- "Not all those who wander are lost." Tolkien 2014 Hood River 177 2005 GMC Envoy XL |
Replies:
Posted By: RPodWeGo
Date Posted: 22 Jul 2014 at 10:37pm
|
WillThrill, I like your setup in fact I have the Renogy 100watt foldable on my Amazon. One of our members recommened this for the battery box in the event you have an older Pod without thevZamp connector http://www.solarcapitalist.com/sae2pinsurfacemount.aspx Maybe Santa will notice my Amazon Wish List.
------------- RPodWeGo RPod 177 04 v8 Toyota 4Runner |
Posted By: WillThrill
Date Posted: 22 Jul 2014 at 10:59pm
I looked at the foldable panel too. It is a bit more convenient, but it is a bit pricier than buying a fixed panel and the Sunforce charge controller. With my 177, I can easily slide the panel in across the width of the panel in the exterior storage. ------------- "Not all those who wander are lost." Tolkien 2014 Hood River 177 2005 GMC Envoy XL |
Posted By: GingerPod
Date Posted: 23 Jul 2014 at 8:42pm
|
Looks good my friend! You might remember I commented on the same Company (Renogy Solar) as being a well reviewed outfit as well. I recently obtained their 50 watt system and improved upon what they sent me to mimic the much higher priced Zamp system,primarily to have it fold up for storage and only need to plug it into the Zamp port to make it operational. 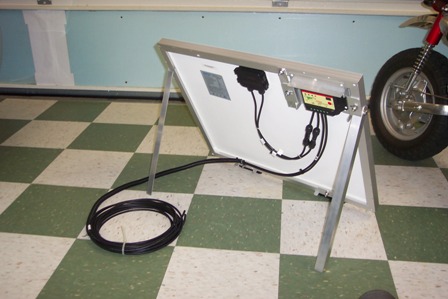 I think that is why the Zamp system is much more expensive.I highly doubt the system is more efficient the than Renogy,just more user friendly,I/E plug and play. That being said,I kinda copied their design  .........I made simple folding legs and mounted the controller to the back of the panel using the supplied roof mount brackets and aluminum stock. .........I made simple folding legs and mounted the controller to the back of the panel using the supplied roof mount brackets and aluminum stock. 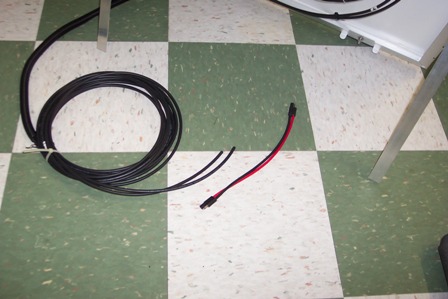 Utilizing the included wires intending to run to the interior mounted controller,which is now mounted to the panel itself,only 6" of wire is needed. So I can now use the remaining length of wire to plug directly into the Zamp port.This allows me to place the panels in the sun up to 20' away from the Rpod. So to set up all I have to do is plug into the Zamp port and the storage hatch can remain closed,just like the Zamp system intended. 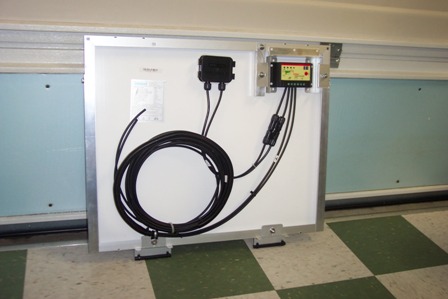 Our controllers are NOT waterproof like the Zamp is so that must be considered.But with the arms angled all the way back so the panel is at a 45* angle,it is protected from rain anyway. I have yet to solder up and shrink wrap the 10ga.connector.After speaking with customer service at Renogy they had no problem with this set up,but recommend covering the solar panel with a towel or facing it away from the sun BEFORE plugging it in.This is to reduce the chance of sparking and sudden loads on the controller,which is good practice methods when dealing with any kind of Solar system. I enjoy seeing how people make things that work for them as well as inspiring fellow RV'ers to do the same/ ------------- FOUND OUR NEW-RETRO TEARDROP!!! |
Posted By: WillThrill
Date Posted: 25 Jul 2014 at 9:31pm
|
Gingerpod, I really like your setup as well. Twenty feet of cable should be more than sufficient to set up your panel in a good spot. The folding legs look really great, very professional.
Everything I've heard about Renogy panels (not necessarily their charge controllers, which are still very good) has been outstanding. It seems to be one of the few brands of panels that will actually output what they are supposed to. I will be interested to hear from you how long it will take to recharge your batteries with the 50 watt panel. It was really cloudy on the only full day that I had to experiment with the panel so far. ------------- "Not all those who wander are lost." Tolkien 2014 Hood River 177 2005 GMC Envoy XL |
Posted By: GingerPod
Date Posted: 25 Jul 2014 at 10:03pm
|
Well,I have yet to test the 50 watt system out.I have read that from a full discharge state it will take about 3 hours to charge 1 battery. Just today I purchased a 2nd battery,so I plan on running 2 since we will be dry camping most of the time. My plan is too keep the solar panel plugged in all the time while Camping so each battery will continuously receive a charge.This way neither battery will get very low at all,especially since I now have double the Amp Hours available for use. The use of double batteries should negate the uncertainty of occasional cloud cover.That being said,the Renogy panels still put out some energy,but just not as much. I will definitely post my results once I try it out...At that time I might also start a "Solar" only thread as I see this route as a viable option to generator power,given the HUGE price drop in Solar energy options in recent years. ------------- FOUND OUR NEW-RETRO TEARDROP!!! |
Posted By: WillThrill
Date Posted: 26 Jul 2014 at 2:24am
|
Ginger, you must be running small batteries if a 50 watt panel can recharge them from 100% depth-of-discharge (0% charge, completely dead) in only 3 hours. A 50 watt panel at full capacity can only produce about 4 amps of power. So in 3 hours, you will have produced 12 amps. The smallest deep-cycle batteries I've seen used in TTs are about 75 amp hours, so it would take about 38 hours of full solar panel output to recharge that battery. And that's not taking into account that once the batteries reach 80-85% charge, the charge controller will begin slowing down the charge.
Such long charging times were why I went with the 100 watt panel. If you're not using much power in dry camping, then you'll probably be okay for 3-4 days with 2 batteries. Given the long charging times, the solar panel might buy you an extra day of battery power. ------------- "Not all those who wander are lost." Tolkien 2014 Hood River 177 2005 GMC Envoy XL |
Posted By: GingerPod
Date Posted: 26 Jul 2014 at 2:04pm
|
Love the discussion as I'm trying to educate myself in this field... From what I have interpreted from reading stuff of which most is way over my head..  ...increasing the AMP hour capacity is key when dry camping.Also never allowing the batteries to fall below 10.5 volts as well as keeping a constant supply of recharge current,no matter how small. ...increasing the AMP hour capacity is key when dry camping.Also never allowing the batteries to fall below 10.5 volts as well as keeping a constant supply of recharge current,no matter how small.So yes in reality it would take around 30 hrs to recharge a 100 AH battery at 3amps if FULLY discharged. The 3A is what drives the chemical storage reaction and regardless of terminal voltage when the battery is discharged, you will not get more than 3Ah out for any 3Ah put in, and in practice will get less. I believe this will keep my batteries happy as there is only 2 of us.We don't really use much power at all between us. In any case I don't think you can go wrong anywhere except with the so called Solar trickle chargers which in most cases put out less than 1 amp,which would do nothing for use trying to keep our batteries at a acceptable level while dry camping. ------------- FOUND OUR NEW-RETRO TEARDROP!!! |
Posted By: WillThrill
Date Posted: 27 Jul 2014 at 2:45am
|
Well it seems that you do have a good grasp of the basics of dealing with batteries. I would just give you a couple of tips I've picked up after spending literally hundreds of hours researching battery banks for homes and RVs.
First, invest a few dollars in a voltmeter you can use to monitor your batteries. The onboard battery meter is nowhere nearly as sensitive as you really need. There are several ways to use a voltmeter, some more complicated than others. The simplest way is to use an ordinary voltmeter than you pick up from a hardware store, place it to the 20V DC setting, and test the battery directly. But this isn't so great for a quick check. For me, I installed a 12V socket inside our Pod right next to the converter box. It took only a few minutes to wire it. If you've ever installed a wall socket in a house, you can easily put in a 12V socket. Otherwise, you might want a handy friend to help you. Just be sure to get the polarity right! I didn't the first time.  Once you have the socket, you can plug in a voltmeter (I like the Innova voltmeter on Amazon for $15) to easily monitor your battery's state-of-charge. Once you have the socket, you can plug in a voltmeter (I like the Innova voltmeter on Amazon for $15) to easily monitor your battery's state-of-charge.
Second, it's doubtful that you could ever get 12 volt batteries down to only 10.5 volts unless they were low on acid. Generally, at 11.9 volts, the batteries are virtually completely dead. In practice, you don't want to regularly go below a 50% state-of-charge since doing so begins to damage the battery. A 50% state-of-charge equates to about 12.2 volts. So when your voltmeter drops to 12.2 volts, you need to think about recharging your batteries somehow (i.e. connect to your vehicle if you have a power line connection there, generator, solar panel, etc.). And yes, for dry camping, multiple deep-cycle batteries are a MUST. Golf cart batteries (which must be wired in series to give you 12 volts) generally give you more amp hours than marine batteries do and are made for greater abuse. Remember, they design these batteries for frequent jolts and bumps in a small vehicle usually driven by half-drunks going off-roading!  ------------- "Not all those who wander are lost." Tolkien 2014 Hood River 177 2005 GMC Envoy XL |
Posted By: Budward
Date Posted: 27 Jul 2014 at 3:38am
Not so. It is entirely possible, even easy, to get to that or below on even a new battery. Problem is- it is very damaging to the battery to do so, IOW it will never be as "good as it was" if it is allowed to get too low. It is important to monitor the voltage as you stated and make sure this doesn't happen, unless you like buying batteries.  ------------- 2014 179 Towed by a 2015 Ford Transit Diesel Supervised by a German/Aussie mix and a Labradoodle! |
Posted By: CharlieM
Date Posted: 27 Jul 2014 at 8:17am
|
Mount the socket as close as convenient
to the power converter and wire it to one of the unused fuse locations.
Use #12 or #10 AWG wire.
This socket can be used for any 12V appliance when not measuring the battery, but it is important to get the voltmeter electrically as close to the battery as practical. The Innova meter is excellent; just disregard the colored lights and
unplug it at night unless you want a really bright night light. A lead-acid battery will read 12.1-12.2 at 50% SOC when at rest. This generally means no charge or discharge for 30-60 minutes. This is important because any load and any voltage drop due to wiring will produce a lower reading and cause premature panic in campers. It is normal for a voltmeter installed as above to read lower than 12.1 under load when the battery is still above 50%. It is best to read the voltage at the battery terminals after a period without heavy loads such as the heater, the pump, a 12V TV, the fan, or the fridge if on DC. Of course this assumes all lights are now LEDs. And it is possible to get a battery to 10.5 volts, but you will then be thinking about a new battery. Don't do that. ------------- Charlie Northern Colorado OLD: 2013 RP-172, 2010 Honda Pilot 3.5L 4WD PRESENT: 2014 Camplite 21RBS, 2013 Supercharged Tacoma 4L V6 4WD |
Posted By: GingerPod
Date Posted: 27 Jul 2014 at 5:25pm
|
Yeah,good discussion here for sure..... Installing a 12V outlet socket was one of the first things I did once we got it home.Not sure why Forest River didn't include one as standard equipment  . .Very easy utilizing one of the two existing empty fuse blocks,plugging in a 15amp fuse and using 10ga wire and mounting the socket on the shelf above the Breaker/Converter Box.Besides using it to charge phones etc,I have a small 150 watt inverter that I use to run the TV,it works great.I believe the TV pulls less than 50 watts. I Do plan on installing a aftermarket Volt meter as well to keep a better eye on things.I was thinking of using the remaining fuse block as a hook up point since the 8ga wire from the battery terminates there resulting in a more accurate reading. The Innova plug in Meter looks like it would make it much simpler,thoughts.... ------------- FOUND OUR NEW-RETRO TEARDROP!!! |
Posted By: CharlieM
Date Posted: 27 Jul 2014 at 6:33pm
Either way you're good to go. The plugin Innova is easier but you'll have to remove whatever's in your new socket. Wiring a separate voltmeter to an unused fuse will work just as well, but use up the last fuse slot. You could also wire the meter to your first unused fuse, in parallel with the new socket, right at the converter terminal. Your choice. ------------- Charlie Northern Colorado OLD: 2013 RP-172, 2010 Honda Pilot 3.5L 4WD PRESENT: 2014 Camplite 21RBS, 2013 Supercharged Tacoma 4L V6 4WD |
Posted By: WillThrill
Date Posted: 27 Jul 2014 at 10:55pm
You don't have to unplug the Innova meter at all if you don't want to. Get a Wagan 4-way socket splitter on Amazon for $11.47 so you can leave your meter plugged in, your car charger, 12 volt fan, and whatever else you want to. http://smile.amazon.com/Wagan-4-Way-Automotive-Socket-Extender/dp/B0009JB7GI/ref=sr_1_1?ie=UTF8&qid=1406516010&sr=8-1&keywords=wagan+4 And if you're asking for feedback on the Innova meter, I've gotten great use out of it. It gives you readings to the hundredth of a volt, and I've used one continuously for months. ------------- "Not all those who wander are lost." Tolkien 2014 Hood River 177 2005 GMC Envoy XL |
Posted By: CharlieM
Date Posted: 28 Jul 2014 at 12:07am
|
"You don't have to unplug the Innova meter at all if you don't want to. Get a Wagan 4-way socket splitter on Amazon for $11.47 so you can leave your meter plugged in, your car charger, 12 volt fan, and whatever else you want to. " Not a good idea. Voltage drop in the wire between the splitter and the plug will yield a falsely low reading. The meter needs to be separately wired as close to the battery as possible. A separate connection to the fuse panel is good enough if there are very few other loads operating. ------------- Charlie Northern Colorado OLD: 2013 RP-172, 2010 Honda Pilot 3.5L 4WD PRESENT: 2014 Camplite 21RBS, 2013 Supercharged Tacoma 4L V6 4WD |
Posted By: WillThrill
Date Posted: 28 Jul 2014 at 2:47am
Not to be persnickety, but this works fine. The splitter line is short, so the voltage drop is minimal. A quick check using a voltage drop calculator indicates that with a very low amp draw (1 amp, which is far more than the meter draws), the voltage drop is about .016 over the 34" splitter line. It's far less than even that with a .2 amp draw (probably about what the Innova meter draws) at only .003. Anyone can live with that. Steven Harris, an energy expert who has helped thousands of lay-people build battery banks, highly recommends this exact setup: www.battery1234.com ------------- "Not all those who wander are lost." Tolkien 2014 Hood River 177 2005 GMC Envoy XL |
Posted By: furpod
Date Posted: 28 Jul 2014 at 8:17am
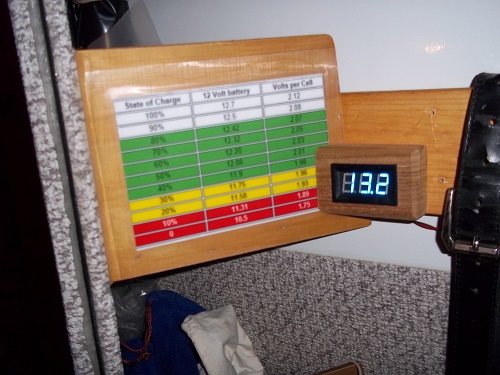
I built this little panel for $4 worth of parts from amazon.. handy to have. This picture was taken as part of a 'fridge experiment. This is 7 hours in, fridge on 12v, dual group 27's. Turned the breaker back on at this point. It reads the same as my fluke placed on the battery terminals. BTW, I would be much more worried by an "optimistic" reading than a "pessimistic" one... So even if it reads a couple thousandths less than actual, I can live with it.  ------------- |
Posted By: CharlieM
Date Posted: 28 Jul 2014 at 8:38am
You are correct if nothing else is plugged into the splitter. It's the higher current drawn from the splitter by other things like charges, fans, computers, etc. that cause voltage drop. These contribute to inaccuracy in the voltage reading. If you're going expend the effort why not do it right? ------------- Charlie Northern Colorado OLD: 2013 RP-172, 2010 Honda Pilot 3.5L 4WD PRESENT: 2014 Camplite 21RBS, 2013 Supercharged Tacoma 4L V6 4WD |
Posted By: GingerPod
Date Posted: 28 Jul 2014 at 8:43am
Nice job there Furpod! This further confirms my notion that running dual batteries is going to meet our dry camping needs especially when running the Fridge on propane,and having a Solar charger. I like this idea with this little meter...I've seen them on Amazon,very inexpensive ------------- FOUND OUR NEW-RETRO TEARDROP!!! |
Posted By: fwunder
Date Posted: 28 Jul 2014 at 8:43am
I copied furpod's idea. Cheap, easy and looks great.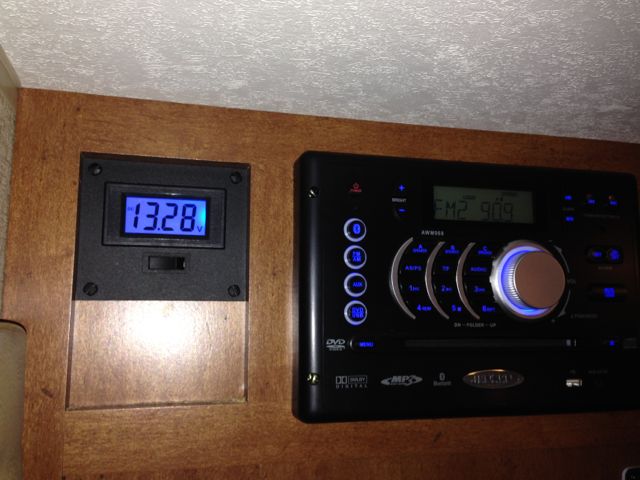 ------------- 2014 RPod 178 => https://goo.gl/CV446f - MyMods and Buying Habits 2008 4Runner Limited 4.0-liter V6 Yes, those are wild ponies dining on grass while dumping tanks! |
Posted By: WillThrill
Date Posted: 28 Jul 2014 at 4:04pm
To get a truly accurate reading, you would need to be pulling no current at all from any source for at least a couple of hours. If anything is drawing from your batteries, you will get a falsely low reading. It just comes with the territory. And as stated by someone else, a slightly low reading isn't going to hurt anything. But that's just my $.02! ------------- "Not all those who wander are lost." Tolkien 2014 Hood River 177 2005 GMC Envoy XL |
Posted By: schwartzw
Date Posted: 23 Jun 2015 at 3:40pm
|
sorry for replying to a 11 month old thread but so i search for on amazon to get that little display voltage meter and how does it plug in (got picts?) thanks, Bill ------------- 2015 R-Pod 182g HRE (SOLD) 2016.5 Lance 2185 |
Posted By: techntrek
Date Posted: 23 Jun 2015 at 8:24pm
|
Welcome. ------------- Doug ~ '10 171 (2009-2015) ~ 2008 Salem ~ http://www.rpod-owners.com/forum_posts.asp?TID=1723 - Pod instruction manual 
|
Posted By: marwayne
Date Posted: 23 Jun 2015 at 11:20pm
 ------------- If you want something done right, do it yourself. 2011 RP172, 2016 Tundra 5.7 Litre, Ltd. |
Posted By: WillThrill
Date Posted: 28 Jun 2015 at 6:14pm
I installed this 12 volt socket close to the fuse box in my 177. http://smile.amazon.com/Blue-Sea-Systems-Volt-Socket/dp/B001U4ZZPK/ref=sr_1_2?ie=UTF8&qid=1435529536&sr=8-2&keywords=12+volt+socket I can then plug in a 4 way extender to give me 4 sockets. I put an Innova battery monitor in one of them to monitor the batteries' voltage and use another one to power a 200 watt inverter for small AC items, like my laptop computer. ------------- "Not all those who wander are lost." Tolkien 2014 Hood River 177 2005 GMC Envoy XL |
Posted By: WillThrill
Date Posted: 18 Jul 2015 at 1:50pm
|
I thought that this thread needed bumping. Several people are asking questions directly answered here. ------------- "Not all those who wander are lost." Tolkien 2014 Hood River 177 2005 GMC Envoy XL |
Posted By: nicfortin
Date Posted: 14 Aug 2015 at 11:45pm
| following this thread... |
Posted By: WillThrill
Date Posted: 25 May 2016 at 1:36pm
|
Some new folks thinking about solar for their Pod might find this thread useful. ------------- "Not all those who wander are lost." Tolkien 2014 Hood River 177 2005 GMC Envoy XL |
Posted By: schwartzw
Date Posted: 25 May 2016 at 2:01pm
|
I bough a socket last fall and was going to install it but never found a good usable circuit in my fuse box. Could someone provide details on where to tap in? thanks, Bill ------------- 2015 R-Pod 182g HRE (SOLD) 2016.5 Lance 2185 |
Posted By: sailor323
Date Posted: 25 May 2016 at 3:38pm
There were 2 unused fuse slots in our 2016 179. I suspect most other pods are similar. It's straight forward and relatively easy to add another 12V circuit. I'd recommend using 12 ga wire, especially if you plan to use an inverter for small appliances.
|
Posted By: WillThrill
Date Posted: 25 May 2016 at 3:46pm
We also had a couple of unused circuits in our fuse box. I installed a 12 volt socket as well as a USB port on the end our dining seat, so the run from the fuse box was only about two feet. BE SURE to use an ohm meter to get the polarity of the socket and USB port correct. The side of the socket should be negative, and the center way down inside will be positive. I didn't do this when I first wired mine up, and I ruined a voltmeter in the process.  ------------- "Not all those who wander are lost." Tolkien 2014 Hood River 177 2005 GMC Envoy XL |
Posted By: schwartzw
Date Posted: 25 May 2016 at 4:20pm
|
Sorry for dragging this out. I obviously did things wrong last fall when i was playing with it. How do i properly tie into one of the open circuits? Just get something like this http://www.amazon.com/Support--circuit-Adapter-Blade-Holder/dp/B00SR5FLG8/ref=sr_1_3?s=automotive&ie=UTF8&qid=1464207602&sr=1-3&keywords=12v+fuse+tap for the hot side and then use the ground bar for the ground? ------------- 2015 R-Pod 182g HRE (SOLD) 2016.5 Lance 2185 |
Posted By: WillThrill
Date Posted: 25 May 2016 at 4:33pm
I didn't use anything quite that fancy, but yes, that will work just fine. You'll be using the ground bar for the 'neutral' line, not ground (though they're actually the same thing). ------------- "Not all those who wander are lost." Tolkien 2014 Hood River 177 2005 GMC Envoy XL |
Posted By: Don Halas
Date Posted: 26 May 2016 at 11:27am
|
Ok, now you've got me considering a solar set up for our 178. I really don't expect to be doing much off the grid camping, but like the idea I can keep the battery charged at home without a long extension cord from the house. Also like the idea that it makes battery consumption less tenuous when no AC is available.
So, I'm considering starting with 1 100 watt panel with the assumption I can add another panel later if required. I like this one: HQST 100 Watt 12 Volt Monocrystalline Flexible Solar Panel (http://www.amazon.com/dp/B017OMTAV6/ref=wl_it_dp_o_pC_S_ttl?_encoding=UTF8&colid=1OFFIBLM4EPOJ&coliid=I180JN9A4WMLPF&psc=1) as it appears I could mount it on the top of the pod using VHB tape and possibly some caulking. Thoughts comments? Has anyone been able to splice the charge controller into the zamp connector without a lot of hassle? I think I will probably mount the first panel on the front of the pod so I could also go right to the battery from there, but I don't see any controllers being sold as waterproof. So I'd rather not have to also buy/attach another box to the toe of the trailer if I don't have to. I like this controller Tracer MPPT Tracer1210RN Solar Charge Controller Regulator 12/24V INPUT 10A (http://www.amazon.com/Tracer-Tracer1210RN-Charge-Controller-Regulator/dp/B008KWPGS6/ref=sr_1_5?s=lawn-garden&ie=UTF8&qid=1464264827&sr=1-5&keywords=mppt+solar+charge+controller). Apparently the MPPT controllers do a better job of maximizing the power you get from the cell and this one appears to be priced right and reviewed fairly well. But if I go through the Zamp connector I'd like to be able to do it with the controller between the connector and battery. This will probably mean mounting the controller in the rear storage area, but that shouldn't be too difficult assuming there's some slack in the wire behind the zamp connector. If I added a second panel, I think I'd mount it on the rear. My objective being to be able to acquire solar power without too much concern of how the trailer is positioned. I understand I'd lose some efficiency, but would not have to hassle moving panels or repositioning the trailer. I don't expect to have a big appetite for power from this. From what I can see I would run the second panel in series which would supply (up to) 24 volts. The controller would step the voltage down to 12v as part of its purpose. Any insight or comments would be appreciated. I think I could do the one panel 100w for about $325 with hardware. |
Posted By: schwartzw
Date Posted: 26 May 2016 at 11:59am
|
I have the following items. http://www.amazon.com/Renogy-Watts-Monocrystalline-Foldable-Suitcase/dp/B00HR8YNK6?ie=UTF8&psc=1&redirect=true&ref_=oh_aui_search_detailpage http://www.amazon.com/Solar-Cable-connectors-Copper-Strand/dp/B008JHXF4O?ie=UTF8&psc=1&redirect=true&ref_=oh_aui_search_detailpage http://www.amazon.com/Battery-Tender-081-0069-6-Terminal-Disconnect/dp/B000NCOKZQ?ie=UTF8&psc=1&redirect=true&ref_=oh_aui_detailpage_o00_s01 Cut the 50' cable in half giving you one wire with a male connector and one with a female. solder the cut ends to the battery tender part (get polarity right). The connector on the battery tender will plug into the zamp connector on the rpod and the male/female ends of long cable will connect to the leads on the solar panel. Now you have a portable solar setup for the rpod with a 25' wire. this lets you put the panels out in the sun even if the rpod is in a shady spot for about $310. I made a shield/cone thing to protect the controller from the weather (it's attached to the panels) so I dont' have to put it away every time it rains. ------------- 2015 R-Pod 182g HRE (SOLD) 2016.5 Lance 2185 |
Posted By: WillThrill
Date Posted: 26 May 2016 at 3:01pm
I know that a lot of people do it, especially on motor homes, but mounting solar panels to the roof of your Pod is not necessarily the best strategy for one big reason: shaded panels will produce little to no output. If you're like us and doing most of your camping in the warmer months, you want your Pod itself in the shade. If your panels are on top, your output will either be zero or so little as to not be effective at all in recharging your batteries. That's why, in the OP, I set up the rig so I could easily move the solar panel some distance away from the Pod into the sun. In order to get anything close to 100 watts from a panel rated for that, it needs to be full sun with not even a little bit of shade on the panel. ------------- "Not all those who wander are lost." Tolkien 2014 Hood River 177 2005 GMC Envoy XL |
Posted By: Don Halas
Date Posted: 26 May 2016 at 3:26pm
|
Thanks for the observation Will, but you will note a large part of the desire is to keep the battery charged at home. Positioning the panel on the front of the Pod will give it max Southern exposure when it sits in my yard.
Also, I don't want something else to carry and assemble when we camp so I'm not considering movable panels. Also they'd need to be secure in bad weather and possibly stolen. I'd accept the diminished performance with something that should be pretty passive once installed. |
Posted By: WillThrill
Date Posted: 27 May 2016 at 11:41am
I just wanted you to be aware that parking your Pod where the panels will be in the shade will prevent them from charging your battery. If you're primarily doing this to keep them charged at home in the sun, that's totally fine. A 50 watt panel would be more than sufficient for that. Out of curiosity, why do you not want to run an extension cord out to the Pod to keep the battery topped off? With as little current as it would take, you could run 500 ft. of extension cords (100 ft. is $19 at my Lowe's) out to it for less money. You can even get green cords that will blend in with your lawn. This would likely be far cheaper than going solar. Alternatively, you could just take the battery out when you're not using the Pod and leave it on a battery maintainer, which is what I do. Regarding storage, I keep my 100 watt panel stored across the width of the storage area in the rear of our Pod. It's pretty easy to pull it out and plug it into the charge controller mounted on the back wall of the storage area, but I don't keep as much stuff in our storage area as I'm sure many people do.
------------- "Not all those who wander are lost." Tolkien 2014 Hood River 177 2005 GMC Envoy XL |
Posted By: sailor323
Date Posted: 27 May 2016 at 2:36pm
|
I have mounted 2 panels on the roof of our 179. DEtailed description and pix can be found at https://www.facebook.com/groups/56931970807/files/ Look for the one titled "How to installation solar panels on roof. I did splice into the zamp wires to the battery. Installed a fuse at the battery. Controller is located inside the pod alongside the factory installed monitor for battery, tank levels, etc. uploads/4133/How_To_-_Installation_-_Solar_Panels_on_Roof.pdf - uploads/4133/How_To_-_Installation_-_Solar_Panels_on_Roof.pdf To splice into the zamp wires, look under the frame of the pod. Just beneath the point where the zamp plug is located, you will find the flex conduit that houses the wires leading to the battery. Splice into those wires at any point that is convenient. Be aware that the wires are attached to the battery and are HOT. The cost for my entire installation for 280 watts of power was about $700. |
Posted By: Don Halas
Date Posted: 28 May 2016 at 8:43am
|
Sailor your panels are mounted similarly to what I am considering. The Pod will be parked in my driveway where the toe side will get southern exposure. It's about 100' from a power source so that requires laying two 50' extensions across the driveway. There are trees near it, but in summer months the pod will get sun most of the day from above. In the winter months, I'll probably have it packed up and battery disconnected, but if I don't the trees have no leaves and I think the slight angle of the solar panel will assure at least some direct sun. I'm planning on starting with one panel, the second will be installed if the initial setup works but not quite optimally. The second panel, like yours would be mounted on the opposite side of the Pod with the intent of making it easier to obtain some solar power without having to position the Pod exclusively for that purpose, or having to move panels around. Again, this is going to be a nice to have for us, not a got to have. I have no desire to have something else to store and pack when travelling and something else to worry about setting up or having to move because of weather or have stolen. The flexible panels appear very capable of being mounted on top of the Pod with VHB tape and perhaps some of the same caulking used on the top of the pod for the other protrusions. Thanks for the insights all. I'll be sure to report more if I approach this. I failed with my install of the 'Lowes shelf', but that's another discussion (and $100 down the toilet). Thanks again. |
Posted By: sailor323
Date Posted: 28 May 2016 at 1:23pm
|
Shade and dirt and debris on the panels have a significant effect on the output of the panels. Even so, if your batteries are fully charged, the panels will produce enough power to keep them topped off. The permanent mounting option eliminates the (minor) hassle of setting up the panels and taking precautions to prevent theft. I do have the option of tilting one of the panels in order to maximize insolation but I've never taken the trouble. |
Posted By: WillThrill
Date Posted: 29 May 2016 at 12:17pm
Yes, anything at all that blocks sunlight from striking the entire panel in a completely unobstructed way will reduce their output. That's why a lot of people who have solar panels around their houses have a fake owl set up very close to them to keep away birds. One good dropping can almost eliminate the output of a panel. ------------- "Not all those who wander are lost." Tolkien 2014 Hood River 177 2005 GMC Envoy XL |
Posted By: Rustler
Date Posted: 30 May 2016 at 3:19am
|
I know this original post is a few years old. But there have been some recent (2016) replies. So I wanted to add my recent experience. A bit of background - my home has a 4.6 kilowatt grid-tied solar system. When one of the 25 solar panels was showing reduced output the inverter manufacturer said it's not a problem with the inverter, it must be the solar panel. So the solar panel was replaced on warranty, but the problem remained. The defective inverter was replaced, and I ended up with a spare 185 watt, 36 volt solar panel. I wanted to make use of this panel to charge a 100 amp-hour deep cycle battery used to power my telescope at remote sites. The same battery is used to power my Ham radio station during power outages. So I got a http://www.ecodirect.com/ProductDetails.asp?ProductCode=Morningstar-SunSaver-MPPT-15L&gdffi=0dae7bd1372740b294ae62e0f7f77b8d&gdfms=F9438E4A7A3342F8A22492A40C11F5C5&gclid=CILuos-Ogc0CFUg8gQod3F8E0A - Morningstar charge controller - SSMPPT-15L maximum power point tracking. I researched how to wire this all up following the national electric code. A good reference for this is the article Photovoltaic Power Systems
And the 2005 National Electrical Code:
Suggested Practices found on this link: http://www.solar-electric.com/media/wysiwyg/PV-NEC-V-193.pdf - http://www.solar-electric.com/media/wysiwyg/PV-NEC-V-193.pdf Here are a couple of photos showing my solar charging setup. First is the 100 amp-hour battery with charge controller and DC rated circuit breakers. 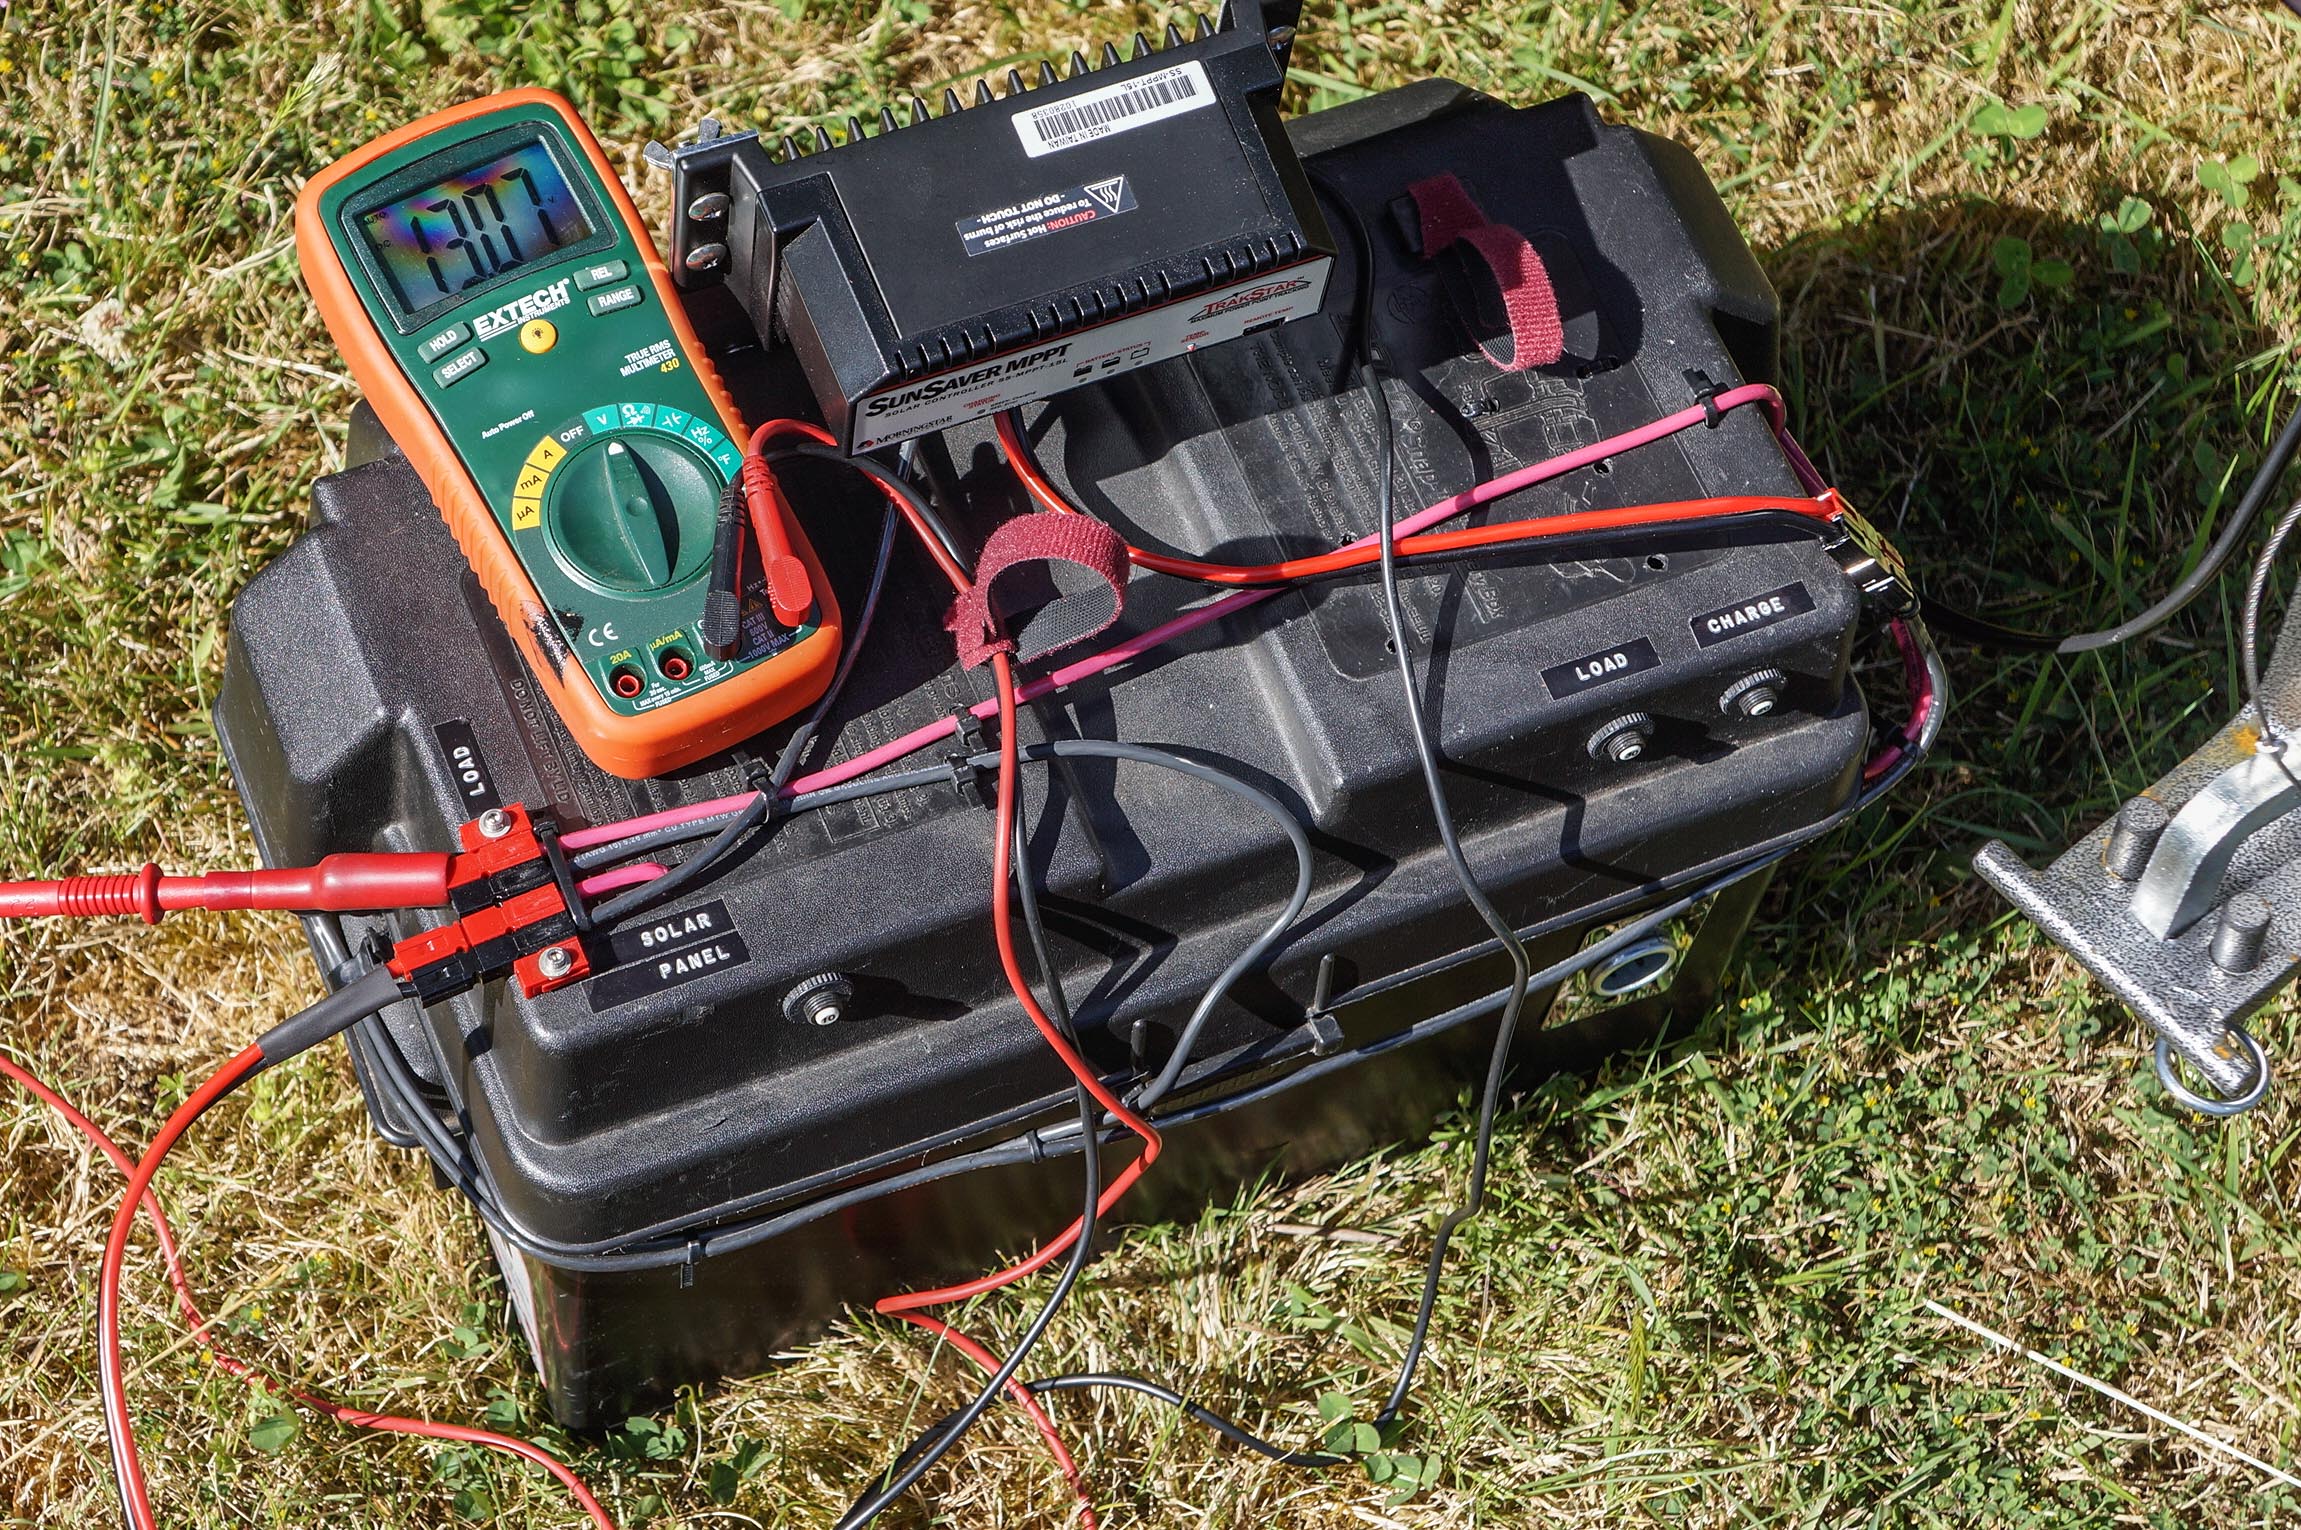 Next is a view of the two batteries with the solar panel attached. 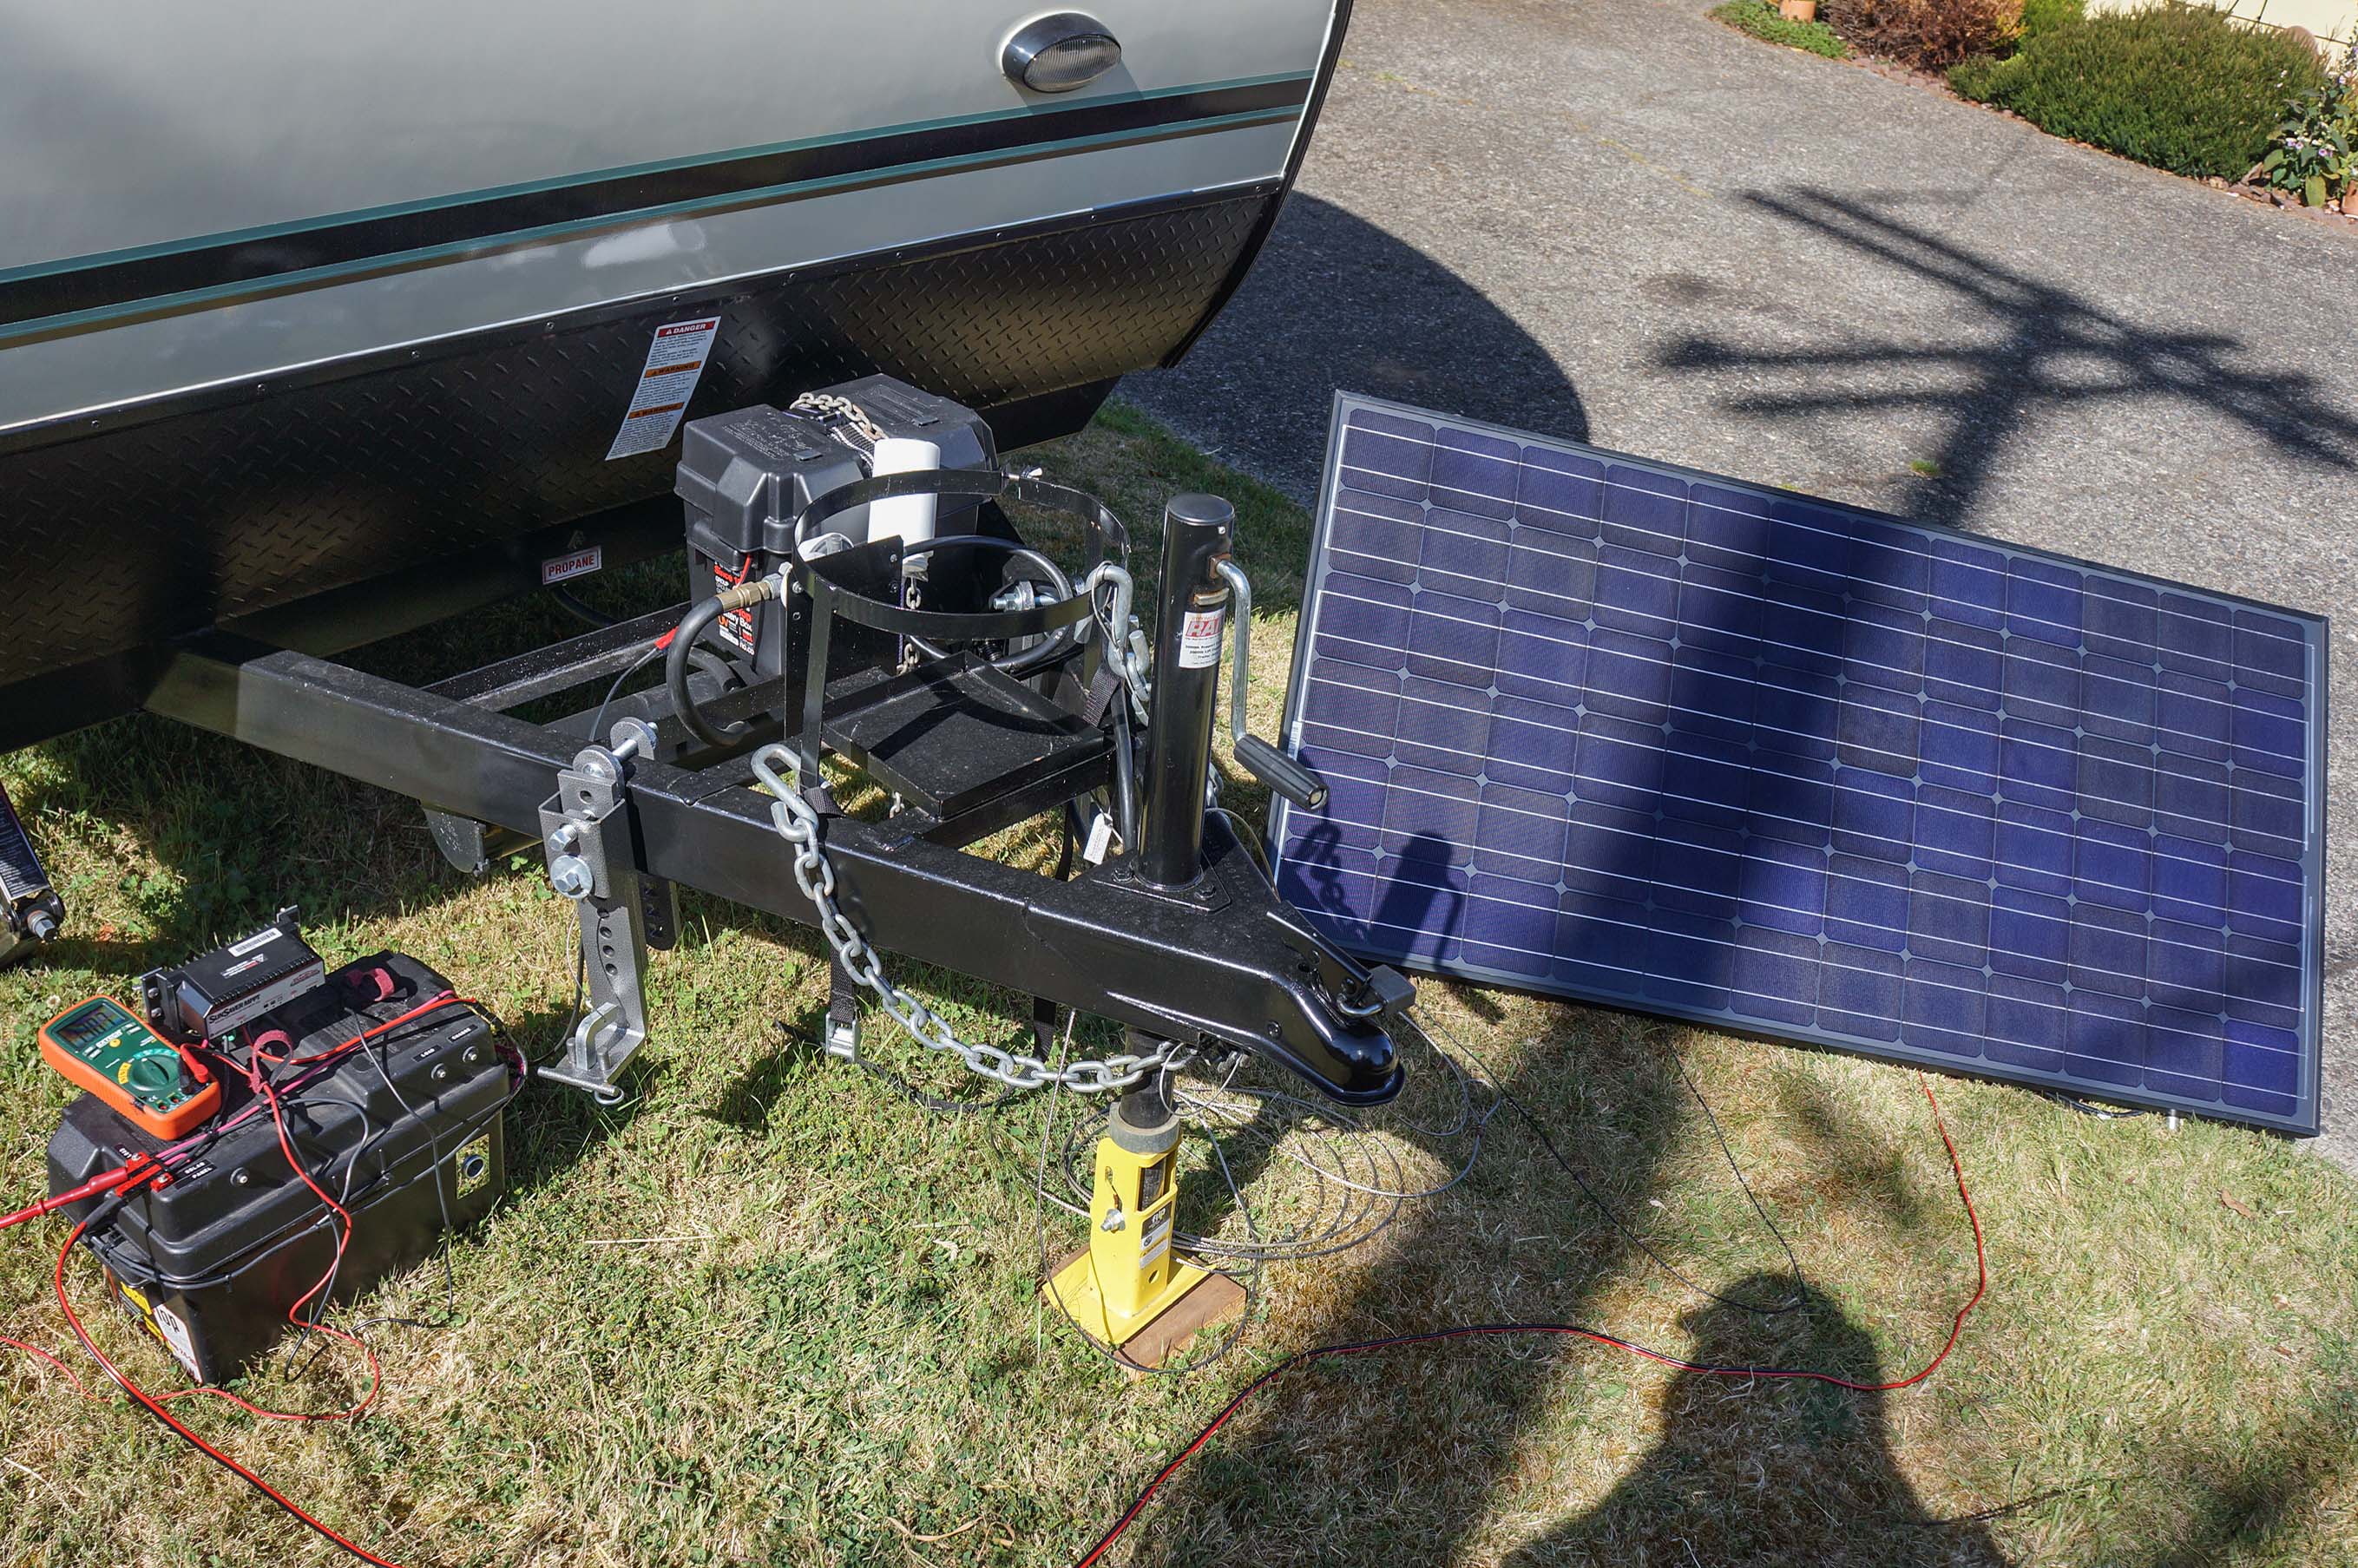 The 72 cells on the panel are wired in series, each producing about 5 amps at 1/2 volt. The volts are additive producing around 36 volts in all. But the current is the same in all of the series wired cells. At the time of the photo the shadow of the power pole is causing the panel to be producing almost no current. If even a single cell is shaded, it will produce very little current, limiting the output of all the rest of the cells in the series. So it's important that a solar panel is not subject to any shade. While this solar panel didn't cost me anything it has some disadvantages compared to the fold-up solar panels some forum members have used. It is rather large (32 x 62 inches) weighing some 37 lbs. I was unable to get it to fit onto the queen bed area of the Rpod 171. I just couldn't maneuver it into that space - walls and ceiling got in the way. But it does fit on the dinette area bed. So I'll use that space for transport of the panel. It will be set up on the south side of the Rpod, connected to the 100 amp-hour battery with charge controller and parallel connected to the Rpod's battery. This will allow me to charge the batteries while using the Fantastic Fan for ventilation during the heat of the day. The fan uses just over 3 amps on high leaving almost 10 amps for battery charging and other loads. I could add another 12-volt fan for increased comfort. While the solar panel was free, I did spend about $220 for the controller - http://www.amazon.com/Morningstar-Sunsaver-TrackStar-Charge-Controller/dp/B006H9VPL6 - Morningstar SSMPPT-15L . The design of this controller (maximum power point tracking) produces more total power than the cheaper pulse width modulation controllers. Since Zamp doesn't mention that its controller is max. power point tracking, we can assume that it is not. I chose not to attach the solar panel using the Zamp plug on the rear of the trailer. I really don't understand why Forest River chose that location for solar plug-in. This is the point most distant from the battery, requiring a lot of wire to reach the battery. It would make more sense in my mind to have that plugin closer to the battery, say on the curb-side front of the Rpod. In any case the existing location gives a convenient place to plug in another 12-volt load like a fan. I highly recommend using https://powerwerx.com/help/powerpole-connectors#set - Anderson Powerpole connectors for DC connections. They are vastly superior to the more common cigarette lighter style connections. The latter are best used for low amperage loads - less than 5 amps. Since they have a spring-loaded tip they tend to push themselves out of the plug. In contrast the powerpole design has positive spring pressure which resists being disconnected. In the smallest version they are rated at up to 45 amps. Powerpole connectors are the standard used in emergency Ham radio and in emergency vehicles such as ambulances. One of the best sources for power pole connectors is https://powerwerx.com/anderson-power-powerpole-sb-connectors - Powerwerx . Once you get to using powerpoles you'll never go back to other connectors. Even the $40 spent on the crimper is well worth it. The crimped connections are even better than soldering the wires and way faster. Here are the https://powerwerx.com/help/powerpole-assembly-instructions - assembly instructions . Another suggestion is to securely anchor your solar panel to avoid problems with wind. I had an experience demonstrating the need for this. I had set up the panel in my yard with it securely tied to a large concrete block. We had some strong winds that night as happens often on the Oregon coast. The next morning I found the solar panel face down on the lawn with the concrete block laying in front of it at the end of the tie down rope. I'm just glad the concrete block didn't land on the solar panel. Now I use a screw-in-ground tethering point - the kind that is used for tethering a pet or perhaps a goat. The solar panel is tightly roped to that secure point to resist any winds. Well this what my experience has been in getting a solar charging system for my Rpod. Any comments or suggestions? ------------- Russ 2009 Toyota RAV4 V6 w/ tow package 2016 Rpod 171 HRE |
Posted By: techntrek
Date Posted: 30 May 2016 at 8:28pm
|
Nice write-up. ------------- Doug ~ '10 171 (2009-2015) ~ 2008 Salem ~ http://www.rpod-owners.com/forum_posts.asp?TID=1723 - Pod instruction manual
|
Posted By: Rustler
Date Posted: 31 May 2016 at 12:22am
|
Thanks. I hope my experience will be of use to other Rpodders. One addition that I learned from a link supplied by another forum member. Some solar panels have bypass diodes on each cell of a solar panel. If there is shading on one or more cells, the diode will allow passing of an increased amount of current from the non-shaded cells. It's not as good as being without any shade. But it is an improvement. I don't know how many of the newer solar panels have this feature. But I would expect that such an improvement would be clearly advertised if present. Another note - when testing the solar panel I tried using battery power on the refrigerator. It was already cold from using shore power. When I switched to battery operation for the refer. the battery voltage stayed almost constant. So in full sun the solar panel could keep up with refrigerator use. I doubt it could do as well as with propane or 120 VAC. But it's an option.
------------- Russ 2009 Toyota RAV4 V6 w/ tow package 2016 Rpod 171 HRE |
Posted By: sailor323
Date Posted: 31 May 2016 at 10:05am
I have kept the fridge on 12v sometimes in order to conserve propane (I have 280 watts worth of solar power). Beware that the fridge needs 11 amps when running, that's 132 watts. Depending on ambient temperature, the fridge runs at least one half the time--mine runs about 3/4 of the time. Consider, though, that the panel only produces 100 watts when conditions are ideal and then only for a short time. While the battery may deliver a fairly constant voltage under load and while being charged, it is important to remember that the current delivered to the battery/load is more important than voltage when charging the battery. I would not count on a 100 watt panel to keep up with the needs of the fridge. Here's an interesting video https://www.altestore.com/video/what-can-i-power-with-a-100w-solar-panel-v69/ |
Posted By: Don Halas
Date Posted: 31 May 2016 at 10:16am
|
Nice work Rustler.
Great attention to detail through and through. |
Posted By: Leo B
Date Posted: 31 May 2016 at 10:33am
|
Ditto!
------------- Leo & Melissa Bachand 2017 Ford F150 2021 Vista Cruiser 19 csk Previously owned 2015 Rpod 179 2010 Rpod 171 |
Posted By: WillThrill
Date Posted: 31 May 2016 at 4:46pm
I completely agree. Propane is too cheap and effective to not use to keep the refrigerator going. The payback period for investment necessary to reliably run it exclusively on solar would be far into the future. At today's prices, I can refill a 20# propane tank locally for around $12. A single 100 watt solar panel from Renogy is $150 + tax, which is around thirteen tanks of propane. You'd have to be practically living in your Pod for it to be financially worthwhile to go solar for the fridge. ------------- "Not all those who wander are lost." Tolkien 2014 Hood River 177 2005 GMC Envoy XL |
Posted By: Don Halas
Date Posted: 02 Jun 2016 at 8:52am
| Just curious, but I'm guessing that using an SAE plug you could use the Zamp plug as a DC source. |
Posted By: WillThrill
Date Posted: 02 Jun 2016 at 2:23pm
Yes, you could easily use the Zamp port as a 12 volt power source. Keep in mind that the wire running the 20' or so is just 16 gauge, so I wouldn't recommend pulling more than 10 amps or 120 watts through it. All you need to plug into it is a universal 2-way connector. You could then wire this into a 12 volt socket adapter that you could then plug almost anything you wanted in to (i.e. USB charger, small fan, lights, etc.). ------------- "Not all those who wander are lost." Tolkien 2014 Hood River 177 2005 GMC Envoy XL |
Posted By: Rustler
Date Posted: 03 Jun 2016 at 2:45am
Willthrill if that wire connection is just 16 gauge, I really would be very reluctant use more than 2-3 amps. To run 10 amps at 12.5 volts through 16 gauge wire for 20 feet would give a voltage drop of 1.6 volts (less than 11 volts at the load). 10 amps would work, but not very efficiently. And there is the risk of overheating the wiring. The following link gives a nice, convenient voltage drop calculator: http://www.calculator.net/voltage-drop-calculator.html?material=copper&wiresize=13.17&voltage=12.5&phase=dc&noofconductor=1&distance=20&distanceunit=feet&eres=10&x=59&y=12 - Voltage drop calculator Running 2 amps for 20 feet on 16 gauge wire gives a more reasonable voltage drop of just 0.3 volts (less than 3%). Does anyone know for sure what the wire gauge on that run? 16 gauge seems awfully light, especially for a solar charge connection with up to a 200 watt Zamp solar panel. Also is there any fuse on that run of wire? If not I would definitely add a fuse for electrical and fire safety. ------------- Russ 2009 Toyota RAV4 V6 w/ tow package 2016 Rpod 171 HRE |
Posted By: sailor323
Date Posted: 03 Jun 2016 at 7:27am
The Zamp wires on our 2016 179 are 10 ga wires. Yes, they should be fused! |
Posted By: Don Halas
Date Posted: 03 Jun 2016 at 12:37pm
|
Moving forward with this.
I am considering doing this and running the solar output to a charge controller and directly to the battery forgoing the zamp connector. To do this I'll need to mount the charge controller inside the battery box or at least in a weatherproof enclosure close to the battery. Because I'm always looking forward and hate re-doing things or wasting money I think I might want to replace the battery box (not the battery) with one large enough for a battery upgrade (the two in series 6volt golf cart type) and to mount the controller say in the lid. Again, I intend to keep my current 12 volt battery, but would rather upsize the box now in anticipation of a battery upgrade in the future. Does anyone have any opinion on the size of box I'd need to accommodate the battery upgrade and mounting a charge controller (in as of yet undetermined size) in the box? As always thanks for feedback. |
Posted By: sailor323
Date Posted: 03 Jun 2016 at 1:23pm
| It's not that difficult to mount the controller inside the pod. |
Posted By: Don Halas
Date Posted: 03 Jun 2016 at 2:50pm
|
I'm hoping not to drill any holes in the Pod itself and since the first panel will be at the front of the pod, going directly to the battery makes sense.
The alternate is going through the zamp connector (or the hole they've already drilled for it) and mounting the charge controller in the storage area behind it. That's the less favored approach. I've looked for weather proof charge controllers and not seen anything specifically promoted as such. Also, doesn't seem worthwhile to spend a lot on that when an enclosure will not be that expensive. |
Posted By: JandL
Date Posted: 03 Jun 2016 at 3:06pm
|
"I've looked for weather proof charge controllers and not seen anything specifically promoted as such"
I bolted my charge controller, Morningstar “SK-12 SunKeeper” 12 Amp PWM Charge Controller on the side of my battery box. You can see my mod here on page 39 of "List Your mods". The battery box is the biggest I could find, it's an Attwood Corporation 9084-1 Large Battery Box http://www.rpod-owners.com/forum_posts.asp?TID=842&PN=39&title=list-your-mods ------------- JandL 2013 Honda Ridgeline 2012 177 2 Paynes in a Pod |
Posted By: Don Halas
Date Posted: 03 Jun 2016 at 3:11pm
|
Thanks JandL. Not a great picture, but more importantly is the charge controller supposed to be rain or weather proof? How's it handling the elements?
|
Posted By: JandL
Date Posted: 03 Jun 2016 at 3:53pm
|
Here is the link to the manufactures web site. It's a sealed unit and I have had no problem. The other advantage with mounting next to the battery I don't have to install any Temperature Compensation.
http://www.morningstarcorp.com/products/sunkeeper/ ------------- JandL 2013 Honda Ridgeline 2012 177 2 Paynes in a Pod |
Posted By: WillThrill
Date Posted: 05 Jun 2016 at 4:38pm
I have verified that the wiring to the Zamp port is indeed 10 gauge. According to the Zamp manual, they say that you can run up to 15 amps of current through this line, depending on which solar panel you have. 15 amps would be about the equivalent power from 200 watts of solar panels. Yes, the at maximum output, you could theoretically be sending 16.6 amps through the line, but given that solar panels almost never provide their rated output in normal circumstances and the loss of power in the lines going to the charge controller, you would be fine.
------------- "Not all those who wander are lost." Tolkien 2014 Hood River 177 2005 GMC Envoy XL |
Posted By: Rustler
Date Posted: 06 Jun 2016 at 3:39am
Something to keep in mind is that some charge controllers require a certain amount of clearance around the unit for cooling. For instance my Morningstar SSMPPT-15L controller requires a vertical mounting with 6 inches above and below the unit for air circulation. It also cautions against exposure to direct sun, high temperatures and water. You might make your decision based on what charge controller you want as well as its requirements for clearance and air circulation.
------------- Russ 2009 Toyota RAV4 V6 w/ tow package 2016 Rpod 171 HRE |
Posted By: Don Halas
Date Posted: 06 Jun 2016 at 7:39am
|
Thanks again all.
Gotta do some homework, but the MorningStar chargers look like they'll work nicely with what I'd like to do. It looks like I might be able to mount them to my existing battery box and not worry about trading up on that yet. I appreciate the input. I'll post some information of the projects progress if I get going on it. Thanks again. |
Posted By: Don Halas
Date Posted: 07 Jun 2016 at 11:41am
|
I'm close to pulling the trigger on this. First I've got to see if my current battery box has enough extra space to accommodate the charge controller mounted inside.
I'm planning on mounting one HQST 100 Watt 12 Volt Monocrystalline Flexible Solar Panel to the roof on the toe side of the Pod. If my approach works I may add a second panel on the rear side at a later date. (http://www.amazon.com/dp/B017OMTAV6/ref=wl_it_dp_o_pC_nS_ttl?_encoding=UTF8&colid=1OFFIBLM4EPOJ&coliid=I180JN9A4WMLPF&psc=1). I'm going to run the wire down the front of the pod directly into the battery box and not use the zamp port on the back. I plan on attaching the panel using 1/2" VHB tape and then using Dicor sealant around the entire panel. Wires will be secured using wire cable clips that I hope will be adequately mounted using command strips. If the command strips fail it shouldn't be a big deal to find a suitable alternative. I hope to mount a Morningstar SS 20L 12V SunSaver 20 amp 12 volt Solar Charge Controller with LVD controller inside the battery box. It's a little over sized for the one panel, but I believe allows me the option of adding the second panel in series with the first panel. It's supposed to be good for exterior applications. (http://www.amazon.com/dp/B017OA5DH8/ref=wl_it_dp_o_pC_nS_ttl?_encoding=UTF8&colid=1OFFIBLM4EPOJ&coliid=I18UBPLNOQR164) I'm guessing a 20 amp fuse between the charger and battery should suffice. Any thoughts or guidance will, as always be appreciated. |
Posted By: JandL
Date Posted: 07 Jun 2016 at 12:09pm
|
You might want to do a Google search on long term sun exposure to the bendable panels. ------------- JandL 2013 Honda Ridgeline 2012 177 2 Paynes in a Pod |
Posted By: Don Halas
Date Posted: 07 Jun 2016 at 1:01pm
|
I'd hope they expect long term sun exposure with sun panels. Description suggests they're more tolerant of the environment.
I won't do this if I need to suitcase or carry panels. I don't want anything else to pack, set-up or secure (theft or weather). The total investment will be less than $400. $600 if I add a second panel. Thanks for the thought. |
Posted By: WillThrill
Date Posted: 07 Jun 2016 at 1:54pm
You are correct in that a 20 amp charge controller is overkill for one panel. A 100 watt panel will, at most, output 8.33 amps (100 watts / 12 volts) of current, and it will likely be less than that because the voltage output of the panels will be closer to 18 volts, so the amperage will be even less. Also, bendable panels will almost always output less than that of rigid panels because they cannot be angled perfectly to the sun like rigid panels can. In the OP, I used a 10 amp Sunforce charge controller that has worked perfectly for me, but I understand that in your situation, you want something that is more tolerant of bad weather. Just be aware that a 20 amp controller is unnecessary for one panel. If you're wanting to add another panel, then go ahead and get the 20 amp controller. And yes, bendable solar panels were made to be exposed to sunshine, so they'll be fine. The biggest drawback I see with mounting solar panels to your Pod is that you must be parked in the sunshine for them to work. We try to avoid this at all costs in order to keep our Pod cool, but I understand that you don't want to pull out a rigid panel when you want to recharge your batteries. I personally don't mind it.
------------- "Not all those who wander are lost." Tolkien 2014 Hood River 177 2005 GMC Envoy XL |
Posted By: JandL
Date Posted: 07 Jun 2016 at 2:23pm
|
The warranty on my Grape Solar GS-STAR-100W is 10 years, 25 years on > 80% power output and 10 years on >90% power output. There flexible panel PhotoFlex-100W warranty is 2 years, 2 years on 80% power output. That's why I went with the rigid glass covered panel ------------- JandL 2013 Honda Ridgeline 2012 177 2 Paynes in a Pod |
Posted By: WillThrill
Date Posted: 07 Jun 2016 at 3:20pm
That kind of thing is by no means universal in the industry. Renogy warranties their flexible panels for 25 years at 80% efficiency. ------------- "Not all those who wander are lost." Tolkien 2014 Hood River 177 2005 GMC Envoy XL |
Posted By: Don Halas
Date Posted: 07 Jun 2016 at 3:27pm
|
This is a nice to have for me, rather than a got to have.
We don't have a lot of dry camping planned. The exception will be occasional boondocking and perhaps when my son gets me in music festivals. My primary reason for this is to not have to drag the extension cords across my driveway while the Pod sits there most of the time. Putting the first panel on the front is strategic since that will be Southern exposure when it's parked in my driveway. A secondary purpose will be if we are using battery that we might not to be so concerned with it. So that's why this is either simple, self sustaining and no more hassle or not happening. Again, thanks for your feedback. |
Posted By: CharlieM
Date Posted: 07 Jun 2016 at 3:33pm
+1 +1 +1 As a general philosophy I like that approach.  ------------- Charlie Northern Colorado OLD: 2013 RP-172, 2010 Honda Pilot 3.5L 4WD PRESENT: 2014 Camplite 21RBS, 2013 Supercharged Tacoma 4L V6 4WD |
Posted By: Rustler
Date Posted: 07 Jun 2016 at 3:36pm
The following link has more than you want to know about solar systems and the National Electric Code. http://www.solar-electric.com/media/wysiwyg/PV-NEC-V-193.pdf - http://www.solar-electric.com/media/wysiwyg/PV-NEC-V-193.pdf ------------- Russ 2009 Toyota RAV4 V6 w/ tow package 2016 Rpod 171 HRE |
Posted By: JandL
Date Posted: 07 Jun 2016 at 4:07pm
|
The reason I pick the Grape Solar for warranty information is because Renogy has discontinued there flexible panel. The Hqst panel only has a 1 year warranty ------------- JandL 2013 Honda Ridgeline 2012 177 2 Paynes in a Pod |
Posted By: CharlieM
Date Posted: 07 Jun 2016 at 4:33pm
With a 12V battery the maximum panel input is 25V. A second panel should be connected in parallel, not series. ------------- Charlie Northern Colorado OLD: 2013 RP-172, 2010 Honda Pilot 3.5L 4WD PRESENT: 2014 Camplite 21RBS, 2013 Supercharged Tacoma 4L V6 4WD |
Posted By: johnmaci
Date Posted: 07 Jun 2016 at 5:50pm
OK, so without flaming me :).....I read somewhere that it is preferable to connect two panels (or more) in series since a higher voltage and lower amperage can use a lighter gauge wire, and less loss of power over a greater length of cable?
|
Posted By: CharlieM
Date Posted: 07 Jun 2016 at 6:24pm
|
No flames here. Just cool specs. The specs on the SS-20L-12V only allow a max solar voltage of 30V. Most solar chargers have a max input to output delta limit. The open circuit voltage of a 12V panel is typically ~18V so two in series would be 36V. You are correct that series panels require smaller wire due to lower current, but the controller has to be designed for that. An MPPT controller will allow that higher input, but the SS 20 L will not. All that said, there is an advantage to parallel connection. If one panel is shaded or partially shaded it's output will drastically drop. In a parallel connection that will only affect one panel. In a series connection it will affect the whole array. On the other hand, in low light conditions the series connection will produce more usable power, but only with an MPPT controller. Which is best? As they say "It depends". ------------- Charlie Northern Colorado OLD: 2013 RP-172, 2010 Honda Pilot 3.5L 4WD PRESENT: 2014 Camplite 21RBS, 2013 Supercharged Tacoma 4L V6 4WD |
Posted By: Rustler
Date Posted: 07 Jun 2016 at 7:53pm
Good solid information you've shared here, Charlie. There is another thread that is current which discusses the tradeoffs between PWM and MPPT controllers. Certainly the latter are more expensive as is most everything solar. There is a tendency for a person to prefer what has already been purchased. I fall in that category preferring the MPPT controller I own. My way of thinking is that one may buy a certain size solar panel (say 100 watts) based on available funds and mounting space. If you were to dry camp for an extended stay, a PWM controller might not keep up with the load. Just a possible scenario. I'll be dry camping four days later this month. With the temperatures in the high eighties to low nineties (and no shade), I'll be utilizing a Fantastic Endless Breeze fan to keep comfortable. The 13+ amps of charge current should be able to keep up with expected loads One other benefit to the MPPT controllers is that they allow using higher voltage panels, which can at times be cheaper. Also the higher voltage between the solar panel and controller will have lower current at the same power level. This will allow smaller cheaper wires. In the case of my 185 watt 36-volt panel it can have up to a 75 foot, 10 gauge cable feeding the controller and still have reasonable (less than 3%) voltage drop. The controller adjusts voltage to the maximum power point, then converts the output voltage to what is needed for battery charging. A 12-volt panel (running at 18-22 volts) would need a larger gauge wire or a shorter one to have the same voltage drop. Like many things there are tradeoffs. ------------- Russ 2009 Toyota RAV4 V6 w/ tow package 2016 Rpod 171 HRE |
Posted By: sailor323
Date Posted: 07 Jun 2016 at 9:01pm
Good enough reason |
Posted By: CharlieM
Date Posted: 07 Jun 2016 at 10:21pm
|
Rustler, No need to convince me on MPPT. If and when I do solar I will go MPPT immediately. I want the most AH from the smallest panel, with the shortest sunlight period, even in partial shade. Trying to save a hundred bucks with PWM is not my way of thinking. Real estate for panels is limited, storage space is limited, and trailer positioning in wide open space is not desirable. Ergo I will opt for MPPT. Saving controller money so you can buy another panel may be OK on a house, but not on a camper IMO. That's my story and I'm stickin' to it .------------- Charlie Northern Colorado OLD: 2013 RP-172, 2010 Honda Pilot 3.5L 4WD PRESENT: 2014 Camplite 21RBS, 2013 Supercharged Tacoma 4L V6 4WD |
Posted By: Rustler
Date Posted: 08 Jun 2016 at 3:48am
That's my way of thinking as well. Also a high voltage solar panel (i.e. 36 volts) with a MPPT controller gives option for placing the solar panel on a portable ground mount away from the shade that's helping keep the camper cool. The high voltage between solar panel and controller will have lower amps with smaller cheaper wires. Of course the possibility of solar panel theft needs to be addressed. With mine I have a stainless steel cable that can be secured to a tree and solar panel. But even then a determined thief can still make off with it.
------------- Russ 2009 Toyota RAV4 V6 w/ tow package 2016 Rpod 171 HRE |
Posted By: Don Halas
Date Posted: 16 Jun 2016 at 8:10am
|
I've received my solar panel, charge controller, cables and connectors. I've also got all the other incidental hardware I anticipate needing to put this together including the VHB tape and Dicor which I intended to use to semi-permanently mount the solar panel to the top of the pod.
I'm rethinking the panel mounting. It is a semi-flexible material .2" thick, weighs 4 lbs. and the manufacturer even suggests using Velcro as an attachment device. So depending upon its flexibility and how well suited it will be to the curve on the top of the POD I'm considering using Velcro strips instead of the VHB tape. As I've stated before I do not intend to store the panel or remove it when travelling and re-attach when setting up. I'd move it only as the season changes and the sun moves closer to the horizon. I am now planning on installing Velcro along the entire edge of all sides of the panel. This will help ensure it staying put on the road and in the event of heavy wind. I'm planning on installing about 4' of Velcro vertically for the sides and 5 strips horizontally that will allow three distinct mounts. Anyone have any thoughts or real concerns in this? Also I'm thinking clear vrs. black Velcro, but not sure what the clear might look like weathered. I'm going to hook up everything this weekend, but won't make a panel mount decision until I've tested the system for a week or two. I'll post some photos of the install if anyone would be interested. |
Posted By: johnmaci
Date Posted: 16 Jun 2016 at 8:47am
|
OK, so I found online an intriguing picture. As you can see, it shows an inverter connected to the DC load terminal. Is this accurate? 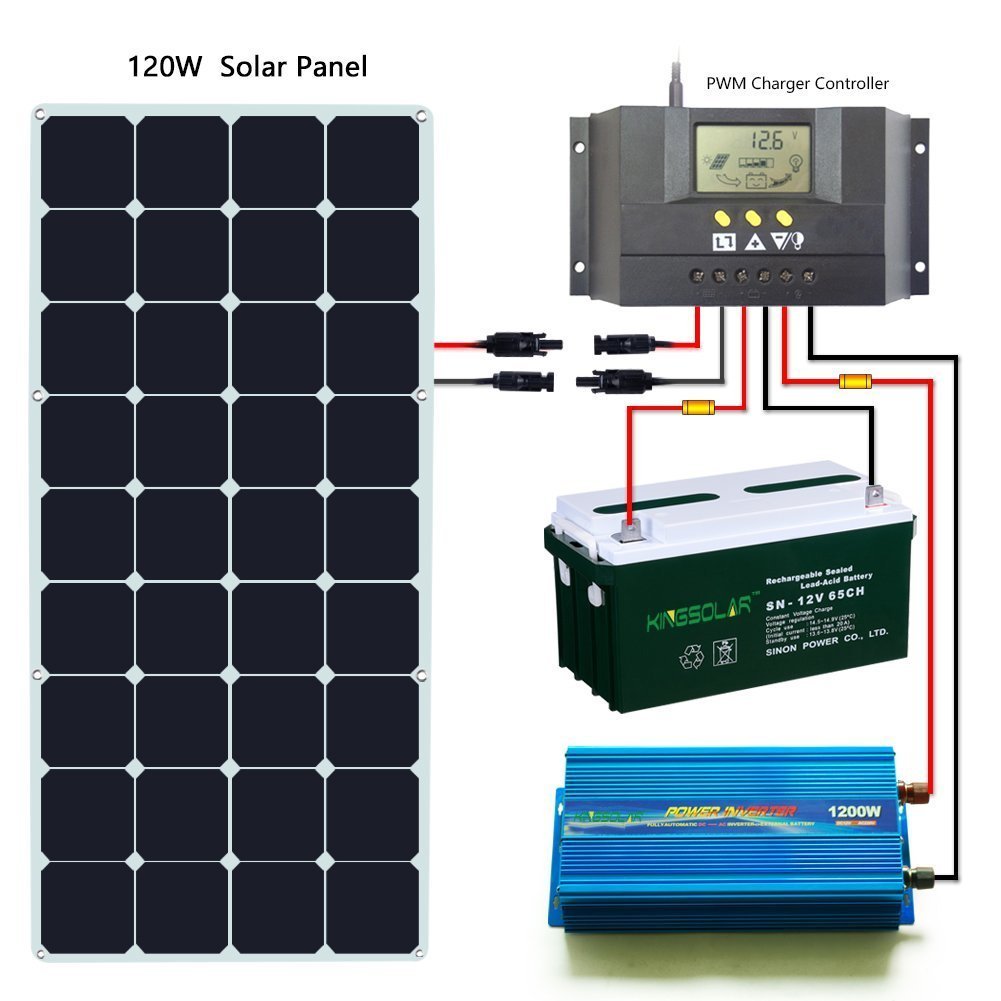 |
Posted By: CharlieM
Date Posted: 16 Jun 2016 at 9:08am
First reaction is no. Second reaction, after some consideration, is hell no. Those load terminals are usually intended for low power long term lighting loads. That inverter at 1000W will draw more than 90A. It will be a race between the controller and the battery as to which one goes Poof! first. ------------- Charlie Northern Colorado OLD: 2013 RP-172, 2010 Honda Pilot 3.5L 4WD PRESENT: 2014 Camplite 21RBS, 2013 Supercharged Tacoma 4L V6 4WD |
Posted By: Don Halas
Date Posted: 16 Jun 2016 at 9:35am
|
"First reaction is no. Second reaction, after some consideration, is hell no. Those load terminals are usually intended for low power long term lighting loads. That inverter at 1000W will draw more than 90A. It will be a race between the controller and the battery as to which one goes Poof! first"
Yeah, I'm with Charlie on this. From what I understand the load should be low wattage. I have a 500 watt inverter, but it's only intended to be used for a hand mixer, or coffee bean grinder or in an emergency to allow us to use the television. I'm not going to run anything off the load from the charge controller. The needs of the trailer will continue to be supplied by the battery and through the converter installed in the Pod and the 12v receptacle that's wired to it. |
Posted By: johnmaci
Date Posted: 16 Jun 2016 at 9:48am
| That's what i thought, just wanted to make sure I had my info correct. Lot's of misinformation online even from the solar vendors...... |
Posted By: Rustler
Date Posted: 16 Jun 2016 at 3:17pm
Great, Don. I bet you are excited to get all the hardware. It would help if you could give us an idea of what you have for solar panel and other hardware, maybe with some web links and photos. In any case I'll give my opinions. If you mount the panel on the sloped surface of your Rpod, then your trailer must be oriented in the direction of the Sun to produce best output. There may be circumstances when staying in a campground where the camper won't be pointed in the right direction. Some people get around this by placing the solar panel on the top of their camper. While this isn't optimum for low Sun conditions, it will produce the same output regardless of the direction the camper is oriented. Just something to consider. I tend to go for dark colored material for anything plastic. It seems that it would better resist deterioration from the sun. It might be best to get the industrial strength velcro to better resist the wind. We're looking forward to see what you come up with. Keep us posted. ------------- Russ 2009 Toyota RAV4 V6 w/ tow package 2016 Rpod 171 HRE |
Posted By: ron/roscoe
Date Posted: 16 Jun 2016 at 3:53pm
|
Do you know the amp draw for the A/C unit? If that s all I run, do you think it would work? My Honda puts out almost 17 amps. ------------- Ron Rowland |
Posted By: Don Halas
Date Posted: 17 Jun 2016 at 8:09am
|
Russ most of the details are in previous posts in this discussion. Once completed I'll post pics and a quick list of the major components.
I hooked it up last night and all worked well. On Saturday I'll do the install of everything but the permanent panel mount. I need to order several rolls of Velcro to do that. My concern with the Velcro is more with the adhesive that is used than the hook and loop. I'm probably going to have a fail safe mechanism for traveling. The solars primary purpose is to keep the battery charged when the Pod sits at my house. Mounting the panel on the toe side is strategic as this offers Southern exposure the way we park it. If we find the need to I'll add another panel on the rear of the Pod, but it's not likely that I'll need it. |
Posted By: Don Halas
Date Posted: 19 Jun 2016 at 8:16am
|
Installed and cranking out power in the summer sun. I still need to finalize the mounting of the panel. Right now it's laying on the top with some suction cup hooks for holding as the Pod's not going anywhere. I'll be installing the Velcro on the panels sometime this week and will post some pics of the installation within a week. Thanks to all who've offered advice and guidance, especially JandL who turned me on to the Morningstar Controller. That was the thing that made my entire design feasible.
|
Posted By: johnmaci
Date Posted: 19 Jun 2016 at 8:57am
|
I used some Industrial Strength Velcro to attach a 50w panel to keep my battery charged during extended periods. It went through wind and rain and never gave in; and had a dickens of a time removing it when I no longer needed the panel attached.... https://www.amazon.com/Velcro-Products-Industrial-Sticky-Back-positioning/dp/B004E2IADO/ref=sr_1_6?ie=UTF8&qid=1466340735&sr=8-6&keywords=velcro+industrial+strength
|
Posted By: Don Halas
Date Posted: 20 Jun 2016 at 11:31am
|
Just curious. Hearing about the full moon on the summer solstice got me wondering if there's any power produced by the moon in optimum conditions like tonight and a clear sky.
I realize it would probably be miniscule, but thinking its possible. |
Posted By: sailor323
Date Posted: 20 Jun 2016 at 2:38pm
Minuscule is not strong enough word, negligible would be better. |
Posted By: WillThrill
Date Posted: 22 Jun 2016 at 11:31pm
Moon glow is not sufficient to produce any output for a solar panel. It might produce just enough to register on a multi-meter, and probably a very sensitive one at that, but not enough for any usable purpose. Heck, the lights in your house aren't strong enough to power a normal solar panel, so there's no way that the moon will. Solar panels don't work when it's cloudy, rainy, or at night. ------------- "Not all those who wander are lost." Tolkien 2014 Hood River 177 2005 GMC Envoy XL |
Posted By: JandL
Date Posted: 22 Jun 2016 at 11:52pm
|
The moon does not produce its own light, it reflects light from the sun ------------- JandL 2013 Honda Ridgeline 2012 177 2 Paynes in a Pod |
Posted By: Don Halas
Date Posted: 23 Jun 2016 at 10:20am
|
I never suspected it would produce anything of use, just curious if the suns reflection from the moon was sufficient enough to be 'recognized' by the panels.
|
Posted By: JandL
Date Posted: 23 Jun 2016 at 11:02am
|
From Wikipedia
"The intensity of moonlight varies greatly depending on the lunar cycle but even the full Moon typically provides only about 0.1 lux illumination, bright sunlight is 111,000 lux" ------------- JandL 2013 Honda Ridgeline 2012 177 2 Paynes in a Pod |
Posted By: furpod
Date Posted: 23 Jun 2016 at 11:48am
In large arrays, like for a cabin or home, this is how it is done.. with one caveat.. They are not running a "12v" system. You use a higher voltage sytem from the get go. Most home/cabin, etc installations run at 48v. Some at 24. Depends on the total load allowed for. This could be done with an RV.. but not real easy in the confines of a Pod. Quality higher input/output inverters also get expensive quick.
Next time I am over in Menonite country, I will get a picture of one of their systems running my favorite country store/bakery... It's a 48v system built on Group 8D batteries in series. Just the battery bank is big as a Pinto.. ------------- |
Posted By: WillThrill
Date Posted: 26 Jun 2016 at 8:15pm
|
A 48 volt system would basically require a completely new electrical system: new converter/charger, new refrigerator capable of running on 48 volts, new water heater, new water pump, new fan, new sound system. In the context of an RV, I can't find a good reason to do all of that, and you would need a minimum of four 12 volt batteries linked in series (not easy to do on the tongue of a Pod). If you're talking about an off-grid cabin, it can make sense to go with a 48 volt system, but not in an RV. With multiple solar panels on an RV, you would simply connect them in parallel to maintain 12 volt (nominal) output. This has the advantage of not bringing down the whole array if one panel gets shaded or something on the panel itself like a bird dropping, a serious concern for solar arrays wired in series. True, you need heavier gauge wire with parallel wiring, but in an RV, the amperage and distances aren't a big concern anyway. ------------- "Not all those who wander are lost." Tolkien 2014 Hood River 177 2005 GMC Envoy XL |
Posted By: Rustler
Date Posted: 27 Jun 2016 at 2:50am
John, with a higher voltage solar array you are quite correct that the current would be lower at the same power rating. This does have advantages in having lower voltage drop (and lower power loss) with a given power output and wire size. Consider two examples:
For a given wire gauge the setup in example 2. could go twice as far with the same voltage drop. You get a further advantage in that the percentage voltage drop would be 1/2 since it is based on 25 volts, not the 12 volts of example 1. Now to get that advantage, you don't need to wire two panels in series. They make higher voltage solar panels that are used in high voltage DC systems or in grid tied systems. For instance I have a 36 volt, 185 watt panel made for a grid-tied solar system. It puts out around 5.1 amps at 36.4 volts. With that panel I can have less than 3% voltage drop with 10 gauge wire running 75 feet. Here's a good link to a handy http://www.wholesalesolar.com/solar-information/voltage-drop - voltage drop calculator . The good news is that you do NOT have to run your camp trailer at the higher voltage. A maximum power point tracking controller (MPPT) runs at the higher voltage for maximum efficiency, lower power/voltage loss in your wiring. But it then conveniently does a voltage conversion to provide for charging a 12-volt battery. In clear text you can use a 36 volt panel to charge a 12-volt battery with a MPPT controller. A 36 volt panel can be found with a diligent search on the internet. They are actually quite common, many thousands being made for the grid-tied market. Here's an example of such a panel at a reasonable price: http://www.wholesalesolar.com/1530190/topoint/solar-panels/topoint-jtm190-72m-silver-mono-solar-panel - 36 volt panel Back to the example of my 185 watt panel. Between the solar panel and controller, the voltage is around 36 volts at 5 amps. From the controller to the battery the voltage is between 12 and 14.7 volts depending on the battery charging needs. Current into the battery is up to 15 amps. Since the MPPT controller is mounted on the battery box, the panel can be up to 75 feet away (with 10 gauge wire). The higher current, low voltage line running from controller to the battery is around a foot long, with minimum voltage/power loss. Here's a photo of the 185 watt panel, MPPT controller and battery. I'm sorry that the photo is so enormous. I can't seem to get it small enough to view the whole thing without scrolling left and right. 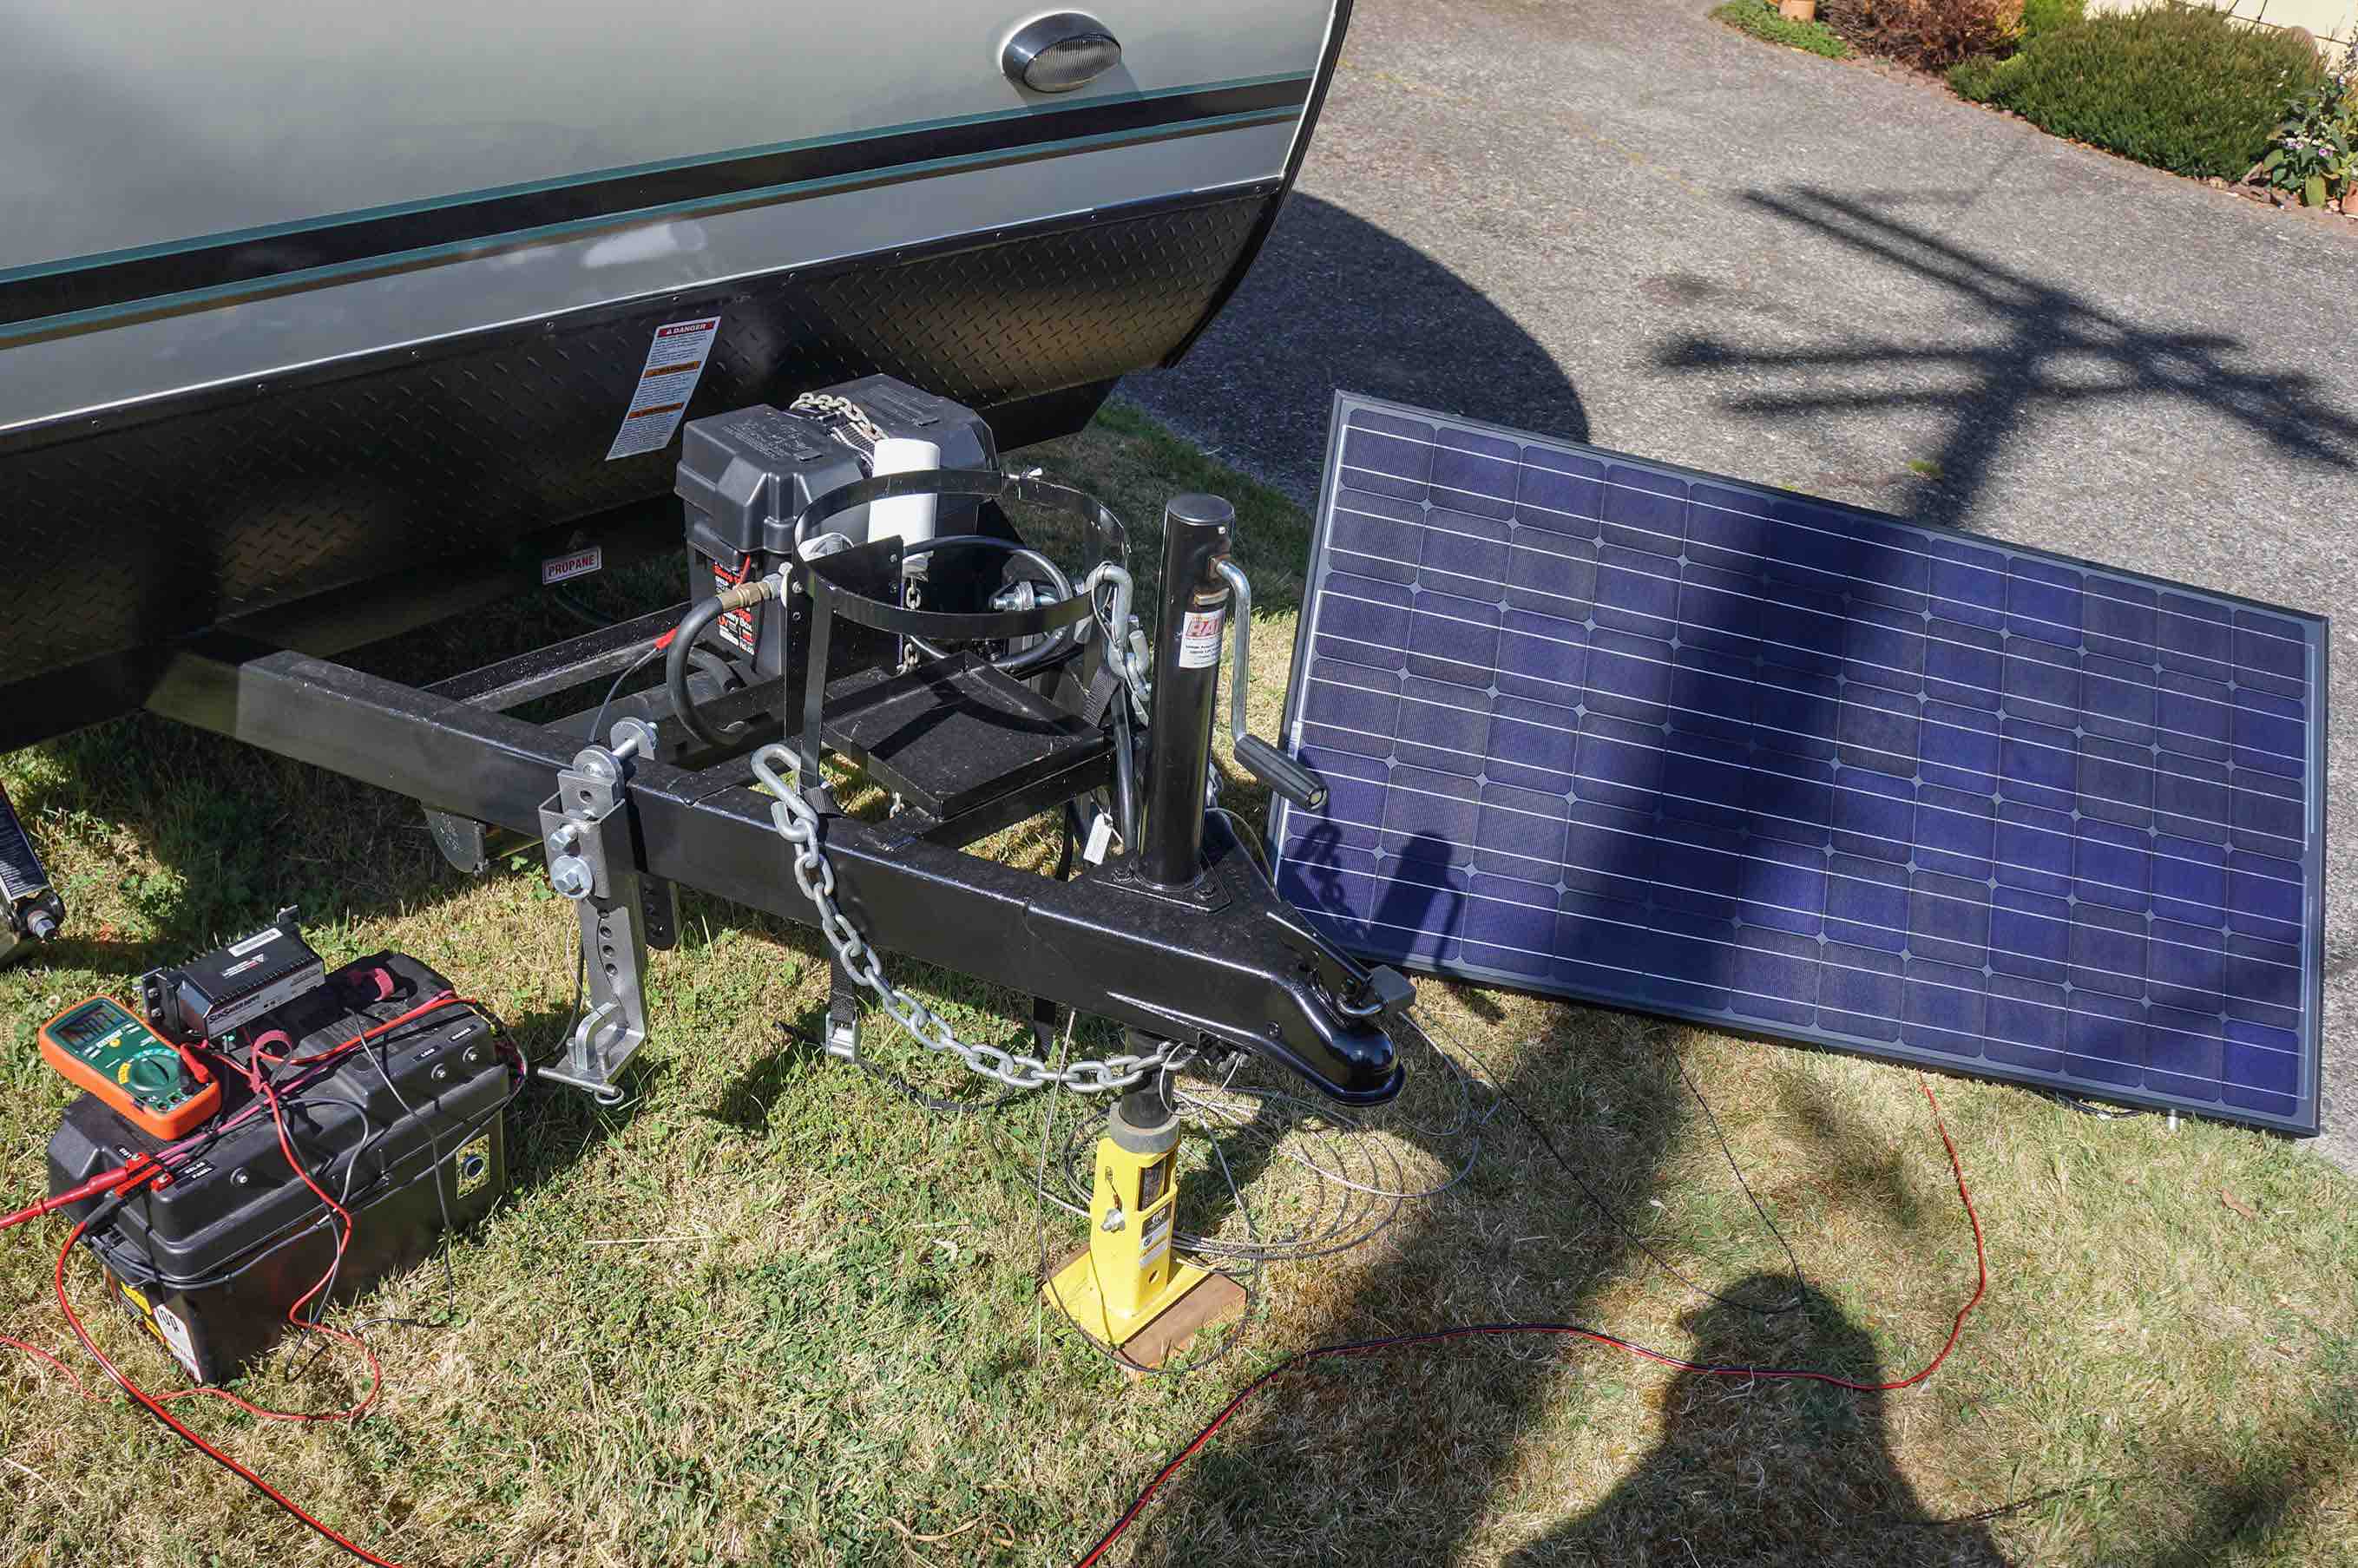 The charge controller is a http://Morningstar%20SSMPPT-15L - Morningstar SSMPPT-15L . It runs around $225. But considering the advantages of a high voltage panel, the extra cost is well worth it. I hope that my thoughts here will be of use, John. If you have any questions, let me know. I would be pleased to be of help. ------------- Russ 2009 Toyota RAV4 V6 w/ tow package 2016 Rpod 171 HRE |
Posted By: Don Halas
Date Posted: 27 Jun 2016 at 7:40am
|
Rustler, someone did their homework.
Nice work. |
Posted By: WillThrill
Date Posted: 09 Jul 2016 at 11:55pm
|
A little bump considering that many questions have arisen about this topic lately. ------------- "Not all those who wander are lost." Tolkien 2014 Hood River 177 2005 GMC Envoy XL |