|
|
Post Reply 
|
Page <123 |
| Author |
 Printable Version Printable Version Google Google Delicious Delicious Digg Digg StumbleUpon StumbleUpon Windows Live Windows Live Yahoo Bookmarks Yahoo Bookmarks reddit reddit Facebook Facebook MySpace MySpace Newsvine Newsvine Furl Furl Topic Search Topic Search  Topic Options Topic Options
|
techntrek 
Admin Group - pHp 
Joined: 29 Jul 2009 Location: MD Online Status: Offline Posts: 9059 |
 Topic: Cleaning the A/C condenser and evaporator Topic: Cleaning the A/C condenser and evaporatorPosted: 12 Aug 2013 at 9:41am |
|
You can pick one up at any local RV shop, too. To be clear, since you said you were going to get "up there", those 4 bolts are on the inside of the pod after removing the venting.
|
|
 |
|
|
kymooses
Senior Member 

Joined: 01 Aug 2010 Location: Louisville, Ky Online Status: Offline Posts: 1807 |
Posted: 12 Aug 2013 at 8:52am |
|
@Tech
I'm hoping to get up there tonight and back those bolts off a bit and hopefully the seal hasn't been compressed too long so that it won't bounce back a bit. In the meantime I'm gonna check with FR on a backup seal. I'd like to have one handy just for future. That's a really good post btw Tech, cleaning the AC is probably something a lot of us have thought about but never gotten around to just yet. Amazing how all it takes is a picture to make something seem all the more doable!
|
|
|
|
|
techntrek
Admin Group - pHp
Joined: 29 Jul 2009 Location: MD Online Status: Offline Posts: 9059 |
Posted: 11 Aug 2013 at 8:03pm |
|
RacerX, no problem. kymooses, worst case if you need to install a new one, it shouldn't be too difficult, probably 2 people 2 hours. I've never done it just going on what I saw doing this cleaning job. |
|
|
|
|
kymooses
Senior Member
Joined: 01 Aug 2010 Location: Louisville, Ky Online Status: Offline Posts: 1807 |
Posted: 11 Aug 2013 at 6:17pm |
|
Ugh I'm going to have to check that foam seal that ours isn't tightened too much. We had a bit of leak occasionally so the Tech team tightened those 4 bolts pretty tight on Friday. I'm willing to bet mine is smooshed now!
|
|
|
|
|
Racer|X|
Senior Member
Joined: 21 Mar 2012 Online Status: Offline Posts: 237 |
Posted: 11 Aug 2013 at 5:48pm |
|
Trek, I would be a camper mess if it were not for this forum. You and all members here have made my first camper owning experience possible and easy.
Thanks for sharing as always. X
|
|
|
|
|
techntrek
Admin Group - pHp
Joined: 29 Jul 2009 Location: MD Online Status: Offline Posts: 9059 |
Posted: 11 Aug 2013 at 11:51am |
|
One more thing I forgot to mention. Grab a flashlight and while the cover is off shine it below the A/C just above the pod's roof. You'll see a thick foam seal which is what keeps rain and condensation runoff from coming inside. Make sure the seal looks good, you can even poke it with your finger to see how it feels. If you see any gaps (especially if you are having a problem with rain coming in) there are 4 bolts on the inside which can be tightened to hopefully close the gaps. If it doesn't work you need a new seal. This seal must not be flattened - don't tighten it down more than 1/2".
|
|
|
|
|
techntrek
Admin Group - pHp
Joined: 29 Jul 2009 Location: MD Online Status: Offline Posts: 9059 |
Posted: 10 Aug 2013 at 10:25pm |
|
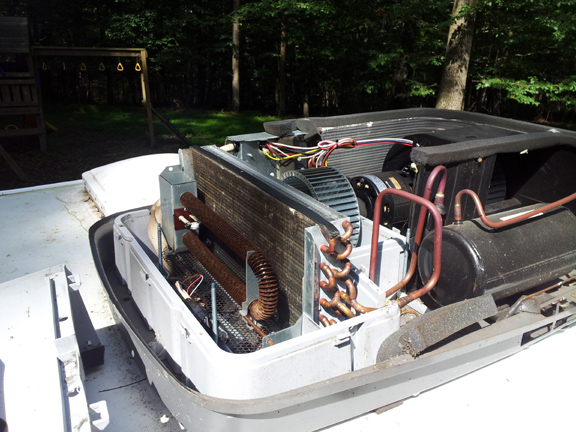
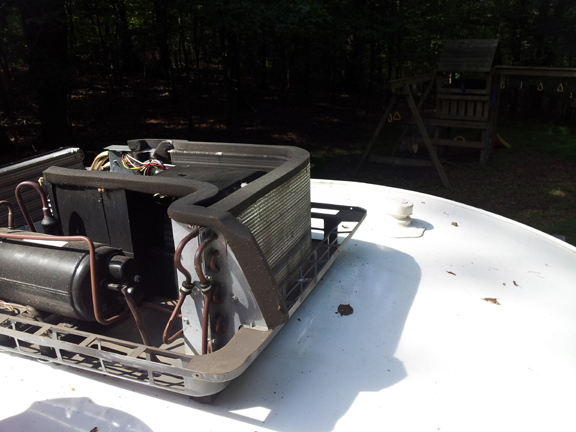
After 4 years in use, I realized I've never cleaned the components up on the roof. I have cleaned the air filters - if you haven't look for one on each side of the A/C, on the inside, towards the front. Pull them out, rinse them in water with a gentle brush, allow to dry and reinsert. Easy enough to do several times each season. Cleaning the evaporator and condenser coils isn't as easy. You need a safe way to get up there, and don't wear anything with metal buttons or buckles so you don't scratch things up. 1. First start on the inside. You need to remove 8 screws to remove the venting. Some are well hidden like inside each side vent, but you can only open them up half-way to get to them. Also look for 4 disguised in the round decorative holes and one each in the end vents. 2. Lay down a large old towel on the floor, under the front two air intake holes. Water will drip from here later on. 3. Gather a large Phillips head screwdriver, and a narrow long-shafted flathead screwdriver. You also need a small soft-bristled brush, a bucket of water, and an all-purpose cleaner in a spray bottle. Formula 409 is recommended by some A/C manufacturers. I also recommend wearing a swim suit and old shoes. 4. Make sure the pod is completely unplugged from AC power. 5. Take everything up with you to the roof. In the past I've been wary of putting my full weight on the roof when I cleaned it, and I still wouldn't stand on it, but I found I had no choice but to sit up there to do this. If you only have a 6 foot ladder you must have someone help hold it while you scramble up. I can get up fairly easy using the railing on my back porch so you may want to think outside the box to see if you have other safer options. 6. Look for 4 Phillip's screws on the plastic shroud, then it will lift right off. Warning - I found several old wasp nests under there... 7. The condenser coils are to the rear, the evaporator coils are underneath a cover up front. Use the flathead screwdriver on two small screws buried near the middle of the cover, then use it to pop the half-dozen tabs around the outer edge. I also found an odd tab on the left side where black plastic held down the gray plastic top. There were several places where I had to tear the black foam. This picture shows it after the cover has been removed. The other picture shows the condenser coil to the rear.
8. I found out mine came from the factory with the "heater strip" installed which is visible in the first pic as the rusty U in front of the evaporator coil. It was in the way for the cleaning, and I don't have the ability to turn it on (different thermostat?), plus we prefer the quieter heat of a small cube heater anyway. So I removed it via several small bolts up top and three screws I could only get to from inside the camper. I also had to get inside a small metal box on the side of the A/C up top to disconnect the wires. This whole process took me some time but wasn't hard. 9. Now spray the cleaner on the front of the evaporator coil and let it soak. Mine was covered in dirt even though I've kept the air filters down below clean. My condenser coils weren't dirty so I didn't bother cleaning them this time. 10. After letting it soak, use the brush and water to carefully scrape off the dirt. Only go up and down, following the direction of the aluminum fins. I also carefully poured some water on it. Just note that the air intake holes (directly below where the heat strip was installed on mine) are now an open hole to the interior of your pod so be careful not to pour water there! Also note that there are two drains where the condensation drains from the evaporator, one on each side, and the water you use to clean will drain onto the roof. This is why I recommended the bathing suit. Look for a drain at the bottom of the channel that's dead-center in this picture. If yours are clogged, clean them out.
11. When you are done, use your fingernail to carefully straighten out any bent fins. I found several areas that were crushed when the unit was installed at the factory. 12. I added some caulk where the the copper line enters the compartment, and on the other side where the wiring enters. Keeping this area fairly air-tight is critical. 13. Reinstall the cover over the evaporator. Don't press it down until you are sure you cleared the fan shaft and all of the tabs on the outer edge are lined up. Then gently tap it making sure each tab locks. Reinstall the two screws in the middle. Make sure it appears tight all the way around the outer edge. 14. I noticed the fan motor wasn't secured right. It is only held in place with two bolts, I had to tighten each one quite a bit. 15. I wanted to be sure neither fan would contact its shroud and turned easily so I climbed down at this point, plugged the pod in and turned the A/C on. Then I turned it off again. 16. Put the shroud back on and tightly replace the 4 Phillips screws. 17. I had a mess on the roof so I cleaned it off while I had access. 18. Inside, replace the 8 screws which hold the vent assembly to the roof. I wouldn't do this every year, but maybe every 2-3 years. |
|
|
|
|
Post Reply
|
Page <123 |
| Forum Jump | Forum Permissions You cannot post new topics in this forum You cannot reply to topics in this forum You cannot delete your posts in this forum You cannot edit your posts in this forum You cannot create polls in this forum You cannot vote in polls in this forum |


 Cleaning the A/C condenser and evaporator