Cleaning the A/C condenser and evaporator
Printed From: R-pod Owners Forum
Category: R-pod Discussion Forums
Forum Name: Podmods, Maintenance, Tips and Tricks
Forum Discription: Ask maintenance questions, share your podmods (modifications) and helpful tips
URL: http://www.rpod-owners.com/forum_posts.asp?TID=3825
Printed Date: 04 Aug 2025 at 7:56am
Software Version: Web Wiz Forums 9.64 - http://www.webwizforums.com
Topic: Cleaning the A/C condenser and evaporator
Posted By: techntrek
Subject: Cleaning the A/C condenser and evaporator
Date Posted: 10 Aug 2013 at 10:25pm
|
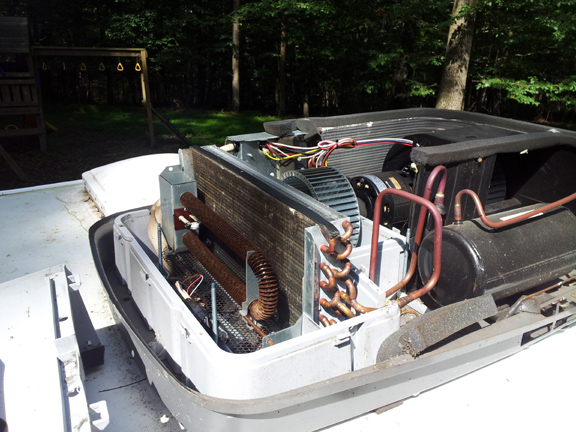
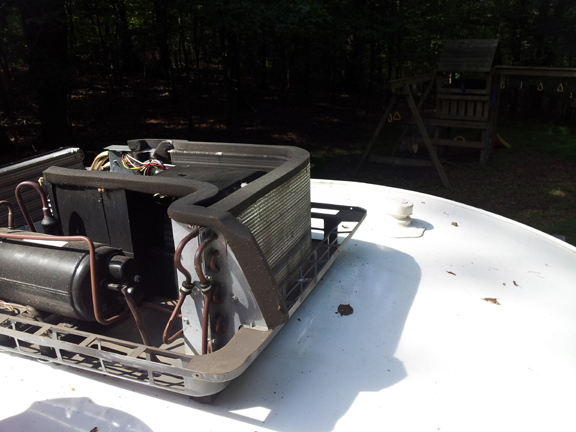
After 4 years in use, I realized I've never cleaned the components up on the roof. I have cleaned the air filters - if you haven't look for one on each side of the A/C, on the inside, towards the front. Pull them out, rinse them in water with a gentle brush, allow to dry and reinsert. Easy enough to do several times each season. Cleaning the evaporator and condenser coils isn't as easy. You need a safe way to get up there, and don't wear anything with metal buttons or buckles so you don't scratch things up. 1. First start on the inside. You need to remove 8 screws to remove the venting. Some are well hidden like inside each side vent, but you can only open them up half-way to get to them. Also look for 4 disguised in the round decorative holes and one each in the end vents. 2. Lay down a large old towel on the floor, under the front two air intake holes. Water will drip from here later on. 3. Gather a large Phillips head screwdriver, and a narrow long-shafted flathead screwdriver. You also need a small soft-bristled brush, a bucket of water, and an all-purpose cleaner in a spray bottle. Formula 409 is recommended by some A/C manufacturers. I also recommend wearing a swim suit and old shoes. 4. Make sure the pod is completely unplugged from AC power. 5. Take everything up with you to the roof. In the past I've been wary of putting my full weight on the roof when I cleaned it, and I still wouldn't stand on it, but I found I had no choice but to sit up there to do this. If you only have a 6 foot ladder you must have someone help hold it while you scramble up. I can get up fairly easy using the railing on my back porch so you may want to think outside the box to see if you have other safer options. 6. Look for 4 Phillip's screws on the plastic shroud, then it will lift right off. Warning - I found several old wasp nests under there... 7. The condenser coils are to the rear, the evaporator coils are underneath a cover up front. Use the flathead screwdriver on two small screws buried near the middle of the cover, then use it to pop the half-dozen tabs around the outer edge. I also found an odd tab on the left side where black plastic held down the gray plastic top. There were several places where I had to tear the black foam. This picture shows it after the cover has been removed. The other picture shows the condenser coil to the rear.
8. I found out mine came from the factory with the "heater strip" installed which is visible in the first pic as the rusty U in front of the evaporator coil. It was in the way for the cleaning, and I don't have the ability to turn it on (different thermostat?), plus we prefer the quieter heat of a small cube heater anyway. So I removed it via several small bolts up top and three screws I could only get to from inside the camper. I also had to get inside a small metal box on the side of the A/C up top to disconnect the wires. This whole process took me some time but wasn't hard. 9. Now spray the cleaner on the front of the evaporator coil and let it soak. Mine was covered in dirt even though I've kept the air filters down below clean. My condenser coils weren't dirty so I didn't bother cleaning them this time. 10. After letting it soak, use the brush and water to carefully scrape off the dirt. Only go up and down, following the direction of the aluminum fins. I also carefully poured some water on it. Just note that the air intake holes (directly below where the heat strip was installed on mine) are now an open hole to the interior of your pod so be careful not to pour water there! Also note that there are two drains where the condensation drains from the evaporator, one on each side, and the water you use to clean will drain onto the roof. This is why I recommended the bathing suit. Look for a drain at the bottom of the channel that's dead-center in this picture. If yours are clogged, clean them out.
11. When you are done, use your fingernail to carefully straighten out any bent fins. I found several areas that were crushed when the unit was installed at the factory. 12. I added some caulk where the the copper line enters the compartment, and on the other side where the wiring enters. Keeping this area fairly air-tight is critical. 13. Reinstall the cover over the evaporator. Don't press it down until you are sure you cleared the fan shaft and all of the tabs on the outer edge are lined up. Then gently tap it making sure each tab locks. Reinstall the two screws in the middle. Make sure it appears tight all the way around the outer edge. 14. I noticed the fan motor wasn't secured right. It is only held in place with two bolts, I had to tighten each one quite a bit. 15. I wanted to be sure neither fan would contact its shroud and turned easily so I climbed down at this point, plugged the pod in and turned the A/C on. Then I turned it off again. 16. Put the shroud back on and tightly replace the 4 Phillips screws. 17. I had a mess on the roof so I cleaned it off while I had access. 18. Inside, replace the 8 screws which hold the vent assembly to the roof. I wouldn't do this every year, but maybe every 2-3 years. ------------- Doug ~ '10 171 (2009-2015) ~ 2008 Salem ~ http://www.rpod-owners.com/forum_posts.asp?TID=1723 - Pod instruction manual 
|

Replies:
Posted By: techntrek
Date Posted: 11 Aug 2013 at 11:51am
|
One more thing I forgot to mention. Grab a flashlight and while the cover is off shine it below the A/C just above the pod's roof. You'll see a thick foam seal which is what keeps rain and condensation runoff from coming inside. Make sure the seal looks good, you can even poke it with your finger to see how it feels. If you see any gaps (especially if you are having a problem with rain coming in) there are 4 bolts on the inside which can be tightened to hopefully close the gaps. If it doesn't work you need a new seal. This seal must not be flattened - don't tighten it down more than 1/2".
------------- Doug ~ '10 171 (2009-2015) ~ 2008 Salem ~ http://www.rpod-owners.com/forum_posts.asp?TID=1723 - Pod instruction manual
|
Posted By: Racer|X|
Date Posted: 11 Aug 2013 at 5:48pm
|
Trek, I would be a camper mess if it were not for this forum. You and all members here have made my first camper owning experience possible and easy. Thanks for sharing as always. X ------------- |
Posted By: kymooses
Date Posted: 11 Aug 2013 at 6:17pm
|
Ugh I'm going to have to check that foam seal that ours isn't tightened too much. We had a bit of leak occasionally so the Tech team tightened those 4 bolts pretty tight on Friday. I'm willing to bet mine is smooshed now! ------------- https://calendar.google.com/calendar?cid=cnBvZC5zcG90dGVyQGdtYWlsLmNvbQ - RPod Rallies https://www.google.com/maps/d/embed?mid=1W1foQXGtrjf8aYly1uh0b-bHPfI&hl=en_US - RPod Owner Map |
Posted By: techntrek
Date Posted: 11 Aug 2013 at 8:03pm
|
RacerX, no problem. kymooses, worst case if you need to install a new one, it shouldn't be too difficult, probably 2 people 2 hours. I've never done it just going on what I saw doing this cleaning job. ------------- Doug ~ '10 171 (2009-2015) ~ 2008 Salem ~ http://www.rpod-owners.com/forum_posts.asp?TID=1723 - Pod instruction manual
|
Posted By: kymooses
Date Posted: 12 Aug 2013 at 8:52am
|
@Tech I'm hoping to get up there tonight and back those bolts off a bit and hopefully the seal hasn't been compressed too long so that it won't bounce back a bit. In the meantime I'm gonna check with FR on a backup seal. I'd like to have one handy just for future. That's a really good post btw Tech, cleaning the AC is probably something a lot of us have thought about but never gotten around to just yet. Amazing how all it takes is a picture to make something seem all the more doable!
------------- https://calendar.google.com/calendar?cid=cnBvZC5zcG90dGVyQGdtYWlsLmNvbQ - RPod Rallies https://www.google.com/maps/d/embed?mid=1W1foQXGtrjf8aYly1uh0b-bHPfI&hl=en_US - RPod Owner Map |
Posted By: techntrek
Date Posted: 12 Aug 2013 at 9:41am
|
You can pick one up at any local RV shop, too. To be clear, since you said you were going to get "up there", those 4 bolts are on the inside of the pod after removing the venting. ------------- Doug ~ '10 171 (2009-2015) ~ 2008 Salem ~ http://www.rpod-owners.com/forum_posts.asp?TID=1723 - Pod instruction manual
|
Posted By: Goose
Date Posted: 12 Aug 2013 at 9:53am
|
I have cleaned the insides before but took the cover off to clean the coils on the roof because of the sand storms over the last three years that we had while camping in AZ. With the unit always running when the storms would come in I was surprised at how little dirt and dust there was under the cover. Blew everything out with the air hose but really did not even need to mess with it. The inside gets far dirtier that the outside. Goose ------------- Mother Goose's Caboose..2011 RP171..07 Grand Cherokee 
|
Posted By: DocTom
Date Posted: 12 Aug 2013 at 1:47pm
|
You could hire yourself out to do r-pod work, Grant, if you ever run out of things to do! ------------- Brush and Floss, It is the Secret of Life! |
Posted By: kymooses
Date Posted: 12 Aug 2013 at 2:51pm
So you can see the seal from inside once the vent cover is off then. Gotcha. I watched the tech team tighten those 4 bolts but was outside the Pod and wasn't sure if this seal was internal or external. I can easily check it out then. Thanks again Tech! ------------- https://calendar.google.com/calendar?cid=cnBvZC5zcG90dGVyQGdtYWlsLmNvbQ - RPod Rallies https://www.google.com/maps/d/embed?mid=1W1foQXGtrjf8aYly1uh0b-bHPfI&hl=en_US - RPod Owner Map |
Posted By: Goose
Date Posted: 12 Aug 2013 at 3:20pm
|
Well Doc, for a couple glasses of wine and good music in the background I'll come over and we will take care of yours too.
I work cheap. Goose ------------- Mother Goose's Caboose..2011 RP171..07 Grand Cherokee
|
Posted By: furpod
Date Posted: 12 Aug 2013 at 6:29pm
FYI.. the top center section of the roof is framed in aluminum, just like the walls and floor. I specifically asked at the factory last week. The front and rear radius are not, but the flat area of the roof is. And the A/C area is boxed completely..  ------------- |
Posted By: David and Danette
Date Posted: 12 Aug 2013 at 7:16pm
|
Furpod do you know the size of the aluminum framing on the roof I am curious to know how strong it might be? And how is the aluminum supporting the roof attached to the sides? I always wandered about that when I have been on the roof cleaning and maintaining the AC. David ------------- 2018 Vista Cruiser 19BFD (2018- 2012 Vibe 6503 (2014-2019) 2009 r-pod 171 (2009-2014) Middle Tn 2014 Ram 1500 Quad cab |
Posted By: furpod
Date Posted: 12 Aug 2013 at 8:10pm
|
1 inch square tubing. Screwed to the wall framing. While I wouldn't hold a barn dance up there, I watched factory service techs move around on it several times last week..
------------- |
Posted By: DocTom
Date Posted: 12 Aug 2013 at 8:11pm
Come over anytime, we'll share the wine and some conversation, no labor needed. lol. See you guys in a couple of weeks. ------------- Brush and Floss, It is the Secret of Life! |
Posted By: David and Danette
Date Posted: 13 Aug 2013 at 9:55am
------------- 2018 Vista Cruiser 19BFD (2018- 2012 Vibe 6503 (2014-2019) 2009 r-pod 171 (2009-2014) Middle Tn 2014 Ram 1500 Quad cab |
Posted By: techntrek
Date Posted: 13 Aug 2013 at 2:32pm
No, the seal is visible from the outside only, but the bolts are on the inside. ------------- Doug ~ '10 171 (2009-2015) ~ 2008 Salem ~ http://www.rpod-owners.com/forum_posts.asp?TID=1723 - Pod instruction manual
|
Posted By: techntrek
Date Posted: 13 Aug 2013 at 2:34pm
Very good info to know, thanks. It certainly felt firm enough once I got up there but knowing is better. ------------- Doug ~ '10 171 (2009-2015) ~ 2008 Salem ~ http://www.rpod-owners.com/forum_posts.asp?TID=1723 - Pod instruction manual
|
Posted By: rpodcamper.com
Date Posted: 14 Aug 2013 at 8:46am
| ok thinking out of the box. If one was to remove the AC unit on the roof and inside with the framing you saw at the factory do you think I would be able to install a sky light in its place? in all the years of owning the camper I think we may have used the AC Unit 5 times and that would be on the high side. |
Posted By: furpod
Date Posted: 14 Aug 2013 at 9:30am
|
Should be a 14" x 14" hole.. that is the standard.. If I was going to do it, I would probably put the Fantastic Fan there, and a non powered vent/skylight over the shower.. or just a second Fantastic Vent.. But personally, I wouldn't give up the AC for anything. It's half the reason we got out of a tent. I have "camped out" for months at a time in parts of the world were the highs were 120, and the night time lows were still in the mid 90's. I now like to sleep in the cool.. The other half of owning a camper is not sharing a bath with 150 other people.. ------------- |
Posted By: Keith-N-Dar
Date Posted: 14 Aug 2013 at 9:44am
|
I agree with Furpod. We tend to camp in places where the air is not needed (mountains, by the lake etc) but getting there we have had some of the hottest, sweaty nights imaginable. I would keep the air.
------------- Keith-N-Dar Boris & Betty (Boston Terriers) 2011 R-Pod 177 2010 Ford F-150 |
Posted By: Sleepless
Date Posted: 14 Aug 2013 at 10:10am
|
All are good comments. All I can add is that if you remove the A/C, you will reduce the value of the R-Pod should you later decide to sell it. It is very much like selling a car without air conditioning. Bob |
Posted By: rpodcamper.com
Date Posted: 14 Aug 2013 at 10:31am
|
Right now I'm not worried about resale value. I would keep the air conditioner to install back in if needed. We do a lot of winter camping and or dry camping at girl scout camps were we do not have hookups and only run battery. I'm thinking that the vent or sky light might be nice. I think I may have to tale a peak around. My other 2 campers do not have air installed but in 1963 that was not an option.
I know others that can not go with the Air. |
Posted By: David and Danette
Date Posted: 14 Aug 2013 at 2:28pm
|
I have thought about adding a skylight in front of the A/C but never did much other than think about it,do not even know if it would be possible. If there was a way to easily remove the A/C and replace it with a skylight and change it back again that would be nice. The A/C I think is a little heavy to be lifting it on and off the roof. David ------------- 2018 Vista Cruiser 19BFD (2018- 2012 Vibe 6503 (2014-2019) 2009 r-pod 171 (2009-2014) Middle Tn 2014 Ram 1500 Quad cab |
Posted By: Sleepless
Date Posted: 14 Aug 2013 at 4:07pm
I would not attempt to add a skylight without first checking the roof framing for a 14" X 14' boxed in area. Use a stud finder to check. I once installed a roof A/C in a 79 Toyota motor home that did not have such a pre-framed area in the roof structure. I had to fabricate one and it was not a simple task. Bob ------------- 2014 R-Pod 178 (OUR POD) 2009 Chevrolet Avalanche |
Posted By: techntrek
Date Posted: 14 Aug 2013 at 5:17pm
|
rpodcamper, I agree that the 14 x 14 opening is standard for skylights and A/Cs, so other than getting the A/C off the roof (around 100 pounds) it shouldn't be hard at all. 8 screws inside, 4 bolts inside, disconnect the electrical connections (120 power and 12 volt from the thermostat) and then lift the top part off. Clean the area and install the new skylight. We'll be doing a Girl Scout campout at the end of next month. I'll be taking the pod and be one of maybe 2 men there, there to tend the fires and torches. ------------- Doug ~ '10 171 (2009-2015) ~ 2008 Salem ~ http://www.rpod-owners.com/forum_posts.asp?TID=1723 - Pod instruction manual
|
Posted By: kymooses
Date Posted: 15 Aug 2013 at 9:55am
That sounds like a fun trip Tech! Keep those torches burning bright!! ------------- https://calendar.google.com/calendar?cid=cnBvZC5zcG90dGVyQGdtYWlsLmNvbQ - RPod Rallies https://www.google.com/maps/d/embed?mid=1W1foQXGtrjf8aYly1uh0b-bHPfI&hl=en_US - RPod Owner Map |