Solar Questions
Printed From: R-pod Owners Forum
Category: R-pod Discussion Forums
Forum Name: I need HELP!!!
Forum Discription: Perplexed/need help with a problem - ask here
URL: http://www.rpod-owners.com/forum_posts.asp?TID=14280
Printed Date: 07 Jun 2025 at 7:20pm
Software Version: Web Wiz Forums 9.64 - http://www.webwizforums.com
Topic: Solar Questions
Posted By: hiker39
Subject: Solar Questions
Date Posted: 11 Dec 2020 at 12:10am
|
My 196 is pre wired for a solar option that apparently would be mounted on the roof. Would those of you who have this option say it's worthwhile or would you prefer to have one of the stand alone portable suitcase solutions? Having the pre wired option installed sounds like a nice way to have solar "built in" to the RV so it's easily available and always charging without much thought. The stand alone suitcase solution requires setup/breakdown time and storage space. I imagine I would need to secure it somehow if I leave my campsite unattended. While this isn't ideal, I can imagine scenarios where it would be nice to have a stand alone solution separate from the RV. Cost is also a consideration - What's a fair price to have my RV service dept install a solar option? Thanks for taking the time. |
Replies:
Posted By: Ricktoon
Date Posted: 11 Dec 2020 at 12:18am
|
I am also considering the solar option. Most likely will go with a stand alone portable unit or panel and connect a charge controller to the panel. I will then run wires to the batteries for charging. The advantage of portable is you can park the R-pod in the shade and put the panels in the sun. The advantage to roof mounted panels is they charge while you are moving as well as parked. Just some thoughts. ------------- Rick and Ellen B 2019 Chevy Colorado 2021 Rpod 196 |
Posted By: Pod People
Date Posted: 11 Dec 2020 at 7:33am
|
We have the renogy 100 watt suitcase unit and love it. As you said, there are pros and cons to both types. We have used the suitcase unit for about 3 years and never had issues. I'm sure someone could steal it, but so far not a problem. One additional thing to consider when going with solar is your battery choice. We use 2 6volt golf cart batteries. this gives us the maximum number of recharge cycles and the most amp hours of usage with a "normal" flooded battery. We get them at costco for about $110 each. they add to the tongue weight, but also add to the available power-it's worth the weight. Vann ------------- Vann & Laura 2015 RPod 179 https://postimg.cc/0zwKrfB9"> 
|
Posted By: offgrid
Date Posted: 11 Dec 2020 at 8:35am
|
You might want to start with a 100 watt or so portable system. Many folks find that sufficient. You can always add an additional 100 watt rooftop system later. Just get a controller that can handle at least 15-20 amps charge current so you don’t have to upgrade that later.
You can certainly connect the controller output directly at the batteries but please install a fuse in the positive line there, Don’t just run wires, it's not safe if you get a short. To keep your voltage drops low I suggest 10 gauge wire and a 30 amp inline fuse. ------------- 1994 Chinook Concourse 1995 RV6A Experimental Aircraft 2015 Rpod 179 - sold |
Posted By: offgrid
Date Posted: 11 Dec 2020 at 8:39am
|
You might want to start with a 100 watt or so portable system. Many folks find that sufficient. You can always add an additional 100 watt rooftop system later. Just get a controller that can handle at least 15-20 amps charge current so you don’t have to upgrade that later.
You can certainly connect the controller output directly at the batteries but please install a fuse in the positive line there, Don’t just run wires, it's not safe if you get a short. To keep your voltage drops low I suggest 10 gauge wire and a 30 amp inline fuse. Any nominal 12V 100 watt or so solar module will work, you don’t need to buy an expensive kit. Get a glass module with an aluminum frame, much more reliable and long lasting that the so-called “flexible” solar modules. You can just bolt on a couple of fold up legs made from some aluminum angle to the module so you can tilt it up facing the sun, ------------- 1994 Chinook Concourse 1995 RV6A Experimental Aircraft 2015 Rpod 179 - sold |
Posted By: yelvington
Date Posted: 11 Dec 2020 at 3:21pm
|
My current plan (which could change another 100 or so times) is to buy a single aluminum-framed glass panel and a charge controller, and use it as a portable via the Zamp port. This lets me put off the question of whether to permanently mount, add more panels, etc., as I gain experience with how it all works with my typical electrical load. Solar doesn't work without sunshine, and a lot of our nearby camping is pretty heavily forested -- but we plan next summer to head west, where sky is open and electrical drops are scarce. There are some good videos like this on YouTube: https://www.youtube.com/watch?v=m1rlrS7QwVI This also lets me get a handle on the battery situation. When my battery eventually dies, I hope to with LiFePO, which also would require spending a couple of hundred to change the charger component of the pod's electrical system. Expecting prices to drop over the next year or so. |
Posted By: Dirt Sifter
Date Posted: 11 Dec 2020 at 7:59pm
|
Our first solar was big and cumbersome for the 100 watts from 4 panels that had to be wired together and lugged around as the sun moved or the wind blew. This rPod came with a rooftop mounted unit and the improvements are notable. At this time the convenience and function have been really nice. The new prtable systems look a lot more convenient than the old ones but our rooftop has served our needs. ------------- Greg n Deb 2020 195 HRE '07 Tundra 5.7L., '17 Tacoma 3.5L. Both with tow packages 1 Puggle, 1 Chihuahua support staff |
Posted By: hiker39
Date Posted: 11 Dec 2020 at 11:15pm
|
Thanks for all the replies, this is such a great resource. I had the same though about using the roof mounted option to charge while driving, I wonder if it would add anything to the trickle charge you get when the lights are hooked up? Thanks for the tips on batteries and hooking directly to the batteries, I'm still unclear how the Zamp connector factors into this, is the Zamp connector another way for a "suitcase system" to connect to the battery or is there more to it than that? Thanks again for all the great replies!
|
Posted By: offgrid
Date Posted: 12 Dec 2020 at 4:24am
|
You don’t need to worry about having solar charging while driving. You should already have charging from your tow vehicle alternator for that. And overall you’re not driving that much of the time so you will be getting a lot more amp hours of solar charging while parked. Your biggest consideration is probably going to be how often you’re camping under trees. If that’s a lot of the time then don’t permanently mount your solar module on the roof. It will do essentially nothing for you in the shade. Leaving the module portable and having a long cable for it will give you more placement options. There is also no reason you can’t start with the module portable on a cable and then mount it on the roof later.
The zamp port is nothing special. It just connects to the battery. You can use it if it’s convenient or just go to the battery directly. But please do use a fuse or circuit breaker at the battery. I’ve designed solar power systems for 40 years now and not installing fuses or circuit breakers is the number one mistake I’ve seen ppl make, sometimes with disastrous results. A shorted 12Vdc circuit can start a fire just as easily as a 120Vac circuit could if you bypass a circuit breaker. Few folks would do the latter but many for some reason ignore safety when wiring 12Vdc circuits. ------------- 1994 Chinook Concourse 1995 RV6A Experimental Aircraft 2015 Rpod 179 - sold |
Posted By: Dirt Sifter
Date Posted: 12 Dec 2020 at 9:39am
|
Offgrid, you are wanting the fuse/circuit breaker on the battery to house wiring not the solar to battery wiring, correct? ------------- Greg n Deb 2020 195 HRE '07 Tundra 5.7L., '17 Tacoma 3.5L. Both with tow packages 1 Puggle, 1 Chihuahua support staff |
Posted By: offgrid
Date Posted: 12 Dec 2020 at 10:06am
|
I was talking about the battery to positive conductor for the solar wiring, at the battery end. There is already a 40A fuse on the battery to house wiring, located at the panel. It would be better to have that fuse located at the battery as well because otherwise that conductor isn't protected, but FR in their infinite wisdom chose not to do that. Basically the rule of thumb for any circuit protection, regardless of voltage, is that each and every piece of wire should be protected from excess current flowing into it from any potential source. So for the solar circuit you have two sources, the battery and the solar module/controller. Say you accidentally short a cable run to a portable solar kit from the battery. The current flow which is normally from the solar to the battery will reverse and flow from the battery into the short. That's why the fuse or breaker needs to be at the battery. Current will flow into the short from the solar end also, but solar modules are by nature current limited, so if you short one out the current only goes up by about 10%, no big deal. The wire is automatically protected without needing a fuse at the solar end. OTOH, shorting the battery will produce heaps of current which without a fuse or breaker will promptly melt the insulation off the cable and start a fire. Hope that makes sense. ------------- 1994 Chinook Concourse 1995 RV6A Experimental Aircraft 2015 Rpod 179 - sold |
Posted By: Dirt Sifter
Date Posted: 12 Dec 2020 at 10:16am
|
Thank you! Got it. Much clearer now. Will check my factory set up next time I get to the hay shed. ------------- Greg n Deb 2020 195 HRE '07 Tundra 5.7L., '17 Tacoma 3.5L. Both with tow packages 1 Puggle, 1 Chihuahua support staff |
Posted By: Pod People
Date Posted: 12 Dec 2020 at 10:41am
|
there has been no mention of the solar charge controller in this discussion. Just to make sure I understand correctly, the solar panel feeds the solar charge controller and then on to the battery. I have a fuse between the solar charger controller and the battery. Is that correct? thank you Vann ------------- Vann & Laura 2015 RPod 179 https://postimg.cc/0zwKrfB9">
|
Posted By: offgrid
Date Posted: 12 Dec 2020 at 10:59am
Correct. Locate the fuse at the battery end of the positive output wire from the charge controller. The fuse is there to protect the wire, so it should be no higher than 20A for 12 gauge, 30A for 10 gauge, or 40A for 8 gauge. Could be a smaller fuse/breaker if you want, but per Code needs to be a minimum of 1.56 x Isc (short circuit current rating listed on the solar module label). The 1.56 multiplier - edit: two 25% factors multiplied together (1.25 X 1.25 = 1.56) is to avoid nuisance tripping if you get extra output from what's called the "edge of cloud" effect, where extra sunshine reflects off nice white clouds onto the solar module.
------------- 1994 Chinook Concourse 1995 RV6A Experimental Aircraft 2015 Rpod 179 - sold |
Posted By: yelvington
Date Posted: 15 Dec 2020 at 8:30am
|
I read Offgrid's comment to mean a fuse between the solar panel and the battery. (Is there any reason this can't be done at the solar panel end?) The battery's wiring already connects to a circuit breaker in the power distribution box. |
Posted By: Dirt Sifter
Date Posted: 15 Dec 2020 at 8:38am
------------- Greg n Deb 2020 195 HRE '07 Tundra 5.7L., '17 Tacoma 3.5L. Both with tow packages 1 Puggle, 1 Chihuahua support staff |
Posted By: offgrid
Date Posted: 15 Dec 2020 at 9:17am
|
If you connect the solar system at the battery then the fuse in the panel doesn’t protect the wires. If you were to get a short on those wires hundreds of amps would flow from the battery into the short and cook off the wires.
You don’t need a fuse on the solar side of the controller at all because if those wires get shorted nothing happens except that you stop charging. Unlike a battery, the solar module short circuit current (called Isc and should be listed on the module label) is current limited by the amount of sunshine on the module to only about 10% more than the normal max power current (Imp) so the fuse wouldn’t blow anyway. Try it sometime. With the module disconnected from the controller short its two output leads together. All you’ll get is a little spark when you make or break the connection, the wires and the solar module will be fine. Just don’t try that with the battery leads unless you like electrical fires or exploding batteries. Only if you had 3 or more solar modules wired in parallel would you need fuses for them to keep current from 2 or more solar modules from backfeeding into the shorted one. Edit: the other question was placement fuses. If you think of an electrical system like a plumbing system it becomes clear. If you get a leak in a pipe and your only cutoff valve is downstream from where the leak is it does you no good. That's why fuses and circuit breakers are always placed upstream from the wires or devices they are supposed to protect. So a battery fuse or circuit breaker that is 20 ft from the battery doesn't help if you get a short in the wire in between. ------------- 1994 Chinook Concourse 1995 RV6A Experimental Aircraft 2015 Rpod 179 - sold |
Posted By: Ricktoon
Date Posted: 03 Mar 2021 at 11:50am
|
I put together my portable solar panel setup this week. Purchased 2 HQST 100 W Monocrystalline Solar Panels from Amazon along with a Renogy 20A waterproof charge controller. I also bought 20 feet of 10AWG wire with the correct connectors and the male and female SAE connectors. I assembled the panels into one unit with legs made from spare aluminum banisters from my friend's railing project. The unit folds up and the wire and charge controller can fit inside. I also bought a case big enough to store the unit when closed. Additional materials include: hinges, clasps to close the case, nuts and bolts, etc. The wire runs from the solar panels to the charge controller with a 15Amp in-line fuse. From the charge controller I attached the male SAE connector and the female will install on the battery case and connect to the battery with a 20A fuse on the positive lead. I can then just plug and unplug the unit at the batteries and attach the charge controller to the frame with magnets when in use. 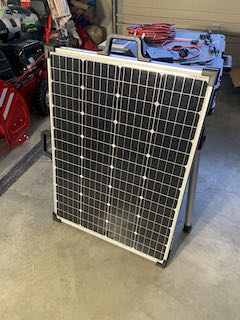 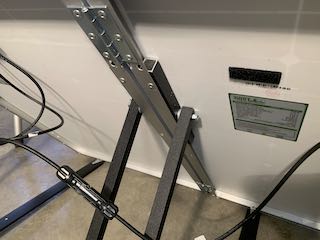 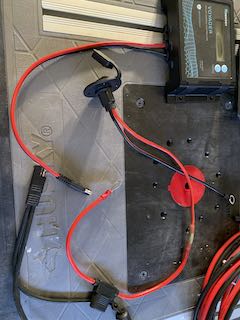 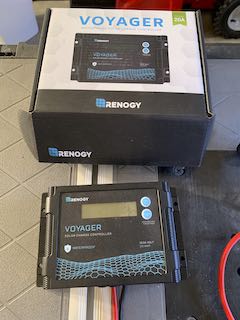 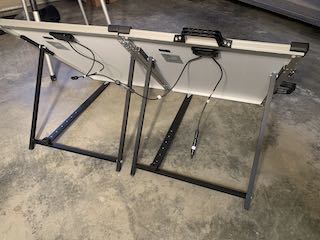 ------------- Rick and Ellen B 2019 Chevy Colorado 2021 Rpod 196 |
Posted By: offgrid
Date Posted: 03 Mar 2021 at 1:31pm
|
Looks nice! Should work out well, and you can always increase the length of the wires to the battery if you find you need more length to get the solar panel into the sun.
I assume you mean the rPod frame when you say you are attaching the controller to the frame with magnets? Nothing else is made of steel I don’t Think. Did you glue the magnets to the controller? Also, it won’t hurt anything that you have made the 15A fuse there but for future reference for others its not really needed. Solar modules are current limited and won’t produce enough current to blow the fuse anyway, unless you have 3 or more in parallel. You do need the fuse at the battery because it can produce hundreds of amps. ------------- 1994 Chinook Concourse 1995 RV6A Experimental Aircraft 2015 Rpod 179 - sold |
Posted By: Ricktoon
Date Posted: 03 Mar 2021 at 5:53pm
|
I will attach magnets to the controller so I can attach to frame. May also come up with place near batteries if needed. Even though the charge controller is waterproof, I am looking at a small pelican type box to help protect it. The 15A fuse between the panels and controller is just an extra precaution on my part. ------------- Rick and Ellen B 2019 Chevy Colorado 2021 Rpod 196 |
Posted By: offgrid
Date Posted: 03 Mar 2021 at 7:14pm
|
There’s no harm done putting a fuse on the solar side of the controller, so go for it if you want. Just sayin’ you don’t have to. While the “waterproof” Renogy controllers are rated to IP67, which includes testing for short water immersions up to 1 meter, the terminals themselves aren’t protected so adding an additional box isn't going to hurt either.
I think you’ve done a great job on you solar system and it should work well for you, ------------- 1994 Chinook Concourse 1995 RV6A Experimental Aircraft 2015 Rpod 179 - sold |
Posted By: chasl
Date Posted: 05 Mar 2021 at 10:45pm
|
I bought a 196 pre-wired and plan to add solar. I purchased go-power overlander kit, which has the solar panel and the solar controller. I plan to mount on top. If you or others have done this, I would appreciate reading your advice, steps, and such for installing the kit. I am handy, but haven't done this before.  ------------- cl |
Posted By: offgrid
Date Posted: 06 Mar 2021 at 7:13am
|
I haven’t done this particular install but the most challenging part is always properly installing the module on the RV roof. The electrical is easy once you find the wires in the location for the controller which by several accounts from other owners are not labeled.
I think the go power kit uses z brackets to attach the module, which is good as it allows cooling airflow underneath. You’ll need to know what you’re attaching to on the roof structure, you can get several hundred lbs of wind uplift. There are some good videos showing how the original smaller rpod roofs are made but I’m not sure they apply to the newer larger rpods. Here is one FWIW: https://youtu.be/vMXneKc_fDo ------------- 1994 Chinook Concourse 1995 RV6A Experimental Aircraft 2015 Rpod 179 - sold |
Posted By: Rana
Date Posted: 30 May 2021 at 4:25pm
|
Hi Offgrid, I have the zamp connection at the back of my 2015 RP179, and two taped cables up at the batteries marked "Solar". We have two 6v golf cart batteries installed. I gather from your earlier reply that the two "Solar" cables up front only go back to the zamp connector at the rear and no where else? I note your suggestion about connecting directly at the batteries, but, when connecting the "Solar" wires to the battery for solar charging do I have to disconnect the two wires that are already connected to the batteries and go back into the chassis, presumably to the Electrical distribution box? As you recommended I can get an inline fuse to fix to the zamp cable positive line at the battery end. Thanks so much for your time, Stay well and stay healthy, Rana. ------------- Rana Stay well and stay healthy in these difficult times. |
Posted By: offgrid
Date Posted: 30 May 2021 at 4:45pm
|
Rana, yes the two wires should only go to the zamp connector, unless of course someone has made a modification to the trailer at done point.
I would disconnect the two larger wires which go to the chassis (negative) and to the fuse box (positive) while working on getting the solar connected. Disconnect the negative first, it prevents accidentally shorting your tools to the rpod chassis when you disconnect the positive. After the solar is connected reconnect the two larger wires in the reverse order, pos first, then neg. ------------- 1994 Chinook Concourse 1995 RV6A Experimental Aircraft 2015 Rpod 179 - sold |
Posted By: Rana
Date Posted: 30 May 2021 at 4:57pm
|
Thanks for the speedy reply, especially at the weekend, very much appreciated! I'll do as you suggest about the disconnection of the two main wires, and then connect the solar wires, and then reconnect the main wires. I am presuming that the main wires can stay connected until the battery charging is complete and I take the solar wires off, or pull out the plug at the rear?? There is no mention of a charging controller in my package that came with the portable panels, will I need to get one? Thanks so much, again, Rana ------------- Rana Stay well and stay healthy in these difficult times. |
Posted By: offgrid
Date Posted: 30 May 2021 at 5:54pm
|
Yes you will need a charge controller for your solar module. That will go in between the solar and the battery. You can mount it either on the solar module or near the battery. Once you have the solar connected up and operating and have reconnected the trailer wires you can leave them connected. You can leave the solar connected too and unplug it when you want to move camp, then plug in again when you set up camp. ------------- 1994 Chinook Concourse 1995 RV6A Experimental Aircraft 2015 Rpod 179 - sold |
Posted By: JR
Date Posted: 30 May 2021 at 6:54pm
|
+1 to offgrids instructions. If you have purchased a solar panel portable system referred to as a suitcase, because it folds up like a suitcase, it should already have a charge controller included in the equipment. The charge controller is normally mounted on the back of one of the solar panels. If you have assembled all the parts of the system yourself you do need to have a charge controller in the system. The other thing to be careful of is when you are using the Zamp wiring included on the trailer make sure the positive from the solar panels is actually going to the positive battery terminal. When you use different manufactures for different parts of your solar system the wiring (+ & -) may not be compatible or wired the same. Hope this helps and have fun. ------------- Jay 179/2019 |
Posted By: Rana
Date Posted: 08 Jun 2021 at 4:33pm
|
Thanks so much offgrid and JR, your advice was spot on, I followed it to the letter and now have a functioning solar charging system. We have a suitcase two panel system that came with a controller and the appropriate connector and correctly sized wiring. Thanks again, your expertise saved me from making a costly mistake. Rana. ------------- Rana Stay well and stay healthy in these difficult times. |
Posted By: Mooree
Date Posted: 10 Mar 2022 at 5:01am
| To upgrade a solar RV requires a certain amount of solar energy. I use the appliance energy approach to determine my RV's solar requirements and see https://www.rvweb.net/how-much-solar-power-do-i-need-for-my-rv/ - how much solar I need for my RV? All electrical equipment has an energy rating expressed in watts and amps. You'll want to check each device's watt-hour rating and list them down. Next, it is important to determine how many hours you plan to operate each piece of equipment. Multiply each appliance's wattage rating by the number of hours the device will be in use. |
Posted By: Rana
Date Posted: 10 Mar 2022 at 4:53pm
|
Thanks so much. That's god advice. We don't really have that many electrical consumers on board, a Nespresso coffee machine, and a small microwave. I will add those up, add what we have already calculated for battery charging, and estimate the daily requirements, and see where that goes. My next challenge is to install a double USB charging outlet somewhere near the stereo and TV, and have seen a few posts about that. Hopefully the snow will be gone soon and it will warm up, and we can start going on some trips! Thanks again. ------------- Rana Stay well and stay healthy in these difficult times. |
Posted By: offgrid
Date Posted: 11 Mar 2022 at 3:08am
|
Do the calculation in amps and amp hours, not watts and watt hours. That is because there are lots of power losses in the system, so you will underestimate if you use watts unless you keep track of those. There aren't really any significant current losses so that approach works better and simpler. Also batteries are rated in amp hours.
Separate your loads into AC and DC. If it is a 12V DC load use or measure the current draw. A clamp on DC multimeter is handy for these measurements. Under $40 on Amazon and well worth having in your travelling toolkit. Multiply the current by the hours or fractions of hours per day you are running that load to get amp hours. Loads like the water pump really only run a few minutes in a while day so no need to overestimate. If it is an AC load convert it to DC amps at 12V as follows AC watts X 10/.85 = DC amps. The X 10 multiplier is to convert from 120V to 12V. The .85 is an approximation of the inverter conversion efficiency. As you can see even a small AC load takes a large amount of energy to operate, so avoid AC loads as much as possible. Once you have the DC amps to the inverter needed to run each AC load multiply by the hours or fractions of hours to get DC amp hours, same as with the DC loads. Add up all the calculated amp hour loads to get total daily amp hours. If you want to be able to run from your batteries for one day, multiply by 2 and get batteries of at leasr that capacity. The 2x multiplier is to limit the max depth of discharge of the battery to 50%, which is the most you will want to pull out of a lead acid battery if you want it to last. If you want to go 2 days without recharging then double that. If you want to run on solar for long periods you might want even more battery capacity in case you run into a few cloudy days or you're camped under a tree canopy, but you will find that the battery size gets excessive quickly if you are trying to run a lot of gear and appliances. Better to bring a generator for those situations. You could also consider converting to lithium batteries but that is another discussion. To determine how much solar you need, start by calculating the size needed to maintain your battery on an average day in your area/time of year you are camping For summer use in the west with a portable solar module tilted south you can expect about 5 hours of full sun daily. In the east around 4. If you are roof mounting the solar modules horizontally then assume around 4 and 3 hours respectively. If you plan on camping into the late fall then solar performance starts dropping pretty quickly, especially for a horizonal roof mount. To calculate solar module size you can use this formula load amp hours per day / sun hours per day × 12 × 1.5 equals watts of solar. The 1.5 takes into account system losses and an adjustment for the way solar modules are tested and rated, the discussion of which I won't bore you with here. Sizing your battery and solar module to you loads this way works fine for most folks, just be sure to have an alternate charging source if you boondock for long periods in areas that get cloudy weather. Don't forget to get a solar charge controller and install properly sized wire with a fuse at the battery + terminal to protect the solar charge circuit. If you get a standard solar module designed for 12V battery operation a simple PWM charge controller will be fine. Wiring and fusing should be sized for current at least 50% higher than the max short circuit rating of the solar module to handle peak output from cloud reflections and avoid nuisance fuse blows. That is 20A for 12 gauge, 30A for 10 gauge, 40 for 8 gauge. If you're using a portable module with long cables go at least one size larger yet to limit voltage drops. ------------- 1994 Chinook Concourse 1995 RV6A Experimental Aircraft 2015 Rpod 179 - sold |
Posted By: Rana
Date Posted: 12 Mar 2022 at 12:43pm
|
Thanks so much Offgrid, for taking the time to respond in so much detail, you have given me much to think about, and I'll have to brush up my math skills to do some measurements and calculations. I have two amp meters, a DC one and an AC one, not sure how accurate they are, but I have a friend who is an electrician and he may be able to check them for me. The weather is improving slowly, and so I should be able to get to grips with this in a few weeks hopefully. I collect the 2 x 6v batteries from the service shop next week. Thanks again. ------------- Rana Stay well and stay healthy in these difficult times. |