|
List Your Mods: |
Post Reply 
|
Page <1 3031323334 77> |
| Author |
 Printable Version Printable Version Google Google Delicious Delicious Digg Digg StumbleUpon StumbleUpon Windows Live Windows Live Yahoo Bookmarks Yahoo Bookmarks reddit reddit Facebook Facebook MySpace MySpace Newsvine Newsvine Furl Furl Topic Search Topic Search  Topic Options Topic Options
|
Scoul 
Newbie 

Joined: 28 Jan 2014 Online Status: Offline Posts: 27 |
 Post Options Post Options
 Quote Reply Quote Reply
 Topic: List Your Mods: Topic: List Your Mods:Posted: 23 Feb 2015 at 5:36am |
|
Great work Motl3y!! Think I'll add some cup holders too.
|
|
|
"Anyone can hold the helm when the sea is calm." Publilius Syrus
2015 GMC 1500 2014 182g 2009 Harley FXSTB |
|
 |
|
|
techntrek
Admin Group - pHp 
Joined: 29 Jul 2009 Location: MD Online Status: Offline Posts: 9059 |
Post Options
Quote Reply
Posted: 23 Feb 2015 at 11:27am |
|
Yes, very nice!
|
|
|
|
|
TigerPawd
Groupie 
Joined: 04 Feb 2015 Location: Corpus Christi Online Status: Offline Posts: 68 |
Post Options
Quote Reply
Posted: 02 Mar 2015 at 7:40pm |
|
Another attempt, after posting in the wrong place, and pictures would not insert.
We have had a couple of pop-ups and two 31' travel trailers,
including the last one from Forest River.
Age and back problems made the change to a smaller RV seem like a smart move. Looked around a lot and the #179 Pod looked
like what we need, and this Forum was a big help. Interesting how the build quality has dropped since our Surveyor was built in 2004 though. As an old engineer friend used to say, "Cheapness is goodness" in industry. Started out with a peep hole in the door. Might add a porthole window in a year or so, but the peep hole gives a really good view - as long as the door is closed. When it's open, the view to the left is pretty marginal.
Took the mattress pad from the old Surveyor and added a
Trav-a-Sak. Also picked up some grabbers
on a stick to help with the far corners of the bed spread. If interested, google "Extension
Grabber." We got ours at Bed Bath
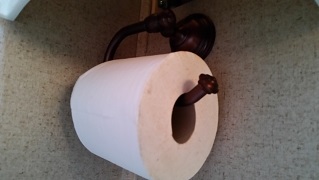
and Beyond but they are available lots of places, including the Wally Marts. Added a small soft hemispherical doorstop on the fender to protect the door from the fender and the fender from the door. In a wet john, placement of the toilet paper is tough. We had a one-armed paper holder in our
previous TT and I looked for one like that.
Had to settle for a fairly ugly one, although it does match the color of
kitchen plumbing. This one is tucked well up
under the basin, where it still might get an occasional splash. I'm looking for a plastic kitchen canister to
cover it in case it really gets wet, but may settle for a big coffee can - or even
a shower cap - in a pinch.
Added grab handles at the door to the john and next to the outside door to make going in and out easier; door framing is solid in both places. We're considering changing to a double step; that 11" drop off is quite a bit for aging knees Switched from hand-cranked jack to electric. Much easier on the old shoulders and back. Easy swap with the Pod on the hitch. Reversed the hinges to the door on the closet so DW can
check her gown before going to the ball. The hinges are now on the side next to the bed instead of next to the john. Handier for most things, not so much from the
bed. Patching the old hinge holes was easy.
Changed the TV swing arm to one with a tilt. Considered moving the mount to where the closet meets the wall - better viewing from the bed, but not so good from the rest of the Pod. Rejected that unless I find a really long arm with lots of bendy places. I have been coveting the 3" of hollow wall between the closet and the john. Considered adding a real medicine cabinet but haven't found one narrow enough to fit around the vent pipe. Might make one of my own. Some day. TV reception with that universal antenna is wretched compared to what we could get in our driveway with the Surveyor. We can get PBS but not NBC or CBS. We also get a couple of shopping channels - one in English and one in Spanish. |
|
|
Joan, Jerry and the two Pugs
2015 R-Pod 179 |
|
|
|
|
TigerPawd
Groupie
Joined: 04 Feb 2015 Location: Corpus Christi Online Status: Offline Posts: 68 |
Post Options
Quote Reply
Posted: 02 Mar 2015 at 7:57pm |
|
Maybe I was exceeding my limit - some didn't get posted. Maybe the third try will work out OK.
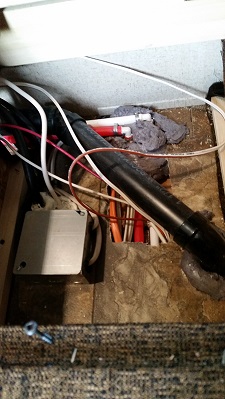
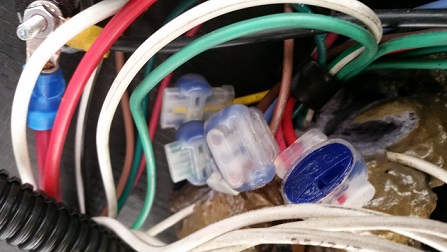
Neither shopping channel will get any use from us. So I pulled the Jensen entertainment unit to see if the innards for a rotating Jack TV antenna can be installed above the closet. The circle in the picture is where the coax comes through the roof - lots of wire clutter is all around and prospects for pulling things away don't look real good. And neither a hole from the top of the closet nor a hole from the john side looks promising. FR didn't do us any favors here. Cheapness is still goodness.l 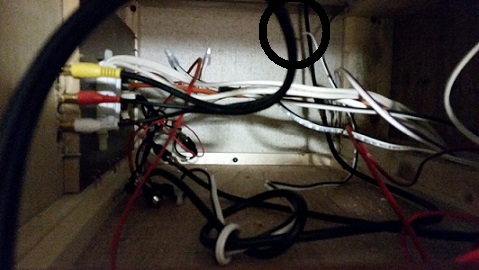
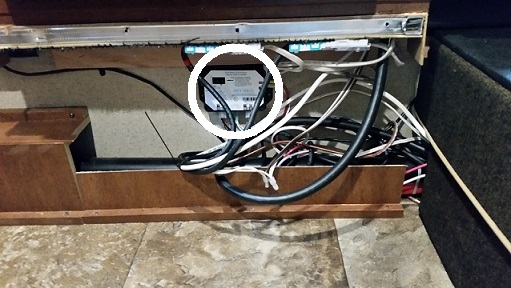
The original fridge had a small problem. It wouldn't cool. So much for quality control. FR then sent the wrong one (good thing we didn't have a trip scheduled) as a replacement - or maybe the dealer ordered the wrong one. The replacement was better and was eventually installed. Afterward, I could see daylight along one side and the top. Fixed that with silicone. I can also see some daylight along the front seal of the slide out. Not a good arrangement for driving in the rain. First aid will be needed. It's still under warranty. Wish we had noticed it before those seal problems earlier so that one trip to the dealer would have been enough. Removed the one screw that holds the top of that strange
hassock next to the fridge. Covered the
wires and plumbing that are there with a plywood panel. Curved front area is ideal to stash at least
four rolls of john paper and it's close to the point of need - if the
slide is out. The rest of the new space
is good for an extra half cubic foot of storage, more or less. Put hinges on the panel under the fridge - just in case
something falls while underway and we don't spot it in time. There are some fragile looking connections
underneath so it's not appropriate for routine storage and access, even with
some bungee cords to try to hold a variety of wiring out of the way. But it will give easy access to the slide
out control module (Circle) if that ever becomes necessary. I have read that some 179s have that control
module inside the hassock mentioned above.
I keep looking at that clunky table which is also to be used to support the auxiliary bed. I'm thinking about adding a piece of plywood hinged to the sitting surface on the slide out couch and then discarding said miserable table, but the differing heights are a stumbling block. Finding acceptable replacement table(s) will be a snap. All the exposed wiring underneath looks bad to me. There is a lot of foampuckey glopped up wherever
wires or plumbing go inside, There are
also some electrical contacts that look like they are exposed to the salty
atmosphere that's all around us down here.
I appreciate that FR wants to keep moisture out of the inside but there
are other goodies underneath that are exposed as the Pods come from the
factory. I have an old plastic box for
3x5" cards that may work well to
block the moisture. Need to keep in mind
the risk of voiding the warranty if water somehow gets inside anyway.... Installed small metal tabs to keep the assist bar from
preventing exiting in the event a prankster was in the neighborhood, per some
earlier Pod Forum Posts. |
|
|
Joan, Jerry and the two Pugs
2015 R-Pod 179 |
|
|
|
|
Cosco
Newbie
Joined: 30 Jun 2014 Location: Lansing, MI Online Status: Offline Posts: 7 |
Post Options
Quote Reply
Posted: 03 Mar 2015 at 9:44am |
|
We are considering the need for grab bars also on both the inside and outside of the bathroom. Could you post a photo(s) and tell me more about what kind of bars you used and how you installed them. We also have a 179.
Thanks |
|
|
|
|
TigerPawd
Groupie
Joined: 04 Feb 2015 Location: Corpus Christi Online Status: Offline Posts: 68 |
Post Options
Quote Reply
Posted: 03 Mar 2015 at 5:10pm |
|
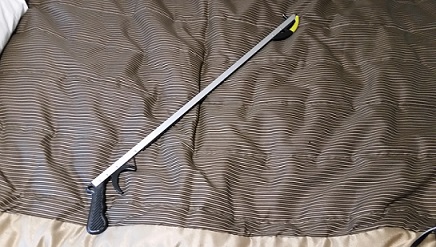
OK. Here goes. First up is the handle next to the exit door. There is quite a drop from the interior down to the step (11", approximately). The big black FR exterior assist bar is a big help getting in, but not much good when leaving. This one attaches to the door frame and is quite strong. If you look close, you can see the little snap-in panels that cover the screw heads. Easy installations.
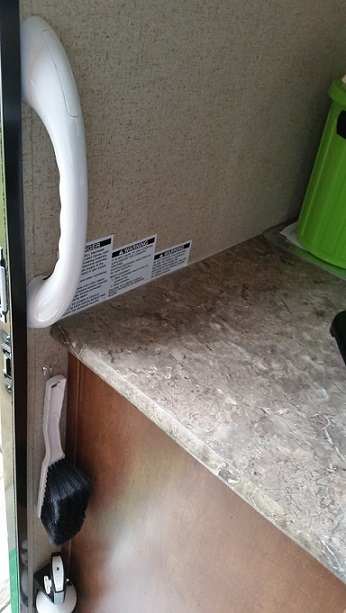 And here's the handle for the john area. So far, it's easily been enough. It's right on the inside door frame and we can easily swing in or out of the john. The bars are 12" from tip to tip. If you install one on the outside too, that might be overkill, and the one in the narrow "hallway" might stick out far enough to catch your shoulder. I suggest that if you go ahead, trying just the inside bar and see if that will be enough. 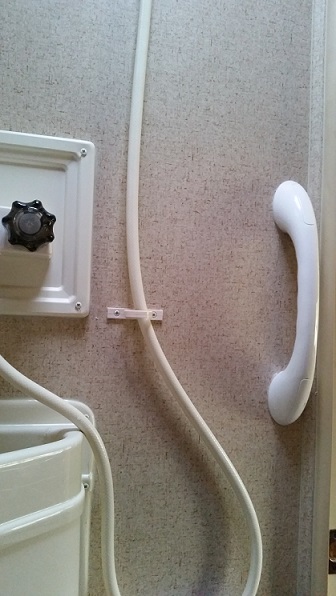 I got the grabbers at Lowe's. They have really big versions tailored for major handicaps, if that's necessary, but these easily do the job for us, either for getting up off the throne or coming and going from the john. And I'm fairly certain the handles could be installed in any other Pod, if needed/wanted. Last, the little bumper to protect the door from the fender and the fender from the door: 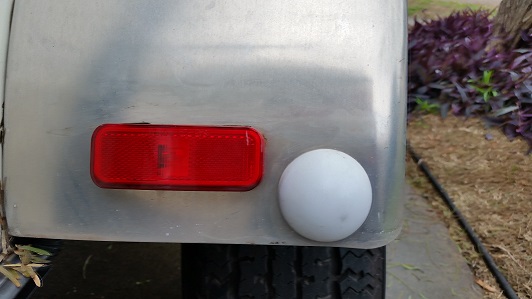 This bumper is actually a soft plastic door stop and there are two to a pack. This one has been on six months with no sign of weakening or sun damage. The friction on the door hinge on the newer 179s is pretty high so I'm not sure the bumper will ever be necessary, but all in all, it's cheap insurance. I hope these help. |
|
|
Joan, Jerry and the two Pugs
2015 R-Pod 179 |
|
|
|
|
Cosco
Newbie
Joined: 30 Jun 2014 Location: Lansing, MI Online Status: Offline Posts: 7 |
Post Options
Quote Reply
Posted: 04 Mar 2015 at 9:03am |
|
Thank you. Our Pod is in winter storage, but when we get back to it, we'll have a few things to do.
|
|
|
|
|
TigerPawd
Groupie
Joined: 04 Feb 2015 Location: Corpus Christi Online Status: Offline Posts: 68 |
Post Options
Quote Reply
Posted: 04 Mar 2015 at 2:19pm |
|
Cosco - I forgot to mention the liberal application of clear silicone around the bathroom handle. Not real easy in a couple of places, but essential when we use the area for showers.
|
|
|
Joan, Jerry and the two Pugs
2015 R-Pod 179 |
|
|
|
|
Chuck
Senior Member 

Joined: 29 Apr 2011 Location: Waukesha WI Online Status: Offline Posts: 140 |
Post Options
Quote Reply
Posted: 04 Mar 2015 at 2:58pm |
|
Motl3y. Do you by any chance have plans (dimensions, etc) for the under the bed drawer. I love this and think I want to do it.
|
|
|
Z-pod
Chuck Janet & Bogie the dog '12 RP 177 1972 Shasta 1400 2005 Ford F-150 5.3L V8 |
|
|
|
|
M0tl3y
Groupie

Joined: 21 Sep 2014 Location: Utah Online Status: Offline Posts: 61 |
Post Options
Quote Reply
Posted: 06 Mar 2015 at 7:41pm |
Sorry, no. I didn't make any plans or diagrams as I went. I basically measured the space underneath the bed and started from there. I'll admit, I had to tweak my original measurements as I went when I realized I wanted more clearance above the drawers and factoring in the attached sliders on the bottom. It was a one-piece-at-a-time-then-remeasure project.
 |
|
|
The 178 club
|
|
|
|
|
Post Reply
|
Page <1 3031323334 77> |
| Forum Jump | Forum Permissions You cannot post new topics in this forum You cannot reply to topics in this forum You cannot delete your posts in this forum You cannot edit your posts in this forum You cannot create polls in this forum You cannot vote in polls in this forum |