
|
|
Post Reply 
|
Page <1234 6> |
| Author |
 Printable Version Printable Version Google Google Delicious Delicious Digg Digg StumbleUpon StumbleUpon Windows Live Windows Live Yahoo Bookmarks Yahoo Bookmarks reddit reddit Facebook Facebook MySpace MySpace Newsvine Newsvine Furl Furl Topic Search Topic Search  Topic Options Topic Options
|
podenvy 
Newbie 

Joined: 06 Jul 2015 Online Status: Offline Posts: 33 |
 Topic: Outer side Seams Topic: Outer side SeamsPosted: 20 Apr 2017 at 5:18pm |
|
We had a different issue on our 2015 179: the front outer shell started buckling in the middle. Our dealer said this was a manufacturing defect and arranged for the trailer to be brought to the FR factory in Oregon last October 2016.
When the trailer returned a few weeks ago (March 2017), we had the same exact issue as the OP: the shell pulled away from the left side resulting in a huge gap that's letting in water. We refused to take possession of it in this condition. Dealer said they put the shell on too tight. Now the dealer is going to try to fix it with permission from Forest River instead of at the factory. I'm absolutely petrified about what this "fix" will entail. Not only that, but the cable/sat exterior outlets were ripped off the exterior either in return transit or at the factory, and the dealer said we'd have to pay to replace it! If your RPOD is going to the factory for warranty work, take pictures of everything including items not going for repair. I'm so upset about this shoddy warranty work done at the Oregon factory. How can anyone say FR will fix it when something comes back in worse condition?! EDIT: here's a picture - http://imgur.com/wUVfny6 |
|
|
2013 FJ Cruiser + 2015 rpod 179 HRE
|
|
 |
|
|
jato
Senior Member 

Joined: 23 Feb 2012 Location: Kewadin, MI Online Status: Offline Posts: 3221 |
Posted: 02 Apr 2017 at 7:51pm |
|
Great workmanship Fred. FR will probably be calling you and seeing if you will go to work for them. So far our 177, built in January 2011 still looks great and am in probable agreement with you that it may very well be a year/assembly line issue.
|
|
|
God's pod
'11 model 177 '17 Ford F-150 4WD 3.5 Ecoboost Jim and Diane by beautiful Torch Lake "...and you will know the Truth and the Truth will set you free." |
|
|
|
|
techntrek
Admin Group - pHp 
Joined: 29 Jul 2009 Location: MD Online Status: Offline Posts: 9059 |
Posted: 02 Apr 2017 at 6:47pm |
|
Great job.
|
|
|
|
|
fwunder
Senior Member

Joined: 04 Oct 2013 Location: New Jersey Online Status: Offline Posts: 1676 |
Posted: 31 Mar 2017 at 4:54pm |
|
Just to followup on repair...  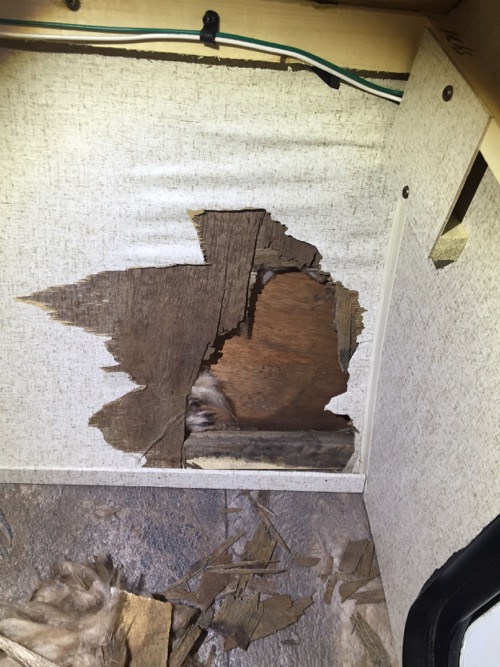 After removing several track screws along lower front curbside it was apparent that my leak came from the lower corner seam separation and insufficient sealing along bottom front edge (underneath). I removed a portion or the dinette frame, carefully removed the trim and cut out a portion of the forward ceiling panel. The insulation was damp, as was the framing along bottom and wall edge. I had to dig out the panel edge between outer front and sidewall - that was a lengthy and delicate process, but I got it cleaned up nicely. I then placed a small space heater to dry everything out real well for a few days. Then I bleached the entire front corner with a mild solution of bleach just to prevent any mold growth. When it was good and dried again, I brushed on a fair amount or wood hardener over the framing and along the wall edge followed by a liberal coating of Epoxy - I wanted a good base to screw outside track into.  I glued some tabs on the existing panel to support panel patch, packed the opening with new insulation and attached the panel patch with glue and staples (narrow gauge crown). I taped the seam with 6" matching seam tape and replace the corner "gimp" trim with new. Used a couple of pocket screws to reassemble the dinette frame, used more seam tape to cover and create new trim and put everything back together. I know that it is put back together better than it was built and is a virtually invisible repair.  The next step was prevention. I replaced the keder track screws with longer stainless and epoxy coated equivalents. Did same along bottom, adding a couple the weren't there in bottom corner.  I also "painted" quite a bit of epoxy under both front corners. Along the entire front edge (under) where there is a seam, I liberally spread Sikaflex. As soon as the monsoons stop here, I'll be re-caulking the entire Pod with Geocel ProFlex RV. I'll also be much, much, more aware of any potential leaking issues!! I hope that might help anyone with a similar issue and encourage you to keep up with required maintenance!! fred |
|
|
2014 RPod 178 => MyMods and Buying Habits
2008 4Runner Limited 4.0-liter V6 Yes, those are wild ponies dining on grass while dumping tanks! |
|
|
|
|
fwunder
Senior Member
Joined: 04 Oct 2013 Location: New Jersey Online Status: Offline Posts: 1676 |
Posted: 21 Mar 2017 at 5:39pm |
That's definitely one way to "fix" it! My plan is to first bleach any signs of dark or moldy wood. Dry thoroughly. Then, I will paint lot's of wood hardener and top off exposed framing with West System G/flex epoxy. That's all before I replace ceiling (wall) panel patch and then screw track back in place with longer stainless screws. Got enough material from Forest River that I can do it four or five times! Had to order a 4x8 sheet of vinyl covers luan wall material. Oh well, time to remover bathroom sink! fred |
|
|
2014 RPod 178 => MyMods and Buying Habits
2008 4Runner Limited 4.0-liter V6 Yes, those are wild ponies dining on grass while dumping tanks! |
|
|
|
|
ToolmanJohn
Senior Member
Joined: 23 Apr 2014 Location: Connecticut Online Status: Offline Posts: 451 |
Posted: 21 Mar 2017 at 5:29pm |
|
Throw a small blob of Gorilla glue onto the screw. It won't come back out. The downside is you can't get them out if you really need to either.
|
|
|
2017 ATC 7X20 Custom Toy Hauler
2013 R-Pod 177 (SOLD) 2013 VW Touareg TDI |
|
|
|
|
fwunder
Senior Member
Joined: 04 Oct 2013 Location: New Jersey Online Status: Offline Posts: 1676 |
Posted: 21 Mar 2017 at 4:54pm |
I would be curious what they mean by "studs". There really isn't any "studs". I agree with the undersized screws. Before I started taking things apart I studied these as best I could. I see a couple of potential construction issues that lead to the problem I have. The exterior black trim along the top is screwed into end-grain plywood all the way around and under a bit of tension due to curve. Doesn't take much moisture or movement for screws to loosen in end-grain ply. The trim along the bottom seems to be simply screwed into the sandwiched foam floor - at least as far as I could tell. Screws are too short to reach aluminum frame. I removed screws along track until I reached screws with no signs of rust. The interior wall (ceiling) repair is a pain because the luan is stapled to plywood frame before the assembly is attached to side walls. I used a variety of dremel tools dig out soft or rotten material being careful not to penetrate exterior wall. It's all fixable and made better than before, but avoidable with closer and frequent inspection. Not sure where I found the images above. Thanks to whoever took them!! fred |
|
|
2014 RPod 178 => MyMods and Buying Habits
2008 4Runner Limited 4.0-liter V6 Yes, those are wild ponies dining on grass while dumping tanks! |
|
|
|
|
venture230
Newbie

Joined: 17 Mar 2014 Location: Idaho Online Status: Offline Posts: 6 |
Posted: 21 Mar 2017 at 1:42pm |
|
RV repair said they missed studs and used undersized screws. Worth inspecting and fixing as needed too avoid water damage. Also, storing covered would be beneficial

|
|
|
|
|
fwunder
Senior Member
Joined: 04 Oct 2013 Location: New Jersey Online Status: Offline Posts: 1676 |
Posted: 19 Mar 2017 at 7:45pm |
|
Hmmm. Now I an starting to wonder if this isn't a year/assembly line issue?
I first noticed the problem by seeing some blistering of the vinyl wall covering in the forward curbside locker. Just lucky I noticed. At first, I thought water had gotten into the locker from the outside locker door and had wicked from the floor. I then noticed a small separation in the seam on the bottom corner outside. I caulked it up good until I could start a proper repair. Recently, after ordering wall panel material, seam tape and corner gimp I started digging. I first found that water had, indeed, wicked up quite a distance. The insulation was damp and there was quite a bit of evidence of long term moisture (rusty brads and staples and a fair amount of soft wood). Fortunately, it seems confined to a small area. I am in the middle of removing all damaged material. Snowstorm slowed me down a bit.  I have cut out a section of the wall (ceiling) panel approximately 24" from the side wall well beyond any signs of water intrusion. Also had to remove portion of dinette frame. After it is all cleaned and dry, I will use some wood hardener and epoxy and then replace the section of panel and insulation. I will also be replacing a number of the screws holding the trim on both front corners with longer stainless equivalents, adding a few more along the bottom and some additional sealant. I am confident the repair will be better than original, but gotta admit I'm disappointed I'm needing to do it at all and soooo glad I happened to notice the blistering before it spread any further. Be very aware that the entire interior front edge (and back edge) is very exposed to potential water damage. I would suggest close and frequent inspection. If the insulation behind the ceiling panel does get wet, it will cause problems. It also seems there is very little tolerance in outside trim overlap with an insufficient number and size of anchors holding the trim. I do kinda wonder if this is happening to more pods? fred |
|
|
2014 RPod 178 => MyMods and Buying Habits
2008 4Runner Limited 4.0-liter V6 Yes, those are wild ponies dining on grass while dumping tanks! |
|
|
|
|
Jpntime
Groupie 
Joined: 28 Jan 2015 Location: Nv Online Status: Offline Posts: 70 |
Posted: 17 Mar 2017 at 10:12pm |
|
My 2014 opened up in the front bottom corners to

|
|
|
Love to camp
2014 171 |
|
|
|
|
Post Reply
|
Page <1234 6> |
| Forum Jump | Forum Permissions You cannot post new topics in this forum You cannot reply to topics in this forum You cannot delete your posts in this forum You cannot edit your posts in this forum You cannot create polls in this forum You cannot vote in polls in this forum |


 Outer side Seams
