
|
ouR escaPOD mods |
Post Reply 
|
Page <1 5455565758> |
| Author |
 Printable Version Printable Version Google Google Delicious Delicious Digg Digg StumbleUpon StumbleUpon Windows Live Windows Live Yahoo Bookmarks Yahoo Bookmarks reddit reddit Facebook Facebook MySpace MySpace Newsvine Newsvine Furl Furl Topic Search Topic Search  Topic Options Topic Options
|
techntrek 
Admin Group - pHp 
Joined: 29 Jul 2009 Location: MD Online Status: Offline Posts: 9059 |
 Post Options Post Options
 Quote Reply Quote Reply
 Topic: ouR escaPOD mods Topic: ouR escaPOD modsPosted: 26 Apr 2016 at 6:56pm |
|
This is the ladder I bought, it collapses so it is only about 2 feet high.
|
|
 |
|
|
LuvPod
Newbie 
Joined: 05 Dec 2015 Online Status: Offline Posts: 7 |
Post Options
Quote Reply
Posted: 26 Apr 2016 at 2:02pm |
|
Thanks, StephenH! :)
|
|
|
|
|
StephenH
podders Helping podders - pHp 

Joined: 29 Nov 2015 Location: Wake Forest, NC Online Status: Offline Posts: 6288 |
Post Options
Quote Reply
Posted: 26 Apr 2016 at 1:14pm |
|
I'm glad my idea gave you one of your own. I used to own a pair of XC-skis, but we donated them when we move to an area which does not regularly have enough snow to use them. Plus, as I get older, the cold appeals to me less and less.
|
|
|
StephenH
Happy is the man that findeth wisdom,... ouR escaPOD mods Former RPod 179 Current Cherokee Grey Wolf 24 JS |
|
|
|
|
Retroactive
Senior Member

Joined: 15 Mar 2016 Location: Bolton, MA Online Status: Offline Posts: 270 |
Post Options
Quote Reply
Posted: 26 Apr 2016 at 12:29pm |
|
My 171 has a full passthrough, so I am going to use your fencepost idea to make multiple elevated storage bays. That would be absolutely perfect for our XC-Skis if we can find a TT friendly year round park, unfortunately most year round parks up this way only cater to motorized RVs (no hookups of any kind, and the snow removal is questionable).
|
|
|
|
|
StephenH
podders Helping podders - pHp
Joined: 29 Nov 2015 Location: Wake Forest, NC Online Status: Offline Posts: 6288 |
Post Options
Quote Reply
Posted: 26 Apr 2016 at 11:47am |
|
It is like this one: Folding Ladder
I didn't pay that price for it. When we were on a trip, someone in a larger motor home had it for sale. They needed a larger ladder, so were getting rid of the one I purchased. It looked like a great deal, so I picked it up. Then I had to figure out a way to carry it.  |
|
|
StephenH
Happy is the man that findeth wisdom,... ouR escaPOD mods Former RPod 179 Current Cherokee Grey Wolf 24 JS |
|
|
|
|
LuvPod
Newbie
Joined: 05 Dec 2015 Online Status: Offline Posts: 7 |
Post Options
Quote Reply
Posted: 26 Apr 2016 at 9:13am |
|
Hi StephenH,
What does your collapsible ladder look like and where did you purchase it? |
|
|
|
|
StephenH
podders Helping podders - pHp
Joined: 29 Nov 2015 Location: Wake Forest, NC Online Status: Offline Posts: 6288 |
Post Options
Quote Reply
Posted: 22 Apr 2016 at 12:15pm |
|
Here is another one that my wife and I really like. Our 2016 Rpod 179 had the older, top mount plastic sink. This is one of the reasons I term it more of a 2015 1/2 model. We both disliked the plastic, both for the size and in my case, because it was flexible and not flat, which meant that water collected in the bottom and did not properly drain. The solution was to replace the sink and, while I was at it, replace the cheap faucet with one that is much better.
Parts: VAPSINT faucet. The exact one I purchased does not seem to be available currently. This one is similar: Faucet Stainless steel sink: Sink Sink strainer: Strainer Flexible tailpiece: Tailpiece Silicone sealant. Tools were a jigsaw and an oscillating tool . Also needed if large tubes of sealant are used is a caulking gun. Masking tape is needed to protect the countertop. Remove the drawers both to keep them clean and to make more working room available. It will also help with fastening the sink and hooking up the components. First step is to remove both the original faucet and the original sink. I put bags over the ends of the water lines to keep trash out. I disconnected the drain also. Once the sink was removed, I cleaned off the old sealant. Then I used masking tape (wider is better) to tape over the whole sink area. Lay the sink upside-down on the counter to mark the location. The actual cut line will be inside the outline of the sink. There is just enough room between the cleat which is at the face of the cabinet and the one on the back wall of the Rpod to fit the sink. When cutting, ensure the cut line is parallel to the outline and that the corners are rounded to match the outline. You should be able to verify the location since you will be able to see the cleats through the opening. Use a jigsaw with a clean-cut blade to cut on your cutting line. I needed to use the oscillating tool with a semicircular blade to get the cut along the back wall since there was insufficient room for the jigsaw there. I also used the oscillating tool to trim the hole as I cut a little small along the front and back, figuring it was better to do this than to cut too big at first. Test fit the sink. Once you are happy with the fit, then it is time to move on to the next step. Install the sink strainer. I used silicone instead of plumber's putty for this. I have had good success with silicone, figuring it would not harden or fall out like I have seen plumber's putty do. Allow some time for the silicone to cure. Install the faucet. Since this sink has three holes, I used the middle one for the faucet, the left one for a soap dispenser, and plugged the right hole with a cover plate. I could have used a cover plate which would have covered the extra holes also. This is optional. Once the faucet is installed, lay down a bed of sealant and place the sink into position. Use the clamps to fasten the sink to the countertop. Clean off any excess sealant. It is easiest to do so before it cures. Connect the hot and cold water connections. You will need adapters since the existing connectors will not be the same size as the new faucet's connectors. Pick these up at your local hardware store. The P trap will not line up with the new drain. This is where the flexible tailpiece comes in. Use it to connect the drain to the trap and move it around to allow room for the drawers to open and close. I needed to saw an arc in the back of the top drawer to allow it to close as the new drain is centered, and not at the back like the old sink had. Test your connections, clean up the mess, reinstall the drawers, and it is done. Enjoy the new sink. 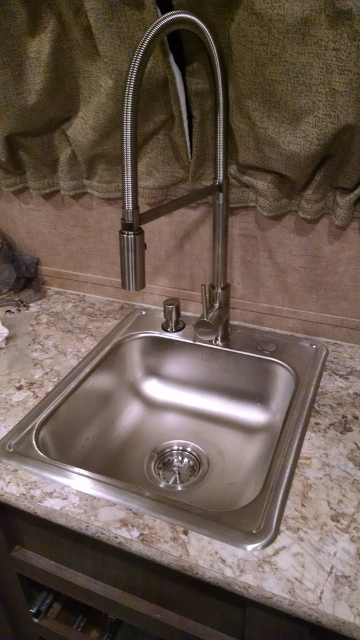 The one thing we do when traveling is to move the head of the hose down and just let the spring part be held by the bracket. This keeps the spring from banging into the window. There is not much clearance between them, but it is so much better than the original, cheap faucet. |
|
|
StephenH
Happy is the man that findeth wisdom,... ouR escaPOD mods Former RPod 179 Current Cherokee Grey Wolf 24 JS |
|
|
|
|
StephenH
podders Helping podders - pHp
Joined: 29 Nov 2015 Location: Wake Forest, NC Online Status: Offline Posts: 6288 |
Post Options
Quote Reply
Posted: 21 Apr 2016 at 2:23pm |
|
I agree that the tv speakers are terrible. That is why I wanted to do this mod. While it works for the 179 and, I presume, the 180, I guess it does not necessarily work as easily for other models. Hopefully, you will find a way to do this easily. The improvement in sound is tremendous, even with the stock speakers in the Rpod.
|
|
|
StephenH
Happy is the man that findeth wisdom,... ouR escaPOD mods Former RPod 179 Current Cherokee Grey Wolf 24 JS |
|
|
|
|
Retroactive
Senior Member
Joined: 15 Mar 2016 Location: Bolton, MA Online Status: Offline Posts: 270 |
Post Options
Quote Reply
Posted: 21 Apr 2016 at 12:36pm |
|
Nice audio mod, the tv speakers are terrible. The grommet seems to let the wire sit flatter against the wall, so it doesn't add any extra clutter to the eye. I have to run my cable outside of the pod to accomplish the mod, so it will be a while until I have the time for it.
|
|
|
|
|
StephenH
podders Helping podders - pHp
Joined: 29 Nov 2015 Location: Wake Forest, NC Online Status: Offline Posts: 6288 |
Post Options
Quote Reply
Posted: 20 Apr 2016 at 9:45pm |
|
The latest mod is a very simple and inexpensive one.
Parts needed: 1 cable that has a stereo 1/8" plug on one end and separate RCA connectors (red and white) on the other end. The cable needs to be long enough to reach from the television's headphone outlet to the cover plate for the antenna switch and then to the back of the stereo. In my case, a 6 foot cable is long enough for the 179. 1 grommet (Lowe's part # 423487), split on one side to slide over cable. 1 drill bit, 1/2" 1 file (as needed). Instructions: Remove stereo from the wall. Check behind the antenna plate to ensure no wires are where you will be drilling. Drill a 1/2" hole between the bottom connector and the bottom screw. Continue on to drill through the partition. Remove the cover plate and use the file if needed to ensure the hole behind is smooth. In my case, it was more like a semicircular depression in on the botttom of the previous opening for the cover plate. There is a thick backing at that point. Place the rubber grommet on the cable. Feed the plug for the television end through the hole in the faceplate and squeeze the grommet through until it is seated and even on both sides of the faceplate. Fasten the faceplate to the wall with the screws you removed earlier. Plug the RCA connectors into the input terminals on the back of the stereo unit. As you look at it from the back, they are the ones on the left. Connect red to red (right channel) and white to white (left channel). Make sure you have enough cable to reach the television's headphone outlet. Plug the cable in there. Turn the television and stereo on. Push the AUX button once. You will now have sound through the stereo system. Adjust the cable and fasten it to run with the other cables. I loosened the zip ties and ran it through there. I then used a velcro tie for the middle. Fasten the stereo unit back in place. You are done, and you will enjoy the sound output so much better. It will have a richer sound instead of the tinny sound the TV speakers have. 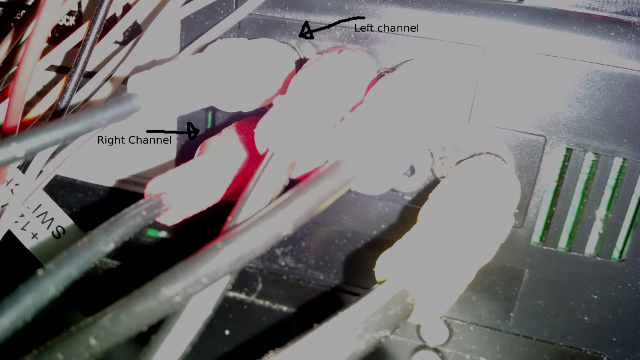 Sorry about the bleached-out picture. It was hard getting my hand in there and trying to see what I was doing. 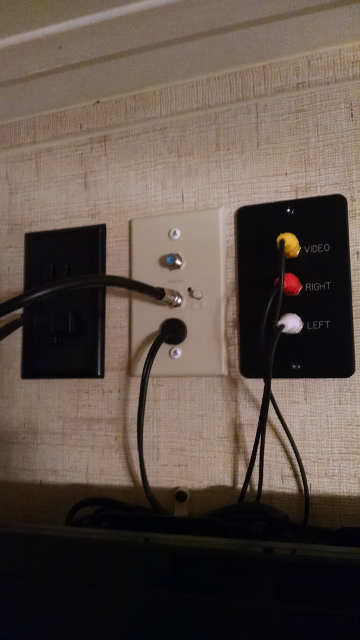 As you can see, this modification ends up looking quite nice. I originally wanted to put a socket there for a wire and then run a separate wire to the back of the stereo. However, this one works well, and was really inexpensive.  |
|
|
StephenH
Happy is the man that findeth wisdom,... ouR escaPOD mods Former RPod 179 Current Cherokee Grey Wolf 24 JS |
|
|
|
|
Post Reply
|
Page <1 5455565758> |
| Forum Jump | Forum Permissions You cannot post new topics in this forum You cannot reply to topics in this forum You cannot delete your posts in this forum You cannot edit your posts in this forum You cannot create polls in this forum You cannot vote in polls in this forum |


