
|
|
Post Reply 
|
Page 12> |
| Author |
 Printable Version Printable Version Google Google Delicious Delicious Digg Digg StumbleUpon StumbleUpon Windows Live Windows Live Yahoo Bookmarks Yahoo Bookmarks reddit reddit Facebook Facebook MySpace MySpace Newsvine Newsvine Furl Furl Topic Search Topic Search  Topic Options Topic Options
|
Ks.Kev 
Newbie 

Joined: 07 Feb 2010 Location: Kansas Online Status: Offline Posts: 28 |
 Calendar Event: Bunk Removal on 176 Calendar Event: Bunk Removal on 176Posted: 03 Sep 2013 at 7:13pm |
I just used the piece of trim that was on the front of the top bunk as the cap on the end of the "cut down" part. The rest that you see is/was the original part of the bunk. Didn't have to stain anything! |
|
|
Kevin & Donna
2010 R-Pod 176 2011 Ford F150 Lariat Supercrew |
|
 |
|
|
Pod-a-terre
Groupie 

Joined: 16 Aug 2013 Location: United States Online Status: Offline Posts: 59 |
Posted: 03 Sep 2013 at 6:43pm |
|
Jackpod: Any pictures of your mod?
|
|
|
John Kris "Lady Sarah" our Golden
Aiken SC |
|
|
|
|
podgirl
Newbie

Joined: 26 Aug 2013 Online Status: Offline Posts: 28 |
Posted: 03 Sep 2013 at 6:15pm |
|
Hello Pam,
If you get I chance I would love to see pictures of this mod. Also, check out Kevin's pictures on this same mod. Thanks. |
|
|
Sally
|
|
|
|
|
podgirl
Newbie
Joined: 26 Aug 2013 Online Status: Offline Posts: 28 |
Posted: 03 Sep 2013 at 6:04pm |
|
Wow!! It looks so much larger. Did you cover the remainder of bunk with a laminate or did you stain it? Also, did you use part of the trim for the side or add another piece? This really helps. Thanks so much for the pictures!

|
|
|
Sally
|
|
|
|
|
Ks.Kev
Newbie
Joined: 07 Feb 2010 Location: Kansas Online Status: Offline Posts: 28 |
Posted: 03 Sep 2013 at 5:42pm |
|
Pod girl,
Sorry it took me a little while, but here is a few pictures of what I did to the top bunk...... 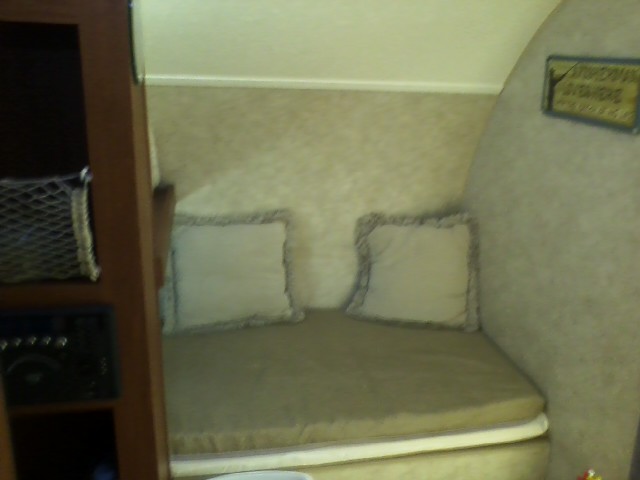 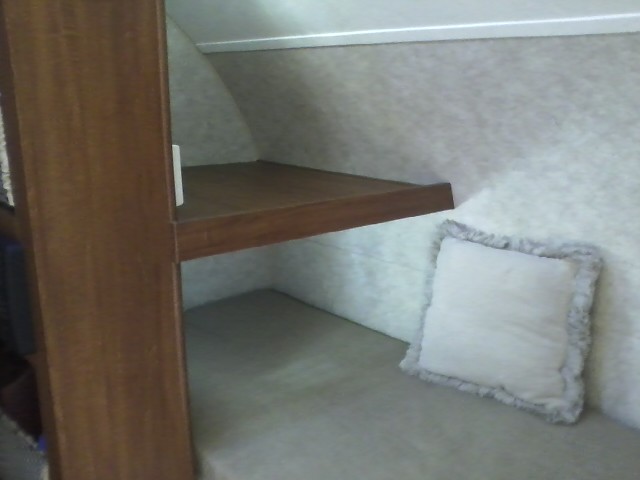 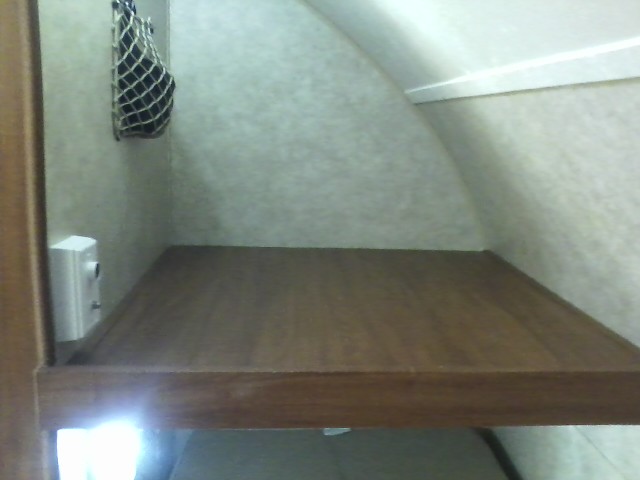
Then I also added a 12 volt with a tv/cable plug in (that's the white box on the left) of the "use to be top bunk" which I tapped into the TV hook up / amplifier on the other side of that wall in the entertainment center. works good to set the small t.v. or DVD player on that shelf while in the bottom bunk. Doing this Mod also allows for another place to sit. Hope this helps in giving you some ideas! |
|
|
Kevin & Donna
2010 R-Pod 176 2011 Ford F150 Lariat Supercrew |
|
|
|
|
podgirl
Newbie
Joined: 26 Aug 2013 Online Status: Offline Posts: 28 |
Posted: 01 Sep 2013 at 11:36pm |
|
Thanks for the information. I do believe that making changes in that area will definitely make the pod better.

|
|
|
Sally
|
|
|
|
|
wallawallaron
Newbie

Joined: 21 Aug 2013 Location: WallaWalla Online Status: Offline Posts: 19 |
Posted: 31 Aug 2013 at 7:56pm |
|
|
|
|
WallaWallaron,2012 RP177 H.R.E.,2010 F-150.NRA Life Member
9/11 Never Forget |
|
|
|
|
JACKPOD
Newbie

Joined: 27 Feb 2013 Location: Georgetown, TX Online Status: Offline Posts: 24 |
Posted: 31 Aug 2013 at 6:31pm |
|
We bought our 176 used in November last year. We knew then that we couldn't both sleep on the dinette bed - he's too tall and has to angle in the bed. So I took the bottom bunk. As I'm not too young and have back issues, it was kind of hard to fold myself in the bunk. So hubby did a large cut out of the top bunk - leaving enough space on the back wall and outside wall for shelf space. He then added about a 7" edge around the cut-out to keep the stuff in as well as an L bracket on the outside edge to give it more support. We're on our way home now after more than a month on the road and it's worked out great. We also added a wire shelf above the bunk shelf on the outside wall so I can't complain too much about storage. Then he made a shelf with legs that fits over the storage containers on the top bunk behind the entertainment center that I use for food storage in a container. Of course everything will fall off that shelf when moving, so I anchor it with a dinette cushion stuffed in. Lastly, we added a battery operated led light on the wall above where my head is so I have good reading light. It's all made life easier in our Jackpod.
|
|
|
Pam and Jack
Abby the Bichon RP 176 towed with 2013 Nissan Pathfinder |
|
|
|
|
podgirl
Newbie
Joined: 26 Aug 2013 Online Status: Offline Posts: 28 |
Posted: 31 Aug 2013 at 1:24am |
|
Oh thank you Kevin. That even sounds like it's possible to reinstall if needed for resell. It would nice if it were in two parts that folded up. Thanks again and will look forward to the pictures.

|
|
|
Sally
|
|
|
|
|
Ks.Kev
Newbie
Joined: 07 Feb 2010 Location: Kansas Online Status: Offline Posts: 28 |
Posted: 30 Aug 2013 at 7:22pm |
I have a R-POD 176 and DID remove 1/2 of the top bunk! I left the part of the top bunk right behind the entertainment center shelving for storage of bedding or for whatever you might need extra storage for! It does help getting in and out of that bottom bunk AND gives a good spot for sitting as well! As for taking it out..... real easy! Just pry up the piece (sheet) of wood on top of the bunk and you will see the framing and the screws that go into the walls and all you have to is remove the screws and take out the top bunk! It might make it easier to cut it in 1/2 to remove it since you don't have a lot of room to get it out whole. I'll try and get some pictures of mine so you can see what I did! Hope this helps! |
|
|
Kevin & Donna
2010 R-Pod 176 2011 Ford F150 Lariat Supercrew |
|
|
|
|
Post Reply
|
Page 12> |
| Forum Jump | Forum Permissions You cannot post new topics in this forum You cannot reply to topics in this forum You cannot delete your posts in this forum You cannot edit your posts in this forum You cannot create polls in this forum You cannot vote in polls in this forum |


 Bunk Removal on 176 - Event Date: 29 Aug 2013