
|
|
Post Reply 
|
Page 12> |
| Author |
 Printable Version Printable Version Google Google Delicious Delicious Digg Digg StumbleUpon StumbleUpon Windows Live Windows Live Yahoo Bookmarks Yahoo Bookmarks reddit reddit Facebook Facebook MySpace MySpace Newsvine Newsvine Furl Furl Topic Search Topic Search  Topic Options Topic Options
|
bhamster 
Senior Member 
Joined: 19 May 2011 Location: Washington Online Status: Offline Posts: 165 |
 Topic: Don't ignore your bearings! Topic: Don't ignore your bearings!Posted: 01 May 2013 at 1:02pm |
|
With the camping season just kicking off I thought I'd share my experience in hopes that it might help someone else.
Our pod is just 2 years old with maybe 5k miles at most. I thought I'd repack the bearings before I took it out on the first trip of the year and it's a good thing I did. I was very surprised to find that water had made it into at least one of the bearings (I still have to do the other side). The contamination was only on the outer bearing, so the cap must have failed. The inner bearing looked good. As you can see from the picture below it has obvious signs of rust and pitting. Luckily my local NAPA had a kit with everything (bearings, races, cap & seals). I picked up a couple just in case the other side has the same issue. So... if you think squirting a little grease through the zerk will make everything ready to go, think again. The grease itself showed no signs of contamination and both the washer and castle nut were fine. If I had just topped it off I never would have known. Make sure that you (or a trusted RV shop) take the bearings apart regularly and inspect and repack. I'll be doing this every year from now on. I also discovered a few interesting things about the brakes that I'll share in another thread (after I take the pictures). 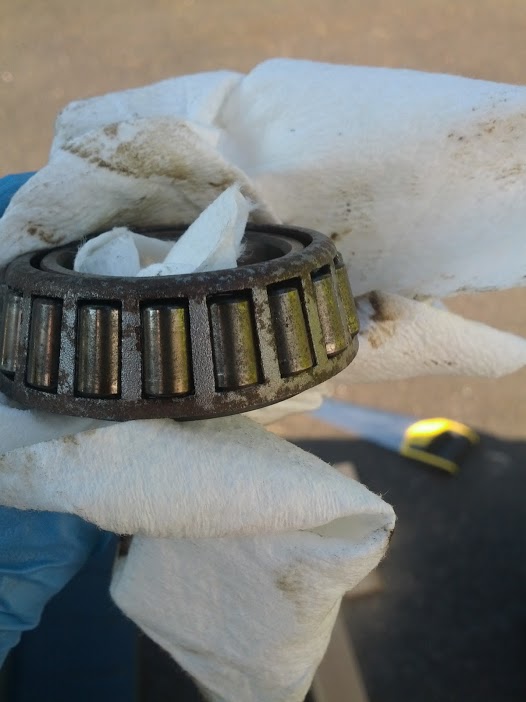 |
|
 |
|
|
Goose
Senior Member
Joined: 24 Sep 2010 Location: Arizona Online Status: Offline Posts: 672 |
Posted: 01 May 2013 at 3:59pm |
|
Great catch!!!!! This is why an inspection is more than worth the time and energy that you put into it. Goose
|
|
|
Mother Goose's Caboose..2011 RP171..07 Grand Cherokee
|
|
|
|
|
bhamster
Senior Member
Joined: 19 May 2011 Location: Washington Online Status: Offline Posts: 165 |
Posted: 01 May 2013 at 4:18pm |
Yep, I was so confident that it was going to be fine that I didn't even have spare bearings (just seals). It's worth it for the peace of mind and shouldn't take very long (unless they're rusted).
|
|
|
|
|
techntrek
Admin Group - pHp 
Joined: 29 Jul 2009 Location: MD Online Status: Offline Posts: 9059 |
Posted: 01 May 2013 at 8:17pm |
|
Dang, glad you caught this.
|
|
|
|
|
bhamster
Senior Member
Joined: 19 May 2011 Location: Washington Online Status: Offline Posts: 165 |
Posted: 02 May 2013 at 2:02am |
|
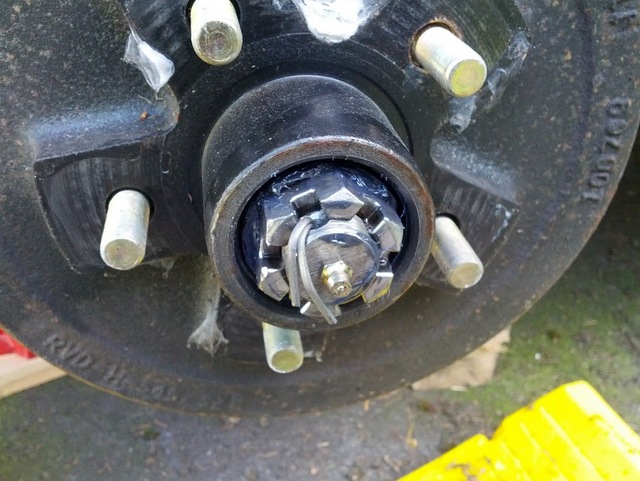
This afternoon I finished the job and interestingly the other side had contaminants on the inside bearing... so one of each kind of failure. Luckily the bearing itself was still usable, so I just needed to replace the seal and repack. I took some more pictures this time so you could see what it looked like. Here's what it looked like after taking the cap off (so far so good):
 But once I pulled it off the spindle the dreaded rust color was obvious on the inner side: 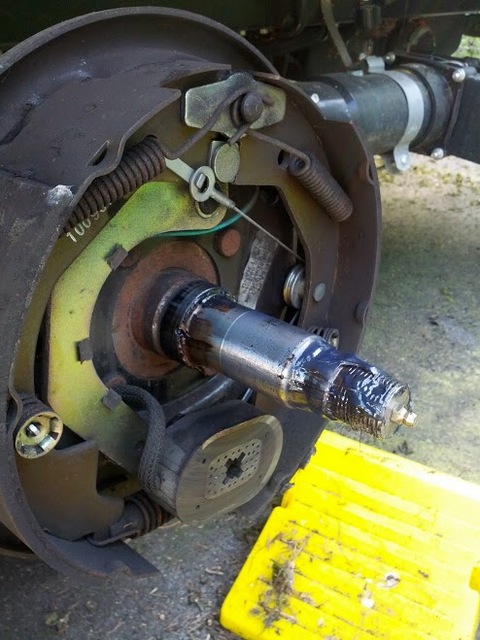 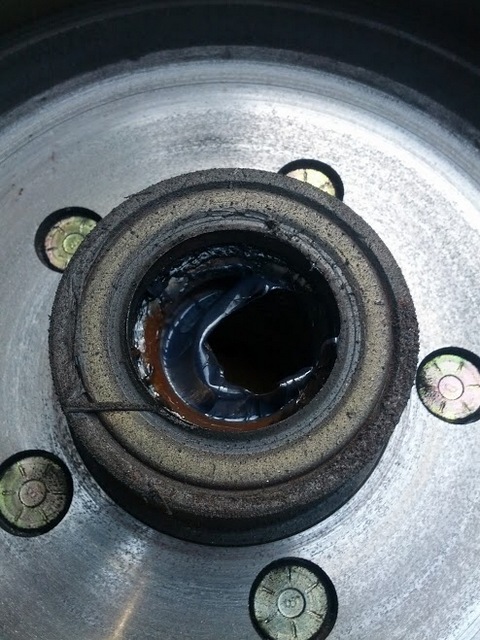 Here's a side by side comparison of the caps (note the contamination was from the rubber plug, not the sides). I never even used the rubber plug: 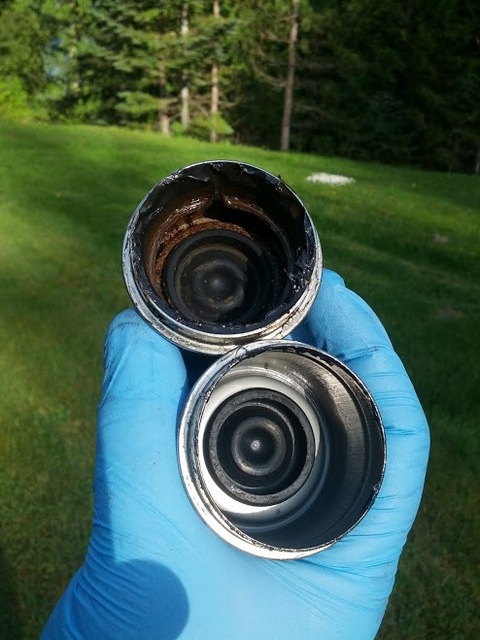 Finally, here's the new seal I put in which seemed much higher quality than the OEM seals and went in much more easily (OEM on the left, new on the right): 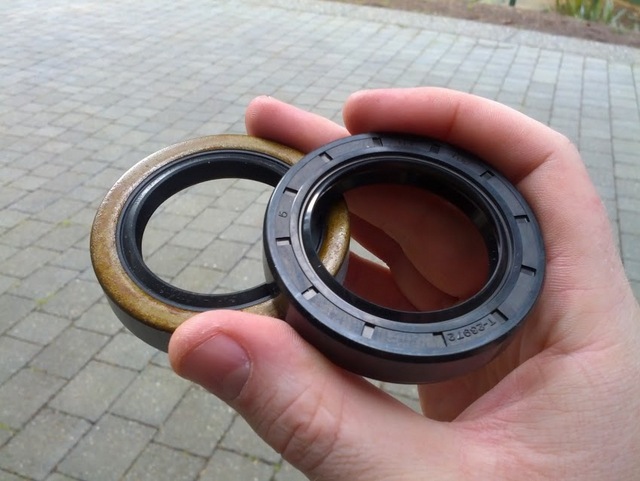 |
|
|
|
|
Alex&Marie
Groupie 

Joined: 25 Feb 2012 Location: Virginia Online Status: Offline Posts: 63 |
Posted: 02 May 2013 at 12:37pm |
|
nice write up and great pictures!
You have motivated me (for one) to tackle this - this weekend if the weather holds. My mileage on the R-pod is probably on the high side for a trailer that is only 14 months old: about 12,000 miles. I'll let the group know what I find. |
|
|
Alex and Marie
2012 R-pod 177 2006 Toyota Tundra 
|
|
|
|
|
bhamster
Senior Member
Joined: 19 May 2011 Location: Washington Online Status: Offline Posts: 165 |
Posted: 02 May 2013 at 3:41pm |
It's not hard at all... just messy. I used the majority of a "box of rags" switching between messy jobs and clean jobs (like taking pictures). Since everything was new for me this time each step took a few attempts due to new tools and unfamiliar procedures. By far, the hardest was removing the rusted race, but even that only took a few minutes once I found a nice-sized metal rod to bang it out with. The videos on etrailer are a great starting point.
|
|
|
|
|
Anthony Valenzano
Groupie

Joined: 09 Apr 2013 Location: Archbald Pa Online Status: Offline Posts: 44 |
Posted: 08 May 2013 at 1:32pm |
|
I re-greased my bearings on my 2010 yesterday. They were in very good shape. No signs of rust at all. I was surprised at how loose the castle nut was. I wouldn't even say it was finger tight. So I'm glad I looked at it. There might have been enough slack to start some wobble. Normally when I do bearings, I tighten them good with a wrench, at which point the wheel won't turn, then I back them off until the wheel spins freely, then back it off until I can insert the pin.
|
|
|
|
|
bhamster
Senior Member
Joined: 19 May 2011 Location: Washington Online Status: Offline Posts: 165 |
Posted: 08 May 2013 at 1:45pm |
|
That's another great point. Even if the bearings are in good shape, the preload needs to be adjusted as the bearings wear. Your procedure sounds similar to mine. I tightened as much as I could with a small crescent wrench while turning the wheel (this is really just to seat them properly and "smush" the grease). Then I backed off until the nut was loose, tighened again with my fingers until it catches, and then finished tightening with the wrench to the next point where I could insert the pin. So basically 1/4-turn or so past finger-tight. It should spin freely but not wobble.
|
|
|
|
|
Burt
Groupie
Joined: 04 May 2012 Online Status: Offline Posts: 62 |
Posted: 13 May 2013 at 12:20am |
|
bamster:
Thanks for your post about the bearings. I checked ours and to my delight, found that there were bearing buddies on them. The grease was good as were the bearings and I learned about how to jack up the POD as well. All good stuff and reminders.  Burt |
|
|
|
|
Post Reply
|
Page 12> |
| Forum Jump | Forum Permissions You cannot post new topics in this forum You cannot reply to topics in this forum You cannot delete your posts in this forum You cannot edit your posts in this forum You cannot create polls in this forum You cannot vote in polls in this forum |


 Don't ignore your bearings!