|
Outriggers Forest River parts |
Post Reply 
|
Page <1 56789 13> |
| Author |
 Printable Version Printable Version Google Google Delicious Delicious Digg Digg StumbleUpon StumbleUpon Windows Live Windows Live Yahoo Bookmarks Yahoo Bookmarks reddit reddit Facebook Facebook MySpace MySpace Newsvine Newsvine Furl Furl Topic Search Topic Search  Topic Options Topic Options
|
LB Boozer 
Newbie 
Joined: 18 Feb 2021 Location: Long Beach, Ca Online Status: Offline Posts: 25 |
 Post Options Post Options
 Quote Reply Quote Reply
 Topic: Outriggers Forest River parts Topic: Outriggers Forest River partsPosted: 30 Apr 2021 at 4:35pm |
|
Are these welded on the newer models? Just ordered two sets and not sure if I am going to mount them with bolts and backing plates or take it to a welder to have them welded on.
|
|
 |
|
|
offgrid
Senior Member 
Joined: 23 Jul 2018 Online Status: Offline Posts: 5290 |
Post Options
Quote Reply
Posted: 30 Apr 2021 at 5:00pm |
|
You don't have to weld them.
FR suggests using TEK self drilling screws and shooting them through both walls of the frame rails. Or you can through books them but if you use a flat washer and don't compress the frame tube by overtightening. It's walls are only 0.1 inch thick. |
|
|
1994 Chinook Concourse
1995 RV6A Experimental Aircraft 2015 Rpod 179 - sold |
|
|
|
|
chasl
Newbie

Joined: 04 Mar 2021 Location: New Mexico Online Status: Offline Posts: 30 |
Post Options
Quote Reply
Posted: 30 Apr 2021 at 6:57pm |
|
I'm not necessarily recommending to anyone, but the factory welded the outriggers to the frame, and used nut/bolt to fasten under the wall sides on my 196.
|
|
|
cl
|
|
|
|
|
StephenH
podders Helping podders - pHp

Joined: 29 Nov 2015 Location: Wake Forest, NC Online Status: Offline Posts: 6288 |
Post Options
Quote Reply
Posted: 30 Apr 2021 at 7:54pm |
|
It is easy for the welding to be done at the factory. I think the screws are a solution for installation outside the factory, especially if one does not have access to a welding shop to do the job.
|
|
|
StephenH
Happy is the man that findeth wisdom,... ouR escaPOD mods Former RPod 179 Current Cherokee Grey Wolf 24 JS |
|
|
|
|
LB Boozer
Newbie
Joined: 18 Feb 2021 Location: Long Beach, Ca Online Status: Offline Posts: 25 |
Post Options
Quote Reply
Posted: 30 Apr 2021 at 7:54pm |
|
Excellent. I will probably through bolt with a backing plate or large washer for most of them. Unfortunately, where it is already sagging, the black tank is mounted directly behind the frame so I can’t through bolt and not even enough room to screw into both sides of the frame without risk of puncturing the black tank. Looks like I may have to weld that one or come up with a work-around.
|
|
|
|
|
StephenH
podders Helping podders - pHp
Joined: 29 Nov 2015 Location: Wake Forest, NC Online Status: Offline Posts: 6288 |
Post Options
Quote Reply
Posted: 30 Apr 2021 at 7:56pm |
|
For my home-made ones, I used screws that went through one side. I also did not want to risk puncturing a tank. So far, it seems to be working okay.
|
|
|
StephenH
Happy is the man that findeth wisdom,... ouR escaPOD mods Former RPod 179 Current Cherokee Grey Wolf 24 JS |
|
|
|
|
LB Boozer
Newbie
Joined: 18 Feb 2021 Location: Long Beach, Ca Online Status: Offline Posts: 25 |
Post Options
Quote Reply
Posted: 30 Apr 2021 at 9:56pm |
|
I’ll keep that in mind. I ordered a couple sets so maybe I’ll just put a couple closer together and just go through the one side.
|
|
|
|
|
K. Frost
Newbie
Joined: 17 Mar 2021 Location: Georgia Online Status: Offline Posts: 4 |
Post Options
Quote Reply
Posted: 01 May 2021 at 5:48am |
|
I asked the repair shop if they had any issues when welding. They had none. If someone can tell me how to attach photos, I'll add some.
|
|
|
|
|
StephenH
podders Helping podders - pHp
Joined: 29 Nov 2015 Location: Wake Forest, NC Online Status: Offline Posts: 6288 |
Post Options
Quote Reply
Posted: 01 May 2021 at 8:51am |
|
Use the advanced editor. Look for an icon that looks like two boxes with an arrow inside pointing to the top-right. That will give you an option for attaching photos. It seems to work best if you re-size the photos to 800x600. You can use a free program like the GIMP (GNU Image Manipulation Program), which is like a freeware Photoshop. You can use other programs also, but you may appreciate the GIMP for other photo use also.
Once you are in the advanced editor, there will be an icon that looks like a tree. Click on it to open the dialog for uploading images.
|
|
|
StephenH
Happy is the man that findeth wisdom,... ouR escaPOD mods Former RPod 179 Current Cherokee Grey Wolf 24 JS |
|
|
|
|
Pod People
Senior Member
Joined: 22 Sep 2011 Location: Chapel Hill,NC Online Status: Offline Posts: 1067 |
Post Options
Quote Reply
Posted: 16 May 2021 at 2:53pm |
|
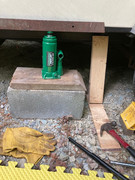
Outriggers finally installed I ordered the 4 outriggers from Forest River months ago when this topic first came up(October,2020). I have been putting off the actual installation for a long time because I knew it was going to be a PITA to install them. I knew that because I had checked my 2015 179 with a square between the floor and the frame under the slidout-the wall definitely had dropped about 3/8”. So, the issue became how to get the outriggers tight to the floor above and tight to the frame at the same time. I read all of the other posts and developed my plan. I decided that in order to eliminate the gap between the top of the outrigger and the floor, I would have to jack up the outside edge of the wall that had dropped. I used a bottle jack, an 8x16 concrete block with 2”x10” wooden block on top of it, and a 24” length of angle iron for jacking up the wall. I jacked it up slowly, checking each stroke of the jack. It took about 3-4 strokes to get flat(90 degrees to the frame)
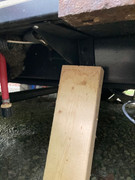
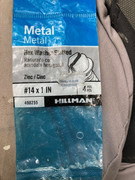
I found that attaching the 2 end screws on the outrigger to the outside wall edge as the first step made the job a little easier as the outrigger was held in place. The next question was how to get the outrigger up tight to the floor. I used a piece of 2x4 cut to the appropriate length and a piece of ¾”x4”x12” as a base runner. Putting the 2x4 at the bottom of the outrigger and tapping it with a hammer as the 2x4 slid forward on the plywood base runner, this forced the outrigger up tight to the floor. Then I could drill the holes for the 2 large screws that hold the outrigger to the frame. I made sure to drill the holes at the top of the outrigger hole to make sure the outrigger didn’t drop after the 2x4 was released. I used 1”x#14 metal screws form Lowe’s. Probably ¾” would work if you can find them.
Overall, this system worked well. Indeed, it was a PITA because you had to move the jack base and jack 4 times as well as lie on your back and drill upward and sideways. It took about 2.5 hours to install all 4 outriggers. All of the outriggers are tight to both the frame and the floor at the junction where it rests on the frame. There is a piece of metal trim at the bottom of the wall that keeps the outside end of the outrigger about 1/8” below the floor. The part of the wall under the slide out no longer shows any droop along the cantilevered part under the slideout. Hope this may help someone who will be installing the outriggers Vann |
|
|
Vann & Laura 2015 RPod 179 
|
|
|
|
|
Post Reply
|
Page <1 56789 13> |
| Forum Jump | Forum Permissions You cannot post new topics in this forum You cannot reply to topics in this forum You cannot delete your posts in this forum You cannot edit your posts in this forum You cannot create polls in this forum You cannot vote in polls in this forum |