
|
|
Post Reply 
|
| Author |
 Printable Version Printable Version Google Google Delicious Delicious Digg Digg StumbleUpon StumbleUpon Windows Live Windows Live Yahoo Bookmarks Yahoo Bookmarks reddit reddit Facebook Facebook MySpace MySpace Newsvine Newsvine Furl Furl Topic Search Topic Search  Topic Options Topic Options
|
Gerald 
Groupie 

Joined: 27 May 2010 Location: Bowmanville, On Online Status: Offline Posts: 73 |
 Calendar Event: R-Pod Stabalizer Modification Calendar Event: R-Pod Stabalizer ModificationPosted: 27 May 2010 at 1:46pm |
|
On our 177 the rear stabalizer runs parallel to the axle and provides great sideways stabality. The front stabalizer is parallel to the length of the trailer and does not provide good sideways stability. Has anyone changed the front to run the same way as the rear? |
|
 |
|
|
Butterfly_Lee
Senior Member 
Joined: 19 Nov 2009 Location: Corpus Christi Online Status: Offline Posts: 131 |
Posted: 27 May 2010 at 3:35pm |
|
I thought about it, when I installed my Stabalizers. The gas line and other stuff was in the way. I find with the two stabalizers down and a foot I bought for the jack, I have three points of contact.
I have a 172 with the Bunks in front and it's A LOT better then before when I didn't have Stabalizers.
Lee
|
|
|
|
|
techntrek
Admin Group - pHp 
Joined: 29 Jul 2009 Location: MD Online Status: Offline Posts: 9062 |
Posted: 27 May 2010 at 6:18pm |
|
Mine didn't come with the front stabs so I use a set of jack stands I already had (http://www.amazon.com/Torin-T42002-Ton-Jack-Stand/dp/B0028JQYPG). First few trips I didn't use them and we had the usual rocking. Finally took them on a trip and it was absolutely rock-solid. My popup has 4 factory stabs and it never was as solid, always lots of rocking. I'm guessing the wide footprint and heavy construction of the jack stands helps to keep things in place. I was going to add the front stabs at some point but now I think I'll stick with the stands. Just some food for thought if the factory 'pod stabs aren't working well enough.
|
|
|
|
|
Butterfly_Lee
Senior Member
Joined: 19 Nov 2009 Location: Corpus Christi Online Status: Offline Posts: 131 |
Posted: 31 May 2010 at 9:26pm |
|
Here are the before and after pics.
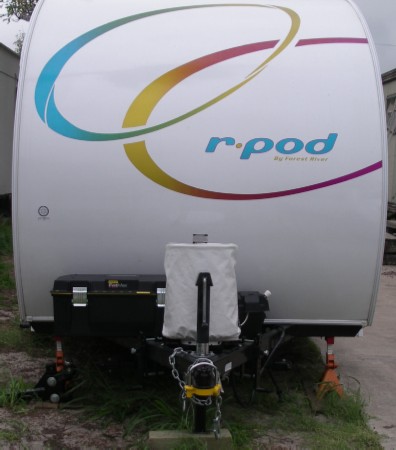 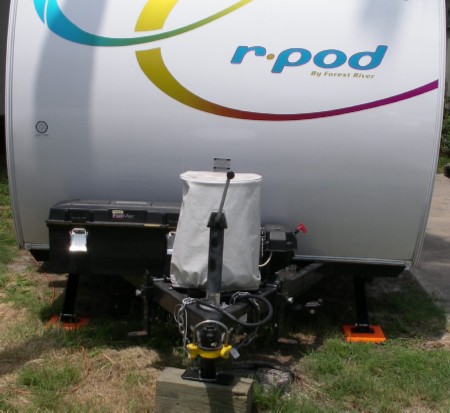 I also use the 1 lego block and lego cover to give the stabilizer foot a solid base. Lee
 |
|
|
|
|
Gerald
Groupie
Joined: 27 May 2010 Location: Bowmanville, On Online Status: Offline Posts: 73 |
Posted: 02 Jun 2010 at 10:21am |
|
Thanks for the reply Lee.
I noticed on your pics that you installed a battery shut off and tool box. I purchased a shut off from Princess Auto and am installing it this weekend. I am very interested in your tool box. What size is it and did you have move your battery outward. I measured and I can move my battery box about 3 inches towards the frame but don't know if this will be necessary. Also how did you support the toolbox and attach it to the frame. Attaching to the main frame at the outside is no problem but the height from the frame near the battery needs to be blocked up. I would like to install one long box which would house the battery also but can't find one of the right size. Your toolbox idea is great.
I had a popup camper and built a box for the front and it worked great. Would like to use a pre built tool box similar to yours.
Thanks
|
|
|
|
|
Butterfly_Lee
Senior Member
Joined: 19 Nov 2009 Location: Corpus Christi Online Status: Offline Posts: 131 |
Posted: 02 Jun 2010 at 11:00am |
|
Yep I hated having to go to the back of the pod or into the truck for things I needed to set up or take down (back up balls, locks, hammers all fit very nicely).
I used a Stanley waterproof tool box (actually I've pickup to others one for r-dome parts and one for the tricycles hemlets and stuff). I was thinking of getting a small luggage rack where the spare tire is, but with all the bike rack problems I'm going to rethink that for now (May have something welded to proide support). Next year I'm hoping to go to some of the National Parks, and may replace the Battery box with another toolbox that will hold two batteries.
Tip 1: Be sure that you bring your box forward enough to open the tool box.
Tip 2: Don't forget to get to have something to close off the batterybox when you take out the key, Tip 3: You might as well ( your working on the batterybox) drill a couple of drain holes in the bottom, some people had water in the battery box last year.
Here's a link on the tool box, and battery cut off switch I did last year. Yes I move the batterybox over as far as I could although I don't think I mentioned it,
Good Luck and Have Fun and Happy Podding
Lee
|
|
|
|
|
Post Reply
|
| Forum Jump | Forum Permissions You cannot post new topics in this forum You cannot reply to topics in this forum You cannot delete your posts in this forum You cannot edit your posts in this forum You cannot create polls in this forum You cannot vote in polls in this forum |


 R-Pod Stabalizer Modification - Event Date: 27 May 2010