
|
ouR escaPOD mods |
Post Reply 
|
Page <12345 58> |
| Author |
 Printable Version Printable Version Google Google Delicious Delicious Digg Digg StumbleUpon StumbleUpon Windows Live Windows Live Yahoo Bookmarks Yahoo Bookmarks reddit reddit Facebook Facebook MySpace MySpace Newsvine Newsvine Furl Furl Topic Search Topic Search  Topic Options Topic Options
|
LuvPod 
Newbie 
Joined: 05 Dec 2015 Online Status: Offline Posts: 7 |
 Post Options Post Options
 Quote Reply Quote Reply
 Topic: ouR escaPOD mods Topic: ouR escaPOD modsPosted: 26 Apr 2016 at 9:13am |
|
Hi StephenH,
What does your collapsible ladder look like and where did you purchase it? |
|
 |
|
|
StephenH
podders Helping podders - pHp 

Joined: 29 Nov 2015 Location: Wake Forest, NC Online Status: Offline Posts: 6452 |
Post Options
Quote Reply
Posted: 26 Apr 2016 at 11:47am |
|
It is like this one: Folding Ladder
I didn't pay that price for it. When we were on a trip, someone in a larger motor home had it for sale. They needed a larger ladder, so were getting rid of the one I purchased. It looked like a great deal, so I picked it up. Then I had to figure out a way to carry it.  |
|
|
StephenH
Happy is the man that findeth wisdom,... ouR escaPOD mods Former RPod 179 Current Cherokee Grey Wolf 24 JS |
|
|
|
|
Retroactive
Senior Member

Joined: 15 Mar 2016 Location: Bolton, MA Online Status: Offline Posts: 270 |
Post Options
Quote Reply
Posted: 26 Apr 2016 at 12:29pm |
|
My 171 has a full passthrough, so I am going to use your fencepost idea to make multiple elevated storage bays. That would be absolutely perfect for our XC-Skis if we can find a TT friendly year round park, unfortunately most year round parks up this way only cater to motorized RVs (no hookups of any kind, and the snow removal is questionable).
|
|
|
|
|
StephenH
podders Helping podders - pHp
Joined: 29 Nov 2015 Location: Wake Forest, NC Online Status: Offline Posts: 6452 |
Post Options
Quote Reply
Posted: 26 Apr 2016 at 1:14pm |
|
I'm glad my idea gave you one of your own. I used to own a pair of XC-skis, but we donated them when we move to an area which does not regularly have enough snow to use them. Plus, as I get older, the cold appeals to me less and less.
|
|
|
StephenH
Happy is the man that findeth wisdom,... ouR escaPOD mods Former RPod 179 Current Cherokee Grey Wolf 24 JS |
|
|
|
|
LuvPod
Newbie
Joined: 05 Dec 2015 Online Status: Offline Posts: 7 |
Post Options
Quote Reply
Posted: 26 Apr 2016 at 2:02pm |
|
Thanks, StephenH! :)
|
|
|
|
|
techntrek
Admin Group - pHp 
Joined: 29 Jul 2009 Location: MD Online Status: Offline Posts: 9062 |
Post Options
Quote Reply
Posted: 26 Apr 2016 at 6:56pm |
|
This is the ladder I bought, it collapses so it is only about 2 feet high.
|
|
|
|
|
StephenH
podders Helping podders - pHp
Joined: 29 Nov 2015 Location: Wake Forest, NC Online Status: Offline Posts: 6452 |
Post Options
Quote Reply
Posted: 29 Apr 2016 at 10:29pm |
|
For all of you 179 owners (and possibly other models as well) who are frustrated with the bathroom sink, this one is for you.
This modification is to move the faucet to reduce the splashing of water by making the water stream hit a wider part of the sink. Why the factory installed the faucet in the location it did is beyond me. The water stream hits right at the edge of the sink. Moving the faucet, even a small amount, allows the water stream to hit in a wider area. Remove screws holding faucet surround and carefully use a putty knife to cut putty holding the surround to the wall. Remove it. Disconnect faucet lines. Remove faucet from surround. Check the opening. Check to see if you can move the surround closer to the wall away from the door. You may be able to move it 1/4 to 1/3 of an inch while still leaving the hole covered when it is replaced. Carefully measure just how far you can move the faucet toward the wall side, away from the door. Enlarge holes to shift faucet over, being careful not to move too far, or you will have a hole. Use some silicone sealant and reinstall faucet to the surround. Reinstall surround, moving it as close to the wall as possible without leaving an uncovered hole in the wall. Use silicone sealant to seal around the plastic to prevent water from going behind it. Result should be that the water from the faucet now hits more toward the drain in a wider part of the sink instead of at the edge. This will not totally eliminate water splashing, but it does reduce it. The putty knife marks the original location of the faucet surround. The faucet was moved as far as possible also. 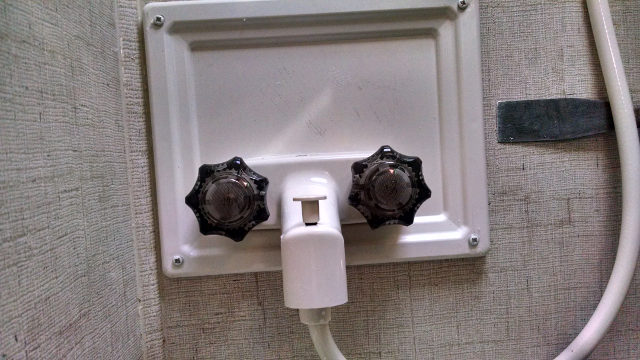 |
|
|
StephenH
Happy is the man that findeth wisdom,... ouR escaPOD mods Former RPod 179 Current Cherokee Grey Wolf 24 JS |
|
|
|
|
larrys39426
Newbie

Joined: 30 Mar 2016 Location: Carriere, MS Online Status: Offline Posts: 17 |
Post Options
Quote Reply
Posted: 30 Apr 2016 at 12:54pm |
|
Thanks -- it may come to that, but I'm likely to mess up something worse when I get tools in my hands.

|
|
|
|
|
StephenH
podders Helping podders - pHp
Joined: 29 Nov 2015 Location: Wake Forest, NC Online Status: Offline Posts: 6452 |
Post Options
Quote Reply
Posted: 30 Apr 2016 at 1:35pm |
|
I'm no expert by any means. I am just not afraid to try. The faucet's original location was unacceptable. I really would like to find one that would fit even tighter into the corner, even if I have to fabricate the surrounding cover plate.
|
|
|
StephenH
Happy is the man that findeth wisdom,... ouR escaPOD mods Former RPod 179 Current Cherokee Grey Wolf 24 JS |
|
|
|
|
StephenH
podders Helping podders - pHp
Joined: 29 Nov 2015 Location: Wake Forest, NC Online Status: Offline Posts: 6452 |
Post Options
Quote Reply
Posted: 03 May 2016 at 8:38pm |
|
Okay, here's another one for those of us frustrated by the plastic track and sliders for the curtains. In our 179, it was the curtains behind the kitchen counter. After seeing that Forest River has finally addressed this in the newest R-Pods, I decided to do something about it. I purchased Cafe Curtain Rods. If you do this, make sure you get ones long enough to cover the window. They are really inexpensive at Wal-Mart.
First, remove the end clip on the plastic tracks and remove the curtains. Second, remove the tracks. Third, using 1" molding, cover the screw holes. In my case, I decided to place the molding all the way across. Fourth, Attach the mounting clips for the curtains. For the center clip, I slipped one end behind the window frame and only used one screw. The others used two screws. Fifth, remove the plastic slider material from the back of the curtains. Fold and sew a casing on top and bottom. This will need to be just big enough to fit the rod. Sixth, slide the curtains onto the rods. Seventh, snap the rods into the mounting clips and adjust the curtains to cover the window evenly. Enjoy being able to move the curtains without them catching on the screw heads. Note: This made for very tight curtains. We will be making new curtains in the near future which will have a little more ease in them so they will fit better. 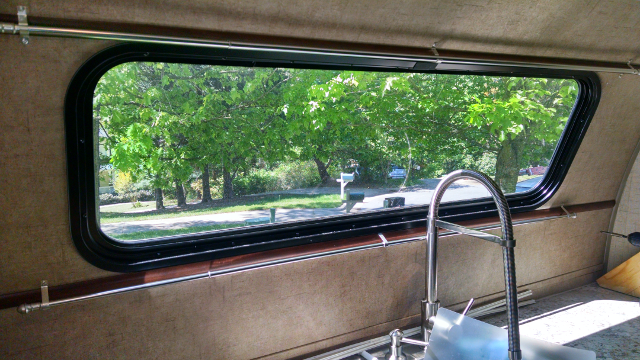 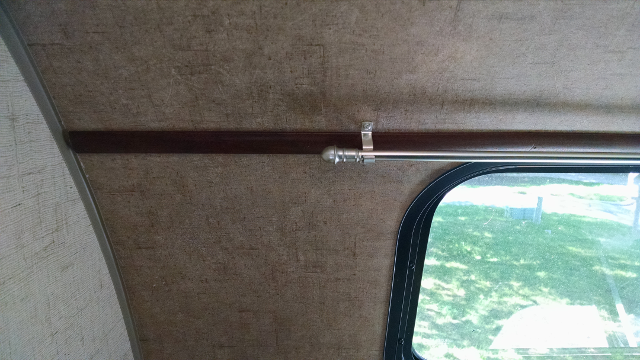 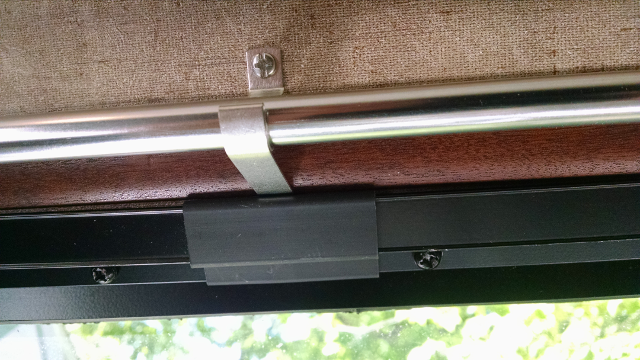  |
|
|
StephenH
Happy is the man that findeth wisdom,... ouR escaPOD mods Former RPod 179 Current Cherokee Grey Wolf 24 JS |
|
|
|
|
Post Reply
|
Page <12345 58> |
| Forum Jump | Forum Permissions You cannot post new topics in this forum You cannot reply to topics in this forum You cannot delete your posts in this forum You cannot edit your posts in this forum You cannot create polls in this forum You cannot vote in polls in this forum |


