
|
|
Post Reply 
|
Page 123> |
| Author |
 Printable Version Printable Version Google Google Delicious Delicious Digg Digg StumbleUpon StumbleUpon Windows Live Windows Live Yahoo Bookmarks Yahoo Bookmarks reddit reddit Facebook Facebook MySpace MySpace Newsvine Newsvine Furl Furl Topic Search Topic Search  Topic Options Topic Options
|
FISHTAIL 
podders Helping podders - pHp 
Joined: 08 Jun 2011 Location: La Plata, MD Online Status: Offline Posts: 130 |
 Topic: Axle Riser DIY Topic: Axle Riser DIYPosted: 04 Jul 2011 at 11:54pm |
|
Since I didn't see a writeup for this, I figured I'd give it a go. Sorry in advance for having so few pictures, but it was so hot out when I did this that sweat kept running off my gloves and onto the camera, and I didn't feel like causing any damage..so I really only took one to start, and when finished. So we'll have to work with that. Anyway, here goes.
Total time, < 2hrs. Tools/supplies needed for this job: 1 axle riser kit 19mm Socket 15/16 socket 15/16 wrench dykes (or sharp scissors) 2 Jack stands 1 Floor jack zip ties wheel chuck Recommended Tools: Impact Gun (Makes the job so much easier) Torque Wrench red loctite Ok, first things first, place the wheel chuck behind the tire opposite of where you are going to work. I started on the right hand side of the pod, just so I could get working around the step out of the way. After you have the wheel blocked up, place your floor jack under the axle and bring the jack up tight against the bottom. If you don't have an impact gun, now is the time to break your lug-nuts loose. Now is also a good time to check your jack alignment, to make sure you can freely move the handle before continuing. Once you are sure you're ready to go, go ahead and raise up the camper. You'll want to get the wheel about 2-3" off of the ground. Next, place your jack stands under the camper on either side of the wheel, careful to leave yourself enough room to move the jack around, and to work. Once positioned, carefully let the camper back down to rest on the stands. Before continuing, check to ensure the camper is secure. Give it a good hard wiggle, and make sure it's steady before going any further. Once your comfortable with it's stability, go ahead and remove your wheel. The next step is to take your dykes and cut the two white wire-ties that hold the wiring for the brakes. There isn't enough slack in the wire as it sits to lower the axle and install the riser. Once cut, just move the wire to the side so that it doesn't get in the way of lowering the axle. Below, you can see both of the zip ties (small red arrows) and the rear facing axle bolt (large red arrow). 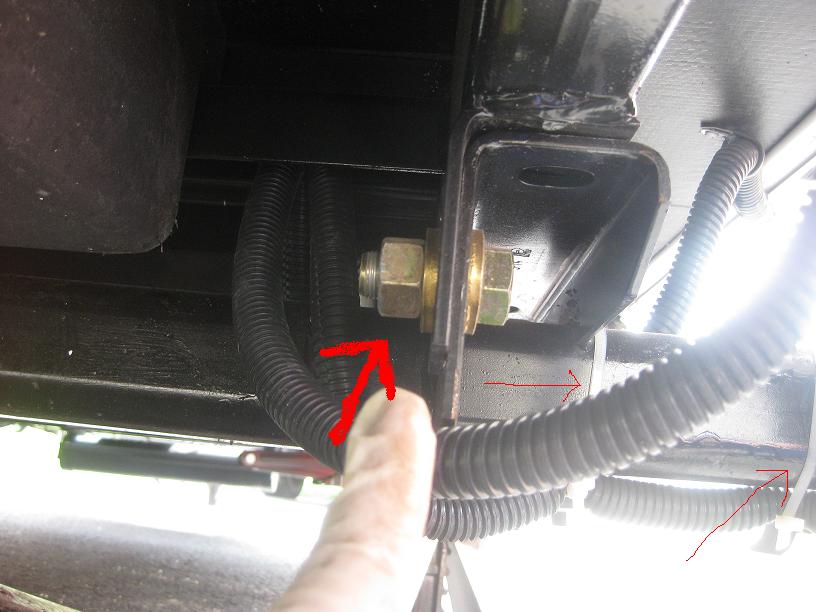 Now, the next step is to remove those axle bolts. To do this, place the jack back under the axle, as close to the end as you can get it, while still giving yourself room to work. Once you have it positioned, raise the jack back up to the axle so that it makes contact, and leave it. Now you're ready to remove the axle bolts. The bolts on my 2011 176 were 15/16", and were on pretty darn tight. This is where an impact gun makes the job much easier, but it's not required. Once you have the bolts out, go ahead and slowly let the jack down to lower the axle. You're halfway there. Now you need to install the riser. The riser installs with the open end facing out, with two of the bolt holes facing down, and the other two facing towards the inside of the camper. The axle riser kit only comes with enough washers to put one washer on each bolt/nut combo, which I didn't like since the factory used washers on both sides. So what I did was re-use the washers from the factory install so that I could have a washer on both the bolt head, and the nut. Go ahead and put the riser into position, and put the bolts into each of holes. Once there, hand thread each of the nuts on as far as you can (make sure the oblong portion of the nut is goes on last, otherwise you won't get it on very far). At this point, you can put some loctite on the bolts too if you wish (I did, partially because of what I"m about to tell you). Now, BEFORE you start tightening the bolts, make sure your riser is positioned how you want it, and raise the axle back up against the camper. DON'T lift the camper back up off the stands, but do give it enough pressure to hold it in place. If you don't do this, the riser will shift when you tighten the nuts and you'll have to start over (ask me how I know...). Once you have the riser in position, and wedged in place with the jack, go ahead and tighten all of the nuts. I couldn't find the torque specs on these, so I went ahead and used the german specs (goodntight). Again, impact gun makes this easy, and lets you run the bolts on VERY tight with little effort. EDIT: Found the specs! Bolts call for 120ft/lbs.
Once tightened, it should look something like this: 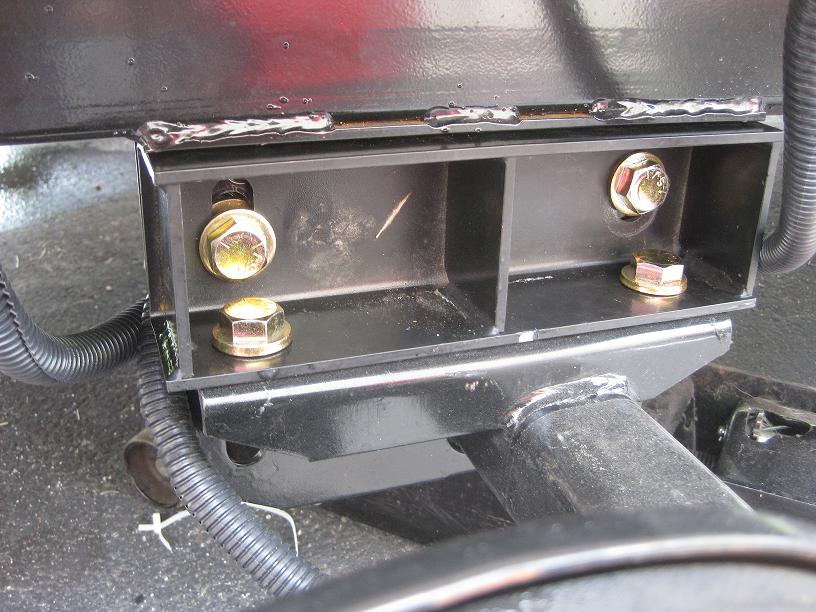 Now you can go ahead and re-secure the brake wiring with fresh zip ties. I put mine in roughly the same position as factory, although it secures a little more inboard now that the slack has been taken up by the riser. This is also the time to put your wheel back on and thread the lugs. If you have an impact, just go ahead and put them all the way on, otherwise you'll need to wait until the camper is lowered to get them tightened. You're almost there! Go ahead and jack the camper back up by the axle to relieve the jackstands of their duty. Take them out of the way, and slowly lower the camper back down until the wheel starts to take some of the weight. Now is the time to finish tightening the lugs if you didn't have an impact handy. When finished, go ahead and let the camper down the rest of the way and take the jack out. If you want to make sure your lugs are where they should be, you can check them with a torque wrench now. Factory spec is 100 ft/lbs. I didn't run mine on very tight with the gun, so all of mine needed a little bit of snugging, but not much. Repeat the process on the other side, and your done! It's as easy as that. |
|
 |
|
|
Tri-Pod
Senior Member

Joined: 17 May 2011 Location: Liberty Hill Online Status: Offline Posts: 112 |
Posted: 05 Jul 2011 at 8:18am |
|
I have read about this process somewhere else but this is the most detailed, thanks for doing this. Clark.
|
|
|
2010 PR 176 sold 2012 replaced with
2013 SP 240 w outside kitchen 2012 Toyota Tundra Crew Max 4x2 5.7L V8 Me, My Honey, and Max our GSP |
|
|
|
|
TerryM
Admin Group - pHp 

Joined: 16 Nov 2009 Location: Saint Augustine Online Status: Offline Posts: 1950 |
Posted: 05 Jul 2011 at 12:15pm |
|
GREAT "How to"!
 Terry |
|
|
RP-175 W/Lift Kit 2011 Ford F-150 4X4
Saint Augustine, FL: The first permanent European settlement in the USA: 1565 |
|
|
|
|
FISHTAIL
podders Helping podders - pHp
Joined: 08 Jun 2011 Location: La Plata, MD Online Status: Offline Posts: 130 |
Posted: 05 Jul 2011 at 1:44pm |
|
Thanks guys. I figured someone should do this, since it's a common thing people ask about. We should open a new DIY forum that's strictly for "how to" write ups. I have a few more things I'll be doing to the pod in the near future, and I'll try to put together one of these for each of them.
|
|
|
|
|
Snowbound
Senior Member

Joined: 17 Apr 2011 Location: Edmonton, AB Online Status: Offline Posts: 270 |
Posted: 05 Jul 2011 at 3:50pm |
|
Wow! What a great description of how to put on axle risers. There is enough information there that I know my husband (graduate of the School for the Mechanically Declined) is not going to attempt it. Plus he would use it as an excuse to buy more tools.
|
|
|
Tom and Bette
in our 177 "The Gastropod" |
|
|
|
|
FISHTAIL
podders Helping podders - pHp
Joined: 08 Jun 2011 Location: La Plata, MD Online Status: Offline Posts: 130 |
Posted: 05 Jul 2011 at 5:03pm |
Eh, it's really not very difficult. Even feeling my way through it it only took me about an hour and a half or so. Had I done it before, or read a set of instructions, it probably would have taken half that amount of time. There is nothing to the entire project that is hard, you just need to be careful while doing it because you are under something that's much heavier than you are. As for the new tool excuse...I use that one all the time. Every new project is an excuse for a new tool :).
|
|
|
|
|
Podsible Dream
podders Helping podders - pHp

Joined: 03 Dec 2010 Location: Hightstown, NJ Online Status: Offline Posts: 571 |
Posted: 05 Jul 2011 at 8:34pm |
|
Only one new tool!? How about one for each level of the house or garage?

|
|
|
Chris and Walt
'10 RP-171 'Free Spirit' '13 Dodge Durango Crew 5.7 L Hemi V8 |
|
|
|
|
techntrek
Admin Group - pHp
Joined: 29 Jul 2009 Location: MD Online Status: Offline Posts: 9062 |
Posted: 05 Jul 2011 at 9:14pm |
|
We had a long discussion on them, which I linked to on this page: http://www.rpod-owners.com/forum_posts.asp?TID=1723&PID=14735&title=creating-an-instruction-maintanence-manual#14735 But, I don't think we've had a good installation thread yet. The "manual" thread has been in hibernation lately, when it gets going again I will make sure I link to this. |
|
|
|
|
FISHTAIL
podders Helping podders - pHp
Joined: 08 Jun 2011 Location: La Plata, MD Online Status: Offline Posts: 130 |
Posted: 05 Jul 2011 at 10:12pm |
Cool. Yeah I'd seen lots of discussion about them, but no install threads which is why I wrote this one. Not the best I admit, but workable I hope. Also, the link you just posted doesn't work? |
|
|
|
|
FISHTAIL
podders Helping podders - pHp
Joined: 08 Jun 2011 Location: La Plata, MD Online Status: Offline Posts: 130 |
Posted: 05 Jul 2011 at 10:12pm |
LOL, yeah, sometimes projects require multiple tools. I've been good lately though :). |
|
|
|
|
Post Reply
|
Page 123> |
| Forum Jump | Forum Permissions You cannot post new topics in this forum You cannot reply to topics in this forum You cannot delete your posts in this forum You cannot edit your posts in this forum You cannot create polls in this forum You cannot vote in polls in this forum |


 Axle Riser DIY