
|
|
Post Reply 
|
| Author |
 Printable Version Printable Version Google Google Delicious Delicious Digg Digg StumbleUpon StumbleUpon Windows Live Windows Live Yahoo Bookmarks Yahoo Bookmarks reddit reddit Facebook Facebook MySpace MySpace Newsvine Newsvine Furl Furl Topic Search Topic Search  Topic Options Topic Options
|
Pawpod 
Senior Member 

Joined: 10 Jan 2011 Location: Regina Sask Online Status: Offline Posts: 137 |
 Topic: Spare Tire Mount for Tongue Topic: Spare Tire Mount for TonguePosted: 26 Jan 2011 at 1:09pm |
|
I emailed forest river about the bike carrier and then I found it from another vender.
http://www.etrailer.com/Hitch-Bike-Racks/Highland/5801200.html I looked at the PDF they sent me and the PDF at etrailer, as far as I can see, they are exact! Also here is a video on it also. http://www.youtube.com/watch?v=YaSmDocKkaU&sns=em I've been wondering about the bike rack for months now. We had one on top of our tent trailer, but it was a real pain. Lifting the bikes on then remove them when we set up. Any chance gepaine that you could post a picture that shows what the better receiver looks like from underneath? |
|
|
Ready to pod around!
|
|
 |
|
|
techntrek
Admin Group - pHp 
Joined: 29 Jul 2009 Location: MD Online Status: Offline Posts: 9062 |
Posted: 22 Jan 2011 at 6:23pm |
|
gepaine, I was going on memory, its been a while since I read about that failure. Good to hear that they have improved the design!
|
|
|
|
|
TerryM
Admin Group - pHp

Joined: 16 Nov 2009 Location: Saint Augustine Online Status: Offline Posts: 1950 |
Posted: 22 Jan 2011 at 6:05pm |
|
Might be a good idea for everyone to take a GOOD inspection look at their receiver.
Terry |
|
|
RP-175 W/Lift Kit 2011 Ford F-150 4X4
Saint Augustine, FL: The first permanent European settlement in the USA: 1565 |
|
|
|
|
gepaine
Newbie 

Joined: 05 Jan 2010 Location: Carnation, WA Online Status: Offline Posts: 29 |
Posted: 22 Jan 2011 at 11:35am |
|
techntrek,
Before moving the spare tire mount to the tongue, I did a lot of research on this site and agonized over whether I could ultimately trust the receiver on our RP175. I learned that there appears to be two ways Forest River mounted the receiver. I'll call them the "Shoddy Design" and the "Improved Design"
Shoddy Design: This is where the receiver is welded under the frame member with no bracing whatsoever. This was the design of the one and only receiver failure that I could find documented on R-PODnation.com (or on this site). This receiver failed not because the welds failed, but because the frame member failed. (I also have not been able to find any postings where cracking of welds was reported. If you know of them, please post a pointer to them.)
Improved Design: This is where the receiver is T'ed into the frame member and supporting plates (I think someone called them "gussetts") are welded above and below the receiver and frame member. This is the design used on my R-POD and is labeled as being capable of carrying up to 200 pounds. (Mine will carry 85 pounds.)
So does this mean I am confident that my receiver will not fail? Nope.
I would like to hear from others who carry two bikes on the rear of their R-POD, especially anyone who has experienced cracked welds or even worse problems. Also, it would be important to know which design their R-POD receiver has.
I am also going to talk to Forest River about their bike rack as well as others that some have said are "approved" for use on travel trailers. (Camping World has a Swagman I may look at.)
So, the question for me is, since I have what appears to be a very good "belt" (the braced receiver installation), do I also want the "suspenders" (a different bike rack than I currently use)?
|
|
|
Gene & Linda - 2007 Escalade - 24-Foot Keystone Cougar TT - Life is not just about gas mileage!
|
|
|
|
|
techntrek
Admin Group - pHp
Joined: 29 Jul 2009 Location: MD Online Status: Offline Posts: 9062 |
Posted: 21 Jan 2011 at 7:13pm |
|
Looks great! Take a good look at the 'pod's receiver hitch then make sure you reinforce it - others have had problems with welds cracking under the dynamic load of bikes bouncing back there, allowing the load to bend the tube downward.
|
|
|
|
|
Goose
Senior Member
Joined: 24 Sep 2010 Location: Arizona Online Status: Offline Posts: 672 |
Posted: 20 Jan 2011 at 5:51pm |
|
gepaine, I forgot that you said that you were going to carry a couple of bikes in the back. Bikes in the back would balance the weight of the tire on the front.
Goose
|
|
|
Mother Goose's Caboose..2011 RP171..07 Grand Cherokee
|
|
|
|
|
gepaine
Newbie
Joined: 05 Jan 2010 Location: Carnation, WA Online Status: Offline Posts: 29 |
Posted: 20 Jan 2011 at 5:28pm |
|
Moose,
How much this changes the hitch weight is a good question. I don't know the answer, but I do know the following:
(1) Wheel, tire, and mount weight removed from the rear and added to the tongue is about 40 pounds.
This is all we need to know regarding change in tongue weight when not carrying the bikes. I'm sure the tongue weight is increased, but I'd have to weigh the R-POD to know exactly. My guess would be between 30 and 40 pounds which is fine with me as previously my tongue weight of 260 pounds was only about 8% of total weight, so more is better. (And my Class IV hitch and TV can handle a lot more weight!)
(2) Each bicycle weighs 35 pounds and the bike rack weighs 15 pounds. So when carrying the bikes on the rear of the R-POD, I will be adding about 85 pounds to the rear. This will tend to reduce my tongue weight, but I don't know by how much. Maybe to less than it was before this mod.
Maybe some physics expert out there can do the calculations.
|
|
|
Gene & Linda - 2007 Escalade - 24-Foot Keystone Cougar TT - Life is not just about gas mileage!
|
|
|
|
|
Guests
Guest Group 
|
Posted: 20 Jan 2011 at 4:45pm |
|
Looks great...well done!!
|
|
|
|
|
Goose
Senior Member
Joined: 24 Sep 2010 Location: Arizona Online Status: Offline Posts: 672 |
Posted: 20 Jan 2011 at 3:52pm |
|
I like that!!! Good job of doing your home work before spending time and energy with something that might not work. Just wondering how much more tounge weight this adds?
Goose
|
|
|
Mother Goose's Caboose..2011 RP171..07 Grand Cherokee
|
|
|
|
|
gepaine
Newbie
Joined: 05 Jan 2010 Location: Carnation, WA Online Status: Offline Posts: 29 |
Posted: 20 Jan 2011 at 11:47am |
|
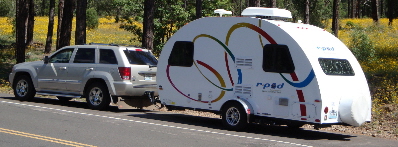
Wanting to carry two bicycles on the rear of our RP-175, I fabricated a spare tire mount for the tongue.  Here is a list of the parts I needed:
Trailer Spare Tire Carrier from Cabela’s (Item # IK-015644) $27.99 2.5” x 1” x 25” steel tube (1/8” thick walls) $25.50 2.5” x 1” x 3” steel tube (1/8” thick walls) $ 3.18 17.25” x 2” x 0.25” steel bar $13.11 (All steel purchased from OnlineMetals.com) (2) 4” x 3/8” bolts with 2 flat washers and 1 lock washer (1) 4.5” x 3/8” bolts with 2 flat washers and 1 lock washer (1) 2” x 3/8” bolt with 2 flat washers and 1 lock washer (2) 4-inch long backing plates fabricated from 1” x 0.25” steel bar stock from Home Depot 1 can Rustoleum primer paint 1 can Rustoleum black paint
I mounted the assembly on the inside of the tongue’s frame to minimize the distance between the tire and the trailer’s center line so that there would be little or no impact on the turning radius and to facilitate access to the WDH’s tensioning mechanism which is just below the tire. Since it was going to be a tight fit for the tire between the front of the R-POD and the single propane tank, I modeled the assembly out of plywood first. I ended up with about 2 inches of clearance on the front and back of the tire. That is more than enough because the mount is rock solid, meaning I don’t have to worry about the mounting post flexing and allowing the tire to move around. I attached the tire carrier to the mounting post with the hardware that came with the carrier. I turned the mounting brackets 90-degrees to the normal orientation and cutoff the excess bracket length. This allowed me to mount the tire carrier to a basically vertical post instead of the horizontal tongue frame that it was designed for. I attached the mounting post to the tongue frame with two 4” x 3/8” bolts inserted thru 13/32” holes drilled all the way thru the frame and mounting post. A 4.5” x 3/8” bolt attaches the ¼” thick steel bracing bar and 3” long steel tube to the frame. (The 3” tube is used as a spacer between the frame and the steel bar.) The 2” x 3/8” bolt attaches the ¼” steel bracing bar to the mounting post. 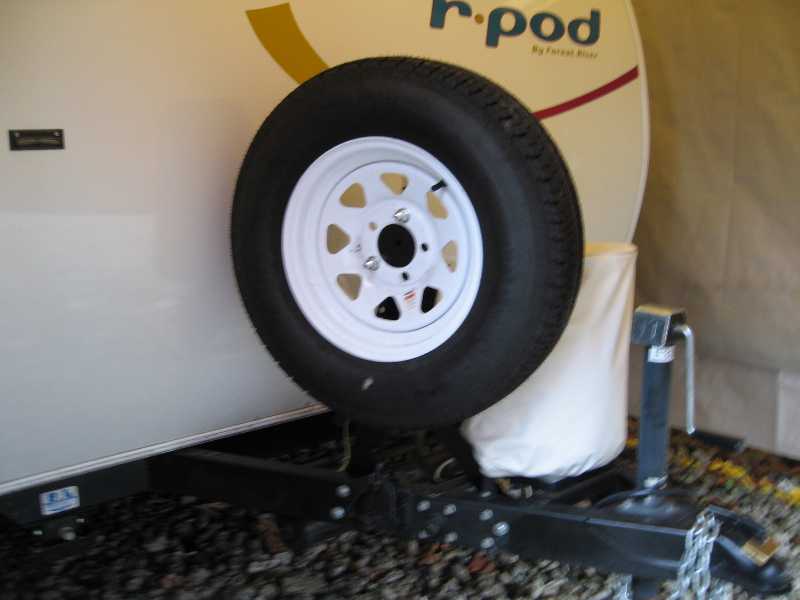  After my initial installation (which is pictured above), I noticed that the bolts thru the frame had deflected the center of the frame side inward about 1/16th inch even though they were only torqued to 16 ft-lbs – the recommended torque for the 3/8” bolts (SAE2). To prevent damage to the outer side wall of the frame, I added backing plates (pictured separately below) made of ¼” thick by 1” wide steel. (If I were to do this again, I would probably go with a 5/16” or 3/8” thick backing plate, or 2 bolts, for attaching the brace bar to the frame since even with the 1/4” thick plate, the side wall as well as the plate deflected inward slightly.) (On the other hand, I did not observe any deflection where the 2 bolts attach the mounting post to the frame.)
 |
|
|
Gene & Linda - 2007 Escalade - 24-Foot Keystone Cougar TT - Life is not just about gas mileage!
|
|
|
|
|
Post Reply
|
| Forum Jump | Forum Permissions You cannot post new topics in this forum You cannot reply to topics in this forum You cannot delete your posts in this forum You cannot edit your posts in this forum You cannot create polls in this forum You cannot vote in polls in this forum |


 Spare Tire Mount for Tongue

