|
|
Post Reply 
|
Page 123> |
| Author |
 Printable Version Printable Version Google Google Delicious Delicious Digg Digg StumbleUpon StumbleUpon Windows Live Windows Live Yahoo Bookmarks Yahoo Bookmarks reddit reddit Facebook Facebook MySpace MySpace Newsvine Newsvine Furl Furl Topic Search Topic Search  Topic Options Topic Options
|
jimandclare 
Groupie 
Joined: 13 Apr 2016 Location: Erie, MI Online Status: Offline Posts: 96 |
 Topic: Creating more space in the R-178 Topic: Creating more space in the R-178Posted: 25 Feb 2017 at 9:15am |
|
We purchased our 2016 R-178 last spring and just love
it. The floor plan works perfect and
there’s plenty of room for us and friends or grand kids. A number of members of the forum have
commented that interior storage space in the 178 is at a premium. That is an absolute fact. Over the past year we’ve poured through this
forum and copied numerous mods from other’s experience in order to use the
space as efficiently as possible. Well, on our last trip my wife commented on how little usable
space there actually is with the entertainment center. I think crappy was the word she used. You know, that skinny cabinet that takes up
space but only provides about 3 1/2” of usable depth. Well, looking at it I realized that on the
178 the entertainment center attaches to an outside wall of over 9” wide. Hey, that’s space that’s going to waste. So, the final mod I made before buttoning up the pod for the
winter was a new, deeper, entertainment center.
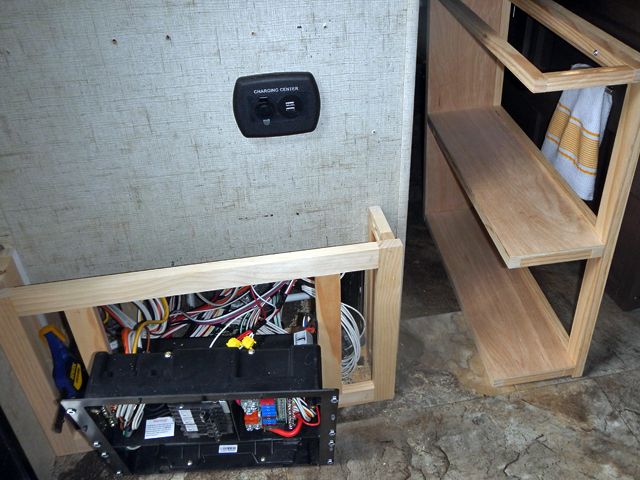
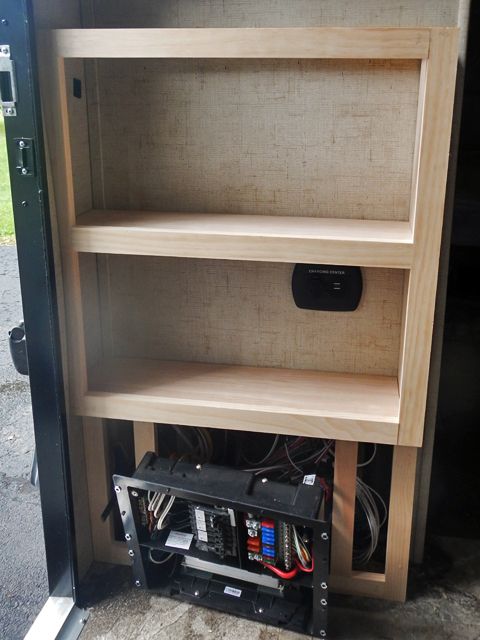
So here it is with a larger top I made. What the heck, I got gutsy, took a chance and
removed the original cabinet to see how it was made. I knew that could always put it back. The removal was pretty straight forward
though you have to search carefully for all of the screws holding it in place. The hardest part during removal was twisting
the electrical panel out of the cabinet opening.
I sketched up some plans and used clear pine and pocket screws for the face frames of the new cabinet. Since I couldn’t find 1/8” plywood locally I opted for ¼” birch plywood for the panels and shelving.
Here’s a couple of pictures of dry fitting the new cabinet
in place to make sure everything fits together properly and to check the size
and shape. I decided early during the
planning to make the new cabinet in two pieces.
The lower section holding the electrical panel is a direct copy of the
original. Because of the rats nest of
wires and cables inside there wasn’t any way to gain any additional usable
space by making it deeper. Also,
removing the panel for electrical work from a deeper cabinet was going to be
difficult at best so it just made sense to keep it the same.
The new shelving section is now about 8” deep and will screw
onto the base and into the walls.
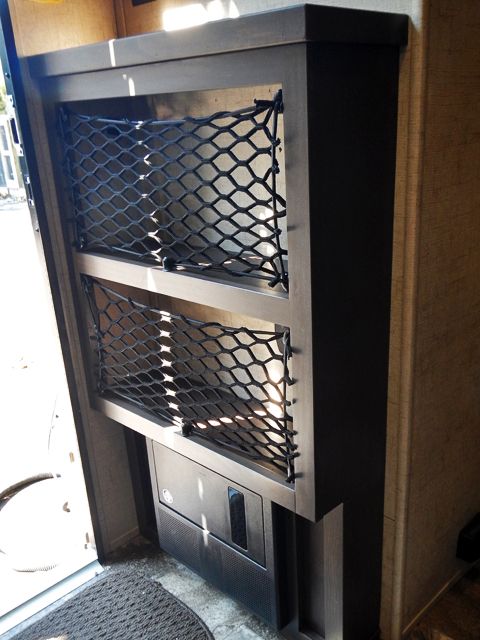
The whole cabinet was screwed together with pocket screws. This made it easy to disassemble the individual pieces for sanding, staining and finishing. I had a stain custom mixed at Sherwim-Williams to match the faux woodwork. Finishing was with a clear polyurethane spray. This step was pretty labor intensive took quite a bit of time to complete.
This was a relatively fun mod to do and I like the way it
turned out. Hope this gives some of the 178
owners an idea of how to gain some more space.
In hind sight this mod could have been done much differently. The lower section of the original cabinet could
be cut off and reused as a base for a new cabinet/shelf. Then a cabinet, maybe with doors and
adjustable shelves could be made to sit on it.
Or, just an open set of shelves. The
television can be moved up on the wall for even more usable space. |
|
|
Jim & Clare
2016 R-pod 178 2014 Ford Edge |
|
 |
|
|
Bugout
Senior Member 

Joined: 01 Jan 2017 Location: S caroline Online Status: Offline Posts: 117 |
Posted: 25 Feb 2017 at 9:54am |
|
Nice mod this just went on my to do list.allso custom stain
|
|
|
Jk Aiken South Carolina 2016 178 Toyota Tundra 2017 4.6
|
|
|
|
|
Leo B
podders Helping podders - pHp

Joined: 13 Jan 2012 Location: Lyndonville, VT Online Status: Offline Posts: 4518 |
Posted: 25 Feb 2017 at 10:55am |
|
Really nice work!
|
|
|
Leo & Melissa Bachand
2017 Ford F150 2021 Vista Cruiser 19 csk Previously owned 2015 Rpod 179 2010 Rpod 171 |
|
|
|
|
voisj
Senior Member

Joined: 19 Jul 2016 Location: San Luis Obispo Online Status: Offline Posts: 471 |
Posted: 25 Feb 2017 at 1:52pm |
|
jimandclare,
Well done! Were the cargo nets in the original cabinet or did you find a source to buy them from. I've added a few shelves and cant find a source for the nets. Does anyone else know? rgds John
|
|
|
|
|
jimandclare
Groupie
Joined: 13 Apr 2016 Location: Erie, MI Online Status: Offline Posts: 96 |
Posted: 25 Feb 2017 at 2:15pm |
|
Thanks Leo and Bugout
The netting is original and came with the pod. I seem to remember another post sometime during this past year that identified a supplier of the elastic netting. You could purchase and cut to the sizes you need. I don't think I bookmarked the link so maybe someone else here may be able to identify the supplier for you.
|
|
|
Jim & Clare
2016 R-pod 178 2014 Ford Edge |
|
|
|
|
jimandclare
Groupie
Joined: 13 Apr 2016 Location: Erie, MI Online Status: Offline Posts: 96 |
Posted: 25 Feb 2017 at 2:22pm |
|
Sorry - Thanks also voisj
|
|
|
Jim & Clare
2016 R-pod 178 2014 Ford Edge |
|
|
|
|
jimandclare
Groupie
Joined: 13 Apr 2016 Location: Erie, MI Online Status: Offline Posts: 96 |
Posted: 25 Feb 2017 at 2:32pm |
|
voisj - Did a quick search and found this website for the webbing. It's a starting point for yyou to look at.
|
|
|
Jim & Clare
2016 R-pod 178 2014 Ford Edge |
|
|
|
|
voisj
Senior Member
Joined: 19 Jul 2016 Location: San Luis Obispo Online Status: Offline Posts: 471 |
Posted: 25 Feb 2017 at 2:35pm |
|
Jim&Clare,
Here is my answer to the lack of storage in our 180. Thanks for the net link!! Original post  |
|
|
|
|
jimandclare
Groupie
Joined: 13 Apr 2016 Location: Erie, MI Online Status: Offline Posts: 96 |
Posted: 25 Feb 2017 at 3:36pm |
|
voisj
I saww that one. Loved it. It's on my list to try a drawer with full extension hardware under the 178 bed and still have space for the furnace and cold air return. Hmmmm ... I wonder how much space is available under the bathroom? Thats for another day. |
|
|
Jim & Clare
2016 R-pod 178 2014 Ford Edge |
|
|
|
|
voisj
Senior Member
Joined: 19 Jul 2016 Location: San Luis Obispo Online Status: Offline Posts: 471 |
Posted: 26 Feb 2017 at 10:47am |
|
Jim&clare,
The 178 has the bed in the back, isn't the furnace up front in the dinette?
|
|
|
|
|
Post Reply
|
Page 123> |
| Forum Jump | Forum Permissions You cannot post new topics in this forum You cannot reply to topics in this forum You cannot delete your posts in this forum You cannot edit your posts in this forum You cannot create polls in this forum You cannot vote in polls in this forum |


 Creating more space in the R-178