Creating more space in the R-178
Printed From: R-pod Owners Forum
Category: R-pod Discussion Forums
Forum Name: Podmods, Maintenance, Tips and Tricks
Forum Discription: Ask maintenance questions, share your podmods (modifications) and helpful tips
URL: http://www.rpod-owners.com/forum_posts.asp?TID=9379
Printed Date: 29 Jun 2025 at 8:53pm
Software Version: Web Wiz Forums 9.64 - http://www.webwizforums.com
Topic: Creating more space in the R-178
Posted By: jimandclare
Subject: Creating more space in the R-178
Date Posted: 25 Feb 2017 at 9:15am
|
We purchased our 2016 R-178 last spring and just love
it. The floor plan works perfect and
there’s plenty of room for us and friends or grand kids. A number of members of the forum have
commented that interior storage space in the 178 is at a premium. That is an absolute fact. Over the past year we’ve poured through this
forum and copied numerous mods from other’s experience in order to use the
space as efficiently as possible. Well, on our last trip my wife commented on how little usable
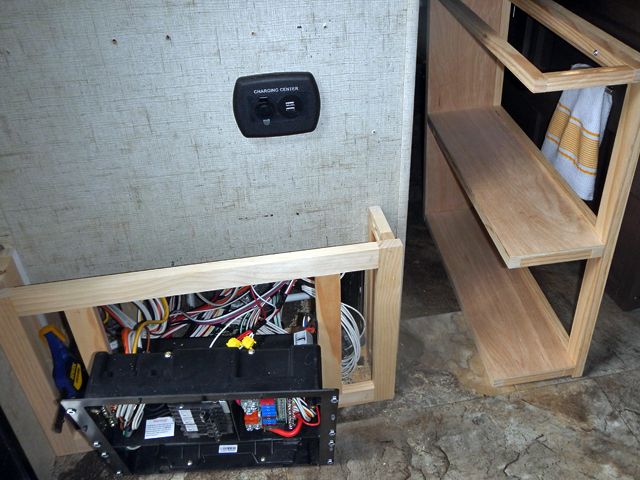
space there actually is with the entertainment center. I think crappy was the word she used. You know, that skinny cabinet that takes up
space but only provides about 3 1/2” of usable depth. Well, looking at it I realized that on the
178 the entertainment center attaches to an outside wall of over 9” wide. Hey, that’s space that’s going to waste. So, the final mod I made before buttoning up the pod for the
winter was a new, deeper, entertainment center.
So here it is with a larger top I made. What the heck, I got gutsy, took a chance and
removed the original cabinet to see how it was made. I knew that could always put it back. The removal was pretty straight forward
though you have to search carefully for all of the screws holding it in place. The hardest part during removal was twisting
the electrical panel out of the cabinet opening.
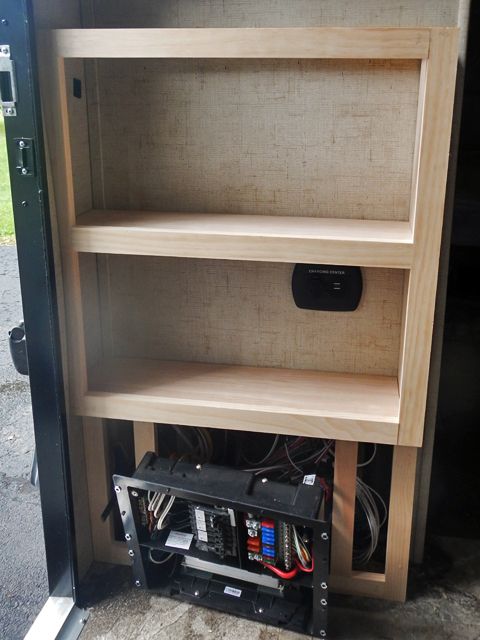
I sketched up some plans and used clear pine and pocket screws for the face frames of the new cabinet. Since I couldn’t find 1/8” plywood locally I opted for ¼” birch plywood for the panels and shelving.
Here’s a couple of pictures of dry fitting the new cabinet
in place to make sure everything fits together properly and to check the size
and shape. I decided early during the
planning to make the new cabinet in two pieces.
The lower section holding the electrical panel is a direct copy of the
original. Because of the rats nest of
wires and cables inside there wasn’t any way to gain any additional usable
space by making it deeper. Also,
removing the panel for electrical work from a deeper cabinet was going to be
difficult at best so it just made sense to keep it the same.
The new shelving section is now about 8” deep and will screw
onto the base and into the walls.
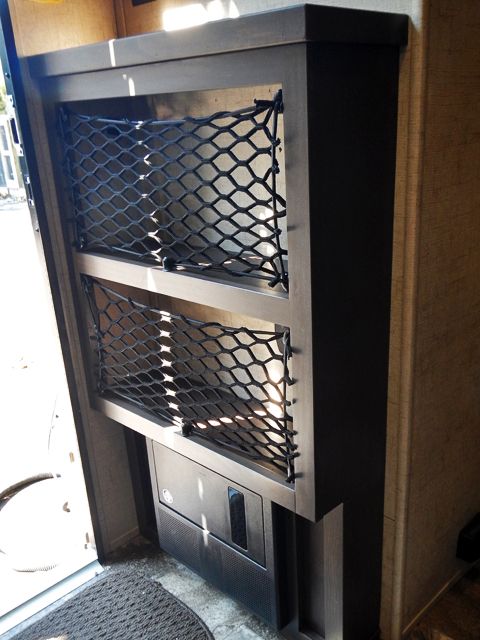
The whole cabinet was screwed together with pocket screws. This made it easy to disassemble the individual pieces for sanding, staining and finishing. I had a stain custom mixed at Sherwim-Williams to match the faux woodwork. Finishing was with a clear polyurethane spray. This step was pretty labor intensive took quite a bit of time to complete.
This was a relatively fun mod to do and I like the way it
turned out. Hope this gives some of the 178
owners an idea of how to gain some more space.
In hind sight this mod could have been done much differently. The lower section of the original cabinet could
be cut off and reused as a base for a new cabinet/shelf. Then a cabinet, maybe with doors and
adjustable shelves could be made to sit on it.
Or, just an open set of shelves. The
television can be moved up on the wall for even more usable space. ------------- Jim & Clare 2016 R-pod 178 2014 Ford Edge |


Replies:
Posted By: Bugout
Date Posted: 25 Feb 2017 at 9:54am
|
Nice mod this just went on my to do list.allso custom stain ------------- Jk Aiken South Carolina 2016 178 Toyota Tundra 2017 4.6 |
Posted By: Leo B
Date Posted: 25 Feb 2017 at 10:55am
|
Really nice work!
------------- Leo & Melissa Bachand 2017 Ford F150 2021 Vista Cruiser 19 csk Previously owned 2015 Rpod 179 2010 Rpod 171 |
Posted By: voisj
Date Posted: 25 Feb 2017 at 1:52pm
|
jimandclare, Well done! Were the cargo nets in the original cabinet or did you find a source to buy them from. I've added a few shelves and cant find a source for the nets. Does anyone else know? rgds John ------------- http://www.rpod-owners.com/forum_posts.asp?TID=9426&title=slopod-180-mods-johnsue - SLOPODMODS John&Sue,SLO,CA 2016 180 HRE, 2013 F150 Eco Boost 
|
Posted By: jimandclare
Date Posted: 25 Feb 2017 at 2:15pm
|
Thanks Leo and Bugout The netting is original and came with the pod. I seem to remember another post sometime during this past year that identified a supplier of the elastic netting. You could purchase and cut to the sizes you need. I don't think I bookmarked the link so maybe someone else here may be able to identify the supplier for you. ------------- Jim & Clare 2016 R-pod 178 2014 Ford Edge |
Posted By: jimandclare
Date Posted: 25 Feb 2017 at 2:22pm
|
Sorry - Thanks also voisj ------------- Jim & Clare 2016 R-pod 178 2014 Ford Edge |
Posted By: jimandclare
Date Posted: 25 Feb 2017 at 2:32pm
|
voisj - Did a quick search and found this website for the webbing. It's a starting point for yyou to look at. https://www.organizedobie.com/categories/259/Barrier-Stretch-Nets - https://www.organizedobie.com/categories/259/Barrier-Stretch-Nets ------------- Jim & Clare 2016 R-pod 178 2014 Ford Edge |
Posted By: voisj
Date Posted: 25 Feb 2017 at 2:35pm
|
Jim&Clare, Here is my answer to the lack of storage in our 180. Thanks for the net link!! Original post http://www.rpod-owners.com/forum_posts.asp?TID=9039&title=2nd-180-podmod-drawers-under-matress - http://www.rpod-owners.com/forum_posts.asp?TID=9039&title=2nd-180-podmod-drawers-under-matress  ------------- http://www.rpod-owners.com/forum_posts.asp?TID=9426&title=slopod-180-mods-johnsue - SLOPODMODS John&Sue,SLO,CA 2016 180 HRE, 2013 F150 Eco Boost
|
Posted By: jimandclare
Date Posted: 25 Feb 2017 at 3:36pm
|
voisj
I saww that one. Loved it. It's on my list to try a drawer with full extension hardware under the 178 bed and still have space for the furnace and cold air return. Hmmmm ... I wonder how much space is available under the bathroom? Thats for another day. ------------- Jim & Clare 2016 R-pod 178 2014 Ford Edge |
Posted By: voisj
Date Posted: 26 Feb 2017 at 10:47am
|
Jim&clare, The 178 has the bed in the back, isn't the furnace up front in the dinette? ------------- http://www.rpod-owners.com/forum_posts.asp?TID=9426&title=slopod-180-mods-johnsue - SLOPODMODS John&Sue,SLO,CA 2016 180 HRE, 2013 F150 Eco Boost
|
Posted By: jimandclare
Date Posted: 26 Feb 2017 at 10:51am
|
Nope its under the bed. ------------- Jim & Clare 2016 R-pod 178 2014 Ford Edge |
Posted By: voisj
Date Posted: 26 Feb 2017 at 11:28am
|
I see it in the pictures now, there's not much room for a drawer, This heat deflector could help a little. http://www.rpod-owners.com/forum_posts.asp?TID=9066&KW=&PID=85213&title=3rd-180-mod-furnace-heat-deflector#85213 - http://www.rpod-owners.com/forum_posts.asp?TID=9066&KW=&PID=85213&title=3rd-180-mod-furnace-heat-deflector#85213 I made it so i could keep plastic bins under the bed and not melt anything. Not pretty, but blows the air out into the cabin instead of under the bed. ------------- http://www.rpod-owners.com/forum_posts.asp?TID=9426&title=slopod-180-mods-johnsue - SLOPODMODS John&Sue,SLO,CA 2016 180 HRE, 2013 F150 Eco Boost
|
Posted By: Wood River Pod
Date Posted: 26 Feb 2017 at 3:33pm
|
What is the SW stain or paint recipe? I'd like to get some mixed up. Both stain and paint. Been using Brown "Espresso" spray paint. Not for anything to out on the open. Does not match 100% but works for small stuff. Would love to match the color. Have not had the time to take a drawer in and have it matched. Great Mod! Looks awesome. Thanks ------------- Smith's in Hailey Early 2017 179 HRE http://www.rpod-owners.com/forum_posts.asp?TID=9134&PN=1&title=wood-river-179-mods - Wood River Mods |
Posted By: jimandclare
Date Posted: 27 Feb 2017 at 6:54am
I took a sample of the opaque muddy gray brown trim to Sherwin Williams and after a few days they produced a stain that is really close. Have to just keep building up 3-4 thin layers of the stain. Here is the formula - hope it helps. 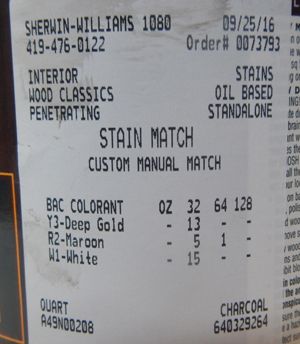 ------------- Jim & Clare 2016 R-pod 178 2014 Ford Edge |
Posted By: jimandclare
Date Posted: 27 Feb 2017 at 6:58am
Great idea. Looks like there still might be room for a full extension drawer. I'll have to get out the tape measure have a look. ------------- Jim & Clare 2016 R-pod 178 2014 Ford Edge |
Posted By: Wood River Pod
Date Posted: 02 Mar 2017 at 5:35pm
|
jimandclare, Thanks for the stain info. I took your info and one of my drawers into my local Sherwin Williams. After a 1 1/2 days they came up with a very close paint recipe. It was difficult since the manufacturer stained the wood and then put a "cloudy" clear coat on (per the paint store), which produces the "muddy" look as you called it. I was pleased with the sample patch we put on the back of the drawer. This should be fine for small patch jobs or painting accent pieces. I'm hoping it works fine on the particle board found throughout the pods. Regardless, it will be better than the espresso brown spray paint I've been using. Hope the forum finds this useful. If someone tweaks this for a better result, please share with the group. Thanks  ------------- Smith's in Hailey Early 2017 179 HRE http://www.rpod-owners.com/forum_posts.asp?TID=9134&PN=1&title=wood-river-179-mods - Wood River Mods |
Posted By: jimandclare
Date Posted: 02 Mar 2017 at 7:12pm
|
Paint instead of stain! Wish I'd thought of that. Looks like a trip to Sherwin Williams is in the cards for this weekend. Thanks for sharing a cool idea. Do you think it's in their computer as Jeffs Rpod Brown? ------------- Jim & Clare 2016 R-pod 178 2014 Ford Edge |
Posted By: Wood River Pod
Date Posted: 03 Mar 2017 at 9:43am
|
It should be. If not the recipe is on my picture. It's an enamel paint, so it will paint everything but glass. They said mix a drop of water with a small amount to thin it out, and it should blend nicely with existing. At first they tried to convert your stain recipe to paint, but it came out pink. The sample on the back of the drawer looks good. Enjoy!
------------- Smith's in Hailey Early 2017 179 HRE http://www.rpod-owners.com/forum_posts.asp?TID=9134&PN=1&title=wood-river-179-mods - Wood River Mods |
Posted By: jimandclare
Date Posted: 04 Mar 2017 at 11:30am
Just a quick note that "Jeff's Rpod Brown" paint color is in fact in the Sherwin-Williams color database. Thanks for sharing Jeff. ------------- Jim & Clare 2016 R-pod 178 2014 Ford Edge |
Posted By: jimandclare
Date Posted: 09 Jun 2017 at 3:00pm
|
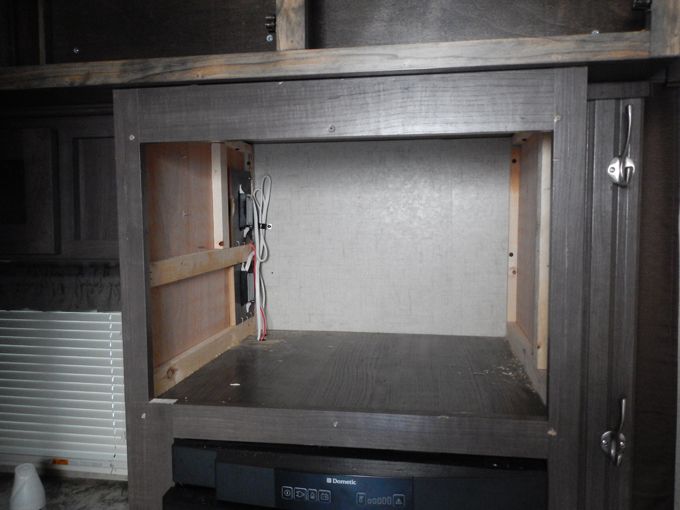
This past winter I was standing in our 178 and got curious
about how much space the microwave actually took up in the cabinet. So on a lark I took it out figuring I could
always put it back in if necessary. Holy
smokes I couldn’t believe the amount of additional storage space that was
available if we took out the microwave completely. We don’t use the microwave that much and it
weighs nearly 50 pounds. That’s just too
much unnecessary weight to heat up a cup of coffee and make popcorn. So we decided to re-purpose the cabinet for
storage and purchase an inexpensive light weight toaster oven to replace it.
I lined the inside of the cabinet with 1/8 thick hardboard and made a removable box around the exposed electrical wires and outlets.
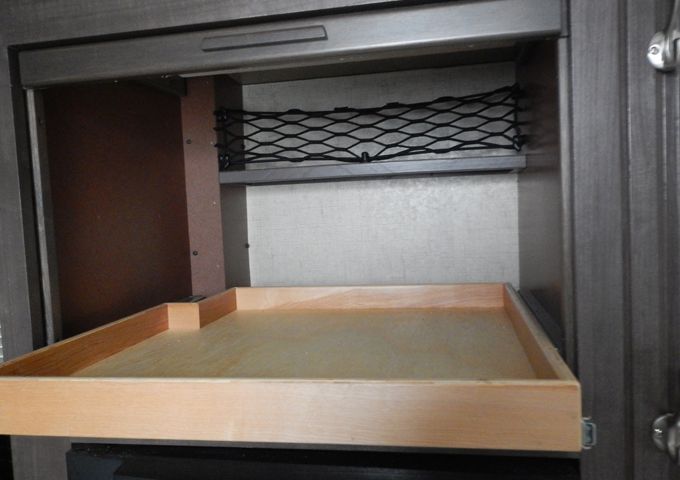
Then I finished off the inside with a small shelf and a slide out tray for our food and cooking supplies.
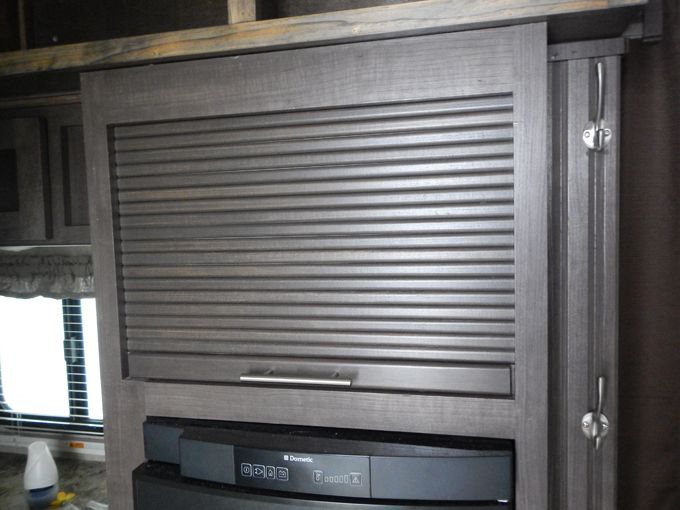
We had a rather warm spell this past winter and with
entirely too much time on my hands I finished of the cabinet with a tambour
door.
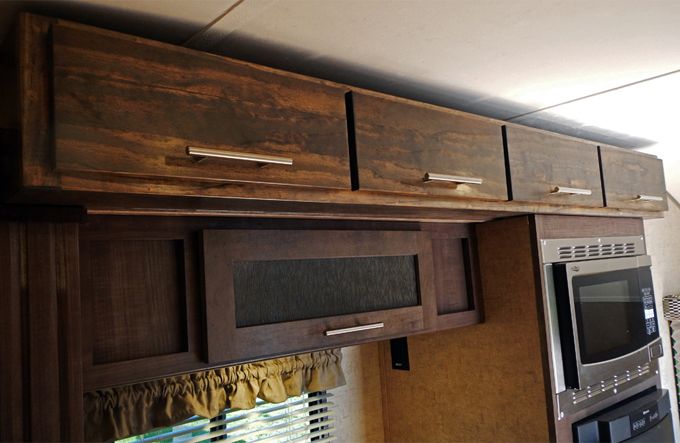
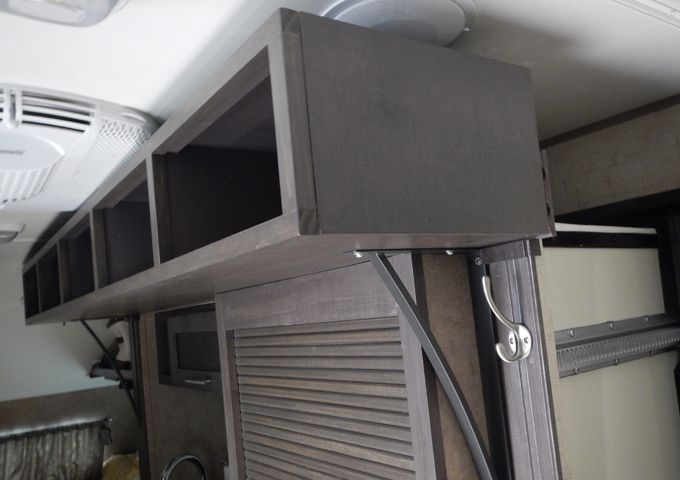
Last summer I built a cabinet above the kitchen area and
fastened it to the molding at the top of the slide out. Great idea for additional space but a really lousy
design. It just wasn’t deep enough to be
of any use.
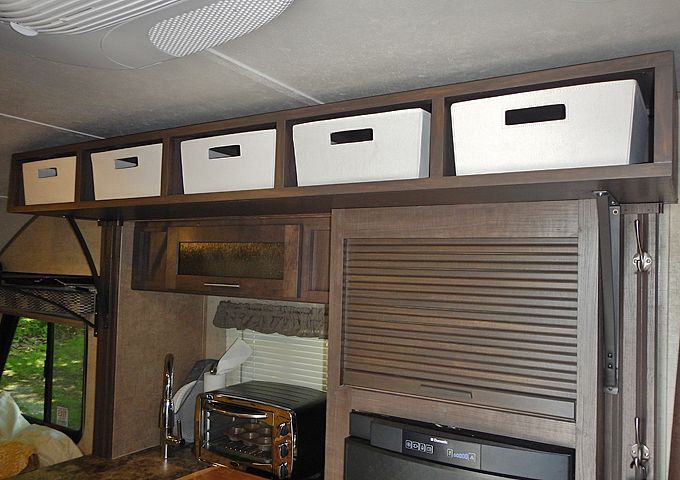
So I took it out and built another one the full 75” length of the upper molding and 13” deep. The height at 7 ¾” is enough to give clearance with the AC unit and the curvature of the ceiling in the rear of the 178 when the slide out moves in and out.
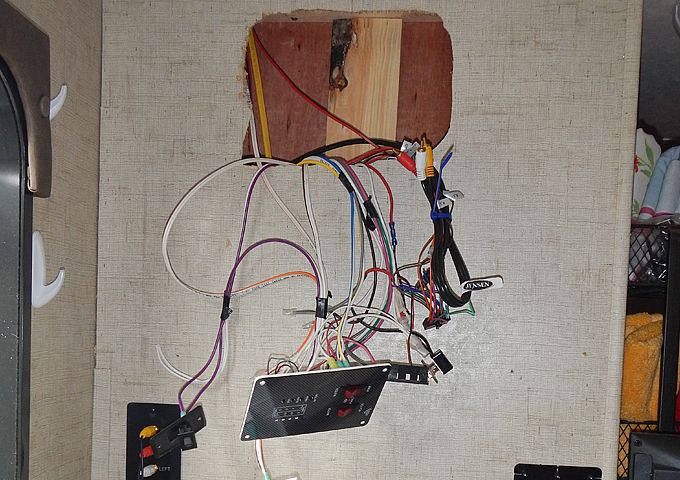
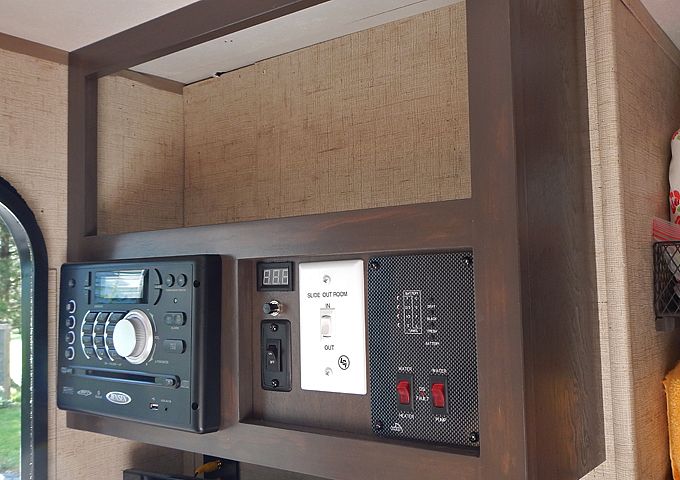
Lastly, one design feature about the 178 we find irritating is the placement of radio. It’s up near the ceiling and it’s impossible to see the LCD display clearly in any level of light without something to stand on.
So I removed the radio and the entire cabinet and built a new deeper cabinet using the original as a model.
Rerouted the rat’s nest of wires through new lower openings
in the wall. Mounting the radio at eye
level and the switches and tank level indicators closer together created another
nice sized storage area above.
I covered the original hole in the wall with the drawer
bottoms I saved after making new deeper and taller drawers. ------------- Jim & Clare 2016 R-pod 178 2014 Ford Edge |


Posted By: greenpod
Date Posted: 09 Jun 2017 at 5:10pm
| Fine looking work! |
Posted By: geewizard
Date Posted: 10 Jun 2017 at 9:49am
|
I removed the microwave from our 177 to use the space for added storage. In our 177, the inside of the space was finished so I didn't have to do anything other than put up a net. The net I bought from Amazon http://www.amazon.com/gp/product/B00QMT3488/ref=oh_aui_detailpage_o05_s00?ie=UTF8&psc=1 - http://www.amazon.com/gp/product/B00QMT3488/ref=oh_aui_detailpage_o05_s00?ie=UTF8&psc=1 fit perfectly. ------------- 2021 Winnebago Micro Minnie 1708FB 2017 R-Pod 177 (Blue) HRE SOLD 2004 Outfitter Apex 8 camper 2014 Toyota Tundra DC |
Posted By: jimandclare
Date Posted: 10 Jun 2017 at 4:11pm
|
I like the cargo net idea because it matches everything else but wasn't able to locate that particular one so I was leaning towards making cabinet doors. My wife didn't want to be banging into the doors so had to find on a compromise. When I was younger I wanted to make a roll top desk but never got around to it so I opted for the tambour door. Easier than I thought it would be and now it's out of my system. ------------- Jim & Clare 2016 R-pod 178 2014 Ford Edge |
Posted By: geewizard
Date Posted: 10 Jun 2017 at 7:17pm
|
My wife likes your tambour door. Where did you get it?
------------- 2021 Winnebago Micro Minnie 1708FB 2017 R-Pod 177 (Blue) HRE SOLD 2004 Outfitter Apex 8 camper 2014 Toyota Tundra DC |
Posted By: jimandclare
Date Posted: 10 Jun 2017 at 8:27pm
Actually I couldn't find anything online that would fit this opening so instead I built it from scratch. Not as difficult as I feared it would be. Plenty of DIY articles and YouTube videos online. First I drew the inside view of the cabinet full sized on some cardboard and laid out a shape for the track. Used that drawing to make a template to route a 5/16" groove for the door to slide in. I made the track in 2 pieces so I could get the door into the tight space.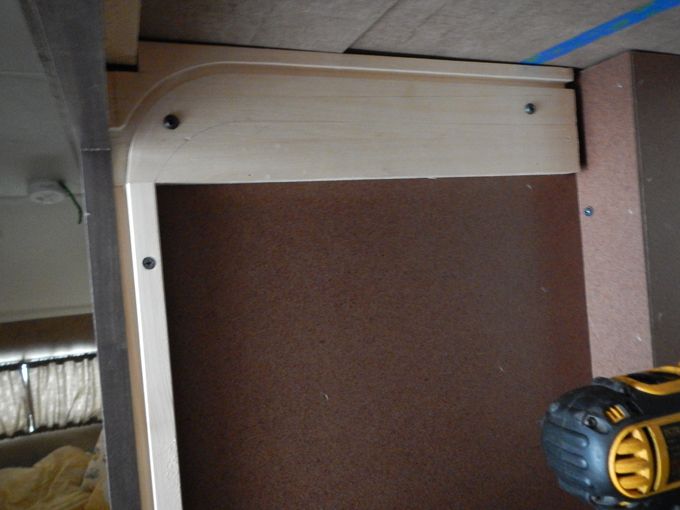 I rounded the edges on some 3/4" poplar and cut each of the slats 1/4" thick. Then I set them in the track to check for length and figure out how many I needed to make. 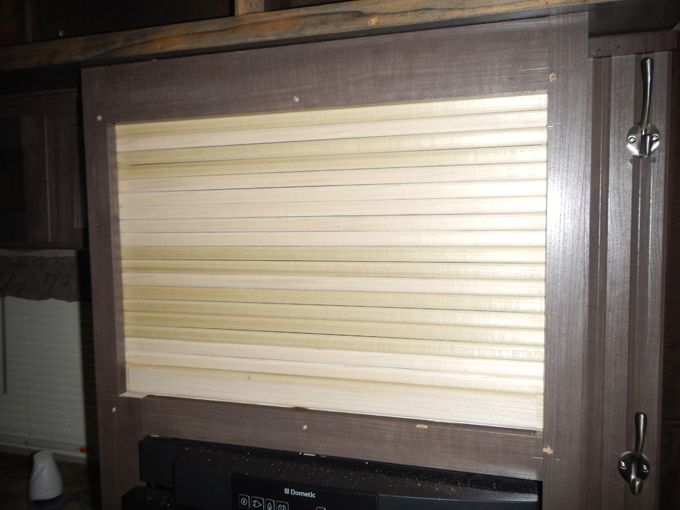 Then I stained and finished them and glued them on to some cotton canvas from Walmart with a spray contact adhesive. I stretched the canvas and stapled it to some plywood. Then I screwed 2 straight boards to the plywood on the canvas at 90 degrees to use as guides to keep the slats lined up and straight. Then I used a sharp knife to cut away the excess canvas. 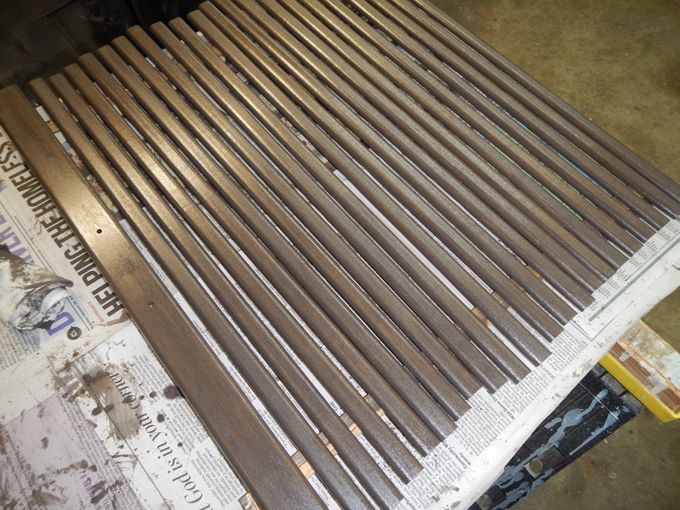 ------------- Jim & Clare 2016 R-pod 178 2014 Ford Edge |
Posted By: Leo B
Date Posted: 11 Jun 2017 at 4:46am
|
Nice work!!
------------- Leo & Melissa Bachand 2017 Ford F150 2021 Vista Cruiser 19 csk Previously owned 2015 Rpod 179 2010 Rpod 171 |
Posted By: geewizard
Date Posted: 11 Jun 2017 at 8:30am
|
yes indeed, very nice work. Thanks for the info.
------------- 2021 Winnebago Micro Minnie 1708FB 2017 R-Pod 177 (Blue) HRE SOLD 2004 Outfitter Apex 8 camper 2014 Toyota Tundra DC |