
|
List Your Mods: |
Post Reply 
|
Page <1 5051525354 79> |
| Author |
 Printable Version Printable Version Google Google Delicious Delicious Digg Digg StumbleUpon StumbleUpon Windows Live Windows Live Yahoo Bookmarks Yahoo Bookmarks reddit reddit Facebook Facebook MySpace MySpace Newsvine Newsvine Furl Furl Topic Search Topic Search  Topic Options Topic Options
|
NutPod 
Newbie 

Joined: 29 Jul 2016 Location: Canada Online Status: Offline Posts: 25 |
 Post Options Post Options
 Quote Reply Quote Reply
 Topic: List Your Mods: Topic: List Your Mods:Posted: 09 Sep 2016 at 10:37pm |
|
Yes they are external speakers that came with the trailer but in that picture I added the two roof vent covers.
|
|
 |
|
|
Bcmckean
Newbie
Joined: 16 May 2016 Online Status: Offline Posts: 13 |
Post Options
Quote Reply
Posted: 10 Sep 2016 at 4:11pm |
|
Ok thanks! I may have to get in contact with Forest River to see about purchasing a couple to add to mine since I don't have any.
|
|
|
|
|
CLT-NC R-Podder
Newbie
Joined: 18 Mar 2016 Online Status: Offline Posts: 8 |
Post Options
Quote Reply
Posted: 10 Sep 2016 at 8:08pm |
|
This is our newest "mod" to create additional storage space while we are camping. We removed the factory galley rail above the microwave and added an 8" wide shelf across the entire slide-out.

|
|
|
Joe & Erin
2016 178 towed by 2016 Toyota Tacoma double cab 4x4 |
|
|
|
|
StephenH
podders Helping podders - pHp 

Joined: 29 Nov 2015 Location: Wake Forest, NC Online Status: Offline Posts: 6484 |
Post Options
Quote Reply
Posted: 10 Sep 2016 at 8:15pm |
|
Nice work!
|
|
|
StephenH
Happy is the man that findeth wisdom,... ouR escaPOD mods Former RPod 179 Current Cherokee Grey Wolf 24 JS |
|
|
|
|
Jonknite
Newbie
Joined: 25 May 2015 Location: Placitas, NM Online Status: Offline Posts: 19 |
Post Options
Quote Reply
Posted: 19 Sep 2016 at 4:20pm |
|
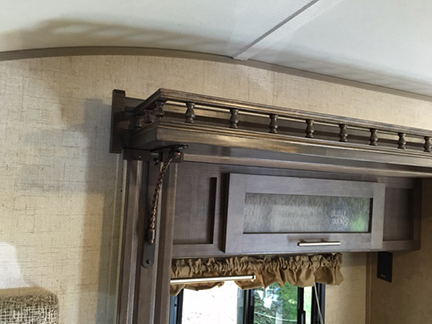
Third window over the dinette of an R-178
One thing I missed when I upgraded from a pop-up to the R-Pod was the amount of light inside. I added the porthole in the door as many have done, but I wanted more light in the dinette area. I ordered a 12" X 30" RV window and here is the result:  I built a frame out of 1X3's. The rounded corners were cut from 2 X 4's using a bandsaw.  Cut out a hole in Pod the same size as the frame. The bottom of the hole is even with the top of one of the framework members for solid attachment of the frame. The sides were screwed into the next frame member up which was cut after the hole.  Then I used high strength adhesive to add another frame member for screwing in the top of the frame and to give the inner and outer skin some strength.  Screw in the frame and then install the window as per the manufacturers directions. Done! |
|
|
|
|
kkomorn
Newbie
Joined: 17 Oct 2015 Online Status: Offline Posts: 7 |
Post Options
Quote Reply
Posted: 19 Sep 2016 at 4:53pm |
|
That is just awesome. Seriously.
|
|
|
|
|
techntrek
Admin Group - pHp 
Joined: 29 Jul 2009 Location: MD Online Status: Offline Posts: 9066 |
Post Options
Quote Reply
Posted: 19 Sep 2016 at 8:52pm |
|
And FR said it couldn't be done. I would have loved a window in the front wall in our 171. Make sure you add a cover on the outside when you tow to protect against road debris.
|
|
|
Doug ~ '98 Coleman ('05-'09) ~ '10 171 ('09-'15) ~ 2008 Salem ('14-'23) ~ 2019 Keystone ('23-now) ~

|
|
|
|
|
Bcmckean
Newbie
Joined: 16 May 2016 Online Status: Offline Posts: 13 |
Post Options
Quote Reply
Posted: 19 Sep 2016 at 8:52pm |
|
CLT-NC R-Podder Looks great, what color stain did you use to match the rest of the wood?
|
|
|
|
|
CLT-NC R-Podder
Newbie
Joined: 18 Mar 2016 Online Status: Offline Posts: 8 |
Post Options
Quote Reply
Posted: 19 Sep 2016 at 9:08pm |
|
We took a drawer from the kitchen cabinet, as well as a piece of the wood we were staining, to Sherwin Williams and they matched it. They did a great job!!
|
|
|
Joe & Erin
2016 178 towed by 2016 Toyota Tacoma double cab 4x4 |
|
|
|
|
Bcmckean
Newbie
Joined: 16 May 2016 Online Status: Offline Posts: 13 |
Post Options
Quote Reply
Posted: 19 Sep 2016 at 9:31pm |
|
Great, thanks! Looks like they did a good job... and your handy work looks good as well!
|
|
|
|
|
Post Reply
|
Page <1 5051525354 79> |
| Forum Jump | Forum Permissions You cannot post new topics in this forum You cannot reply to topics in this forum You cannot delete your posts in this forum You cannot edit your posts in this forum You cannot create polls in this forum You cannot vote in polls in this forum |


