
|
List Your Mods: |
Post Reply 
|
Page <1 4142434445 79> |
| Author |
 Printable Version Printable Version Google Google Delicious Delicious Digg Digg StumbleUpon StumbleUpon Windows Live Windows Live Yahoo Bookmarks Yahoo Bookmarks reddit reddit Facebook Facebook MySpace MySpace Newsvine Newsvine Furl Furl Topic Search Topic Search  Topic Options Topic Options
|
|
rsgmd 
Newbie 
Joined: 08 Aug 2015 Online Status: Offline Posts: 7 |
 Post Options Post Options
 Quote Reply Quote Reply
 Topic: List Your Mods: Topic: List Your Mods:Posted: 17 Aug 2015 at 1:05am |
|
|
I have a teeny white dog in there when she wants to sleep undisturbed.
|
||
 |
||
|
rsgmd
Newbie
Joined: 08 Aug 2015 Online Status: Offline Posts: 7 |
Post Options
Quote Reply
Posted: 17 Aug 2015 at 1:29am |
|
A new regular awning rail needed to be attached by stainless crews and silicone sealant as the current one is curved and the size is too large. Once that was done, I took my awning arms and set them apart on the pod as far as possible without intruding into essential openings-- in this case the storage hatches. Shorter awning arms may have enabled me to get another few inches of awning width, but I did not have such hardware. Once the width of the arms were determined, I drilled holes to attach them to the pod. These holes accommodate 1/4" stainless bolts approximately 2.5 to 3.5" in length depending on the location. These definitely needed to be drilled through and attached with large flat washers and lock nuts. The holes were sealed with silicone around the bolts. For my hardware 4 bolts per attachment were needed (4 attachments in total). For the locations I picked, the upper attachment bolts will jut out of the inner wall by about 1/2 inch, but will be barely noticeable or may be covered up with some type of trim if one wishes. The lower attachments will have bolts that come out into the front and rear comparments. Once the arms are attached the total legth of the awning can be determined. Once measured, the awning can be cut with a metal oscillating blade or metal hacksaw to size. One must be careful of the springs in the awning as they are in tension. The tension should be carefully released per manufacturer instructions. Some awnings do not have springs and work with gears. These will be easier and safer to cut. Once the awning tube is resized, the awning material may be cut with a sharp blade or scissors. A half inch of hemming material should be left on to protect the edges from fraying and tearing. This extra awning cloth material can be folded in and stitched if desired. I used contact cement to keep the edge folded as I am not handy with needle and thread. Once the awning tube and cloth are put back together, it is just a matter of attaching the awning to the rail and securing the ends of the inserted bead with screws to prevent it from sliding out. The arms then attach to the awning ends. Done! It took me about 8 hours to finish, but I was trying to figure out the proper steps and how to cut the awning up along the way.
|
||
|
||
|
wcurry
Newbie

Joined: 30 Jun 2015 Location: Rock Springs Wy Online Status: Offline Posts: 2 |
Post Options
Quote Reply
Posted: 24 Aug 2015 at 12:31am |
|
 Found this shelf which is 8 ft x 16 inches from John Louis Home. You can purchase hardware from them as well (L brackets) and wood angle brackets (if desired) to maybe?? hang a garment bar from? The nice thing about this shelve is that it will fit the entire width on a 178/179 and can be cut to size. Will this work and....is there an easy way to find the aluminum studs on the inside walls to mount L brackets to? Stud finder? Thanks, Wally |
||
|
Wally
|
||
|
||
|
wcurry
Newbie
Joined: 30 Jun 2015 Location: Rock Springs Wy Online Status: Offline Posts: 2 |
Post Options
Quote Reply
Posted: 24 Aug 2015 at 12:42am |
|
|
After looking at the Wall Construction on the internet, it appears to me that the aluminum stud runs horizontally above and below the window. Could you at least get one screw into this stud for support? May have to turn the L bracket upside down so it doesn't interfere with awning of window/blind? http://www.rpodnation.com/uploads/270/DSC_0128_modified.jpg Tell me what you think? Thanks, Wally |
||
|
Wally
|
||
|
||
|
techntrek
Admin Group - pHp 
Joined: 29 Jul 2009 Location: MD Online Status: Offline Posts: 9066 |
Post Options
Quote Reply
Posted: 24 Aug 2015 at 7:44pm |
|
|
A molly bolt will work fine if you can't hit stud.
|
||
|
Doug ~ '98 Coleman ('05-'09) ~ '10 171 ('09-'15) ~ 2008 Salem ('14-'23) ~ 2019 Keystone ('23-now) ~

|
||
|
||
|
KrogPod
Newbie
Joined: 07 Jul 2013 Location: Central TX Online Status: Offline Posts: 26 |
Post Options
Quote Reply
Posted: 24 Aug 2015 at 8:56pm |
|
|
As for finding the aluminum studs, I managed to find them using a carpenters stud finder.
|
||
|
2014 RP-172, AKA KrogPod
2003 S10 ExCab V6 4.3L Automatic Central Texas 
|
||
|
||
|
hammockmadness
Groupie 
Joined: 07 Jul 2015 Location: Middleburg, FL Online Status: Offline Posts: 61 |
Post Options
Quote Reply
Posted: 25 Aug 2015 at 11:19am |
|
|
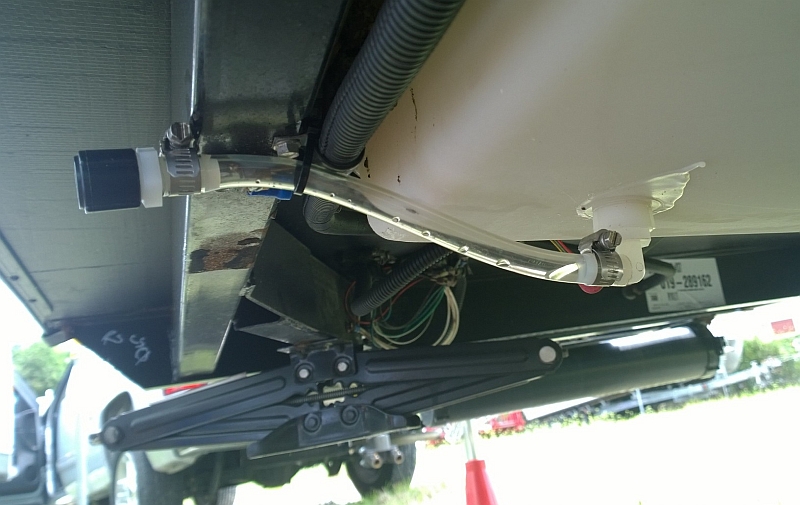
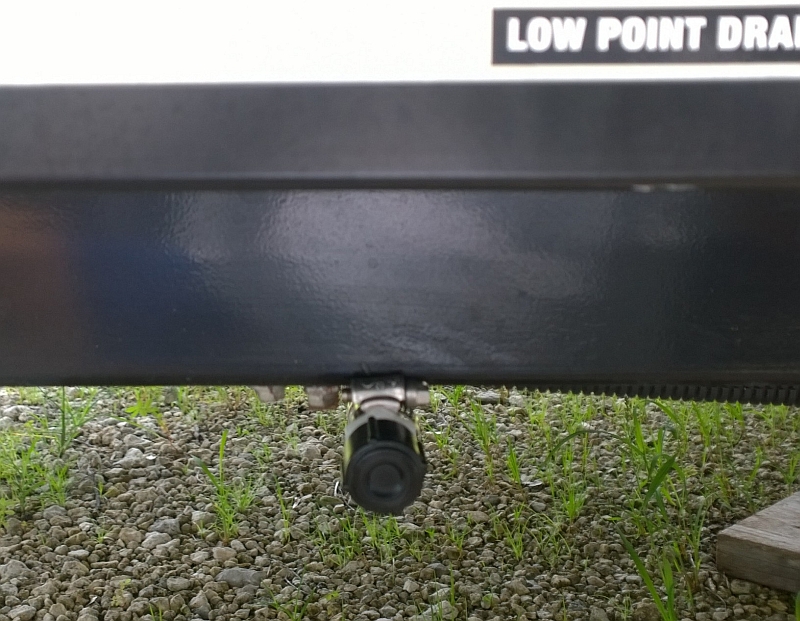
To make life easier when draining the fresh water tank, I extended the drain cap to the outside of the frame and used a zip tie to hold it to a clamp that retains a wire bundle. The 1/2" nylon fittings are available at Home Depot. In the picture, it appears that the cap is above the bottom of the tank, however it's actually at the same level as the bottom. The bottom of the elbow in the tank is about 3/4" higher than the original setup. Problem solved!
  |
||
|
Dana & Regina
Fleetwood & Jasper 2014 181-G 2014 Silverado 4X4 |
||
|
||
|
SeattleMALCKS
Newbie

Joined: 12 Jun 2013 Location: United States Online Status: Offline Posts: 3 |
Post Options
Quote Reply
Posted: 25 Aug 2015 at 11:31am |
|
|
Hi,
Can you please provide the exact model number of the awning. Also, did you have to locate beams in the wall (if there are any) or was the installation a bolt and plate on each side of the wall? Thanks ! |
||
|
||
|
regdave
Newbie
Joined: 06 Apr 2015 Location: Oklahoma Online Status: Offline Posts: 7 |
Post Options
Quote Reply
Posted: 25 Aug 2015 at 1:41pm |
|
|
A couple of items we've found recently that might be useful.
Found a plastic framed metal wall mirror at Lowe's for $6. Weighs around 5lbs and is indestructible. Screwed into the inside of the bathroom door with #8 wood scres (heads painted to match) and caulked: http://www.lowes.com/pd_33107-28392-72462_1z11oomZ2z8vj__?productId=3698032 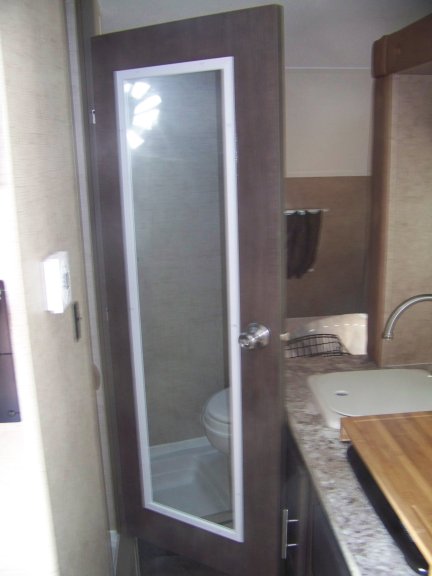 Found a bamboo cutting board for the range cover. Glued on 1/4" spacers and then some rubber non-skid pads to get the proper clearance (1-3/4"). Costs between $15 to $25. Google: "Lipper International Bamboo Large Over the Sink/Stove Cutting Board" for a local price. A little wider and a narrower than the range top but works very nicely and stows on the counter behind the stove. 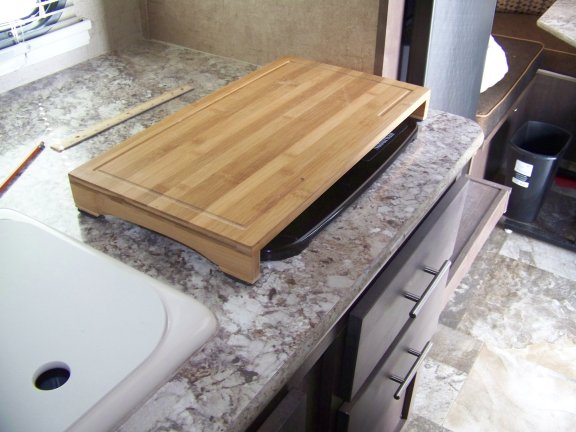 - Dave and Adele R |
||
|
Dave & Adele
|
||
|
||
|
Leo B
podders Helping podders - pHp 
Joined: 13 Jan 2012 Location: Lyndonville, VT Online Status: Offline Posts: 4519 |
Post Options
Quote Reply
Posted: 25 Aug 2015 at 3:41pm |
|
|
really nice cutting board!
|
||
|
Leo & Melissa Bachand
2025 Ford Transit Camper van 2017 Ford F150 2021 Vista Cruiser 19 csk Previously owned 2015 Rpod 179 2010 Rpod 171 |
||
|
||
|
Post Reply
|
Page <1 4142434445 79> |
| Forum Jump | Forum Permissions You cannot post new topics in this forum You cannot reply to topics in this forum You cannot delete your posts in this forum You cannot edit your posts in this forum You cannot create polls in this forum You cannot vote in polls in this forum |


