
|
Have You Done Any Mods? |
Post Reply 
|
Page <1 2728293031 52> |
| Author |
 Share Topic  Printable Version  Google  Delicious  Digg  StumbleUpon  Windows Live  Yahoo Bookmarks  reddit  Facebook  MySpace  Newsvine  Furl  Topic Search  Topic Options |
Leo B 
podders Helping podders - pHp 

Joined: 13 Jan 2012 Location: Lyndonville, VT Online Status: Offline Posts: 4519 |
 Post Options  Quote Reply  Topic: Have You Done Any Mods? Posted: 14 Jun 2015 at 6:16am |
|
Nice work!!
|
|
|
Leo & Melissa Bachand
2025 Ford Transit Camper van 2017 Ford F150 Previously owner 2021 Vista Cruiser 19 csk 2015 Rpod 179 2010 Rpod 171 |
|
 |
|
|
JandL
Senior Member
Joined: 29 Mar 2014 Location: California Online Status: Offline Posts: 364 |
Post Options
Quote Reply
Posted: 14 Jun 2015 at 12:06am |
|
Battery cutoff switch
This is what I did to add a battery cutoff switch to my trailer. I used a 50 amp circuit breaker, panel mounted and switchable (Cooper Bussmann #285050P-121-S) and a Flange Mount Panel Gasket for the Circuit Breaker (#B156-7003-J). I ordered them from waytekwire.com. The battery box will fit a group 31; it was the largest I could find that would fit in the existing space (Atwood Marine 9084-1 Large Battery Box). I got it from amazon. I mounted the circuit breaker on the side of the battery box. The wire from the trailer is bolted to one side of the circuit breaker and I made up a short jumper wire that goes from the circuit breaker to the battery. The factory wire runs under the trailer to a factory installed auto reset breaker. I am not a fan of high amp auto reset breakers; if something happens that causes the breaker to trip I want it to stay off till I can find out why it tripped. I took the 2 wires bolted to the auto reset breaker and combined them on one stud, this took the auto reset breaker out of the circuit without having to remove it and was an easy way to splice the wires together. I also coated every exposed connection with Liquid Electrical Tape to insulate and protect the connections under the trailer. It’s available from Home Depot and comes in different colors and the lid has a brush attached. On the circuit breaker is a red button you can press that causes the breaker to open and a yellow reset lever drops down to show you it is off. To reset you push the yellow lever back up. I also removed where the white wire ground wire is attached to the frame and took a 3M sanding disk to remove the paint and reattached the ground wire. I also added 6 gauge jumper wires to tie all the factory ground points on the frame together. Steel is not as good of a conductor as copper is, and then coated the bolts with Liquid Electrical Tape. On the other side of the battery box is where I attached my solar controller for my solar panel (I will write that up in another post) 


|
|
|
JandL
2013 Honda Ridgeline 2012 177 2 Paynes in a Pod |
|
|
|
|
Seanl
Senior Member

Joined: 19 Sep 2011 Location: Fredericton NB Online Status: Offline Posts: 633 |
Post Options
Quote Reply
Posted: 20 Mar 2015 at 12:52pm |
I am guessing that you might have to change out the jacks or put blocks under them.
|
|
|
Sean, 2011 Rpod RP-173,2009 Jeep Liberty Rocky Mountain Edition
|
|
|
|
|
Webstas
Newbie 
Joined: 16 Jul 2014 Location: United States Online Status: Offline Posts: 28 |
Post Options
Quote Reply
Posted: 20 Mar 2015 at 12:36pm |
post pics of the tank mods, i wanna see how you insulated them :)
|
|
|
|
|
techntrek
Admin Group - pHp 

Joined: 29 Jul 2009 Location: MD Online Status: Offline Posts: 9066 |
Post Options
Quote Reply
Posted: 19 Mar 2015 at 8:40pm |
|
You won't hit a ramp or speed bump even if you try.
|
|
|
Doug ~ '98 Coleman ('05-'09) ~ '10 171 ('09-'15) ~ 2008 Salem ('14-'23) ~ 2019 Keystone ('23-now) ~
|
|
|
|
|
apache
Newbie
Joined: 14 Mar 2015 Online Status: Offline Posts: 4 |
Post Options
Quote Reply
Posted: 19 Mar 2015 at 8:26pm |
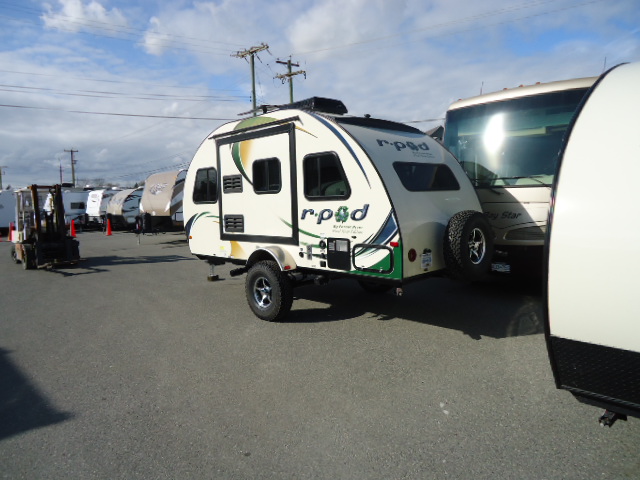
swapped torsion axle with 5,000lb solid axle, slapped some leaf springs in there and 33" tires on 15"wheels. Also installed 120V heat trace wire on water tanks and insulated them. Pod is 6" taller now.
|
|
|
|
|
TigerPawd
Groupie 
Joined: 04 Feb 2015 Location: Corpus Christi Online Status: Offline Posts: 68 |
Post Options
Quote Reply
Posted: 26 Feb 2015 at 6:14pm |
|
Started out with a peep hole in the door. Might add a porthole window in a year or so, but the peep hole gives a really good view - as long as the door is closed. When it's open, the view to the left is pretty marginal. Took mattress pad from the old Surveyor and added a
Trav-a-Sak Added a small soft doorstop on the fender to protect the door from the fender and the fender from the door.
Added grab handles at the door to the john and next to the outside door; door framing is solid in both places. We're considering changing to a double step; that 11" drop off is quite a bit for aging knees Switched from hand-cranked jack to electric. Much easier on the old shoulders and back. Easy swap. Reversed the hinges to the door on the closet so DW can check her gown before going to the ball. The hinges are now on the side next to the bed instead of next to the john. Handier for most things, not so much from the bed. Changed the TV swing arm to one with a tilt. Considered moving the mount to where the closet meets the wall - better viewing from the bed, but not so good from the rest of the Pod. Rejected that unless I find a really long arm with lots of bendy places.
Removed the one screw that holds the top of that strange hassock next to the fridge. Covered the wires and plumbing that are there with a plywood panel. Curved front area is ideal to stash at least four rolls of john paper and it's close to the point of need - if the slide is out. The rest of the new space is good for an extra half cubic foot of storage, more or less.
I keep looking at that miserable table which is also to be used to support the auxiliary bed. I'm thinking about adding a piece of plywood hinged to the sitting surface on the slide out couch and then discarding said miserable table, but the differing heights are a stumbling block. Finding acceptable replacement table(s) will be a snap. All the exposed wiring underneath looks bad to me. There is a lot of foampuckey glopped up wherever wires or plumbing go inside, There are also some electrical contacts that look like they are exposed to the salty atmosphere that's all around us down here. I appreciate that FR wants to keep moisture out of the inside but there are other goodies underneath that are exposed as the Pods come from the factory. I have an old plastic box for 3x5" cards that may work well to block the moisture. Need to keep in mind the risk of voiding the warranty if water somehow gets inside anyway.... Installed small metal tabs to keep the assist bar from preventing exiting in the event a prankster was in the neighborhood, per some earlier Pod Posts.
Hmm. Photos aren't inserting. I need to work on that.... |
|
|
Joan, Jerry and the two Pugs
2015 R-Pod 179 |
|
|
|
|
TigerPawd
Groupie
Joined: 04 Feb 2015 Location: Corpus Christi Online Status: Offline Posts: 68 |
Post Options
Quote Reply
Posted: 23 Feb 2015 at 2:11pm |
|
Gray Otter - on your #179 door hitting the fender, I went to a hardware store and got a soft half-dome shaped door bumper. It just sticks on. Six months later, it has worked well to protect the door from the fender and the fender from the door. No indication that attachment is getting weaker, and besides, they come two to a pack for just a couple of $$$.
|
|
|
Joan, Jerry and the two Pugs
2015 R-Pod 179 |
|
|
|
|
Rockhound
Newbie

Joined: 20 Oct 2014 Location: Duvall, WA Online Status: Offline Posts: 4 |
Post Options
Quote Reply
Posted: 03 Nov 2014 at 11:20pm |
|
Thanks Shadow! We have Crazy Creek chairs I was planning on using for the side seats, but I just wasn't sure if 3-4 pairs of adult size legs and feet would fit under that table, especially the way the legs are now. Mostly it will be just the two of us and our Aussie pup, but sometimes we will have one or both of my parents with us. I also really like your mod of adding shelves to the wardrobe and cabinets; I imagine they will hold a great deal more that way!
|
|
|
|
|
Shadow
Newbie

Joined: 17 Aug 2014 Location: Kanata, Ontario Online Status: Offline Posts: 24 |
Post Options
Quote Reply
Posted: 03 Nov 2014 at 7:16pm |
|
Rockhound: Will get the picture of the underside of the table later this week. Can't take pictures inside as we have winterized and taken all the cushions etc inside.
Canoe chairs work really well for a backrest when sitting on the side. Shirley and Carol r-pod 179
|
|
|
S&C
2015 R-POD 179 2010 Toyota Highlander |
|
|
|
|
Post Reply
|
Page <1 2728293031 52> |
| Forum Jump | Forum Permissions You cannot post new topics in this forum You cannot reply to topics in this forum You cannot delete your posts in this forum You cannot edit your posts in this forum You cannot create polls in this forum You cannot vote in polls in this forum |


 We
have had a couple of pop-ups and two 31' travel trailers, including the last
one from Forest River.
 .
 In
a wet john, placement of the toilet paper is tough.

 I
have been coveting the 3" of hollow wall between the closet and the
john.
 The original fridge
had a small problem.

 Put hinges on the
panel under the fridge - just in case something falls while underway and we
don't spot it in time.