Mods - Interior & Exterior-
Printed From: R-pod Owners Forum
Category: R-pod Discussion Forums
Forum Name: Podmods, Maintenance, Tips and Tricks
Forum Discription: Ask maintenance questions, share your podmods (modifications) and helpful tips
URL: http://www.rpod-owners.com/forum_posts.asp?TID=8850
Printed Date: 26 Jun 2025 at 1:25pm
Software Version: Web Wiz Forums 9.64 - http://www.webwizforums.com
Topic: Mods - Interior & Exterior-
Posted By: AmberKate
Subject: Mods - Interior & Exterior-
Date Posted: 29 Sep 2016 at 9:46pm
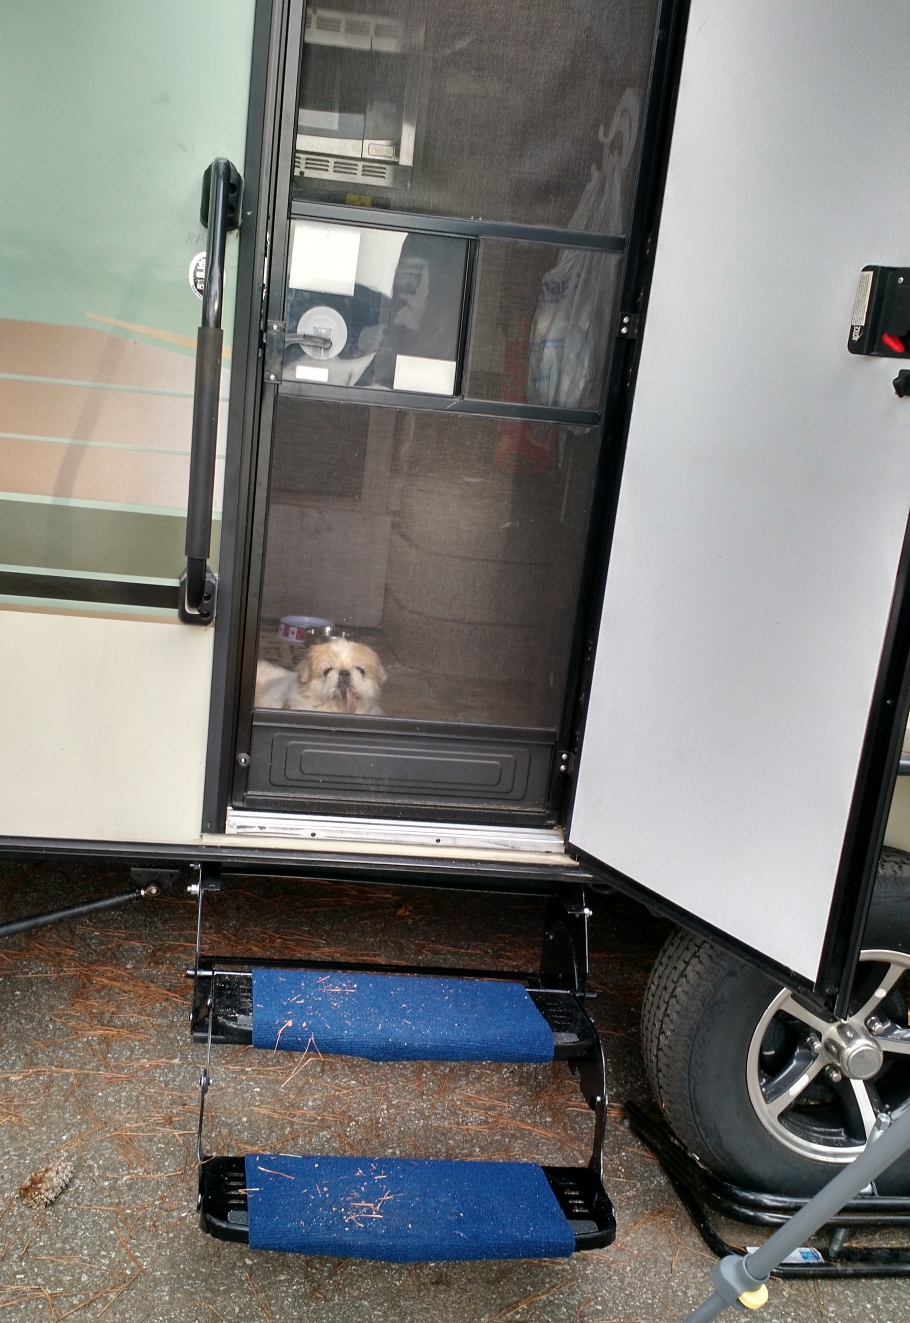
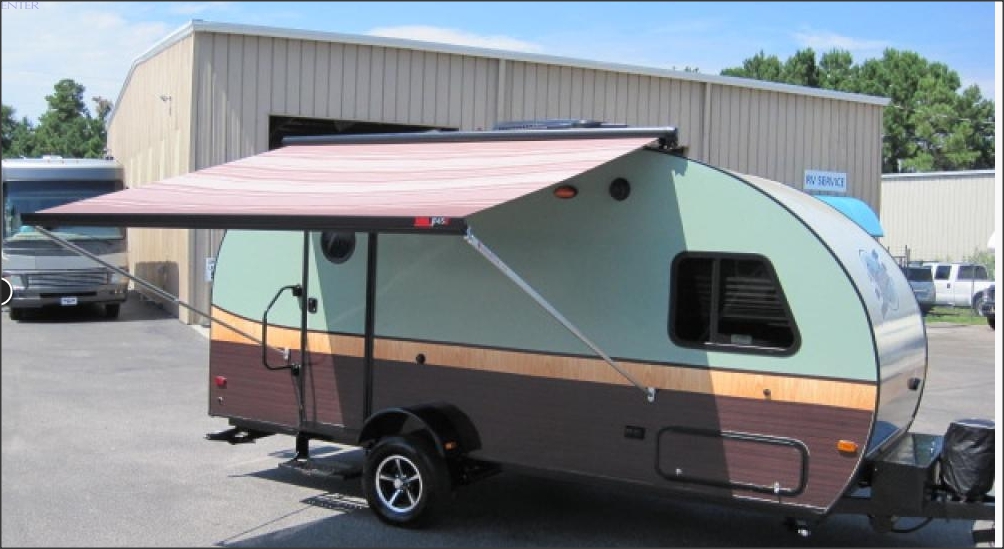
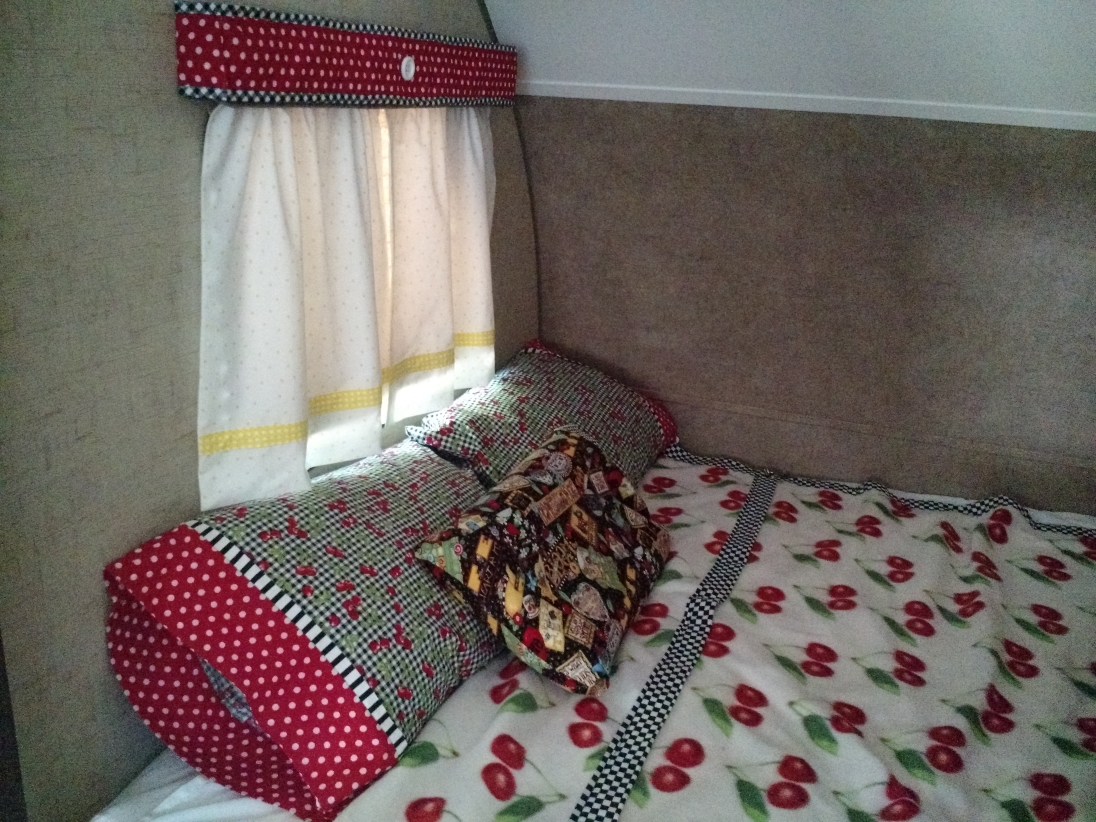
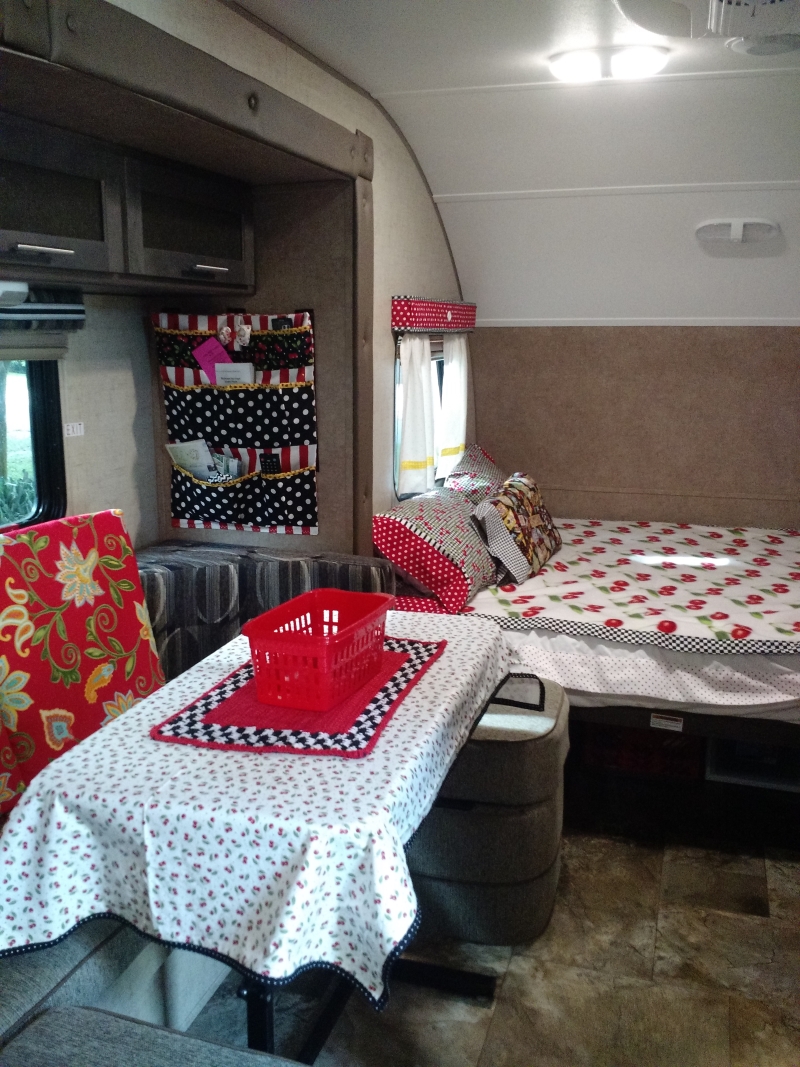
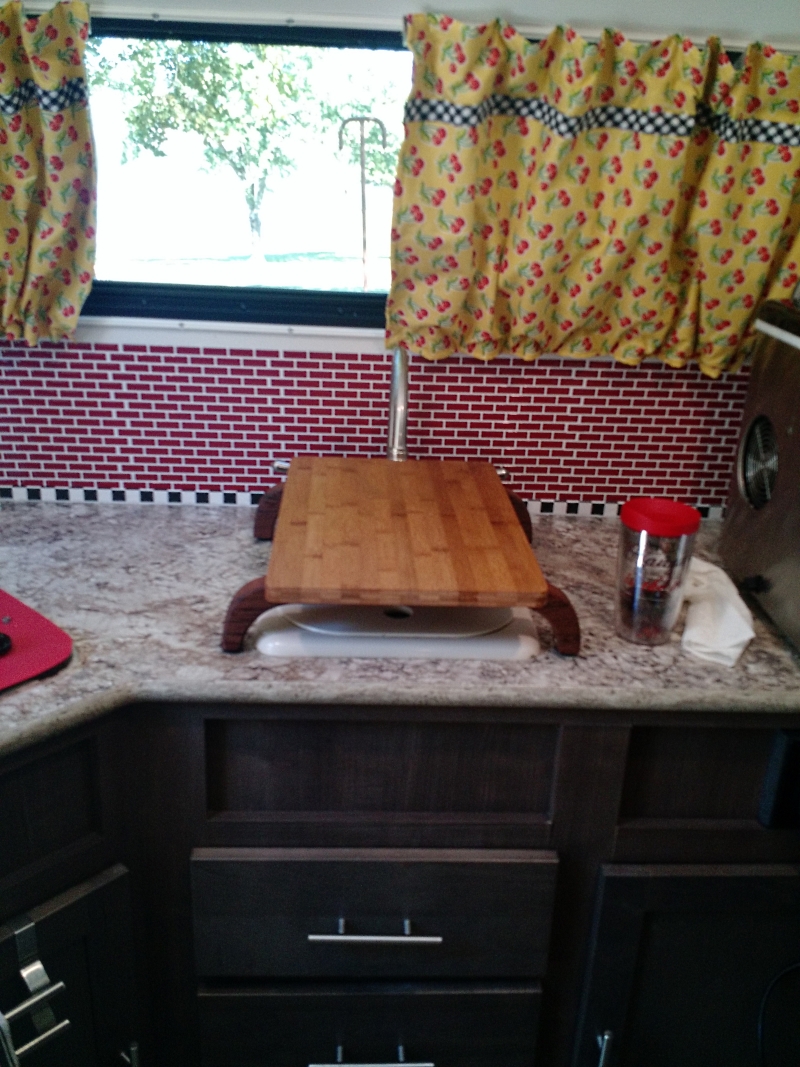
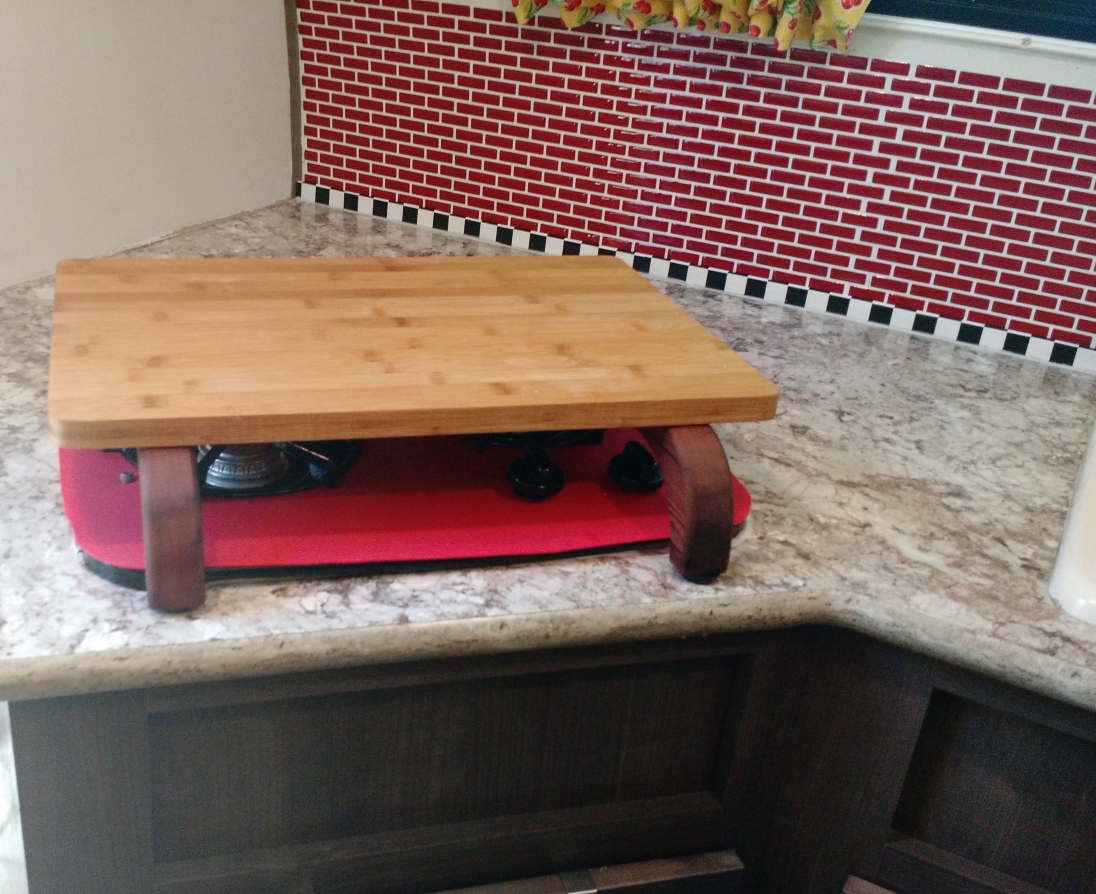
I started some interior Mods which I will post to this thread soon but then I went to TN to see my son and stayed @ the beautiful Defeated Creek campground, he got hornswaggled into doing some exterior mods for me. Showed up at the campground with all his tools ready for action. When he took the door off he was surprised at how very light it was. After copious measuring he was ready to cut the hole for the window (from etrailer.com) with a jigsaw... 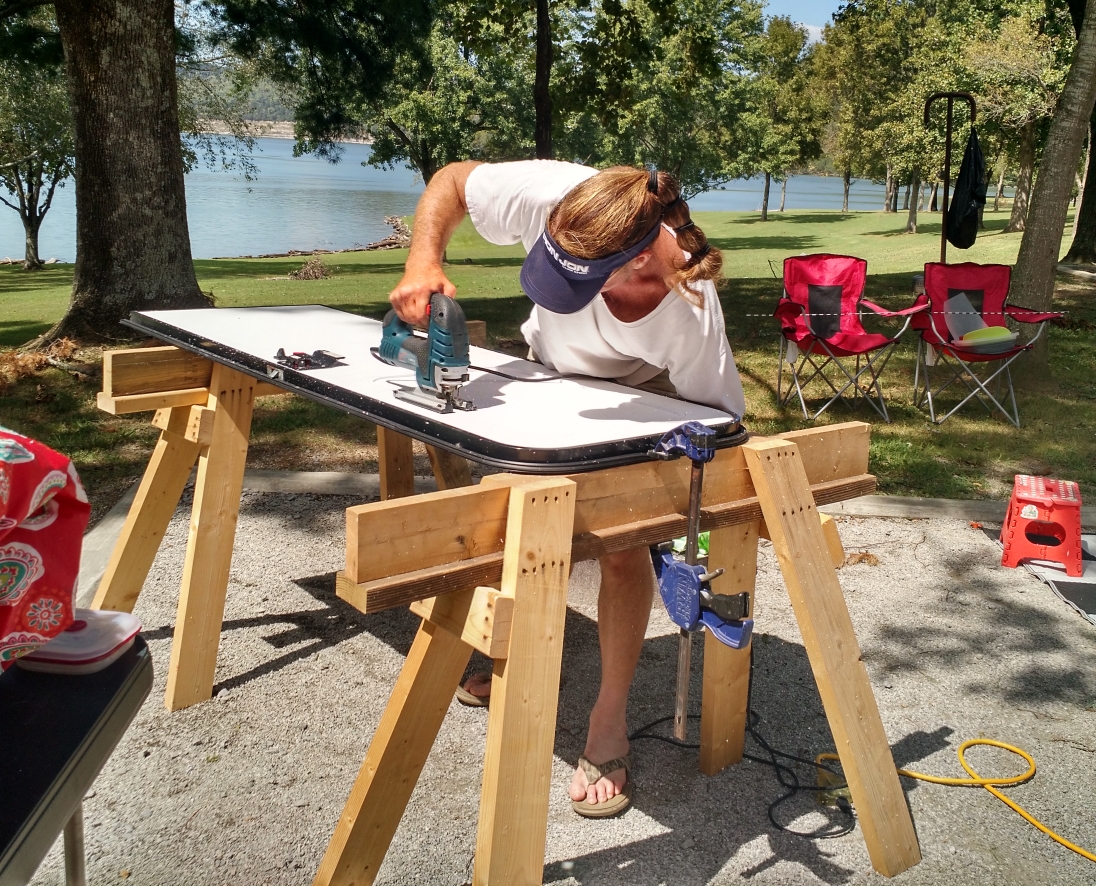 Here is is nice neat hole - we discover the reason the door was so light, it seems to be "solid" Styrofoam. BTW, the cutout fits perfectly on top of the ubiquitous campsite grill & makes a perfect table! 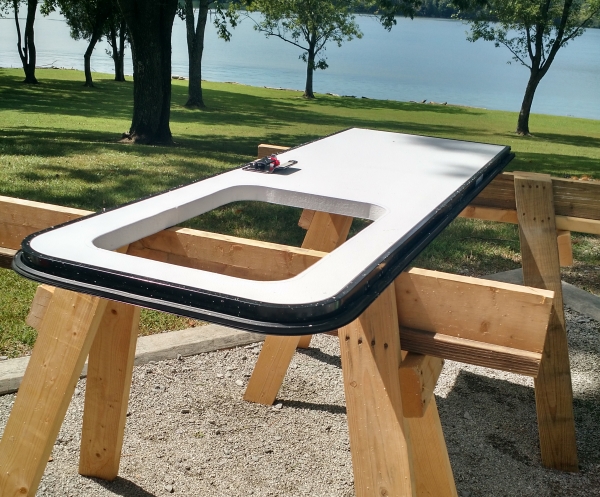 When he tested the window, it was a perfect fit - it actually popped in! Fastened it with the supplied screws... 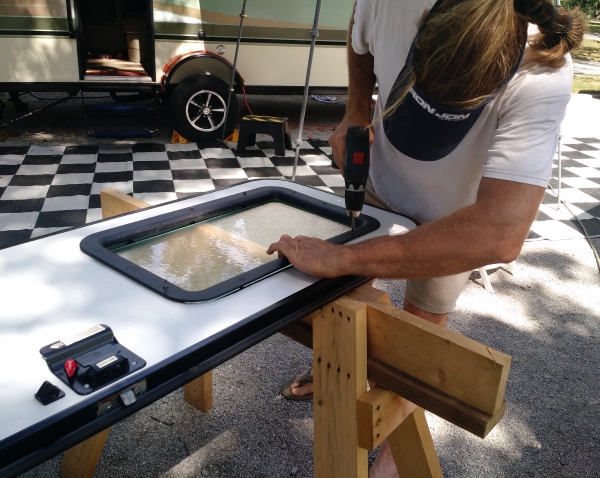 And prepped it for the final caulking... he uses the painter's tape so it will get a nice clean finish on the outside edge! There was a tip that I, the world's worst caulker, was thrilled to get! 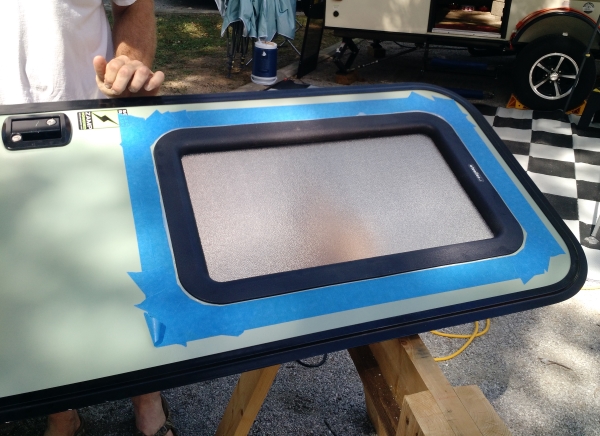 Once the silicone caulking was done, he put the door back up and said, "Let there be light!!!"  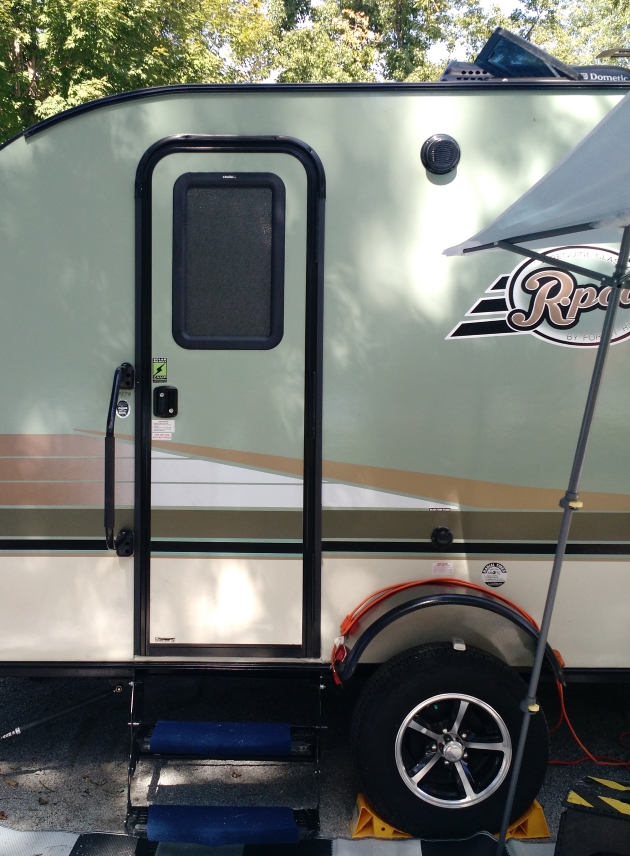 PERFECT!!!! BTW - not only is there light - but also heat! We cut out a big chunk of the insulation! He took on 2 other projects first the new http://www.dwincorp.com/products/125/NEW-SUPER-SLIDER-Adjustable-SUPER-TUBE - SaniTube Super-slider sewer hose storage - we actually spent more time trying to decide where we should put it than he did putting it on - and it is delightfully inconspicuous!  The daylight was rapidly getting away from us by the time we got to setting up the dual LP tanks... I had purchased a Flame King (KT20MNT) http://https://smile.amazon.com/gp/product/B00IZCNOVC/ref=oh_aui_detailpage_o09_s00?ie=UTF8&psc=1 - Dual RV Propane Cylinder Rack from Amazon along with the http://https://smile.amazon.com/gp/product/B0024ECC3S/ref=oh_aui_detailpage_o09_s00?ie=UTF8&psc=1 - Camco tank cover ... but the fit of it on the exixsting tank pad on the A frame left something to be desired - new longer bolts had to be retrieved from his shop that was 30 minutes away... so there are not many pix of the actual procedure. Sorry - but of course here is what it looked like when we were done... 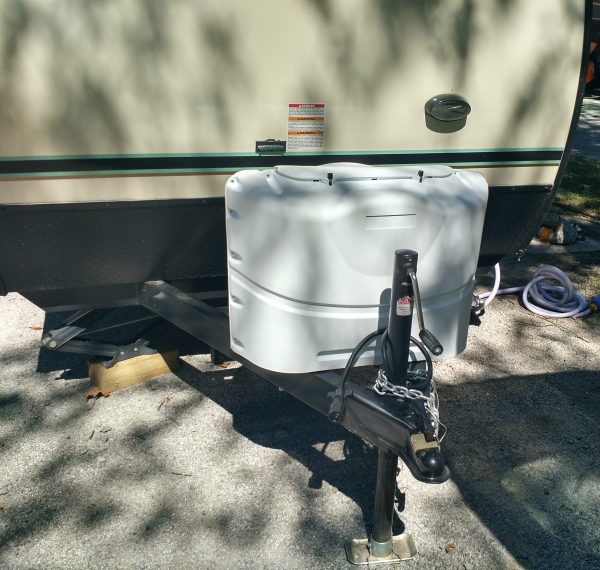 Did I mention he also straightened out one of the scissor jacks that had an unfortunate meeting with a sapling at Blue Springs State Campground? And he got the cross-threaded bolt in my https://smile.amazon.com/BAL-23216-Lock-Arm-Stabilizing-Bar/dp/B001UGNJ60/ref=sr_1_1?s=automotive&ie=UTF8&qid=1475199005&sr=1-1&keywords=bal+stabilizer+bars - BAL 23216 Lock-Arm Stabilizing Bar back to operating again with an impressive impact wrench! He is a very handy guy and a spectacular hardwood cabinet carpenter!I wasn't totally useless because it was little old me who changed out the single step for the 2 step model (purchased from etrailer.com) as suggested on this forum... I won't mention that I sheared 2 bolts off and had to make a special trip to Lowes to complete the task... sigh. Here's Tootsie showing off my handiwork while we were at Lakenorth of Atlanta: |


Replies:
Posted By: AmberKate
Date Posted: 29 Sep 2016 at 10:23pm
|
Off to Pt. St. Lucie South for the weekend! ------------- AmberKate & RIP Little Tootsie - 
|
Posted By: patrick_dube
Date Posted: 30 Sep 2016 at 9:25am
|
Wow... nice list of mods.
I too will have to check out the Suburban cooktop to avoid fading... Fiamma's are really great. Had one on my previous trailer (ProLite Profil 14). If you want a attached dinette on it, double check if the model you want can have one... Dealer said they could have it (that made the sale then) only to tell us (after numerous calls from us asking when we should get it) that they do not made it for this specific model anymore. After some research and a call to Fiamma headoffice in Europe, they NEVER did it for this model... Well long story short, sold the ProLite this summer to get the rp-179. ------------- Patrick Dubé, 2017 RP-179 owner towed by a 2015 Cadillac SRX Premium |
Posted By: StephenH
Date Posted: 30 Sep 2016 at 11:53am
|
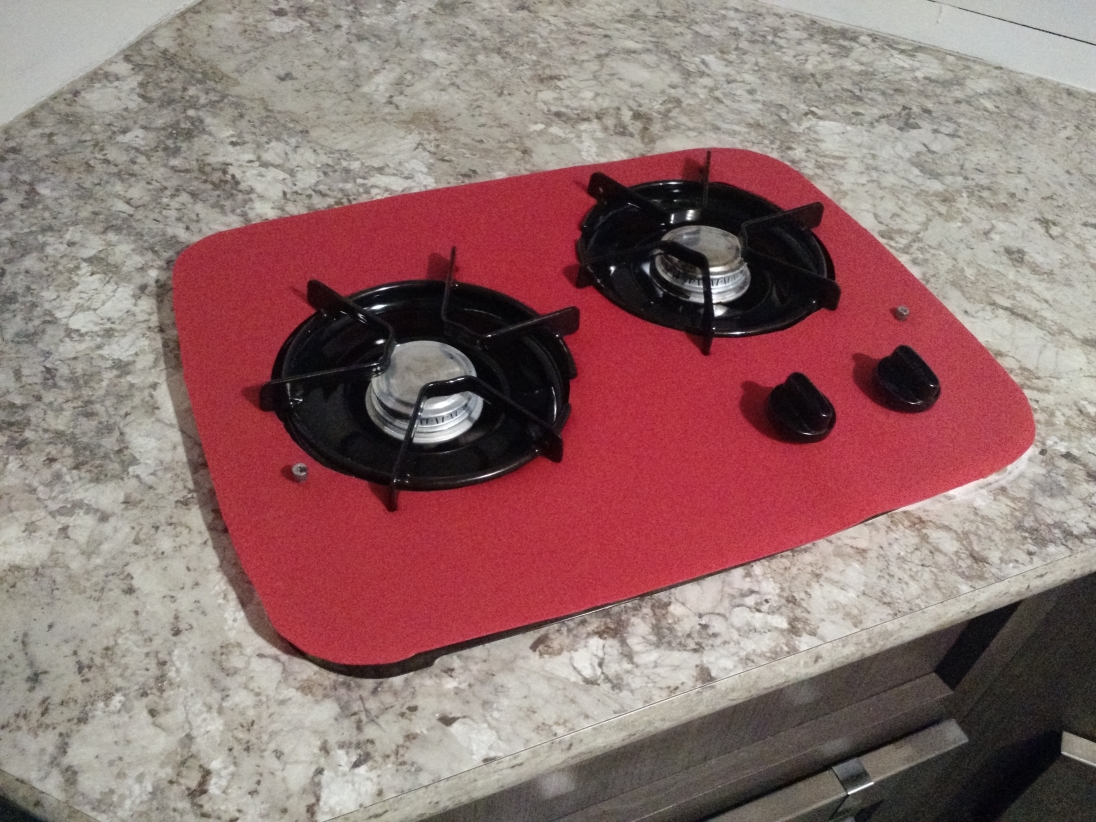
How heat resistant is the silicone topping? I like the stove/sink cover. The magnets are a really nice touch. I've also made many mods to our EscaPOD. They can be seen in the link below. The dual-propane tank mod is one I have been considering. However, I already have added significant weight to the tongue of our pod. I don't want to overdo it. ------------- StephenH Happy is the man that findeth wisdom,... http://www.rpod-owners.com/forum_posts.asp?TID=7712 - ouR escaPOD mods Former RPod 179 Current Cherokee Grey Wolf 24 JS |
Posted By: densmorema
Date Posted: 30 Sep 2016 at 1:54pm
|
Love your personal touches. ------------- Mike and Cherie Michigan 2015 R179 2016 silverado |
Posted By: techntrek
Date Posted: 30 Sep 2016 at 7:32pm
|
Nice mods all around and nice decorating job. Good tip on the caulk with the painter's tape. ------------- Doug ~ '10 171 (2009-2015) ~ 2008 Salem ~ http://www.rpod-owners.com/forum_posts.asp?TID=1723 - Pod instruction manual 
|
Posted By: AmberKate
Date Posted: 03 Oct 2016 at 2:18pm
|
Patrick, I am so fortunate as to be quite close to Orlando, Fl where Fiamma has a manufacturing plant & have been in touch with them regarding brackets & the right awning! I have found them to be very promptly courteous! ------------- AmberKate & RIP Little Tootsie -
|
Posted By: AmberKate
Date Posted: 03 Oct 2016 at 2:30pm
According to the manufacturer good to 480º see at Amazon: Super Kitchen Food Grade Non-stick Silicon Baking Oven Mat Liner For Sheet Pans Cooling Rack 16 By 12 In (2, red) $13.99 (that is what I paid for 1)------------- AmberKate & RIP Little Tootsie -
|
Posted By: mcarter
Date Posted: 03 Oct 2016 at 6:19pm
|
AmberKate,
What size is the window in the door? Contemplating that mod. Thanks. |
Posted By: AmberKate
Date Posted: 03 Oct 2016 at 7:36pm
|
MCarter, this is the window I purchased at etrailer: Valterra Frame & Glass For Rv Entrance Door - 12 X 21 It seems to be the common size. Can't wait to see your installation  ------------- AmberKate & RIP Little Tootsie -
|
Posted By: StephenH
Date Posted: 03 Oct 2016 at 8:46pm
|
This is the https://www.amazon.com/R-pod-Teardrop-Trailer-Camper-Windows/dp/B013TFWWW6?ie=UTF8&psc=1&redirect=true&ref_=oh_aui_detailpage_o06_s00 - door window I used. http://www.rpod-owners.com/forum_posts.asp?TID=7712&PID=72932&title=our-escapod-mods#72932 - This link will take you directly to my mods showing the installation. The reason I got this one is that it allows for ventilation right near the stove in our RP-179 without needing to have the door wide open. Also, my wife did not like the porthole style that I was originally considering. It also is nice since it is transparent. We can see who or what is just outside the door. Frosted glass would not have allowed that. ------------- StephenH Happy is the man that findeth wisdom,... http://www.rpod-owners.com/forum_posts.asp?TID=7712 - ouR escaPOD mods Former RPod 179 Current Cherokee Grey Wolf 24 JS |
Posted By: Blue Highways
Date Posted: 03 Oct 2016 at 9:26pm
|
I liked your new double step. We're at a campsite now, where the entry side of the Wanderpod is on leveling pads, making that last drop down from the stock step to "terra firma" a little much. (Wouldn't be much fun camping with a sore ankle). Will have to look into your "step" mod for 2017. WanderPod Towed by BG "aka Baleuga" the 2010 blue Tundra
|
Posted By: john in idaho
Date Posted: 04 Oct 2016 at 10:35am
| did you figure out a good way to make the sliding curtain over the sink really slide? |
Posted By: AmberKate
Date Posted: 04 Oct 2016 at 12:04pm
|
John In Idaho, Yes, well "sliding" is somewhat of a misnomer now isn't it? I did put some silicone spray on the track while I had the whole show apart to replace the curtains, it helped somewhat, and sanded off the burrs from the screws insertion with an emery board, but the thing that has really helped the most is to just keep sliding the curtains back and forth in the track. I see in the new 2017s they have replaced that bothersome track with real curtain rods, so the next time I make curtains, I will take down the rail & will do the same thing. Can't believe I didn't think of that in the first place.  ------------- AmberKate & RIP Little Tootsie -
|
Posted By: AmberKate
Date Posted: 04 Oct 2016 at 12:12pm
|
Dear Blue Highways, Hopefully I gave you the part #... I found it here on this site posted by B&K-Joslin who reported having no trouble with the steps but having to add some extra washers - although I had purchased them, found I didn't need them. Here is the link to the page http://www.etrailer.com/RV%20Stairs%20and%20Steps/Stromberg%20Carlson/SMFP-2100.html - http://www.etrailer.com/RV%20Stairs%20and%20Steps/Stromberg%20Carlson/SMFP-2100.html Of note, made by Stromberg Carlson, weight restrictions 350 pounds, 24 inches wide $89.95 @ etrailer.com The dog is happy that now she can get into the Pod without the humiliation of being lifted in!! (I love them because it makes loading and unloading much more steady! But of course I am only here to sere the dog so her opinion is paramount
)------------- AmberKate & RIP Little Tootsie -
|
Posted By: Alaskaflyer
Date Posted: 06 Oct 2016 at 4:20pm
Just FYI, I thought this was such a great idea that I tried it. Unfortunately the mats that you linked are too small. Not sure if the mats shrunk since you ordered them or the Suburban stoves in 2016 and later R-Pods grew, but they are too small for my stovetop. They actually measure out 11 1/2 by 15 1/2, and my stovetop in my '16 176 is 13 1/2 by 18. So we'll use these for biscuits at home and I'll be looking for a larger mat.
Edit: I found the x-tra large version here, measuring 15.5 by 23.5 inches which should work: https://www.amazon.com/gp/product/B017R4DQJS/ref=crt_ewc_title_huc_1?ie=UTF8&psc=1&smid=A1SMQHGT30QHSR
|
Posted By: AmberKate
Date Posted: 06 Oct 2016 at 5:40pm
|
Which could explain why they were cheaper than the one 1 bought! My humble apologies -didn't mean to steer you in the wrong directions! Good recovery though. ------------- AmberKate & RIP Little Tootsie -
|
Posted By: mcarter
Date Posted: 09 Oct 2016 at 4:11pm
| I went with the Amazon window, and primarily because of screen feature, added curtains to inside. Thanks for heads up on self tapping screws, interesting challange:) Also surprised it was a foam door, all good here, THANKS. |
Posted By: AmberKate
Date Posted: 10 Oct 2016 at 4:52pm
------------- AmberKate & RIP Little Tootsie -
|