12 volt power socket installed in 177
Printed From: R-pod Owners Forum
Category: R-pod Discussion Forums
Forum Name: Podmods, Maintenance, Tips and Tricks
Forum Discription: Ask maintenance questions, share your podmods (modifications) and helpful tips
URL: http://www.rpod-owners.com/forum_posts.asp?TID=4248
Printed Date: 19 Aug 2025 at 9:45am
Software Version: Web Wiz Forums 9.64 - http://www.webwizforums.com
Topic: 12 volt power socket installed in 177
Posted By: jj
Subject: 12 volt power socket installed in 177
Date Posted: 07 Dec 2013 at 7:38pm
|
12 volt DC socket for r-pod 177   Disconnect 120 volt power cord from r-pod to house if connected. Disconnect 12 volt deep cycle battery by removing negative cable. Remove wooden top from dinette seat  Open front cover (access door) converter. WFCO converter.
")
Turn off all the breakers inside the panel, extra precaution. Breakers are in the middle of the panel to right of the paper with the word “MAIN”. (see picture above) Remove front cover from the panel by removing screws.   Panel shown with breakers and 12 volt automotive fuses on the right side on green circuit board and with front panel removed. Look for empty 12 volt connection screw on right side of the panel (green circuit board) to the right of the automotive fuses. This particular panel has 2 empty connection screws at the bottom of the 12 volt circuit board. Use one of those connection screws. 12 volt power sockets, you can choose the following: 12 volt dash sockets (black) drill 1 1/8 hole in the side panel of the bench seat. 12 volt DC power socket with metal cover plate. Drill hole in the side of bench seat (make sure there is space) and install the 12 volt power socket, secure by tightening large nut on back of socket against backside of the panel. Secure plate with screws. Pop out 12 volt DC circuit board from the panel housing to get access to the back of the circuit board to guide wire inside the converter housing to the front of the circuit board, or guide wire with board in place. Use 14 or 12 gauge wire 1 red and 1 black. Red wire will be the power source wire connected to the 12 volt DC circuit board connection screw. Black wire will be the ground wire connected to the 12 volt DC ground bus bar behind the WFCO power panel housing. It is screwed to the floor of the trailer. (metal strip with holes on side and screws on top) Top view back side of power converter panel housing. 
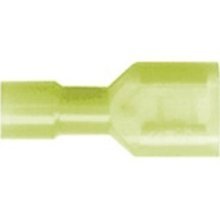
12 volt DC Ground bus bar is in this picture right below the roll off white wire Top view with ground wires connected to ground bar behind the converter panel housing, ground bus bar screwed to the floor, connect ground wire from the 12 volt power socket to the ground bus bar. Wiring diagram below, use 2 crimp-on vinyl female connectors for the back of 12 volt DC power socket. Connect one to the red wire and the other to the black wire and connect to back of 12 volt DC power socket. Red to the power side of the socket and black to the ground side of the socket. Use crimp-on female connectors, 12 guage sample shown Automotive fuse, 10 amp sample fuse shown http://innovision-group.net/catalog/images/image_product.height.50099.png">  After installation is finished, install automotive fuse in the slot next to the connection screw dedicated to power the 12 volt DC power socket. http://www.rpod-owners.com/uploads/2422/12_volt_drawing.jpg - http://www.rpod-owners.com/uploads/2422/12_volt_drawing.jpg
|
Replies:
Posted By: techntrek
Date Posted: 08 Dec 2013 at 3:42pm
|
Nice write-up. I took the last pic out of your post and replaced it with a link to the pic, for some reason that pic was completely messing up the page layout.
------------- Doug ~ '10 171 (2009-2015) ~ 2008 Salem ~ http://www.rpod-owners.com/forum_posts.asp?TID=1723 - Pod instruction manual 
|
Posted By: Jdub
Date Posted: 08 Dec 2013 at 3:58pm
| Is the ground wire the same as the big white wire on the top left of the green fuse panel? |
Posted By: jj
Date Posted: 08 Dec 2013 at 7:39pm
| the big white wire on the top left of the green fuse circuit board is the negative cable from the converter which is located in the bottom of the panel housing. |
Posted By: jj
Date Posted: 08 Dec 2013 at 7:43pm
Posted By: Jdub
Date Posted: 08 Dec 2013 at 7:58pm
So can't you also ground a negative from the 12v to it? |
Posted By: Sleepless
Date Posted: 08 Dec 2013 at 8:43pm
|
A ground is a ground.
------------- 2014 R-Pod 178 (OUR POD) 2009 Chevrolet Avalanche |
Posted By: jj
Date Posted: 08 Dec 2013 at 8:44pm
|
Use the ground bus bar behind the converter panel housing for propper connection. in the panel you would normaly see two big white wires connected to that terminal top left of the green fuse circuit board. one coming from the converter and the other going to the ground bus bar behind the converter.
|
Posted By: Jdub
Date Posted: 08 Dec 2013 at 10:16pm
Ok, but I already put my 12v with the ground going to the ground wire in the panel as I described above.....no reason to re-wire I would assume?
|
Posted By: furpod
Date Posted: 08 Dec 2013 at 11:12pm
Would be nice if you are going to use someone else's pictures.. that you at least ask first if you are posting them as YOUR mod.. 
------------- |
Posted By: Jdub
Date Posted: 10 Dec 2013 at 10:55pm
Me? |
Posted By: furpod
Date Posted: 11 Dec 2013 at 1:45am
Unless you are also "JJ", (the OP) then no, not you. If you are, then you already know that those pictures are not of a mod you/he did to your/his Pod. They are of other peoples mods/Pods, and in fact, at least one isn't even from a Pod at all. ------------- |
Posted By: wingnut2312
Date Posted: 11 Dec 2013 at 8:05am
|
I was wondering what you would install a 12v for? ------------- 2014 rpod 182G Ford Expedition |
Posted By: Seanl
Date Posted: 11 Dec 2013 at 8:17am
I noticed that some of the pictures in this Post were from furpods mods so I took a closer look at the pictures and all of them came from the internet and a few of them are not even pictures of an rpod. I have used pictures that I have gotten off of the internet to illustrate posts on other forums that I participate in but I think the etiquette for this is to note that the internet is the source of your pictures and that they are not your own. ------------- Sean, 2011 Rpod RP-173,2009 Jeep Liberty Rocky Mountain Edition 
|
Posted By: wingnut2312
Date Posted: 11 Dec 2013 at 8:25am
|
I was wondering what you would install a 12v for? ------------- 2014 rpod 182G Ford Expedition |
Posted By: Jdub
Date Posted: 11 Dec 2013 at 8:40am
Seriously? Charging phones or iPads or portable sound system or anything else you would use from the car charger. We have a Bose sound box that runs on 12v and bluetooth it with the iPhone and got tunes. I should probably take a picture from the interwebs and pretend it was mine. Crazy that the 178's come with NO 12v outlets.
|
Posted By: furpod
Date Posted: 11 Dec 2013 at 12:08pm
There are a plethora of 12v camping/household accessories out there that a person might want to plug in. You have a 182G, I think it comes with 12v receptacles, doesn't it? and a 12v TV and stereo system? The other pod models do not all have that option. So we have a need to recharge mp3 players and phones and cameras and ipads, etc.. When camping with hook ups, no big deal, wall warts abound. But when boondocking... (always wanted to use "plethora" in a normal conversation... lol) ------------- |
Posted By: LePodders
Date Posted: 11 Dec 2013 at 1:48pm
|
... a thought.... ------------- Keenan, Kathryn, Millie, Rio & Cali (2015 r pod 179) Poddy by Nature |
Posted By: Seanl
Date Posted: 11 Dec 2013 at 2:12pm
I agree the OP probobly wanted to be a part of the forum. He put together a great "how to" and illustrated it well. I don't think he meant anything by it. At least I hope he didn't. ------------- Sean, 2011 Rpod RP-173,2009 Jeep Liberty Rocky Mountain Edition
|
Posted By: techntrek
Date Posted: 11 Dec 2013 at 6:21pm
|
I've been waiting for the OP to respond before weighing in publicly... ------------- Doug ~ '10 171 (2009-2015) ~ 2008 Salem ~ http://www.rpod-owners.com/forum_posts.asp?TID=1723 - Pod instruction manual
|
Posted By: wingnut2312
Date Posted: 11 Dec 2013 at 8:23pm
|
Ok, I must be spoiled with charger cords... I was wondering if the 12 volt adapter was for something specific. Ipods, phones and such can be plugged into any of the numerous outlets. Does the 12 volt offer an advantage to current draw? I am looking for a benefit of installing the outlet compared to the standard outlets. Thanks! ------------- 2014 rpod 182G Ford Expedition |
Posted By: CharlieM
Date Posted: 11 Dec 2013 at 8:38pm
|
One of the first mods I made to my 172 was to add four 12V sockets. If shore power is available the advantage of 12V is minimal. A slight advantage is conversion efficiency fo devices the esseentiall run of low voltage like 12V or 5V for USB devices, but on shore power it is not significant. However, if you are off the grid with no 120VAC everything must run on 12V. IPones/Pod/Tablets, radios, TVs, lights and even CPAP machines for those that need them. The only reason FR doesn't include the interior 12V outlets is cost. Charlie ------------- Charlie Northern Colorado OLD: 2013 RP-172, 2010 Honda Pilot 3.5L 4WD PRESENT: 2014 Camplite 21RBS, 2013 Supercharged Tacoma 4L V6 4WD |
Posted By: jj
Date Posted: 11 Dec 2013 at 8:50pm
|
for me the advantage is when at a campsite with no power connection.(no 120 volt to outlets) I can still charge my cell phone or other device via the 12 volt power socket. Use also a plugin usb car charger which plugs into the 12 volt power port which has 2 usb ports. Or plug in my small inverter.
|
Posted By: jj
Date Posted: 11 Dec 2013 at 8:52pm
|
 USB Car Charger works with iPhone 5, 5S and 5C")
Posted By: techntrek
Date Posted: 11 Dec 2013 at 9:14pm
|
jj, please respond to the discussion earlier in this thread.
------------- Doug ~ '10 171 (2009-2015) ~ 2008 Salem ~ http://www.rpod-owners.com/forum_posts.asp?TID=1723 - Pod instruction manual
|
Posted By: wingnut2312
Date Posted: 11 Dec 2013 at 10:30pm
|
Thanks guys! That's what I was looking for. I do have one factory installed, but the plug in usb charger is a good idea. ------------- 2014 rpod 182G Ford Expedition |
Posted By: jj
Date Posted: 13 Dec 2013 at 9:58pm
|
rpodders helping rpodders. I tried to upload my own pictures, but after several atempt I stopped trying. I gave up. Then it I realized I could use pictures from older post to enhance the write up and converter power panel pictures from the web. I am sorry I caused such a controversy, my apologies. Hope the write up will help fellow podders with the step by step installation of the 12 volt power socket.
|
Posted By: furpod
Date Posted: 14 Dec 2013 at 10:13am
|
JJ, There is at least one tutorial here on how to post pictures. But the jist of it is: You can either upload your pictures to a hosting site such as photobucket, and then link them in the body of your post, which is what I usually do, or you can use the advanced settings here, and upload from your computer straight to your post, by clicking on the little "insert image" icon in the post tool bar. "Browse" to the picture on your computer/device, make sure it meets the size requirements, "open" and done. It will upload straight from your computer. Often, depending on your camera/phone settings the file size will be to large, I use a resizing site on the web.. http://www.shrinkpictures.com, there are others. 1 advantage to photobucket is it does any resizing needed for you... ------------- |
Posted By: jj
Date Posted: 24 Jan 2014 at 8:32pm
 |
Posted By: jj
Date Posted: 24 Jan 2014 at 8:37pm

|
Posted By: bcskimiller
Date Posted: 29 Apr 2014 at 1:35am
|
Quick question for the install, I am looking to put two 12V DC plugs in my 2014 178 (yes, it came with one, but only by the TV). I like how this post describes it because it runs off a separate fuse (not tapped off the heater etc), however I want to put in one by the bed and the other under the dinette (power panel is right beside the door on the bathroom wall). I bought a spool of wire for the positive, but was assuming I can put the ground to anything that is steel, kinda like in a car. True for an RV or should I run it all the way back to the ground bar by the door? It may be a naive question, because I haven't tried to find steel on this yet, but if nothing else assumed the frame would work... Thanks! ------------- Me, the Wife, 3 Kids 5 and under...its Crowded! 2014 RP-178 HRE 2017 Expedition EL 4WD |
Posted By: Budward
Date Posted: 29 Apr 2014 at 4:44am
|
If you are going to run a positive back to the convertor or to the battery then run two wires and connect the ground there. Using the frame is possible but not really a great idea- there is almost no other steel to be found, at least that is grounded. Are you going to drill a hole in the floor to get to the frame? Are you going to drill yet another hole in your frame adding yet another future rust spot? The possible rust spot is assuming you scrape the paint off where you attach the lug, that is the proper way to do it, something FR does not bother to do. I mean it would have taken them an extra 30 seconds- profit margins and all you know  |
Posted By: techntrek
Date Posted: 29 Apr 2014 at 1:26pm
|
I agree, run both back to the converter. ------------- Doug ~ '10 171 (2009-2015) ~ 2008 Salem ~ http://www.rpod-owners.com/forum_posts.asp?TID=1723 - Pod instruction manual
|
Posted By: bcskimiller
Date Posted: 29 Apr 2014 at 6:24pm
|
Roger, I was figuring a quick self tapper into the frame would be no differenth then how they put on the super stable stabilizer jacks! ha In reality, the frame paint job is a joke...would probably be better to just let the whole frame flash rust and leave it then chase all the chipped off paint spots and I have only had it for a month! I'll run it back to the bus bar...Thanks! ------------- Me, the Wife, 3 Kids 5 and under...its Crowded! 2014 RP-178 HRE 2017 Expedition EL 4WD |
Posted By: CharlieM
Date Posted: 29 Apr 2014 at 9:07pm
|
Let me add my 2 cents to the discussion. As an engineer I can say the quicker (shorter) you can get to a good ground the better. A full length wire return to the power panel doubles the voltage drop. That said, I did add four 12V outlets to my 172 and ran the return all the way back to the panel. It was just as close and somewhat easier than finding a chassis ground. No wall or floor penetrations required and the added outlets were close to the power panel. Depends on the layout. Either way will work fine unless you're running a high current device like an inverter. Use at least #12 wire; #10 if you can and fuse with a 15 Amp fuse. ------------- Charlie Northern Colorado OLD: 2013 RP-172, 2010 Honda Pilot 3.5L 4WD PRESENT: 2014 Camplite 21RBS, 2013 Supercharged Tacoma 4L V6 4WD |
Posted By: Budward
Date Posted: 29 Apr 2014 at 9:41pm
|
Cig sockets really aren't meant for more than about 10A so a 15 A fuse is about right. Tough to run an inverter of over 120 watts without heating things up, I've melted more than a few plastic cig lighter sockets in my years  Speaking of invertors- I've got to get mine installed pronto, our first trip will be to a campground with AC power but the next one a couple of weeks from now will be dry camping. Unfortunately I have to run a CPAP at night and an inverter is the best way to do this for me. I bought a pure sine wave 1000 watt unit, (Sunforce) that works well. It is the second one as the first developed a problem after a year or so where it was noising up the 12v line causing problems with other 12V electronics. Be aware if you buy a Sunforce their warranty is a PITA, took me a good 3 months after I shipped it to them, to get action on my invertor, which they eventually replaced. BTW if you want wiring fun try connecting your invertor with 2/0 cable as I do  |
Posted By: CharlieM
Date Posted: 29 Apr 2014 at 9:50pm
Talk about PITA................ ------------- Charlie Northern Colorado OLD: 2013 RP-172, 2010 Honda Pilot 3.5L 4WD PRESENT: 2014 Camplite 21RBS, 2013 Supercharged Tacoma 4L V6 4WD |
Posted By: bcskimiller
Date Posted: 30 Apr 2014 at 2:00am
|
OK, so I was excited to start installing new 12 volt sockets
and started pulling off panels for the first time in my 2014 178. Unfortunately, as you can see from my
pictures, the power panel is in the bathroom wall and the only access to the
bus bar would be to pull the entire panel out.
The other problem is that all power is run from the back of the panel
thru the floor under the trailer thru a crappy spray foam job (and you can see
where the ground is also). After going
under the trailer, all wires are run very clean and wrapped in the plastic protectors
where they exit the spray foam, so basically impossible to tell what is what. I started pulling my “lights” fuses and found that it
appears my kitchen LED light has its own 15 amp fuse. At this point I’m looking at either finding
where it comes up under the sink and tying into that or just jumping into the very
accessible furnace or water pump circuits which are right under the bed and
right where I want one of the outlets.
These outlets sure are becoming a lot more work then I thought they were
going to be… One other thing for this new pod modder, I’m assuming all
brake and trailering lights are run off the TV and are completely independent
from the power system in the trailer itself (except the emergency break away)? With all the back, side, wheel well and
spoiler lights, there are low voltage wires run everywhere it seems like!  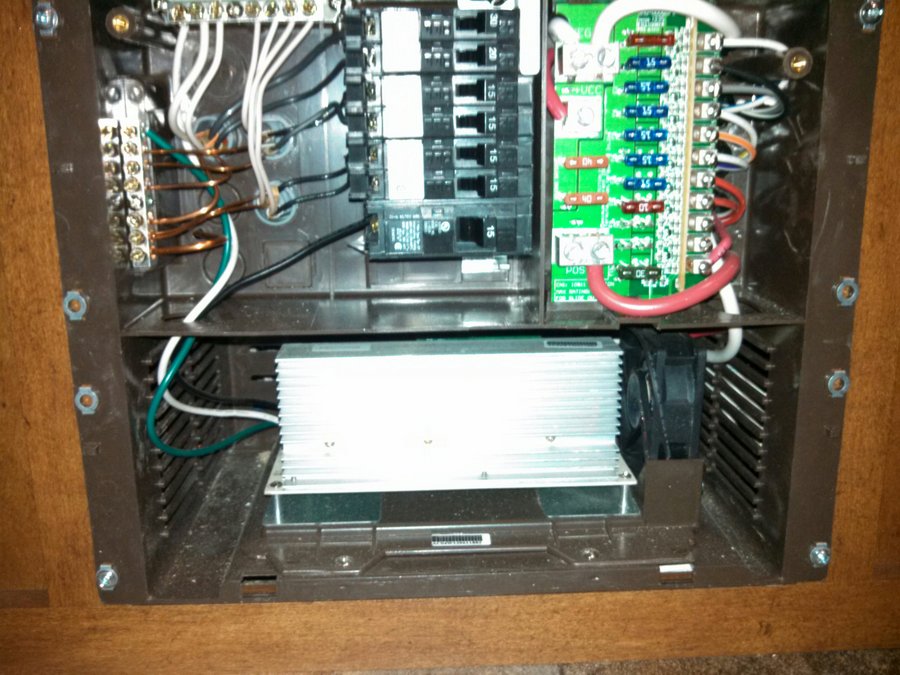 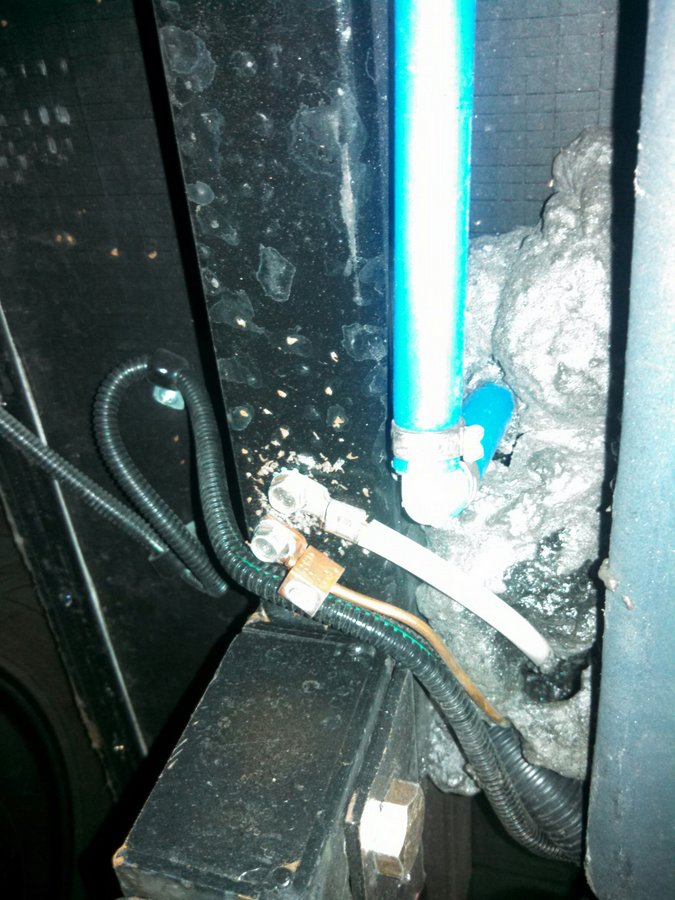 ------------- Me, the Wife, 3 Kids 5 and under...its Crowded! 2014 RP-178 HRE 2017 Expedition EL 4WD |
Posted By: Budward
Date Posted: 30 Apr 2014 at 4:37am
|
You were probably going to have to pull the panel anyway to fish the hot into the fuse area. Not a big deal- IF FR did it right and left some slack in the wiring and didn't pull it tight underneath after they hooked it up to the panel. I hope so because I'm about to dive into mine too, 2014 179. My Blue Sea 12v sockets arrived yesterday, highest quality I've found and worth a few extra dollars in the long run. PS- I see FR overtightened the screws on your under shower vent also, already had mine off to straighten it and reinstall, with correct screw depth to hold but not bend.  |
Posted By: techntrek
Date Posted: 30 Apr 2014 at 7:56am
|
Ouch, definintely not as easy as the installations in the dinnettes on may other pods - about the same amount of work getting behind the converter (a few screws either way), but not as easy to run new wires.
Since cigarette lighters aren't installed in cars anymore, I wish everyone would agree to a new standard for 12 volt accessories. Something less bulky with a more secure connection (not based on the tension of a few springs). A small Anderson connector is probably best, maybe a small twist-lock 2nd best. ------------- Doug ~ '10 171 (2009-2015) ~ 2008 Salem ~ http://www.rpod-owners.com/forum_posts.asp?TID=1723 - Pod instruction manual
|
Posted By: fwunder
Date Posted: 30 Apr 2014 at 9:03am
Pulling out the panel is not a big deal and will give you access to the grounding bus. - mine is screwed to the floor behind panel. Once out, installing adapter was straight forward; using empty fuse position and drilling hole for snap-in adapter. Oh, you will probably find a lot of sawdust behind the panel. I guess they don't have shop vacs in the factory. You will find a lot more sawdust after you tow over bumpy roads a few times. While you have the panel out, you'll notice the wiring running up to the stereo. Unscrew the four screws holding the stereo and you can easily install a voltmeter, dropping the wires down to the 12v. power bus and ground. The voltmeter is one of my favorite mods! 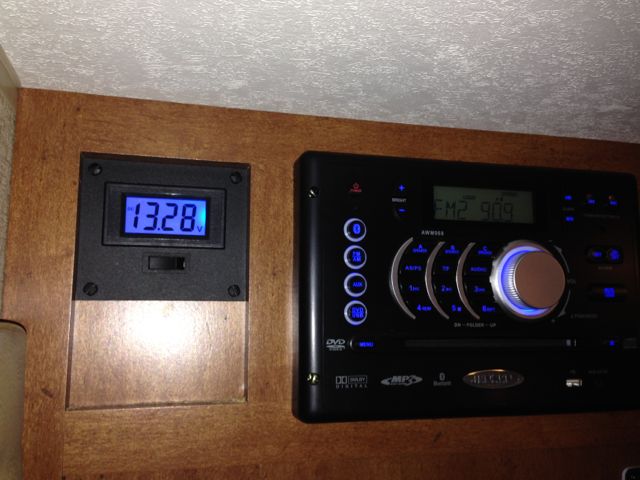 ------------- 2014 RPod 178 => https://goo.gl/CV446f - MyMods and Buying Habits 2008 4Runner Limited 4.0-liter V6 Yes, those are wild ponies dining on grass while dumping tanks! |
Posted By: CharlieM
Date Posted: 30 Apr 2014 at 9:22am
|
I'll second the comments of Budward and Techntrek. I installed 4 extra outlets in my 172 so I can sympathize somewhat. Pulling the panel is not hard if wire slack is there; 4 screws. It will give you access to the wiring and a way to run new wires. There is also added access through that shower vent (mine was originally installed upside down). Running the wires aft to the bed should be fairly easy. The wires forward to the dinette may have to go below the floor to get across the doorway. Drilling small holes through the floor is not difficult; it's a little over 2" thick consisting of plywood and foam insulation. You can probably pass two #12 wires through a 1/4 or 3/8 inch hole. Just seal the holes afterwards with silicone or similar. Underneath the trailer I prefer the small plastic split wire molding available at auto stores for added protection. Use adequate zip ties to secure it. I would also recommend two outlets in both locations. Easy to do while you're at it and we all keep getting more 12V gadgets. I like the BlueSea sockets, but you should use the recommended hole saw for installation. I'd also recommend plugin USB adapters for cell phones, iPads, etc. See the links below. http://www.amazon.com/Blue-Sea-Systems-Volt-Socket/dp/B001U4ZZPK/ref=sr_1_6?ie=UTF8&qid=1398862410&sr=8-6&keywords=bluesea - http://www.amazon.com/Blue-Sea-Systems-Volt-Socket/dp/B001U4ZZPK/ref=sr_1_6?ie=UTF8&qid=1398862410&sr=8-6&keywords=bluesea http://www.amazon.com/Mediabridge-High-Output-Charger-iPhone/dp/B007TV88F2/ref=sr_1_22?ie=UTF8&qid=1348760263&sr=8-22&keywords=usb+charger - http://www.amazon.com/Mediabridge-High-Output-Charger-iPhone/dp/B007TV88F2/ref=sr_1_22?ie=UTF8&qid=1348760263&sr=8-22&keywords=usb+charger And on the foaming job: more is better. The alternative is no foam, which FR has also done on Friday afternoon models. Makes for a really leaky cold Pod! ------------- Charlie Northern Colorado OLD: 2013 RP-172, 2010 Honda Pilot 3.5L 4WD PRESENT: 2014 Camplite 21RBS, 2013 Supercharged Tacoma 4L V6 4WD |
Posted By: Budward
Date Posted: 30 Apr 2014 at 2:49pm
I do like the Anderson connectors, I've used them on many things even up to 300 Amp ones for a winch...I really love the way they are "unisex"- for those that haven't seen them- only one plug is needed, two of them plug together even though they are the same!
|
Posted By: bcskimiller
Date Posted: 30 Apr 2014 at 7:45pm
|
Thanks to everybody for the quick replies! I think I'm taking all the parts I got at O'Rileys back and just ordering 4 of the Blue Sea Systems plugs. May upgrade to the built in USB chargers once they get enough power to do the IPAD and these new fancy big screen phones; till then we'll stick with our cigarette lighter ones.One last (for now...) novice question: for the wiring, especially since I will have to run some of it under the trailer, is it worth paying for the outdoor/underground low voltage 12 guage 2 wire such as this: http://www.amazon.com/Coleman-Cable-095136208-Lighting-100-Feet/dp/B002G9TND8/ref=cm_cr_pr_product_top - http://www.amazon.com/Coleman-Cable-095136208-Lighting-100-Feet/dp/B002G9TND8/ref=cm_cr_pr_product_top or will regular 12 guage 2 wire house stuff work? Thanks Again! ------------- Me, the Wife, 3 Kids 5 and under...its Crowded! 2014 RP-178 HRE 2017 Expedition EL 4WD |
Posted By: CharlieM
Date Posted: 30 Apr 2014 at 8:00pm
Bud, I've seen the Andersons advertised, but never seen one in person. How do they handle keying or polarity? Will two reds mate, two blacks mate, but not a red and a black? Or is it something else. Also have you ever seen a panel mount version? Any connector system to replace the cig plug will have to have a panel mount female and cable mount male. ------------- Charlie Northern Colorado OLD: 2013 RP-172, 2010 Honda Pilot 3.5L 4WD PRESENT: 2014 Camplite 21RBS, 2013 Supercharged Tacoma 4L V6 4WD |
Posted By: OhTallMan
Date Posted: 01 May 2014 at 10:38am
Sorry to be late to this portion of the conversation, but let me just add this: As a professional photographer I understand a bit about copyright, fair use laws and attribution etiquette. At minimum attribution of a photo is required, and certainly appreciated. It is not fair, right or legal to simply use someone else's work without acknowledgement - even if the photo is taken by Joe Schmoe camper. A link to the Web site the pics were taken from would be even better. What I found unusual about this series of photos is that, not only were the photos used from other sources without attribution, the modification work had not even been done by the poster. The more proper way to handle that would have been, "hey guys, here's an idea . . ." And "here are some pics of how to do it from Joe Schmoe . . ." Plus, a link to the original Web address would be appropriate. Hope this helps. ------------- ______________________________ 2014 Honda Ridgeline 2014 R-Pod 178 |
Posted By: CharlieM
Date Posted: 01 May 2014 at 11:49am
In my last post to you I included 2 links, one for BlueSea and one for a USB adapter. The BlueSea sockets I used are just the cigarette plug connectors, no USB included. That gives you connectivity for all cigarette plug devices. The other link is to a USB adapter that plugs into the cigarette lighter socket and does provide 2 Amps for iPads etc. I'm a bit skeptical about the BlueSea built in USB sockets, if only for the replacement upon failure issues. On the wire: The Coleman wire looks like it will be fine, but maybe longer than you'll need. I would use 12 Ga. wire available at auto stores plus the wire molds available from the same source, but you can do a cost comparison. The Coleman wire will work; don't use regular old house wire. For one thing, house wire is not rated for outside use. Secondly house wire is solid conductor, not stranded. Solid conductors are a lot harder to work with in cramped quarters like a trailer. ------------- Charlie Northern Colorado OLD: 2013 RP-172, 2010 Honda Pilot 3.5L 4WD PRESENT: 2014 Camplite 21RBS, 2013 Supercharged Tacoma 4L V6 4WD |
Posted By: Boomertype
Date Posted: 01 May 2014 at 2:15pm
I've been looking at volt meters and haven't found one that I like till I saw this one, where did you get it and what brand is it. What else does it show? |
Posted By: fwunder
Date Posted: 01 May 2014 at 2:43pm
|
This is the voltmeter I used: http://www.amazon.com/dp/B005UWD2J4/ - http://www.amazon.com/dp/B005UWD2J4/ It's just measures volts. I picked up the rocker switch at Radio Shack and made the plastic panel out of some scrap I had sitting around. 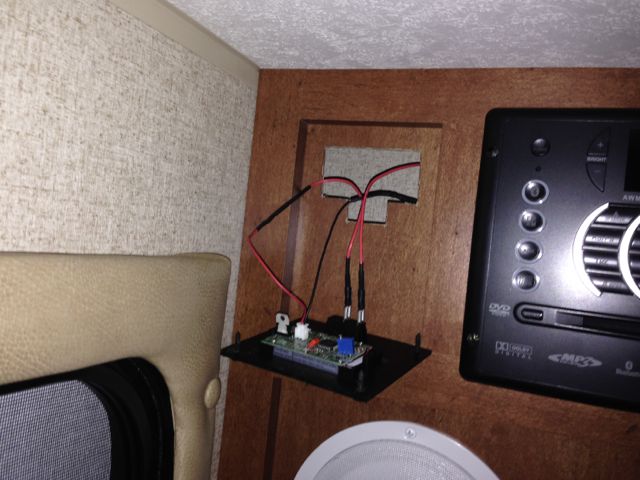 Hope that helps! fred ------------- 2014 RPod 178 => https://goo.gl/CV446f - MyMods and Buying Habits 2008 4Runner Limited 4.0-liter V6 Yes, those are wild ponies dining on grass while dumping tanks! |
Posted By: jjkd
Date Posted: 01 May 2014 at 8:51pm
|
Description of Anderson PowerPole connectors http://en.wikipedia.org/wiki/Anderson_Powerpole - http://en.wikipedia.org/wiki/Anderson_Powerpole For power distribution apps like this, you always put them together in pairs with red/positive on the right (red right tongue top), since pairs connect in opposite (upside down) orientation, the polarity is always correct. Some panel mount options shown here: http://www.powerwerx.com/powerpole-accessories/ - http://www.powerwerx.com/powerpole-accessories/ But sometimes you can get them cheaper on ebay... ------------- -- Joe Kyle --jjkd-- |
Posted By: Budward
Date Posted: 01 May 2014 at 9:02pm
The colors are simply to identify different "systems". The colors have nothing to do with which ones mate with each other. Standard is grey. The same size of any color will mate, IOW no problem plugging a grey into a red if they are the same size. Polarity is marked on them for DC systems. they really are someones great idea- I like them a lot. If wired correctly it is impossible to reverse polarity plugging them into each other. The links in jjkd's post detail the physical design, although I admit I've never seen the single pole ones wikipedia shows, all I've used have been 2 pole. |
Posted By: CharlieM
Date Posted: 01 May 2014 at 10:21pm
|
Thanks Joe and Bud for the info. If I understand any color within the 15/30/45 series will mate with another color of the series. It looks like a 15A would also mate with 45A connector of any color. So given four separate wires, two red (+) and two black (-), it is physically possible to mate them in any combination, even shorting out the source if the wires are long enough? Now if the same for wires are assembled into plugs, using the roll pins, with one red and one black per pair and following the convention of "red right, tongue top" is it still possible to cross-mate them and reverse polarity?
------------- Charlie Northern Colorado OLD: 2013 RP-172, 2010 Honda Pilot 3.5L 4WD PRESENT: 2014 Camplite 21RBS, 2013 Supercharged Tacoma 4L V6 4WD |
Posted By: Budward
Date Posted: 02 May 2014 at 5:49am
|
No, if assembled correctly they will always maintain polarity correctness. Each connector is marked as to which contact is positive on the two conductor ones. I've never had a need to use the individual contact version since I've only used them on 12V DC systems where both + and - are needed. Roll pins? Lost me there.....haven't seen that on the ones I've used.  |
Posted By: CharlieM
Date Posted: 02 May 2014 at 7:52am
|
Thanks for the reply. I hadn't seen the assembled connectors. The PowerWerx website talks to supplied roll pins used to join two single connectors, e.g. red and black, to form a single two circuit connector. Obviously the assembled one you show is preferable.
------------- Charlie Northern Colorado OLD: 2013 RP-172, 2010 Honda Pilot 3.5L 4WD PRESENT: 2014 Camplite 21RBS, 2013 Supercharged Tacoma 4L V6 4WD |
Posted By: cody91
Date Posted: 02 May 2014 at 10:51am
CharlieM, What kind of foam do you use? I can't seem to find that black expanding foam that FR uses? Cody91 |
Posted By: CharlieM
Date Posted: 02 May 2014 at 11:08am
|
Cody, Fortunately my Pod was completely and perfectly foamed from the factory. So tight I could hear the difference in the Fantastic fan with and without a window open. Therefore I never went in search of the foam. However, home improvement stores carry several types of expanding polyurethane foam in spray type containers. Black color is not necessary. For small fills like wire entry/exit I use GE clear Silicone II sealer. Easy, permanent, and removable. Available at Lowes, HD, Ace, etc. ------------- Charlie Northern Colorado OLD: 2013 RP-172, 2010 Honda Pilot 3.5L 4WD PRESENT: 2014 Camplite 21RBS, 2013 Supercharged Tacoma 4L V6 4WD |