First trip
Printed From: R-pod Owners Forum
Category: R-pod Discussion Forums
Forum Name: Miscellaneous / Off-topic
Forum Discription: Pull a chair up to the campfire and chat. No religious, political or weapons talk, please.
URL: http://www.rpod-owners.com/forum_posts.asp?TID=3572
Printed Date: 12 Jul 2025 at 1:33am
Software Version: Web Wiz Forums 9.64 - http://www.webwizforums.com
Topic: First trip
Posted By: Zag
Subject: First trip
Date Posted: 04 Jun 2013 at 6:34pm
|
Taking my recently acquired 152 (and TV) out for a 'test' camp with a couple of friends before I bundle up the wife and new-born for an outing. Really excited (this has been a long time dream coming to realization) and have been scouring the forum and elsewhere on tips&tricks to make sure my trip goes smoothly. I have my checklist app that I will review before I hit the road and will spend a couple hours the day before making sure I'm comfortable towing and moving the trailer. A couple of areas I'm still in doubt about are: - Stabilizing and leveling the trailer at the campground. - How to flush the grey/black water at the end of the trip. If anyone has any first-time outing advice they would like share I would love to hear it! Thanks. PS - Will post a pic of my trailer and TV once it's in the right setting; a campground on the coast of Vancouver Island, Canada  ------------- 2009 RP-152 (Cutie-Pod) 2001 Nissan Pathfinder |
Replies:
Posted By: techntrek
Date Posted: 04 Jun 2013 at 7:49pm
|
Leveling - first you need to level side-to-side by raising one tire or the other. Some people use boards (2 x 6s) of various lengths with the ends cut at 45 degree angles so you can stack them like a triangle at various heights. Some people buy "legos", orange blocks which stack like legos. Since you need to pull/push the trailer onto these things you do this before you unhitch. Then after unhitching you level front-to-back using the tongue jack. Once it is leveled you lower the stabilizers on the corners until they touch the ground, then crank it one or two more times - max. Don't empty the black tank until it is at least 2/3 full. If you do it with less water you risk getting the "triangle of death", where the solids in the tank don't empty correctly and build up. If you must dump before you are 2/3 full, add water by flushing the toilet until it is. Empty the black tank first, then the gray tank. This flushes out the sewer hose. Since the gray tank often fills before the black one, you can empty just that one w/o a problem - and even empty it if it isn't full. ------------- Doug ~ '10 171 (2009-2015) ~ 2008 Salem ~ http://www.rpod-owners.com/forum_posts.asp?TID=1723 - Pod instruction manual 
|
Posted By: Kickstart
Date Posted: 04 Jun 2013 at 8:45pm
|
Don't forget to chock your trailer wheels--especially if your campsite is even a little off level. Single axle trailers can do some pretty strange rolling, even sometimes when your stabilizers are down. I always carry two pair of cheap plastic chocks-always use one pair, and sometimes both if necessary. They're available at all RV stores, Amazon, and Wally World. Also, I notice you have a 2009 Pod. I don't think they came with front stabilizers, so if you don't have any installed up front, Camco makes some cheap portable stabilizers. They work well, but are not as handy as installed ones. ------------- '10 RP 175-Replaced by 2014 Kodiak 173 QBSL '12 Toyota Tundra '05 Sportster (half a Harley) Retired-We're on Beach Time! |
Posted By: Outbound
Date Posted: 04 Jun 2013 at 8:45pm
|
With levelling, pick your poison. I suggest that you go with either a Bal leveller or with Lynx Levellers (legos) and stay away from wood (sorry guys) or those step-like all-in-one levelling blocks. Personally, I use legos. For the black tank, as I'm packing up the trailer before pulling out of the campground, I'll run water into the toilet and fill it to at least the 2/3rds mark. A well positioned soap/shampoo bottle in the corner will keep the toilet flush pushed in. As tech said, the volume of water will help completely empty the tank. Also, after visiting the dump station, I'll fill the toilet with water, add some toilet treatment and flush (leaving it in the black tank). The sloshing water/chemicals will work on the sludge as you drive down the road to your next stop. BTW: your black tank gauge WILL gum-up and constantly read full. Don't worry about it. Don't spend endless hours with a spray wand down the toilet trying to clean them off. Just live with it. It'll take two people over 10 days to fill your black tank. ------------- Craig :: 2009 RP171 towed by a 2017 F150 |
Posted By: bhamster
Date Posted: 05 Jun 2013 at 9:59am
I'd recommend getting and using two pairs. They're cheap and easy to use. That way you don't have to guess which way everything will roll. I had one time where it moved unexpectedly and after that I always used all four.
|
Posted By: coopercdrkey
Date Posted: 05 Jun 2013 at 11:28am
|
I have noticed at several dump stations a coiled, extendable hose long enough to reach the black water tank flush input. As long as your dump hose is in place and your black water valve is open, you can run fresh water into and out of the tank until you're satisfied it has been well purged. ------------- Bob and Joyce Jennifer and Baxter, the Campin' Cocker Spaniels RP 177 "Key Pod" Chevrolet Silverado 1500 LT / Z71 |
Posted By: CharlieM
Date Posted: 05 Jun 2013 at 1:19pm
|
Yes, the coiled hose works well IF someone has put a standard male garden hose connector on it. Some I've encountered had a short wand installed; probably from the original installation before newer campers had the black water flush connection. Also, I like to close the dump valve and let the black tank fill about 1/2 so there is a lot of water to flush out. However, you have to watch the tank level carefully or you'll understand why the caution on keeping the dump valve open is pasted on the side.  ------------- Charlie Northern Colorado OLD: 2013 RP-172, 2010 Honda Pilot 3.5L 4WD PRESENT: 2014 Camplite 21RBS, 2013 Supercharged Tacoma 4L V6 4WD |
Posted By: techntrek
Date Posted: 05 Jun 2013 at 9:29pm
|
Dang, I did forget that very important step! ------------- Doug ~ '10 171 (2009-2015) ~ 2008 Salem ~ http://www.rpod-owners.com/forum_posts.asp?TID=1723 - Pod instruction manual
|
Posted By: techntrek
Date Posted: 05 Jun 2013 at 9:36pm
Good point, completely true. The best indicator that your black tank is full is when you start seeing fluid come back up the tube when you flush! ------------- Doug ~ '10 171 (2009-2015) ~ 2008 Salem ~ http://www.rpod-owners.com/forum_posts.asp?TID=1723 - Pod instruction manual
|
 (not kidding)
Posted By: Zag
Date Posted: 10 Jun 2013 at 1:20pm
|
Hey Pod Owners, Here's a little story about my first outing with 'Cutie-Pod'. I had a 7-pin connector and brake controller installed the day before and took the TV and trailer out to the local Costco after hours to set the controller and get comfortable with backing up (thinking about the tight camp site entrances). For other first time RV owners, this is a great tip! The next day I left with a buddy on the inaugural journey. We pulled in to the nearest gas station to fill up and I didn't approach the entrance at an angle so ended up scraping the back end of the trailer. Looks like I took a bit of the underlay off where I touched so I'll have to figure out how to patch that up. Otherwise a comfortable 90 minute road trip to the campground. The road had some dips that made the trailer bounce a bit but it seems no worse for wear and everything in the trailer survived. Managed to back up into my space on my first attempt (with the guidance of my buddy). Followed the many tips and posts on the forum and had the Pod all set in under 15 minutes. It took us a little longer to figure out how to switch the fridge from battery to propane. By chance I tried resetting the power with the fridge set to propane and that initiated the pilot light; after that it was all good. Had a strange thing happen on day two. I had been turning the water pump and water heater on and off as I needed it (thinking about battery conservation(. As the day progressed and I saw we still had plenty of battery I turned on the pump and heater and kept it on. After a while I hear water gushing out of the side of the RV and see water (clearly under pressure) coming out of the city water intake. It was the fresh water and the tank emptied. We found what looks like some sort of spring and piece of plastic on the ground afterwards which might be part of the pressure valve? I spoke to a couple of RV'ers at the waste station and I don't think I did anything wrong by leaving the pump and heater on so I'm assuming I had some sort of failure with the water system. Any thoughts on what might have happened based on the symptoms? I'll post a pic of the piece I found on the ground later. Otherwise it was all good. Actually it was great! Hopefully my two incidents won't be too costly to address. Can't wait for the next outing! ------------- 2009 RP-152 (Cutie-Pod) 2001 Nissan Pathfinder |
Posted By: bhamster
Date Posted: 10 Jun 2013 at 2:18pm
Sounds like your check valve failed. The check valve allows water to flow into the city water connection, but not out of it. You should be able to replace it fairly easily. On a related note... this is why I never leave my pump on. Even something like a leaky faucet (or something bumping the faucet handle) will cause the tank to drain without you knowing it. Leaving the water heater on won't hurt water or electricity consumption much, but will use extra propane.
|
Posted By: Seanl
Date Posted: 10 Jun 2013 at 4:05pm
yes check valve failure is my guess as well. This is what the check valve looks like with the screen removed. That little white pin is the the back of the check valve. My guess that the spring and plastic were part of of the valve that came apart. There is normally a screen over the check valve so it looks like the bottom picture.  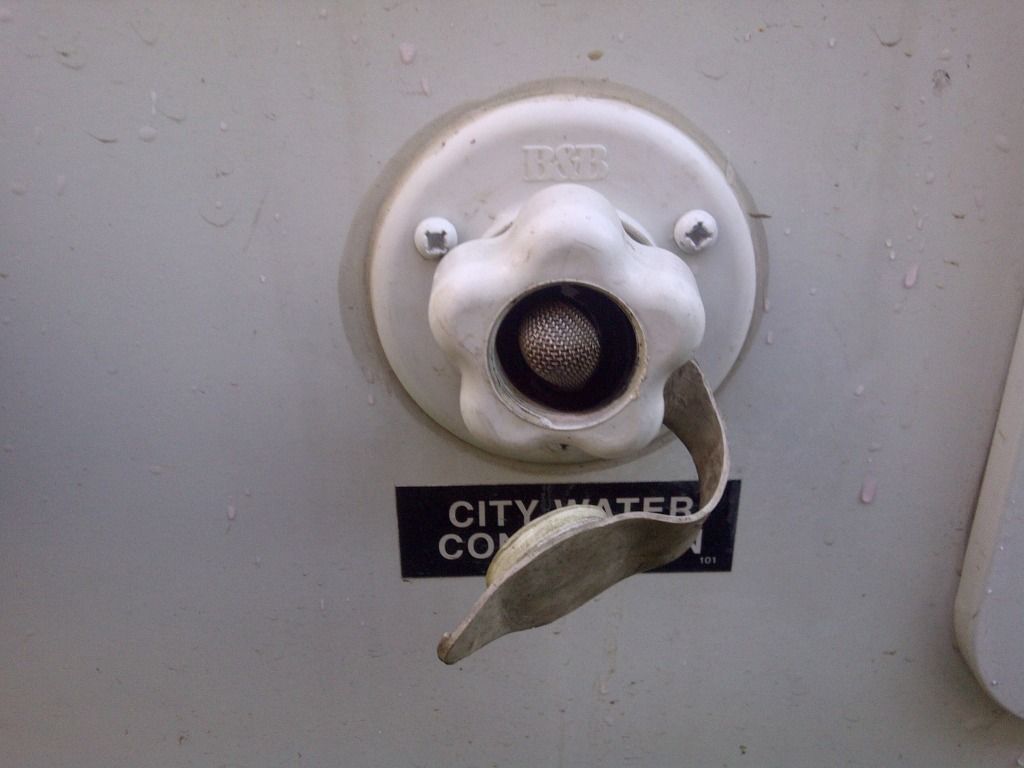 ------------- Sean, 2011 Rpod RP-173,2009 Jeep Liberty Rocky Mountain Edition 
|
Posted By: Zag
Date Posted: 10 Jun 2013 at 4:10pm
That's it for sure.  Glad my buddy saw and picked up the piece of plastic and spring from the push. Glad my buddy saw and picked up the piece of plastic and spring from the push.Anybody know what the process is to fix/replace the check valve? ------------- 2009 RP-152 (Cutie-Pod) 2001 Nissan Pathfinder |
Posted By: Seanl
Date Posted: 10 Jun 2013 at 4:49pm
|
I did a quick check online and found this link showing putting one back together. It's a different camper but the valve looks very similar. Looks like you have to get at the back of the valve so it means taking it out. http://www.sunlineclub.com/forums/f71/fresh-water-inlet-valve-repair-11736.html - http://www.sunlineclub.com/forums/f71/fresh-water-inlet-valve-repair-11736.html If you have to replace the whole valve they are only about $20.00
------------- Sean, 2011 Rpod RP-173,2009 Jeep Liberty Rocky Mountain Edition
|
Posted By: francoisfrogpod
Date Posted: 11 Jun 2013 at 5:36pm
|
A side note about the tank indicators ALWAYS reading full... We've had our pod for 4 months. We've spent many nights sleeping in it, but we have never put water into our holding tank. We have never used the gray tank or black tank due to personal preference. Last time we were camping, just for fun I pushed the black tank indicator button. FULL!!! Never believe the indicator lights. Proof positive. ------------- Denny and Linda 2013 Pod 177 '08 Santa Fe |
Posted By: techntrek
Date Posted: 11 Jun 2013 at 9:59pm
|
The gray and fresh tank indicators usually work.... usually.
------------- Doug ~ '10 171 (2009-2015) ~ 2008 Salem ~ http://www.rpod-owners.com/forum_posts.asp?TID=1723 - Pod instruction manual
|
Posted By: CharlieM
Date Posted: 11 Jun 2013 at 10:11pm
If you bought the Pod new and have NEVER put water in the tanks, there is a defect. Sometimes the sensors get clogged with use, but new ones should work. Looks like Forest River owes you a fix. ------------- Charlie Northern Colorado OLD: 2013 RP-172, 2010 Honda Pilot 3.5L 4WD PRESENT: 2014 Camplite 21RBS, 2013 Supercharged Tacoma 4L V6 4WD |
Posted By: francoisfrogpod
Date Posted: 12 Jun 2013 at 9:28pm
|
Charlie M, Prior to the pod we had a 34 ft Cedar Creek 5th wheel. Also a Forest River product. Those indicator lights were never accurate either. It was easier just to keep track and empty as needed. Really don't plan on using the tanks on the pod, but I'll definitely pass along the info to DH. Thanks!
------------- Denny and Linda 2013 Pod 177 '08 Santa Fe |
Posted By: dsmiths
Date Posted: 12 Jun 2013 at 10:07pm
Maybe I am just lucky but my gauges seem to be pretty accurate on our 2011 RP-172. fresh water gauge is very accurate and the black and grey seem to be very close also. I am going to keep my mouth shut so I don't jinx myself  ------------- Dane and Donna Smith 2011 RP-172 2008 Chevrolet Trailblazer 4X4 lift kit prodigy wireless brake controller |
Posted By: Goose
Date Posted: 13 Jun 2013 at 12:00am
|
Never have had any issue with our gauges either, they seem to be accurate. Goose ------------- Mother Goose's Caboose..2011 RP171..07 Grand Cherokee 
|
Posted By: hogone
Date Posted: 13 Jun 2013 at 6:53am
|
curiosity question............if for some reason they weren't accurate what would happen, let's say on the gray tank. Would the water just back up or not drain? Am I to assume it would be pretty obvious? My gauges seem to be fairly accurate as well.
------------- Jon & Pam 2013 RP177 2023 F150 2017 HD Streetglide CHEESEHEAD |
Posted By: CharlieM
Date Posted: 13 Jun 2013 at 7:24am
|
I've actually observed this in the process of measuring the capacity of my tanks. The gray water will begin to drain slowly and back up into the shower. You may also hear some gurgling in the kitchen sink drain as the air attempts to escape. For the black water the back up will be into the toilet bowl. Fortunately you can see this coming if you look down the toilet as you flush. You will have some warning when it's getting full. All in all real messes can be contained, but it's really worth some effort to keep the gauges working by back flushing and cleaning. I have used the Geo Method with some success. And, if you're into such things, it helps to run a test to see how the gauges respond to varying fill levels. This can be done with a known 5 or 6 gallon bucket. The gauges are not linear. I have an additional 10 gallons of capacity after the top light comes on. Good to know what that top light really means. ------------- Charlie Northern Colorado OLD: 2013 RP-172, 2010 Honda Pilot 3.5L 4WD PRESENT: 2014 Camplite 21RBS, 2013 Supercharged Tacoma 4L V6 4WD |
Posted By: hogone
Date Posted: 13 Jun 2013 at 8:22am
|
Very helpful Charlie, thanks. ------------- Jon & Pam 2013 RP177 2023 F150 2017 HD Streetglide CHEESEHEAD |