dometic refrigerator replaced with Norcold N4150
Printed From: R-pod Owners Forum
Category: R-pod Discussion Forums
Forum Name: Podmods, Maintenance, Tips and Tricks
Forum Discription: Ask maintenance questions, share your podmods (modifications) and helpful tips
URL: http://www.rpod-owners.com/forum_posts.asp?TID=15938
Printed Date: 02 Aug 2025 at 6:59pm
Software Version: Web Wiz Forums 9.64 - http://www.webwizforums.com
Topic: dometic refrigerator replaced with Norcold N4150
Posted By: Pod People
Subject: dometic refrigerator replaced with Norcold N4150
Date Posted: 03 Mar 2024 at 6:23pm
|
Dometic refrigerator replacement with a Norcold unit This is long overdue, but I have finally put together a report on replacing our Dometic refrigerator RM8501 (original RPOD equipment) with a new, larger Norcold N4150. The last post was in mid December in the “I Need Help” section and was listed as “refrigerator gas operation help please”. We had trouble with the Dometic refrigerator every time we used it over the 5 years we owned it. After our last trip, we could not get it to work in LP mode and asked the forum for help. We received a lot of good information, suggestions and help from other forum members. We tried what you recommended but could never get it work reliably and consistently. After much thought and research, we decided to replace the refrigerator. We had long talked about replacing the Dometic 3.5 cubic foot fridge with something larger. After weeks of looking, we could find only one model that would fit in our slideout if we removed both our Dometic and Sunbeam Microwave/Convection oven. We ordered the Norcold N4150 refrigerator on the advice of a local dealer. The dealer charged $2360.45 for the unit compared to $1850 for the Dometic 8501. We picked it up and transported it to our house. The dimensions of the Norcold were almost a perfect fit although the Norcold is 1.5” taller than the Dometic. But the new unit required renovations of the fridge/microwave bay. The Dometic refrigerator and microwave were easily removed. The shelf holding the microwave was removed along with all of the interior firring strips that lined the refrigerator bay walls. We did not have to relocate the LP line or the electrical wiring. https://postimg.cc/ns9jj1SH"> Original dometic and microwave
I installed ½” foil faced foam insulation on both side walls and added the necessary filler strips to make the interior dimensions appropriate to the new refrigerator. https://postimg.cc/K42fbK4K">
After insulation, the walls were covered with 1/8” Masonite and all seams were thoroughly caulked as part of the combustion seal for the rear compartment
https://postimg.cc/zy6wcv9G"> Insulated wall
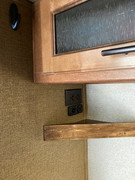
I also added a 120v outlet and 12v charging center in the upper right side that would be available over the couch and under the overhead cabinetry. I used the original 120v outlet that served the microwave for the power source and tapped into the existing 12v refrigerator power supply for the new 12v charger.
https://postimg.cc/kBtgy5Fc"> New 12v,120v charging station
I had to add a new exterior vent at the top of the refrigerator bay as the new refrigerator completely filled the bay and needed a hot air exhaust area at the top of the bay. Amazon had an exact duplicate of the Dometic vent and it was an easy install. (The hard part was mustering the courage to cut a BIG hole in the exterior wall!) https://postimg.cc/pp1KmyVJ"> New vent opening
The original top vent became the-center vent. I sealed it shut on the inside with vinyl that I hot-glued to the inside of the vent. This had to be done in order to enable proper air circulation – the bottom vent is the intake, the middle vent is sealed off and the top vent is the outflow of the heated air.
https://postimg.cc/18m51K1W"> New vent
The Norcold comes equipped with a single mid-mounted fan that blows upward over the fins. I added 2 small computer fans at the top vent to insure positive upward and outward air flow. All fans are connected with a thermo-switch.
https://postimg.cc/qNzSKtsJ"> New fans
We measured the Norcold to make sure we could get it inside the RPOD. We slid it into the opening from the front with no problems.
Next, we had to seal the refrigerator bay to ensure that no gasses (carbon monoxide or propane) could escape into the trailer. I created a combustion seal which is essentially caulking all joints of the framing and all sides of the refrigerator box to the walls. This is a messy and difficult job. Access to caulk is only available through the 3 exterior vents. All sides of the refrigerator box have extremely close tolerances and are difficult to reach due to the fins, combustion chamber, flue, etc. Some areas are almost impossible to get a caulking tube access. Ultimately, I had to attach 6” of clear vinyl tubing with a ¼” dowel taped to the end of the tubing as a hand hold in order to apply the caulk where it needed to go. This was a major pain in the ass.
The next step was the installation of the interior baffles. Norcold specifications require that there be no more than 1” of air space between the exterior wall of the refrigerator bay and the rear fins. This is to ensure proper cooling of the fins by constant air flow from the lower vent to the upper vent.
I restricted air space by fabricating baffles. These baffles were made from 1/8” plywood and attached to both the interior of the exterior wall and to the side walls of the bay. Again, this was a real pain, but I made it work. In hindsight, it would have been much easier to build and install these baffles prior to putting the refrigerator in place.
Now that basic installation was complete, it was time to make the final wiring (120v and 12v) and propane gas connections. I hired a local mobile RV tech to do this part of the installation. He did a great job of extending the gas line and connecting it, as well as finishing the wiring. As part of the wiring process, I used a 12v busbar from Amazon to make all of the miscellaneous 12v connections for the refrigerator, exhaust fans and new charging center.
https://postimg.cc/DWGNCtpR">
Now, the bad news.
The refrigerator works perfectly on propane and 120v shore power. However, after much testing, we could not get the fridge to work in 12v battery mode. After hours of troubleshooting (reading the Installation manual and making many calls to Norcold), we learned that our new Norcold N4150 was NOT meant to be used in a travel trailer. It was designed to be used in an RV or motor home (something with an engine). Neither the dealer (who knew the fridge was going into a travel trailer) nor the Norcold website ever mentioned that it was designed for an RV. The trailer battery or the 7-pin connection will provide enough 12v power for the N4150 control board to operate correctly on propane and 120v. However, it does not have enough power to run the 12v battery mode heaters. There is a component to the heaters that requires 14.4v in order to function. This has to come directly from the alternator of an RV engine and is not available from the 12v trailer battery or the 7 pin connection.
We did a lot of research with Norcold, the dealer and the RV tech and decided it was impossible to make the unit work on 12v without adding additional charging circuits and changing the wiring in our truck. We decided that, in reality, we never used 12v to run the refrigerator and we did not want to mess with our truck wiring. Actually, a 2-way refrigerator (120v or propane) was totally acceptable to us.
Bottom Line We just returned from a 3-week trip to Florida and the refrigerator worked perfectly. The refrigerator is about 50% larger than the RPOD’s stock Dometic and the freezer is huge. Both maintained temperatures accurately during our trip, even though outside temps ranged from 37 to 80 degrees. The shelves and drawers made it easy to see what we had stored. And, the airflow inside the refrigerator is much better thanks to the design of the shelves.
We spent a LOT of money, time and effort to make this transition, but we are glad we changed out the fridge. We like our new refrigerator and we love our 179 and hope to use it for many more years. https://postimg.cc/zLTh2jCx">  https://postimg.cc/LJbg8WTC">  I’m happy to answer questions or provide more in depth details. I also have a Dometic 8501 that works fine except on propane if you need a 2 way refrigerator or repair parts. We also have the original Sunbeam Microwave/Convection oven we would like to sell. ------------- Vann & Laura 2015 RPod 179 https://postimg.cc/0zwKrfB9"> 
|


Replies:
Posted By: Ben Herman
Date Posted: 05 Apr 2024 at 5:48pm
Nice job! I did note how many times you let us know that it was a pain in the ass!!!! I've been one of the lucky ones, my Dometic unit in our now 5 yr old 179 has worked flawlessly on propane.
|
Posted By: JA-Pod
Date Posted: 24 Apr 2024 at 2:50pm
|
Thorough write up, thanks for posting! Interesting re the 8501 fridge, mine will go to propane as the default, does take a bit for it to light but will work without issue once it gets started. I have a real problem switching to shore power or battery but never really use the battery for the fridge. Since we use park campgrounds with shore power we use this for cooling. While on the road we travel with propane running the fridge (which is an ongoing debate). The eyebrow board is the problem and I can get it to change to shore power if I shut down the propane at the tank and let the propane pressure release (fire up the stove burners), power off the fridge and with a prayer and patience I can get the fridge to work on shore power. Turning on the propane again at the tank while on shore power will not cause the fridge to revert to propane. Go figure, strange as this is. I believe in the very near future I will have to change out the fridge, possibly go with a 110 v fridge and use an inverter to move from 12 v DC to 110 v AC while on the road. Still figuring out this hybrid method. Going with a 12v or absorbtion fridge is costly. Any chance your eyebrow board is still available? thanks John ------------- John & Allison R-Pod 179 (2017) Nissan Frontier SL V6 4.0 (2019) |
Posted By: Pod People
Date Posted: 26 Apr 2024 at 9:29am
|
Here is a quick follow up regarding our replacement of the Dometic refrigerator with a Norcold unit: Immediately after the Norcold was installed, we went to Florida for 3 weeks in mid January/February. The Norcold unit (both the refrigerator and freezer) maintained desired temperatures very accurately and consistently. The overall operation was flawless. We loved the larger space in the refrigerator and the freezer was a big benefit as we took many frozen entrees with us. We appreciated a travel lock which keeps the door locked on even the bumpiest roads. The trip was a good example of how a refrigerator should work. We just returned from a 3 week trip to Texas. Once again, the Norcold unit performed flawlessly, even in temperatures in the low 90’s. We did have one problem when the fridge could not keep temperatures in the 36-39 degree range. We discovered some ice buildup on the fins. A couple of pots of hot water in the fridge compartment melted the ice and the fridge returned to it’s normal operation. It was again flawless. So, overall, the Norcold unit has proven to be reliable and
performs as expected. It works well on both
gas and electric shore power/generator. As
I noted in the original report, it is not usable on battery power. It is much
larger and more user friendly in all aspects. As we want to keep our 179 for a
long time, we think it was definitely worth the extra cost and the installation
issues that we had. Travel often and safe Vann ------------- Vann & Laura 2015 RPod 179 https://postimg.cc/0zwKrfB9">
|