Sagging floor and outriggers
Printed From: R-pod Owners Forum
Category: R-pod Discussion Forums
Forum Name: Podmods, Maintenance, Tips and Tricks
Forum Discription: Ask maintenance questions, share your podmods (modifications) and helpful tips
URL: http://www.rpod-owners.com/forum_posts.asp?TID=15071
Printed Date: 02 Aug 2025 at 12:10pm
Software Version: Web Wiz Forums 9.64 - http://www.webwizforums.com
Topic: Sagging floor and outriggers
Posted By: Mojavered
Subject: Sagging floor and outriggers
Date Posted: 04 Dec 2021 at 7:07am
|
Hello Everyone, new to the forum. We have a 2017 HR 178 and after checking I find that my floor is sagging on the slide side, door side is perfectly square. I am at the point where I am ready to install the outriggers but have ran into a problem. When I place the hydraulic jack under the side wall that is sagging it only moves the floor and wall up about 1/4" after that the whole trailer is being lifted. This leaves the floor and frame about 1/4" off of being square but the floor and wall will not move any higher. could use some help. Anyone have any ideas? Thanks |
Replies:
Posted By: GlueGuy
Date Posted: 04 Dec 2021 at 11:21am
|
I might suggest giving it a little time and/or adding some weight to the trailer. You don't want to push too much, as it might fracture the floor. ------------- bp 2017 R-Pod 179 Hood River 2015 Ford F150 SuperCrew 4WD 3.5L Ecoboost |
Posted By: Mojavered
Date Posted: 04 Dec 2021 at 1:21pm
| Thanks GlueGuy I'll keep that in mind. |
Posted By: offgrid
Date Posted: 04 Dec 2021 at 7:28pm
|
Is the spot where you are jacking coming into alignment leaving other floor areas still too low? If so try placing blocks and shims in that area and jacking somewhere else. IOW applying upward force at several points might help. ------------- 1994 Chinook Concourse 1995 RV6A Experimental Aircraft 2015 Rpod 179 - sold |
Posted By: Mojavered
Date Posted: 04 Dec 2021 at 7:52pm
|
Hi Offgrid, No, it doesn't seem to matter where I place the jack the wall only moves up about 1/4" before it starts lifting the trailer. At that point it's still about 1/4" out of square. One thing I was thinking today was if I raise it the 1/4" then install the outrigger the weight of the wall would be on the last inch (outside edge) of the outrigger and I'm not sure it that would be good or not.
|
Posted By: Pod People
Date Posted: 04 Dec 2021 at 8:25pm
|
. I would suspect that having the wall drop 1/2" was happening over a period of time and not instant. I would suggest that you jack up the wall area the 1/4" and leave it in that position( jacked up) for a day or two and let it slowly acclimate to the new stresses. I would spread the stress over several horizontal feet. After several days you "MAY" be able to jack it up the last 1/4" needed. but, it may also be at its limit and further jacking would cause damage. That decision would have to be made after leaving it jacked up for some given time period. Safe travels Vann ------------- Vann & Laura 2015 RPod 179 https://postimg.cc/0zwKrfB9"> 
|
Posted By: offgrid
Date Posted: 05 Dec 2021 at 3:47am
|
How are you determining what is actually plumb, square, or level and what isn't? Try to jack the floor level first, both laterally and longitudinally, so you have a baseline. Then get the walls plumb.
It could well be for example that the floor outer edges are bent permanently downward relative to the rest of the floor making it impossible to close the last quarter inch gap. Or it could be there is just something (caulk, wood, misalighned fasteners) between the wall and floor surface keeping the two from engaging fully. By carefully measuring to determine what's off you might be able to ID the problem. If the floor has been bent downward you my not be able to get everythjng closer than that 1/4 inch. Thats OK, it's a travel trailer not a moon rocket. I'm just going though the rig on my airplane's wings and the max dimensional tolerances on that are 1/2 inch. And it has to fly straight and level, all the trailer needs to do is roll down the road and not come apart. The outriggers are going to take most of their load on the outer inch where where the wall is. That's what they're intended to do. If you're concerned about overloading them you can add more and just space them closer to each other in that area. ------------- 1994 Chinook Concourse 1995 RV6A Experimental Aircraft 2015 Rpod 179 - sold |
Posted By: Mojavered
Date Posted: 05 Dec 2021 at 8:19pm
|
Hi Vann, Thanks for the idea it sounds like it's worth a try. I'll let you know the outcome in a few days.
|
Posted By: Mojavered
Date Posted: 05 Dec 2021 at 8:37pm
|
Offgrid, great info, lots to think about. Your right, it's only a travel trailer so as long as everything is working and tight it should be ok. I've been thinking that if I can't get the last 1/4" then I will just make sure the floor is even (same distance from the outer edge of the floor to the bottom of the frame) under the slide and install the outriggers as needed. That would at least prevent any further sagging, hopefully. |
Posted By: pedwards2932
Date Posted: 06 Dec 2021 at 2:29pm
| NA |
Posted By: Mojavered
Date Posted: 07 Dec 2021 at 8:39am
|
Hi Pedwards, That's interesting. What model Rpod do you have?
|
Posted By: pedwards2932
Date Posted: 07 Dec 2021 at 5:46pm
| Mine is a 189 not sure it makes a difference as it seems to happen to models with slide out. |
Posted By: Mojavered
Date Posted: 07 Dec 2021 at 7:16pm
|
I agree it probably does not make a difference in what model it is. I was just curious because I haven't heard anyone else say about jacking it up until the wheels are off the ground and the floor still not squaring up with the frame. I have mine lifted now and braced in 3 places to see if the floor and wall will move closer to square in a couple of days, tomorrow is day 3 so I plan to install the outriggers then. Just want to make sure the slide works properly. I plan on 3 outriggers for sure and possibly 5 total just under the slide.
|
Posted By: Mojavered
Date Posted: 12 Dec 2021 at 2:19pm
|
Hello everyone, Anyway, I installed 4 of the outriggers trying to get then as even as possible so the slide works properly. Everything went good and the slide works fine, time will tell if 4 outriggers will be enough. Thanks for all the replies.
|
Posted By: sjesse
Date Posted: 04 Jan 2022 at 1:13pm
|
The floors /walls of our 2018.5 rpod 190 were sagging to the
point the slide side fender was rubbing the tire. Our model trailer only had a
pair of outriggers at the very front. We
observed the 2021 rpod model 190 had multiple factory outriggers installed.
When we notified FR, they offered to sell us outriggers which we deemed
unsatisfactory due to they were not welded at the upper corner and did not
extend to the bottom of the frame tube, thus putting too much pressure on the
center of the frame tube wall. We had an
independent machine shop ( http://www.innomach.com/ - www.innomach.com )
manufacture welded and taller outriggers that were powder-coated. The company
has the dimensions on file and charge $12@ for the powder-coated steel
outriggers that we used, and $24@for stainless steel ones. We installed seven outriggers on the slide side and six on
the other side: 5/16 x 3 stainless steel through-bolts used on the upper
hole, with extra thick 5/16 fender washers. We ground two flat sides on the
outer washers to fit inside the bracket.
The machine shop will make the outer washers for $3@. 5/16-18 x ¾ machine screw type F self-tapping used on the
lower hole applying loctite. #14 x 1 ¼ stainless steel hex-head sheet metal screws used
on the upper outer holes. We reported a safety problem with the NHTSA https://www.nhtsa.gov/ - https://www.nhtsa.gov/ . We recommend that everyone do this to
initiate a forced recall by Forest River. |
Posted By: offgrid
Date Posted: 05 Jan 2022 at 2:30am
|
Great write up and suggestion. How did you level your floor and were you able to fully recover your floor height? If not, how close did get? ------------- 1994 Chinook Concourse 1995 RV6A Experimental Aircraft 2015 Rpod 179 - sold |
Posted By: sjesse
Date Posted: 05 Jan 2022 at 11:43am
| Yes, we were able to restore to its original floor height. We placed two 4ft. 4x4's on the outer edge of the wall- one in front of the axle and one behind the axle - using two scissor jacks on blocks. Over a two-week period I periodically raised the jacks higher as the wall was going up from its sagging position as to not damage any of the body panels. The jacks were raised until the weight was barely off the suspension. |
Posted By: Atranvt
Date Posted: 24 Jan 2022 at 8:34am
|
I have a 2018 179 with the missing outriggers. I contacted Forest River to order the outrigger parts, but they don’t have any in stock and are not sure when they will get more in. I’m told that some owners have made their own, which I am considering. If you have made yours, would you please tell me the dimensions of the outrigger and the gauge of the steel you used. |
Posted By: sjesse
Date Posted: 24 Feb 2022 at 1:30pm
|
We had a machine shop make ours, and they have a template to make more. INNOVATIVE Machine & Supply 345 Sun Valley Circle Fenton MO 63026 636 600-1171 http://www.innomach.com/?fbclid=IwAR3mC74Pgwg6jqiUbO6rnFbijjCuqD8V9OPaFiZBqHy3Ly8RlD-6x9XAUzE - www.innomach.com |
Posted By: GlueGuy
Date Posted: 25 Feb 2022 at 2:30pm
Thanks for this post. I called Innovative today, and they are now asking $17.50 each for RP179 outriggers. ------------- bp 2017 R-Pod 179 Hood River 2015 Ford F150 SuperCrew 4WD 3.5L Ecoboost |
Posted By: GlueGuy
Date Posted: 11 Mar 2022 at 4:23pm
|
I just got the outriggers from Innovative Machine, and I think we have a (collective) fitment issue. Our RP-179 has a very shallow, inverted U-shape rail that runs along the outside wall on both sides of the Rpod. I think it is used to close out the edge along that outside wall, BUT it interferes with the proper installation of the outrigger(s). See the picture below. I see several potential ways to deal with this:
I'm inclined to do a hybrid of #1 and #2; cut just enough of the rail to allow the outrigger to have a very small space between it and the bottom of the floor, and then add a very thin shim between the outrigger and the bottom of the floor (not sure how thick the flat part of the rail is, but it only looks to be a few thousandths thick). 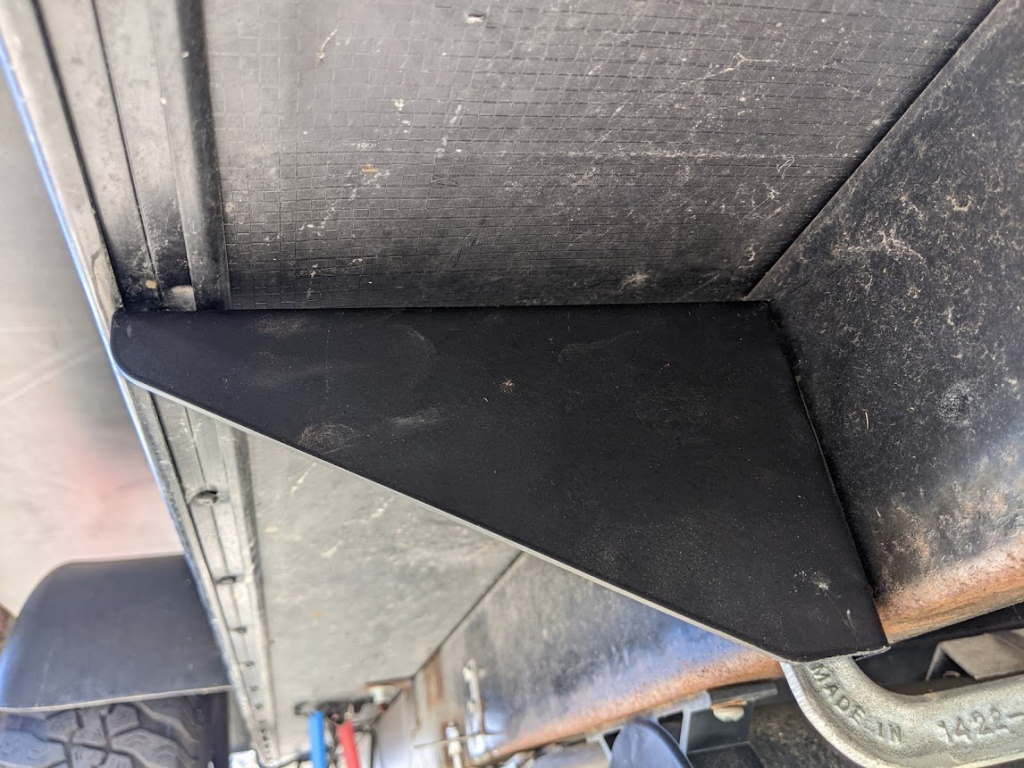 ------------- bp 2017 R-Pod 179 Hood River 2015 Ford F150 SuperCrew 4WD 3.5L Ecoboost |
Posted By: lostagain
Date Posted: 11 Mar 2022 at 4:47pm
In my trailer modification class in law school they taught us to never......... In all seriousness, I'd be real nervous about making any holes in the bottom where water could sneak in and stay [if it ever rains again in CA or if you come to visit us in CT]. If you make a notch in the outrigger [option 3] would it materially affect its integrity? From a carpentry point of view, my trade in retirement, notching the outrigger sure seems like a lot less work and if there is no structural down side, why not? Good luck with the work.
------------- Never leave footprints behind. Fred & Maria Kearney Sonoma 167RB Our Pod 172 2019 Ford F-150 4x4 2.7 EcoBoost |
Posted By: sjesse
Date Posted: 11 Mar 2022 at 7:05pm
|
The outriggers from Innovative Machine or Forest River all rest on the extruded aluminum on the outside wall. I inserted a 1/8" x 1/2" piece of aluminum in that inverted u gap that I cut from a 3' piece purchased from Lowe's. On the quarter inch gap between the outrigger and the floor, I inserted a 1/4" thick piece of PVC trim board with a dab of silicone to hold in place on top of the outrigger; I cut the pieces from a 24" by 4' Vernada PVC trim board from Home Depot. Wasn't sure if all of this was needed due to the critical weight load is on the extruded aluminum outer piece, which is why I inserted the little aluminum shims there.
|
Posted By: Atranvt
Date Posted: 12 Mar 2022 at 5:45pm
|
I made my own outriggers and wasn’t sure what to do about the rail. I decided to cut the rail where the outrigger goes so that it is resting on the floor and not the rail. After cutting the aluminum rail, I covered the area with silicone caulking to prevent any water penetration.
|
Posted By: sjesse
Date Posted: 12 Mar 2022 at 7:14pm
|
I think either way is ok as long as the weight of the outer 1 1/2" of the wall is on the outrigger since the floor underneath is only 1/8 luan plywood and would not be able to hold much weight. So we want the outrigger on the 1 1/2" aluminum floor framing, not mainly on the floor. I opted to put the outrigger over the aluminum channel with a 1/8"x1/2" aluminum shim in the open area of the channel with caulking to seal the 2 screws we put up threw the wall, my thinking was it would help distribute the weight over a little larger area of the wall. Like I said earlier I did put some 1/4" thick PVC on top of the outriggers for a little more support. I cut them from a piece of 1/4"x2'x4' Vernada PVC trim board I got from Home Depot. Our Rpod 190 which had no outriggers originally was sagging 1" ( tire was hitting fender) and after jacking the walls back up over a 2 week with 4 scissor jacks and 4x4 under the walls we put on a total of 13 outriggers from Innovative Machine, 7 on slide side & 6 on door side it seems to be fine now. I do have a list of parts I used if anyone wants them.
PLEASE report a safety problem on the NHTSA web site( upper right of their web page) so as to force Forest River to do a recall, and maybe reimburse us for this. |
Posted By: offgrid
Date Posted: 13 Mar 2022 at 12:11pm
|
I would notch the outrigger. This won't weaken it significantly, the bending moment (torque) on the outrigger increases toward where it attaches to the frame and is very small out at it's end. As LA says the less you modify/make holes in the trailer itself the better. ------------- 1994 Chinook Concourse 1995 RV6A Experimental Aircraft 2015 Rpod 179 - sold |
Posted By: GlueGuy
Date Posted: 15 Mar 2022 at 6:35pm
|
I emailed Innovative Machine, and they suggested not cutting the rail or the outrigger, but shimming it thusly: I would suggest the following: 1) purchase some 1/4 PVC board at Home Depot and cut strips to be siliconed on the top of the outriggers to fill the gap with the wood floor 2) Do not cut the rail or notch the outrigger - the gap is approx 1/8 in the alum rail - I would suggest finding some washers and adding 2 on each bolt to fill that gap
------------- bp 2017 R-Pod 179 Hood River 2015 Ford F150 SuperCrew 4WD 3.5L Ecoboost |
Posted By: offgrid
Date Posted: 15 Mar 2022 at 7:11pm
|
Well, fabricators aren't engineers and vice versa.
I can tell you with certainty that notching that outrigger would be fine. The purpose of the outrigger is to carry a moment (think torque) load back to the rpod frame. That moment load starts at zero out at the end and increases to it's max where the outigger attached to the frame rail. It's exactly like when you drive a nail a little into a piece of wood and then push sideways on it. The nail will bend where it enters the wood every time, never out at the end. I'd be a lot more concerned that the outrigger would pull out of the thin wall frame rail than I would that that little notch would cause a problem. ------------- 1994 Chinook Concourse 1995 RV6A Experimental Aircraft 2015 Rpod 179 - sold |
Posted By: MitchReef
Date Posted: 23 Mar 2022 at 9:04pm
|
What does everyone think of getting a piece of 1/4 thick steel and put it under the floor in the gap over outriggers? Further support at the same time. ------------- Mitch and Laurie Carter.... Still rolling.... |
Posted By: offgrid
Date Posted: 24 Mar 2022 at 5:10am
|
should work fine but the PV trim suggested above is probably better long term bc it won't rust. ------------- 1994 Chinook Concourse 1995 RV6A Experimental Aircraft 2015 Rpod 179 - sold |
Posted By: GlueGuy
Date Posted: 24 Mar 2022 at 10:14am
|
+1 Corrosion would be the main concern. The PVC would be pretty much corrosion proof. Steel would rust, and even aluminum (unless anodized) would corrode. PVC has reasonable resistance to compression too. ------------- bp 2017 R-Pod 179 Hood River 2015 Ford F150 SuperCrew 4WD 3.5L Ecoboost |
Posted By: Masternav
Date Posted: 11 Aug 2022 at 10:31pm
| Can't delete |
Posted By: Masternav
Date Posted: 11 Aug 2022 at 10:33pm
|
|
Posted By: Masternav
Date Posted: 11 Aug 2022 at 10:35pm
Thank you for the information. FWIW, the 2021 model change did not solve the floor sagging problem. The new outriggers are too flimsy and spaced too far apart. The support toward the front of the slide (just in front of the axle) broke the spot weld and the support toward the back of the slide (behind the axle bent out of shape. The end result is the same: Outer edge wall and floor sags, the slide drags on the floor inside, the fender slants down, and the slider doesn't evenly meet the weather seals. I've currently got the outside floor squared up with a jack, with a jack stand supporting the axle. If I can obtain these in short order, I hope to be able to keep it that way, with supports every foot or so. Thanks again! ------------- 2021 R-Pod 190, Towed by 2013 Honda Pilot Touring |
Posted By: tony122
Date Posted: 22 Jul 2024 at 4:54pm
| I just received my outriggers from Innovative Machine Supply for my 2011 Rpod 177. The entire slide out side is sagging. I plan to gut 1/2 inch or 3/4 inch plywood to size and install it between the Outriggers and the floor of the Rpod to assure stiffness after I have straightened it. Has anybody done this in the past? Can you see a problem with that strategy? |
Posted By: sjesse
Date Posted: 22 Jul 2024 at 10:10pm
| The plywood may distribute the weight to outriggers better, but we did not do that. The wood would have to be wrapped in waterproof membrane and may not prevent the wall from sagging. After our repair with the seven outriggers, we have logged over 30,000 miles with no problems.Of the seven outriggers installed, four were under the slide out. |
Posted By: Masternav
Date Posted: 23 Jul 2024 at 9:53am
| FYI, shortly after my own post two years ago, I discovered that the frame was also cracked just behind the axle. Fortunately, I found a welding shop in town that specialized in trailers (though specifically semi trailers). They repaired and beefed up the frame on the side with the slide out, repaired the damaged outrigger(s), and added more outriggers so that I now have one every foot. That has been beneficial. |