Adding shelves above bed
Printed From: R-pod Owners Forum
Category: R-pod Discussion Forums
Forum Name: Podmods, Maintenance, Tips and Tricks
Forum Discription: Ask maintenance questions, share your podmods (modifications) and helpful tips
URL: http://www.rpod-owners.com/forum_posts.asp?TID=14402
Printed Date: 14 Aug 2025 at 6:26pm
Software Version: Web Wiz Forums 9.64 - http://www.webwizforums.com
Topic: Adding shelves above bed
Posted By: Osutrikers
Subject: Adding shelves above bed
Date Posted: 15 Feb 2021 at 11:53am
| Wondering who has added single shelves across front above bed? What did you use for anchors, and into what bracing? Just wondering of process. Wanted something to store ebags, etc. thanks. Tom |
Replies:
Posted By: Kup-Pod
Date Posted: 15 Feb 2021 at 2:17pm
|
There are lots of posts about adding shelves, especially in the "List your mods" string. It all depends on your model and where exactly you want to add the shelf. Best off just searching "shelf" in the search tool. As far as anchoring, some simple wall anchors will do, but you have to remember that the walls are thin and there are few "studs" to anchor in. Often people have used the window valence along with wall anchors to provide the support. Check out http://www.rpod-owners.com/forum_posts.asp?TID=842&KW=mods&PN=65&title=list-your-mods for my shelf post in a 178. Hope this helps!:-) ------------- 2017 RP-178 2021 F150 5.0l "Lead me on a level path" |
Posted By: Osutrikers
Date Posted: 15 Feb 2021 at 3:37pm
| Thanks |
Posted By: Pod People
Date Posted: 15 Feb 2021 at 5:51pm
|
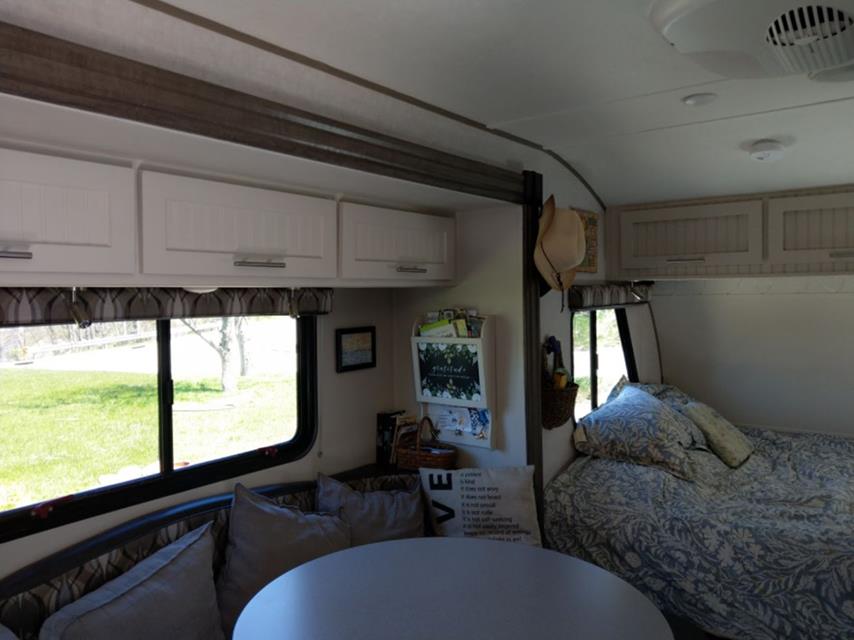
Here are some pictures in our 179. It is different because we ran our shelf front to back instead of side to side Vann https://postimg.cc/G85nkJhk">  https://postimg.cc/q66VQhzW"> 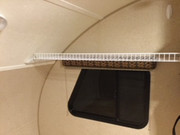 https://postimg.cc/pp6y24NB"> 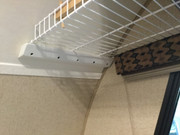 ------------- Vann & Laura 2015 RPod 179 https://postimg.cc/0zwKrfB9"> 
|
Posted By: JA-Pod
Date Posted: 16 Feb 2021 at 8:10pm
Many thanks to Vann for his inspiration!! I was able to nearly duplicate his method of creating a shelf at the foot of the bed. For the shelf I used left over wainscoting plywood, corner trim molding and for support directly under the shelf a split closet rod. I fashioned for wall supports using some wood I had and attached at the endwall using screws and construction adhesive. I attached the side wall supports to the wall where the aluminum frame is located next to the window and wardrobe. In addition to this I moved the TV (another inspiration from Vann) down since it really is at a odd height to be enjoyable also it was in the way of the shelf. I added support inside the wardrobe to carry the load of the TV and the shelf support. A bit of calk and touchup paint should complete it. A great space saver mod! 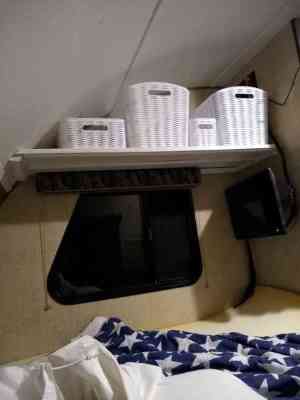 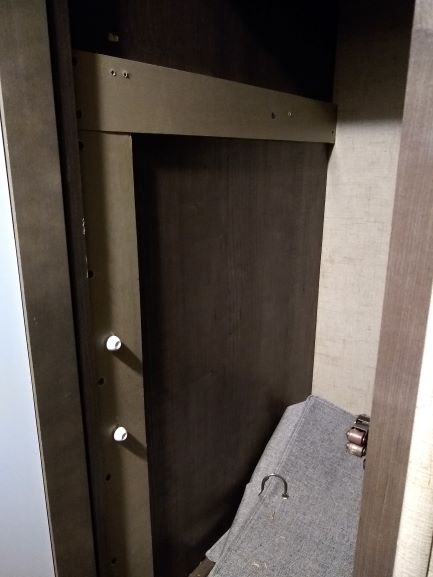 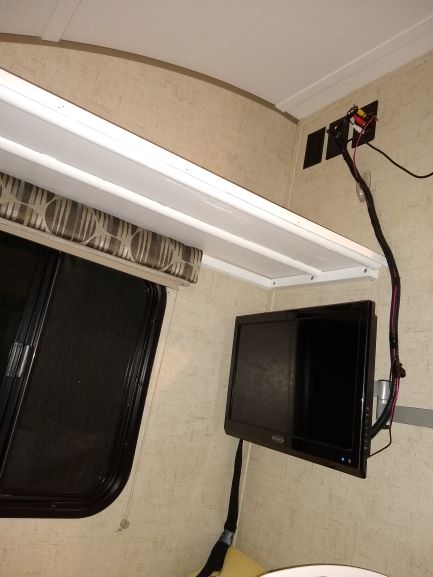
------------- John & Allison R-Pod 179 (2017) Nissan Frontier SL V6 4.0 (2019) |
Posted By: StephenH
Date Posted: 16 Feb 2021 at 8:22pm
|
For us, that shelf would be at the head of the bed. We switched around because it helps with sound isolation from the AC and water pump since the pump is underneath the other end. Also it helps block light when I get up and turn on a light in the morning. I put up a curtain across the opening for light control also. My wife likes to sleep in and this keeps her happier. I ran my shelf across. We really don't watch a lot of television. When we do, we are usually sitting at the dinette. ------------- StephenH Happy is the man that findeth wisdom,... http://www.rpod-owners.com/forum_posts.asp?TID=7712 - ouR escaPOD mods Former RPod 179 Current Cherokee Grey Wolf 24 JS |
Posted By: Osutrikers
Date Posted: 17 Feb 2021 at 10:54am
| Just getting our 189 which is why I’m wondering if the studs at curved end over bed and the wall studs are different? Aluminum vs wood? How to locate. Best type/length screws to use. Thanks |
Posted By: Osutrikers
Date Posted: 17 Feb 2021 at 10:57am
| Just getting our 189which is why I’m wondering if studs at end over bed and side wall studs are the same? Aluminum vs wood? How to locate? Best type screw to use and length. Thanks a lot. Great forum. Tom |
Posted By: JR
Date Posted: 17 Feb 2021 at 12:53pm
Rather than a shelf I decided to make a cabinet to hold the stored clothing over the bed in our 179. This picture only shows 2 of the 3 cabinet doors and the cabinet goes the entire width of the trailer over the bed. It has preformed well. Hope this gives some more ideas.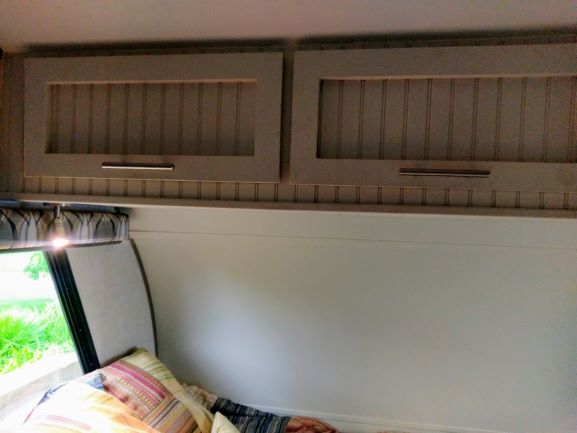 - -
------------- Jay 179/2019 |
Posted By: Pod People
Date Posted: 17 Feb 2021 at 10:23pm
|
Nice work JR! Great job of matching up the vertical kerfs I'm sure that looks a LOT better than our bare wire! Vann ------------- Vann & Laura 2015 RPod 179 https://postimg.cc/0zwKrfB9">
|
Posted By: JR
Date Posted: 18 Feb 2021 at 8:10am
|
Best part is that the clothing hasn't fallen out yet... Just some different thoughts. ------------- Jay 179/2019 |
Posted By: marwayne
Date Posted: 18 Feb 2021 at 3:33pm
|
Hi JR, nice job, all l can say great minds think alike. I put cabinets over the windows, at the foot end of the top bunk and a cabinet at the foot end of the bottom bunk. The other thing I did put in flush mount handles and finger pulls on the awning doors ------------- If you want something done right, do it yourself. 2011 RP172, 2016 Tundra 5.7 Litre, Ltd. |
Posted By: geewizard
Date Posted: 19 Feb 2021 at 8:51am
|
Very nice cabinets. How are they attached to the walls and ceiling?
------------- 2021 Winnebago Micro Minnie 1708FB 2017 R-Pod 177 (Blue) HRE SOLD 2004 Outfitter Apex 8 camper 2014 Toyota Tundra DC |
Posted By: JR
Date Posted: 21 Feb 2021 at 7:46am
|
In answer to your question on how I made the over the bed
cabinet in my 179 as nearly as I can remember, I made it 2 ½ years ago, keeping
in mind that I am not a carpenter and my terminology will be a stretch but here
goes. I wanted to keep the cabinet off
and above the window valences. With that
in mind the finished bottom of the cabinet is 18.5 inches deep and the finished
front of the cabinet is 12.75 inches tall.
I used a sheet of 3/16 plywood/bead board for the exterior of the front
and bottom. Using some scraps out the sheet
of plywood I cut two end pieces for the cabinet that looked like a pregnant
triangle to match the curvature of the front wall/ceiling of the trailer. Once those end pieces were cut to the correct
pattern I cut to fit 3 cross members for the cabinet skeleton out of pine 1x2s.
The end pieces were screwed into the
cross members. One cross member at the
bottom back lays flat, the bottom front cross member was in the upright
position when the end plates were screwed on and then the front top cross
member was also in the upright position when the end plates were screwed on. I then used more 1x2s as spanners between the bottom
2 cross members and the front 2 cross members (I think I used 5 spanners on the
bottom and 4 spanners between the front cross members) After the assembling all
these parts it’s installed in the trailer using screws in the end plates into
the aluminum framing (about 6 to 8 screws running on the top edge of the end
plates, then securing the bottom edge and front edge into the wall with screws
and into the aluminum framing if possible.
Using long enough screws and if you can find the wood framing secure the
top cross member and the lower back cross member into the wood framing behind
the wall/ceiling of the trailer. Once
you have the skeleton of the cabinet installed you can install the exterior
finishing (I chose bead board). On the
front of the cabinet using the spanners for the edge support of the door openings
cut out the doors from the front skin and reuse these pieces after trimming them
out to be the doors. Paint; mount the
finished doors with hinges, door supports, and door pulls as to your décor. Install a false bottom on the inside of the
cabinet of luan that you can run the lighting electrical wiring through from
the ceiling light in the cabinet to the head of the bed for installation of a
task reading light. Wala you have a
cloths storage cabinet. The task
lighting, hinges, door supports, and handles were purchased off Amazon. The cabinet is doing what we had in mind for
it and it seems to be holding up. If
need further information or have more questions you can PM me. Hope this helps you.
Once we got the cabinet installed then we had to update the décor on the factory installed cabinet over the dining area, so we changed out the
glass inserts in the cabinet doors with bead board and painted them all. It never ends. ------------- Jay 179/2019 |
Posted By: geewizard
Date Posted: 23 Feb 2021 at 9:09am
|
Thanks JR. Good info.
------------- 2021 Winnebago Micro Minnie 1708FB 2017 R-Pod 177 (Blue) HRE SOLD 2004 Outfitter Apex 8 camper 2014 Toyota Tundra DC |