178 dinette under bench wiring
Printed From: R-pod Owners Forum
Category: R-pod Discussion Forums
Forum Name: I need HELP!!!
Forum Discription: Perplexed/need help with a problem - ask here
URL: http://www.rpod-owners.com/forum_posts.asp?TID=14077
Printed Date: 18 Jul 2025 at 11:25am
Software Version: Web Wiz Forums 9.64 - http://www.webwizforums.com
Topic: 178 dinette under bench wiring
Posted By: Camp town usa
Subject: 178 dinette under bench wiring
Date Posted: 02 Oct 2020 at 6:06pm
|
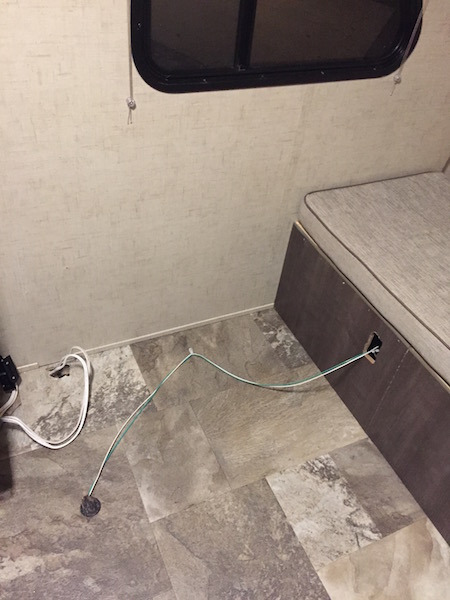
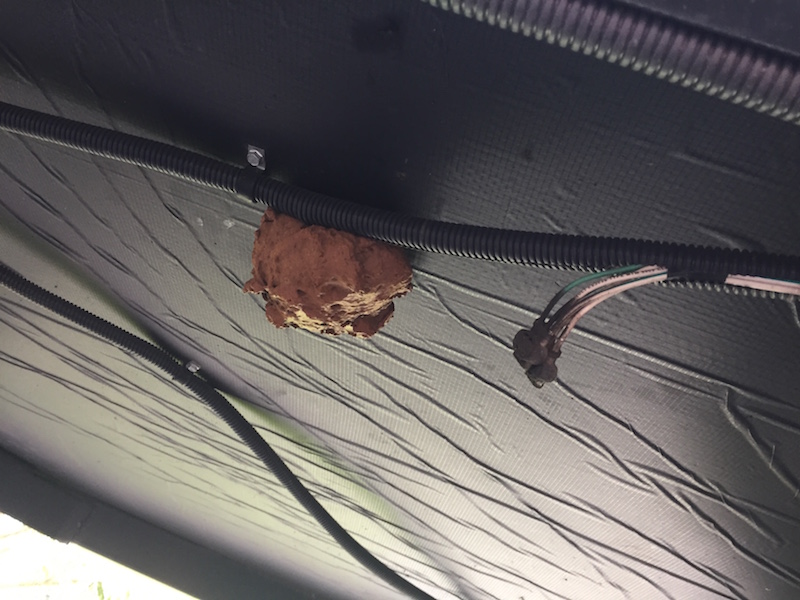
Hi Team, I have removed one of the peninsulas on the U-dinette to have more floor space. Before i can move on i need to understand some wires. I am seeing a green and a white line, which i think are for Ext lights. They come straight out of the floor 2 feet off the wall. I need to move these out of the way. There also seems to be a huge gob of expanding foam on the unit belly - not sure if these are the same thing but look about in the same area. I m not having luck with pics.
|
Replies:
Posted By: StephenH
Date Posted: 02 Oct 2020 at 7:59pm
|
Hello Camp town, It would be helpful to post a picture with it. You need to go to the advanced editor to do that. Look on the icons above the text entry box. There is one that looks like two overlapping squares with an arrow pointing to the top-right corner. That will take you to the advanced editor which has the icon for posting a picture. It works best if you use a program like the GIMP or other graphics program to resize it to 800x600 or at most, 1024x768 before posting to limit the size. Third, welcome! How long have you had your RPod 178? I have a 179, so I can't help you with the wiring. With the 179, we have the wiring on the ottoman on the other side. I built a frame and covered turned the ottoman into a small compartment where we store documentation, a small whisk broom, some microfiber cloths, and a Thermocell mosquito repeller. Maybe you could do something similar with yours.
------------- StephenH Happy is the man that findeth wisdom,... http://www.rpod-owners.com/forum_posts.asp?TID=7712 - ouR escaPOD mods Former RPod 179 Current Cherokee Grey Wolf 24 JS |
Posted By: Camp town usa
Date Posted: 02 Oct 2020 at 9:20pm
|
Posted By: Camp town usa
Date Posted: 02 Oct 2020 at 9:24pm
|
Posted By: JR
Date Posted: 03 Oct 2020 at 7:41am
|
You maybe correct in thinking the white and green wires are for the exterior driving marker light(s) but you should make sure by tracing where the wires go after they go through the hole in the storage area under the seat. If it is power for a marker light it will be running over to the left front corner of the trailer and run out through the wall. The gob of expanded foam maybe where the wiring is run through the floor and you can't see the wiring from the picture because the wiring loom is in the side of the foam. Just trace out the wiring inside the trailer and if needed you could reroute the wiring and come up through the flooring under the seating. Just get a good seal if you make another hole in the floor. ------------- Jay 179/2019 |
Posted By: Camp town usa
Date Posted: 03 Oct 2020 at 8:13am
| They are the marker lights. I disconnected and reconnected to go through that old outlet hole for driving purposes. It needs to go in storage today. My hope is to do just exactly that - pop it through the floor under the long bench in a new hole. I have no idea though how the wires will move, exposed in a tube or through the belly and floor board seams... Being cautious, do i just peel out the foam to get to the wiring housing, and what would i expect to see? Will i have to complete with other wires, and if so i would think to leave those as they are. What is suggested to cover the old hole on the belly and internal - can i find a laminate flooring patch or something? As far as the new hole, am i OK to drill it straight through the belly to flooring, and likely use expanding foam there as it was initially? |
Posted By: offgrid
Date Posted: 03 Oct 2020 at 8:21am
|
This procedure will work with any wires that you want to determine the function of that you might be unable to physically trace. Get a mulimeter if you don't have one already. Confirm what voltage you have between chassis ground and each of the two wires. You can check that at the nearest terminals if you can trace the wires that far or if need be you can strip a very small amount of insulation off so you can just see and access the copper, then tape it up with electrical tape after. For safety use an insulated tool and disconnect 120V before doing any stripping. You can turn on the lights or other items you suspect the wires go to and check the voltage again to confirm your suspicions. You can also pull fuses or open circuit breakers one at a time. Its good to have a helper for that. ------------- 1994 Chinook Concourse 1995 RV6A Experimental Aircraft 2015 Rpod 179 - sold |
Posted By: mcarter
Date Posted: 03 Oct 2020 at 11:45am
|
I have a 178, the wiring in question on mine is the front service light. There is some marker light wiring also, but it does not go forward as high and out front. ------------- Mike Carter 2015 178 " I had the right to remain silent, I just didn't have the ability." |
Posted By: Camp town usa
Date Posted: 03 Oct 2020 at 3:19pm
|
mcarter, any idea why those lines draw into the floor that far off the wall? The unit is now in storage, which gives me time to figure this out. The green/white wires are for lights, indeed. Im trying to understand the logistics of moving these lines from the hole floor to in the revised dinette bench seating (front L end). I have no background in electrical, so any detail in what is recommended would be super helpful.
|
Posted By: mcarter
Date Posted: 03 Oct 2020 at 4:08pm
|
They used an available source. Not complicated. The wiring is going from source to light from the bottom of left hand side dinette into front storage and out to light. I would cut the wiring, remove it from the current internal hole , route it back along the external floor, drill a hole, run it back up to the light at a better location, splice the wiring back together and finally reseal the holes. On bottom of floor use an external reseal product. And you can add a wiring cover that is readily available. ------------- Mike Carter 2015 178 " I had the right to remain silent, I just didn't have the ability." |