179 new exterior light fixture
Printed From: R-pod Owners Forum
Category: R-pod Discussion Forums
Forum Name: Podmods, Maintenance, Tips and Tricks
Forum Discription: Ask maintenance questions, share your podmods (modifications) and helpful tips
URL: http://www.rpod-owners.com/forum_posts.asp?TID=13867
Printed Date: 15 Aug 2025 at 6:42am
Software Version: Web Wiz Forums 9.64 - http://www.webwizforums.com
Topic: 179 new exterior light fixture
Posted By: Pod People
Subject: 179 new exterior light fixture
Date Posted: 04 Aug 2020 at 3:33pm
|
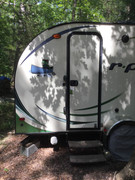
179 Exterior Light Addition Our R Pod 179 exterior light has always been a problem. The light is located approximately in the middle of the pod on the exterior. The entry door is hinged on the forward facing (right) side of the door. This means that when the door is open, it blocks the exterior light so you can’t see the steps going in or out at night. So I decided to add a new exterior light on the rear (left)side of the door. I ordered a matching exterior light fixture and rocker switch from Forest River. It is easy to mount a new light fixture on the exterior. The hard part was finding a suitable way to route the wiring on the inside of the pod from the electrical panel to the switch and then on to the new light fixture on the exterior. I removed the 2 existing interior trim pieces over the door and on the left side of the door. I made new wooden trim for both areas. We stained and sealed it to match the existing trim. The large wooden trim over the countertop provided a nice place to locate the switch and also several hooks for pot holders and kitchen towels. In order to get the wiring in place, I routed a groove on the underside of both pieces of trim. That made it easy to get the wire from the electrical panel to the necessary location. Our electrical panel is at floor level and immediately adjacent and to the left of the entry door on an interior partition wall. I drilled a hole through the interior partition wall next to the panel and as close as possible to the exterior wall at floor level. I attached the wiring to the panel, ran it through the hole in the wall, up the left side door trim in the recessed channel, across the top of the door in the recessed channel to the switch mounted in the larger horizontal trim piece. From there, the wire went through the exterior wall and connected to the new exterior light fixture. Attaching the fixture to the wall and adding some sealant finished the project. Now we can see the steps and also have a better looking interior door trim. Vann https://postimg.cc/YjLTJwr4"> https://postimg.cc/MMMr2ySk"> ------------- Vann & Laura 2015 RPod 179 https://postimg.cc/0zwKrfB9"> 
|

Replies:
Posted By: offgrid
Date Posted: 04 Aug 2020 at 7:00pm
|
Looks great, nice mod. ------------- 1994 Chinook Concourse 1995 RV6A Experimental Aircraft 2015 Rpod 179 - sold |
Posted By: JR
Date Posted: 04 Aug 2020 at 7:26pm
|
Molding looks great, good job matching the stain and now you can find the steps. ------------- Jay 179/2019 |