179 Awning
Printed From: R-pod Owners Forum
Category: R-pod Discussion Forums
Forum Name: Podmods, Maintenance, Tips and Tricks
Forum Discription: Ask maintenance questions, share your podmods (modifications) and helpful tips
URL: http://www.rpod-owners.com/forum_posts.asp?TID=12271
Printed Date: 20 Aug 2025 at 9:02am
Software Version: Web Wiz Forums 9.64 - http://www.webwizforums.com
Topic: 179 Awning
Posted By: Pod People
Subject: 179 Awning
Date Posted: 03 Oct 2018 at 5:14pm
|
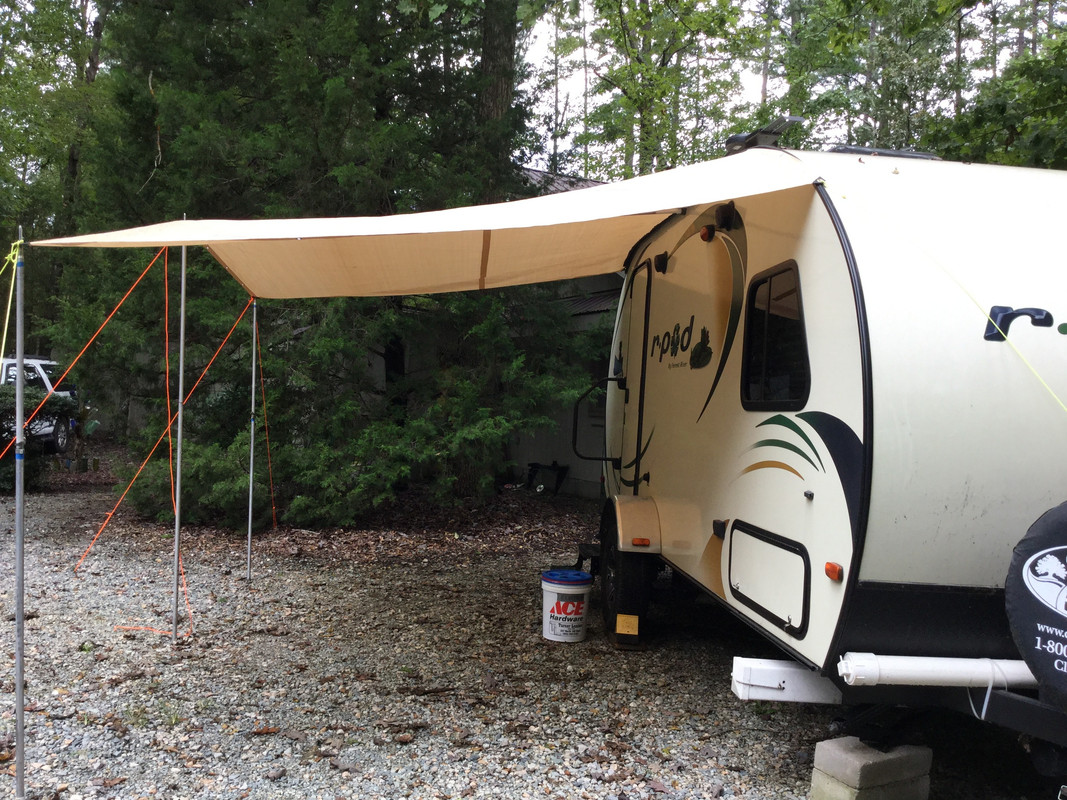
New Tarp/Awning for our R Pod 179
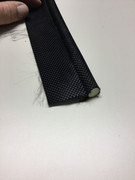
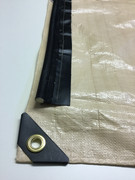
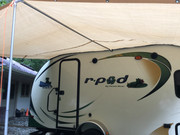
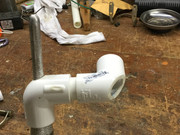
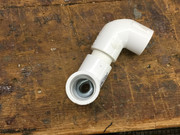
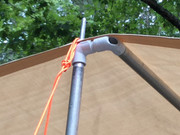
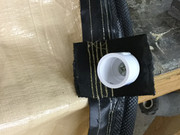
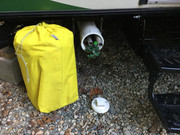
Laura and I just finished making a new awning for our 179. https://postimg.cc/pp7drpsp"> We started with a tarp and ended up with an awning. Actually, this is our second attempt. We made an earlier model using sail slugs that were zip tied to a tarp that we already had. It worked, but not very well. The slugs got caught up in the rail, they bunched up and were just not acceptable. So, we started over using keder welting that Laura sewed onto a tarp. We purchased a 10’x14’ tan tarp from TarpsNow.com. They were the best place that I could find for heavy duty tan tarps (we wanted tan to go with our exterior color). https://postimg.cc/mz248smv"> The finished size was 9’6” out from the Pod and 13’6” along the keder rail. Our keder rail measures 12’long, so we ended up with about 18” of “extra“ tarp length that overhangs evenly approximately 9” on each end. I ordered the keder welting from Keder Solutions ( http://www.kedersolutions.com/ - www.kedersolutions.com ) .The rail on our 2015 179 measured 14mm, so I ordered 13mm keder welting. It cost $5.02/yard plus shipping. It was exactly as pictured and the order shipped quickly. It is a stiff plastic core with a 2” edge for sewing. https://postimg.cc/0MqnskT4"> Laura sewed the keder welting on the tarp with 3 lines of stitching. https://postimg.cc/s1bFZ7Rd"> https://postimg.cc/XBYvGFMy"> The keder welting fit perfectly in our track and slides smoothly. One of us can stand on the steps and feed the awning from the rear while the other one stands on the ground and pulls it along the rail toward the front. We don’t need a ladder to install the awning. We had the aluminum poles from our other camping activities and tarp setup, so we did not need to purchase them. We used 3 adjustable poles for the outer edge. Each pole is in a reinforced grommet on the awning edge. We used 3 short sections of aluminum poles to create a ridge that went from the RPod out to the outer edge of the awning. https://postimg.cc/cKxPNcfY"> The ridge pole is attached at the awning edge with a joint made from an assortment of ½” PVC fittings and a 3/8x3 eye bolt and some washers. This was the hardest part of the whole project. I fabricated this piece so that the vertical pole holds the edge of the awning and also connects to the ridge pole. The PVC joint is made so that is can swivel up and down to accommodate different ridge angles when we raise or lower the center vertical pole. https://postimg.cc/F1pmd7Hh"> https://postimg.cc/PNSsf9Sx"> https://postimg.cc/tnjhLBxG"> The Pod end of the ridge pole rests in a ¾” PVC sleeve. We used a 3/4” end cap that was sewn onto the tarp when the keder welting was sewn on and a short piece of ¾” PVC pipe to extend the length. We insert the tapered end of the aluminum pole into the PVC receiver. https://postimg.cc/SX2HgK4Y"> 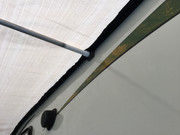 Once the awning has been installed and the poles staked out, we tie each end of the awning that is in the keder rail to the R Pod. We tie the rear line to the rear driver side stabilizer and the front line is tied off on the A frame. This keeps the awning tight in the track and will not let it slide front to back. We store the awning by rolling it and putting in a drawstring nylon bag under our bed. We store the poles and stakes in a 6” round PVC pipe with screw ends that is attached under the frame and behind the steps. https://postimg.cc/rKCkXs7B"> We put the awning up and down several times while constructing it. We can do it now from start to finish in about 10 minutes. We put the awning up at home knowing that rain was coming—we wanted a “real world” test before we had to really count on it during a trip. Well, the rain came and so did the wind—lots of rain. It stood up with no damage and no problems. So I feel pretty confidant that it will hold up and be useful for us. It was a good project. I hope this will be helpful to others and I’m happy to
answer any questions. I also hope the pictures worked-I never know until the article is actually posted--and then it is too late to change them. You can click on the picture to enlarge it. Vann ------------- Vann & Laura 2015 RPod 179 https://postimg.cc/0zwKrfB9"> 
|

Replies:
Posted By: Pod People
Date Posted: 03 Oct 2018 at 5:58pm
|
I should have mentioned several other things that Laura just brought to my attention. The keder rail that came on our R Pod is the same rail that will carry our R Dome. There are 2 different sizes depending on your year model. the newer models come with either a keder rail or a roll out awning. They are not interchangeable. We also own, use and love our R Dome. It fits in the same rail as the new awning. We usually use the R dome when we are staying somewhere for several days. We wanted an awning because it was quicker and easier. As I mentioned, the keder rail is 12', the finished awning is 13'6". We put keder welting along the entire length of the awning. Therefore, the new awning can be moved 18" front to back in the keder rail to shade the complete bedroom window as well as the door. Vann ------------- Vann & Laura 2015 RPod 179 https://postimg.cc/0zwKrfB9">
|
Posted By: mcarter
Date Posted: 03 Oct 2018 at 6:05pm
|
That is a nice DIY mod, and it serves a purpose, I was lazy and bought a visor from PahaQue. Good job.
------------- Mike Carter 2015 178 " I had the right to remain silent, I just didn't have the ability." |
Posted By: Leo B
Date Posted: 03 Oct 2018 at 6:23pm
|
Really nice work!! ------------- Leo & Melissa Bachand 2017 Ford F150 2021 Vista Cruiser 19 csk Previously owned 2015 Rpod 179 2010 Rpod 171 |
Posted By: Live2Camp
Date Posted: 04 Oct 2018 at 3:02pm
Fantastic! And I love your sewing machine, a Kenmore, right? I have a 1969 and they are workhorses. Really love this awning, thanks for sharing and it looks like you'll be getting lots of enjoyment and utility out of it. I also love it that you can install it without a ladder  ------------- 2017 R-Pod 179 HRE (the green one) His:Ford F150 double cab 4WD; Hers/mine:Tacoma V6 double cab 4WD Still love rugged, diggin' comfy too |
Posted By: Pod People
Date Posted: 04 Oct 2018 at 3:18pm
|
Hello Live2camp You are correct!! The sewing machine IS a 1969 Kenmore. We bought it as a floor model from our local Sears while we were still in college. It was a demo unit and we paid $69. We got a 10% discount because we opened a Sears charge account and that was our first purchase . It has been a good machine and Laura has done a ton of utility sewing with it. Ovviously we are still using it. Amazing that you noticed! Vann ------------- Vann & Laura 2015 RPod 179 https://postimg.cc/0zwKrfB9">
|
Posted By: backin15
Date Posted: 04 Oct 2018 at 6:54pm
|
Nice work! Thanks for sharing. ------------- 2015 179 2013 Xterra Pro 4X |
Posted By: Live2Camp
Date Posted: 05 Oct 2018 at 3:38pm
Well they're the only ones that look exactly like that. And since I too am the first owner (Christmas gift in high school from my parents) I know every nook and cranny of it, as I'm sure your Laura does. Another one that comes to mind as being unique at this level is the front fender of an MGA (like Kenmores, those who know them, know). Great story about your machine, and love it that it has a place in your RPod story. I'm betting we're not the only two households that have/will be sewing for our RPods with a vintage Kenmore! I also have a Sailrite, I use it for some things that my Kenmore would have no trouble with just to justify to myself having bought it (the Sailrite that is). I cannot imagine owning outdoors gear, RPod, etc. without having a sewing machine. I know others here have mentioned their machines too including Juki, etc. Keep having fun and thanks again for showing us the awning. ------------- 2017 R-Pod 179 HRE (the green one) His:Ford F150 double cab 4WD; Hers/mine:Tacoma V6 double cab 4WD Still love rugged, diggin' comfy too |
Posted By: Happy Tripping
Date Posted: 05 Oct 2018 at 4:03pm
|
Very nice. Do you need a special 'heavy duty' sewing machine to handle the keder welting??
|
Posted By: Live2Camp
Date Posted: 05 Oct 2018 at 4:28pm
|
Generally you'll want a sturdy machine, a #16 [edit: or a #18, have both on hand] needle, a longer stitch, go slower and if possible a heavy-duty thread which can be purchased at stores such as Joann's Fabrics (or on-line). A sturdy machine is just about any U.S.A-, UK- or Japanese-made machine from any decade into the 1970s, or any Juki, Consew, Sailrite, etc. As much as anything the key is to go slower, longer stitch, etc. as described above. And probably release the presser-foot pressure a bit. The most common thing people do to throw off the timing and/or completely ruin a machine is to sew something thick and/or heavyweight by "punching it" instead of taking care. What kind of machine do you use? ------------- 2017 R-Pod 179 HRE (the green one) His:Ford F150 double cab 4WD; Hers/mine:Tacoma V6 double cab 4WD Still love rugged, diggin' comfy too |
Posted By: Live2Camp
Date Posted: 05 Oct 2018 at 4:32pm
|
To add...vintage sewing machines are routinely available at garage- and estate sales, on-line, etc. People routinely all but give them away because "it doesn't work". In fact, they're like old vehicles that have been sitting. Clean them up, get rid of the old grease, add new grease and oil, etc. etc. There's a version of a Chilton manual for vintage mechanical machines that spells out everything. Well it's not called a Chilton, but you get the idea! Anyone who can manage a TV and a trailer, can maintain and care for a mechanical sewing machine (only trained technicians should work on the computerized ones). I hope this helps! Sewing machines are the original home appliance and really fit into an outdoors lifestyle. ------------- 2017 R-Pod 179 HRE (the green one) His:Ford F150 double cab 4WD; Hers/mine:Tacoma V6 double cab 4WD Still love rugged, diggin' comfy too |
Posted By: Pod People
Date Posted: 05 Oct 2018 at 10:30pm
|
live 2camp—funny that you should mention MG fenders. Laura and I renovated a 1956 MG-A. Now, it had fenders! I agree withyour earlier post about the sewing machine capability- take your time, go slow, use good thread and multiple lines of stitching. Laura has made many utilitarian items duringour 45 years of outdoor life together. Clothing kits, sleeping bags, Vests, bags, curtains, pack repairs, etc. a sewing machine and a decent operator can do wonderful things. Vann ------------- Vann & Laura 2015 RPod 179 https://postimg.cc/0zwKrfB9">
|
Posted By: crw8sr
Date Posted: 06 Oct 2018 at 11:06am
|
Nice work. I like our factory installed awning but would love the length and width of yours. Not to mention the cost difference. ------------- Chuck & Lyn Izzy, Morkie. RIP Zoe Joy & Gracie, Yorkie 2018 R Pod 190 2019 Traverse In moments of adversity;when life's a total wreck, I think of those worse off than me and really feel like heck. |