
|
|
Post Reply 
|
Page <1 23456 10> |
| Author |
 Printable Version Printable Version Google Google Delicious Delicious Digg Digg StumbleUpon StumbleUpon Windows Live Windows Live Yahoo Bookmarks Yahoo Bookmarks reddit reddit Facebook Facebook MySpace MySpace Newsvine Newsvine Furl Furl Topic Search Topic Search  Topic Options Topic Options
|
voisj 
Senior Member 

Joined: 19 Jul 2016 Location: San Luis Obispo Online Status: Offline Posts: 471 |
 Topic: SLO-Pod 180 mods, John&Sue Topic: SLO-Pod 180 mods, John&SuePosted: 11 Mar 2017 at 2:30pm |
|
DawgLady,
InspirePod, new name for the Pod! The reason I did not make it go all the way to the edge of the cabinet space was I did not need to. It works as it should and when I don't need it installed I have to store it somewhere and space is always at a premium. I usually fill that space with plastic tubs for shoes, daypacks and other nice to have along items. rgds John
|
|
 |
|
|
ChetC
Groupie 

Joined: 17 Jul 2016 Location: Las Vegas, NV Online Status: Offline Posts: 43 |
Posted: 15 Mar 2017 at 10:35am |
|
I bounce on here every now and then and admire your mods. Your attention to detail is top shelf! One of these days, when I'm in one place long enough and have access to tools, I'm going to take on the under-bed drawers.
|
|
|
Former 2017 rPod 180 owner
Now in a 2019 Little Guy MAX Full timer who logs more than 35,000 miles per year. |
|
|
|
|
texman
Senior Member
Joined: 24 Jul 2014 Location: TeXas Online Status: Offline Posts: 446 |
Posted: 27 Mar 2017 at 8:51am |
|
Stud finder worked...
But i don't see a stud between the door and the stud to the right of the window. Is there one there?   |
|
|
|
|
voisj
Senior Member
Joined: 19 Jul 2016 Location: San Luis Obispo Online Status: Offline Posts: 471 |
Posted: 27 Mar 2017 at 8:08pm |
|
Texman,
Looks like there is 2 near the door and then nothing until 10" or so before the window. That's like 3 feet! I have the 180 so mines totally different, But it doesn't look like anything is there, did you try a regular studfinder also? maybe someone with a 182G could chime in? rgds John
|
|
|
|
|
StephenH
podders Helping podders - pHp

Joined: 29 Nov 2015 Location: Wake Forest, NC Online Status: Offline Posts: 6289 |
Posted: 27 Mar 2017 at 8:35pm |
|
If you look at some of the Youtube videos available that show the R-Pod factory, you can see that the frames essentially outline the shape and have framing members near the door and windows. It is not like a house with studs every 16 or 24 inches.
|
|
|
StephenH
Happy is the man that findeth wisdom,... ouR escaPOD mods Former RPod 179 Current Cherokee Grey Wolf 24 JS |
|
|
|
|
texman
Senior Member
Joined: 24 Jul 2014 Location: TeXas Online Status: Offline Posts: 446 |
Posted: 28 Mar 2017 at 11:43am |
|
i will get the stud finder out. has to be something there, might be wood? That area is the bathroom on the 182g. maybe they use different material there.
|
|
|
|
|
voisj
Senior Member
Joined: 19 Jul 2016 Location: San Luis Obispo Online Status: Offline Posts: 471 |
Posted: 28 Mar 2017 at 10:33pm |
|
Texman,
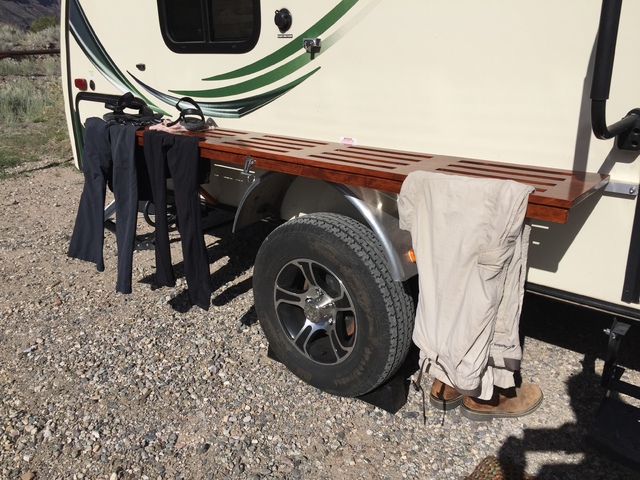
Not sure if your going for the outdoor table, but instead of Instead of buying the thread insert tool you could just get these, I get them at ace hardware and they are about .50 cents each. I think they call them Jack nuts. They come with a little tool that holds the insert while you tighten the bolt which draws the threads closer and smashes them up against the back of the aluminum, The tool is $1. It does look like you would get three mounting points, one by the door, then either side of the window. Not sure but I think the grab handle would still fold flat. Or just shorten the table up to a little bigger than under the window and get 2 good mounting points. rgds John  |
|
|
|
|
texman
Senior Member
Joined: 24 Jul 2014 Location: TeXas Online Status: Offline Posts: 446 |
Posted: 29 Mar 2017 at 9:59am |
|
yes, i am trying to do the outdoor table. I ordered the tool from amazon already. it will be useful for many things i decided: boats, trailers, pods, etc. I have used the studfinder some in the area between the window and the door. It picks up something, but not what i think is an aluminum stud. I think i have to do exactly what you said: three points using the stud by the door or a shorter table. i may have to have the mounting board a bit longer than the table on the side next to the door so the table will fold up and clear the mounting hardware of the handle. My plan, at this point, is to rip a 2x6 redwood to 3/4" for my table and assemble as you did. Should be light, plenty strong and look good with a nice stain and finish.
|
|
|
|
|
voisj
Senior Member
Joined: 19 Jul 2016 Location: San Luis Obispo Online Status: Offline Posts: 471 |
Posted: 29 Mar 2017 at 12:30pm |
|
Texman, nice, looking forward to seeing it! On the wood try to make sure you get a kiln-dried piece with low moisture content that way it won't want to twist and bend so much. Good luck! I do have a bunch more pictures if you want them let me know. Regards John
|
|
|
|
|
Jacob Orbach
Newbie 
Joined: 30 Apr 2017 Online Status: Offline Posts: 2 |
Posted: 30 Apr 2017 at 6:34pm |
|
Dear John, We love your twin bed modification. I consider myself semi handy. Would you consider sharing your modification and provide as much detail as possible. I am 6'1" tall and current sleeping arrangement is not working for me.
|
|
|
|
|
Post Reply
|
Page <1 23456 10> |
| Forum Jump | Forum Permissions You cannot post new topics in this forum You cannot reply to topics in this forum You cannot delete your posts in this forum You cannot edit your posts in this forum You cannot create polls in this forum You cannot vote in polls in this forum |


 SLO-Pod 180 mods, John&Sue