R-pod Owners Forum Homepage

This site is free to use.
Donations benefit a non-profit Girls Softball organization

Forum Home Forum Home > R-pod Discussion Forums > Podmods, Maintenance, Tips and Tricks
  New Posts New Posts RSS Feed: Our-Pod Mods
  FAQ FAQ  Forum Search   Calendar   Register Register  Login Login

Topic ClosedOur-Pod Mods

 Post Reply Post Reply Page  <123>
Author
Message
sean p View Drop Down
Groupie
Groupie


Joined: 24 Feb 2016
Location: athens ga
Online Status: Offline
Posts: 48
Direct Link To This Post Topic: Our-Pod Mods
    Posted: 29 Jan 2017 at 11:54am
his route is perfect. i've towed that way several times. no sweat..
2016 179pod--BETTY
2010 nissan frontier
Sean and Doug
Butchie the morkie
touring the west
Back to Top
GlennZippy View Drop Down
Groupie
Groupie
Avatar

Joined: 19 Feb 2013
Location: Colorado Spring
Online Status: Offline
Posts: 44
Direct Link To This Post Posted: 29 Jan 2017 at 4:02pm

Kitting Up

Since we tend to camp in places that are pretty out of the way, I decided I wanted to have a somewhat complete took kit. So here is my primary kit, and no: it doesn’t all fit into the toolbox.
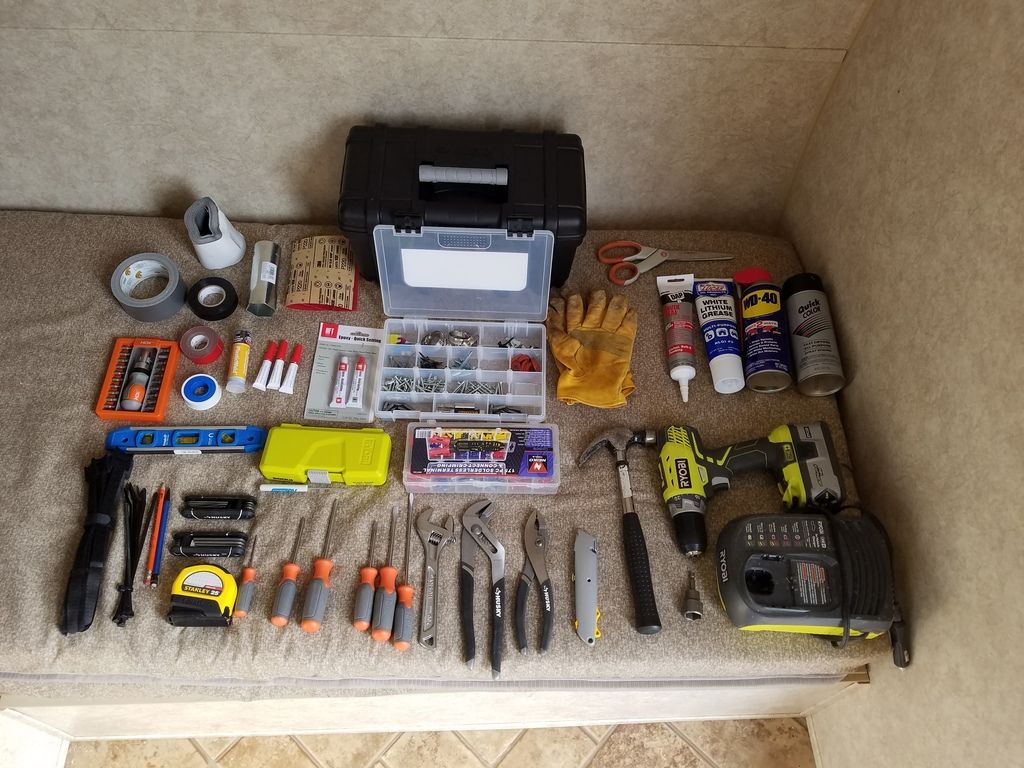

Some items are stored in one of the drawers for quick access: The duct tape, one of the super glue tubes, scissors, tape measure, and the orange screw driver set. The drill, along with the stabilizer socket and the charger are stored in the outside storage area or, if I feel the need for more security, in the truck. The box of screws, the terminal set, the silicone, the lithium grease, WD-40, and spray paint are in a bin together. The rest fit into the toolbox nicely.

The toolbox and the bin with the chemicals and other items are stored under the bed up front.

Not pictured is a basic socket set that I picked up from Home Depot:


This also goes in the above bin as well.

I also worked a bit on getting all of my water stuff in the same place. So i have those items here:
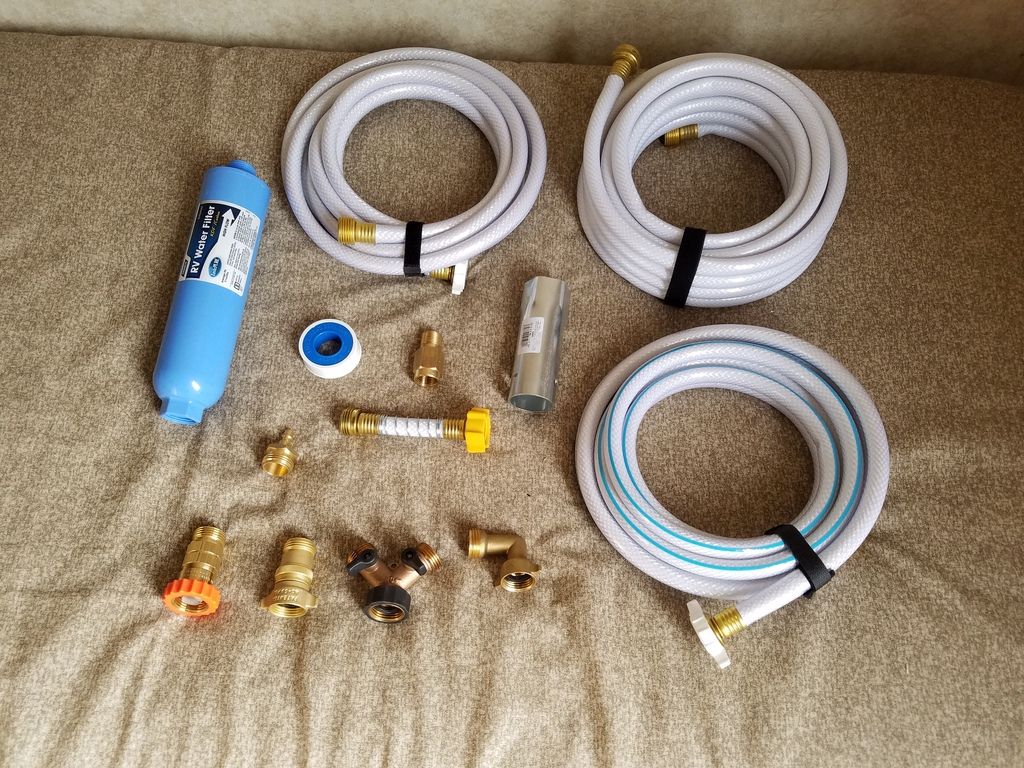

The longer hose is stored loose, and the rest go into a bin together. Some parts are redundant (there are two pressure reducers shown) and I can't imagine needing the  water heater element wrench in the field, but better to have and not need than to need and not have!

I'm also working on a similar bin for my sewer bits and pieces, but I will wait for that another day.

2010 R-Pod 152
Back to Top
jato View Drop Down
Senior Member
Senior Member
Avatar

Joined: 23 Feb 2012
Location: Kewadin, MI
Online Status: Offline
Posts: 3221
Direct Link To This Post Posted: 29 Jan 2017 at 8:26pm
A very thorough kit, thanks for sharing.
God's pod
'11 model 177
'17 Ford F-150 4WD 3.5 Ecoboost
Jim and Diane by beautiful Torch Lake
"...and you will know the Truth and the Truth will set you free."
Back to Top
GlennZippy View Drop Down
Groupie
Groupie
Avatar

Joined: 19 Feb 2013
Location: Colorado Spring
Online Status: Offline
Posts: 44
Direct Link To This Post Posted: 04 Feb 2017 at 3:59pm

Kitting Up, Continued

We were VERY tempted to take the Pod out this weekend. Temperatures were going to be in the upper 50’s and lower 60’s but schedules and wind dictated a few more mods.

So continuing from my last set of mods, I finished my sewer kit. Once again, this kit goes into a plastic bin that fits into the outside storage area. This one has a clear 45 degree adapter, a coupler, nitrile gloves, a sewer adapter (with the other end already attached to a sewer hose) and a sewer hose support. This last item does not fit into the bin, but it seems to travel pretty well as is. My pod came with 2 sewer hoses, and I put a Valterra EZ coupler sewer hose connection shortly after it arrived.

Naturally, since I have 2 hoses, I checked to see if they would both fit in the smallish sewer hose holder and they would not. I wish I had checked that before I had put the tongue box on a few weeks ago as I had to take the box off to attach the second holder. It tucks in nicely behind the box and between the Pod. I shifted it a bit to the driver side since that’s where it would be used the most.

Continuing in the water vein, I swapped out the standard shower head with the Oxygenics Shower head. This was a pretty straightforward process where I removed the old hose and bracket and replaced it with the new one. The new one also came with a water cutoff switch that makes it easier to take a navy shower. My hope is that the hose will straighten out once I get some hot water running through it.


I also went ahead and swapped out the light bulbs in the Pod for LED lamps. Also a very easy process and took all of 5 minutes to complete. I kept the old bulbs and put them into my hardware box I discussed a few posts up.


A few small items were also added: A mirror (a must have for my wife), a cup-holder so that I have a spot for a water bottle at night when the dinette is turned into a bed, and a few strategic command-strip hooks.

2010 R-Pod 152
Back to Top
GlennZippy View Drop Down
Groupie
Groupie
Avatar

Joined: 19 Feb 2013
Location: Colorado Spring
Online Status: Offline
Posts: 44
Direct Link To This Post Posted: 05 Feb 2017 at 1:48pm
Stumbled onto these "floor cushions" today at Costco for $20 each. We've been trying to figure out a way to make the front bed more into a couch and these worked out quite nicely! We added in the small pillows just to see how they felt and will look for some others down the road that will fit the color scheme we are thinking.

2010 R-Pod 152
Back to Top
osage View Drop Down
Senior Member
Senior Member


Joined: 13 Mar 2016
Online Status: Offline
Posts: 146
Direct Link To This Post Posted: 05 Feb 2017 at 5:17pm
where are the vice grips and baling wire 
Back to Top
GlennZippy View Drop Down
Groupie
Groupie
Avatar

Joined: 19 Feb 2013
Location: Colorado Spring
Online Status: Offline
Posts: 44
Direct Link To This Post Posted: 05 Feb 2017 at 6:40pm
Every Day Carry Wink
2010 R-Pod 152
Back to Top
Leo B View Drop Down
podders Helping podders - pHp
Avatar

Joined: 13 Jan 2012
Location: Lyndonville, VT
Online Status: Offline
Posts: 4508
Direct Link To This Post Posted: 06 Feb 2017 at 7:22am
Great mods!
Leo & Melissa Bachand
2017 Ford F150
2021 Vista Cruiser 19 csk
Previously owned
2015 Rpod 179
2010 Rpod 171
Back to Top
GlennZippy View Drop Down
Groupie
Groupie
Avatar

Joined: 19 Feb 2013
Location: Colorado Spring
Online Status: Offline
Posts: 44
Direct Link To This Post Posted: 06 Feb 2017 at 7:34am
Thanks. I can't take sole credit though: This site is a gold mine!

"Originality is the fine art of remembering what you hear but forgetting where you heard it."
2010 R-Pod 152
Back to Top
lostagain View Drop Down
Senior Member
Senior Member
Avatar

Joined: 06 Sep 2016
Location: Quaker Hill, CT
Online Status: Offline
Posts: 2587
Direct Link To This Post Posted: 12 Feb 2017 at 10:19pm
GZ, how was the upper bunk attached?  I've took a cursory look at it and didn't see where the fasteners were located.  Also, what did you do to cover the faster holes?  I can't see any sign of the upper bunk having been there in your pictures.  The work you did really looks nice and I am hopeful I can do it as well as you did.
Never leave footprints behind.
Fred & Maria Kearney
Sonoma 167RB
Our Pod 172
2019 Ford F-150 4x4 2.7 EcoBoost
Back to Top
 Post Reply Post Reply Page  <123>

Forum Jump Forum Permissions View Drop Down

Bulletin Board Software by Web Wiz Forums® version 9.64
Copyright ©2001-2009 Web Wiz