
|
|
Post Reply 
|
Page <1 1920212223 33> |
| Author |
 Printable Version Printable Version Google Google Delicious Delicious Digg Digg StumbleUpon StumbleUpon Windows Live Windows Live Yahoo Bookmarks Yahoo Bookmarks reddit reddit Facebook Facebook MySpace MySpace Newsvine Newsvine Furl Furl Topic Search Topic Search  Topic Options Topic Options
|
offgrid 
Senior Member 
Joined: 23 Jul 2018 Online Status: Offline Posts: 5290 |
 Topic: Texman 182g Mods Topic: Texman 182g ModsPosted: 11 Feb 2019 at 5:06pm |
|
Leaving flooded batteries connected to the pod charger is fine, but letting the plates become exposed from lack of electrolyte is indeed bad. That was probably the cause of your shortened battery life. Charging causes the electroysis of the water in the battery which is what the little bubbles you see are. So I don't think you need to use a stand alone charger but you do need to check the water level and add distilled water only when you add water, and never let the plates become exposed.
If you feel that you're consuming water faster than you want to be checking the electrolyte level than you can install a battery disconnect, charge the battery fully, disconnect, and then remember to reconnect and recharge every few weeks. You can choose your poison as it were. It looks like you're installing a meter that can measure battery state of charge. In that case, you can use it to check the actual battery capacity occasionally. Program it for the nominal capacity of the battery in amp hours, then maybe once a year (not often, or your test will in itself reduce your battery life) do a deep discharge and see what our SOC./capacity meter reads when the voltage is down around 11.8V or so.
|
|
|
1994 Chinook Concourse
1995 RV6A Experimental Aircraft 2015 Rpod 179 - sold |
|
 |
|
|
texman
Senior Member
Joined: 24 Jul 2014 Location: TeXas Online Status: Offline Posts: 446 |
Posted: 12 Feb 2019 at 9:10am |
|
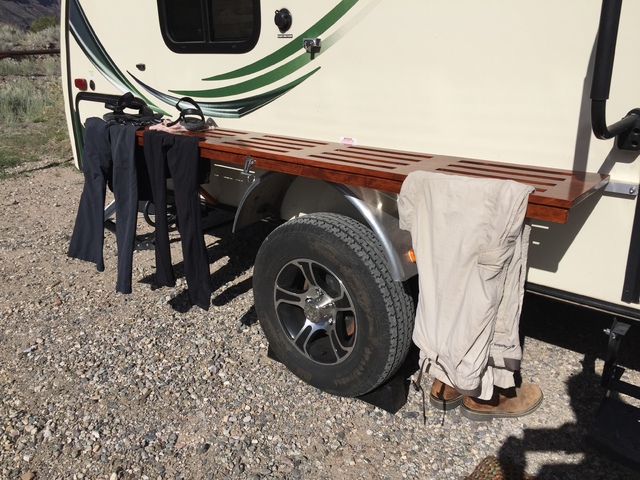
made some progress i think. I pot the new batteries in the pod and let them charge all night. i checked current this morning and read the following: first try at 7:18 was 5.13 -5.28 amps on battery= 62 watts 2nd try at 7:57 was while still charging was 2.61 amps on battery only was 2.13 amps or 25.6 watts. not sure what changed between 7:18 and 7:57, on battery only during this time. maybe it takes a while to level off. no lights, nada. should only be stereo(cant find a fuse for that) propane monitor and other always on stuff. i have a usb charger with an indicator light and the meter i just added as well. Is that a normal current for all off that can be off? I got the new hall meter set finally. Instructions need some english education. the next challenge on setting it up is to clear the current to a base reading with no load. in order to do that, it must be powered, obviously. Only thing i can think of is maybe use a 9volt battery and clear it all or run a jumper direct to the pod batteries and clear it so it reads the loads correctly. Right now it is cleared to no load at all when on battery because i cleared it to set it up. 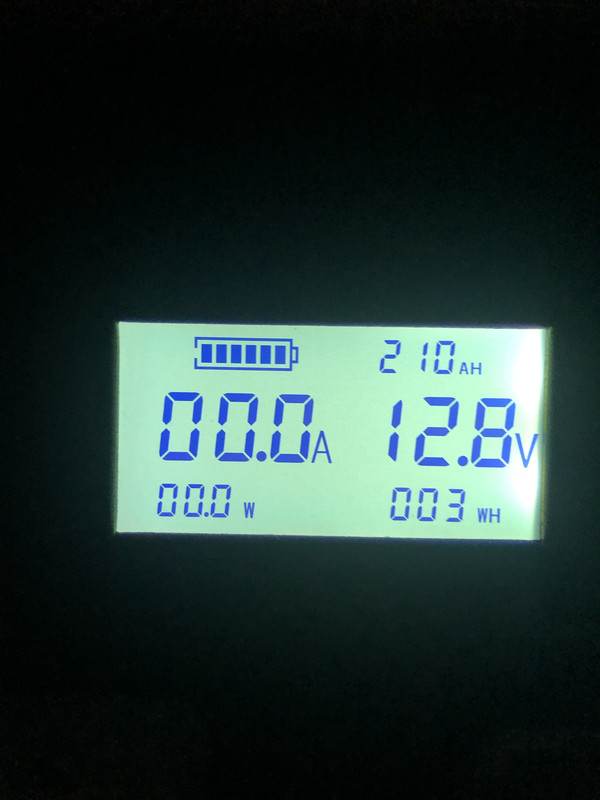 |
|
|
|
|
texman
Senior Member
Joined: 24 Jul 2014 Location: TeXas Online Status: Offline Posts: 446 |
Posted: 12 Feb 2019 at 9:10am |
|
|
|
|
|
texman
Senior Member
Joined: 24 Jul 2014 Location: TeXas Online Status: Offline Posts: 446 |
Posted: 12 Feb 2019 at 9:21am |
|
this is the meter that i installed: https://www.amazon.com/gp/product/B07B4CWKRJ/ref=ppx_yo_dt_b_asin_title_o00__o00_s00?ie=UTF8&psc=1 does the sequence need to be followed as indicated? battery then red then yellow then hall sensor then controller? i think the red is just for monitor power and not measurement. if the sequence is to be followed then i will need to jump wires to the battery box.  |
|
|
|
|
GlueGuy
Senior Member

Joined: 15 May 2017 Location: N. California Online Status: Offline Posts: 2629 |
Posted: 12 Feb 2019 at 9:22am |
|
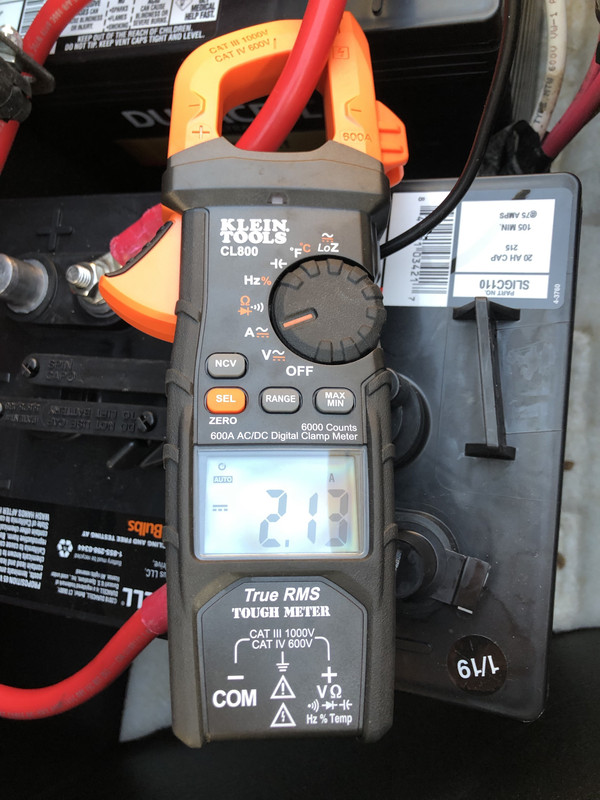
When you use the current meter, it's recommended that you get the wire as close to the center of the loop, and oriented as close to perpendicular to the loop. Your picture shows it coming through at an angle. I don't know how much this affects the reading, but the Klein manual makes a point of it.
|
|
|
bp
2017 R-Pod 179 Hood River 2015 Ford F150 SuperCrew 4WD 3.5L Ecoboost |
|
|
|
|
texman
Senior Member
Joined: 24 Jul 2014 Location: TeXas Online Status: Offline Posts: 446 |
Posted: 12 Feb 2019 at 9:30am |
|
Glue - i was looking at the picture i guess. but this isnt that clear to me either. item 2 talks about the polarity markings which is what you are referring to correct? 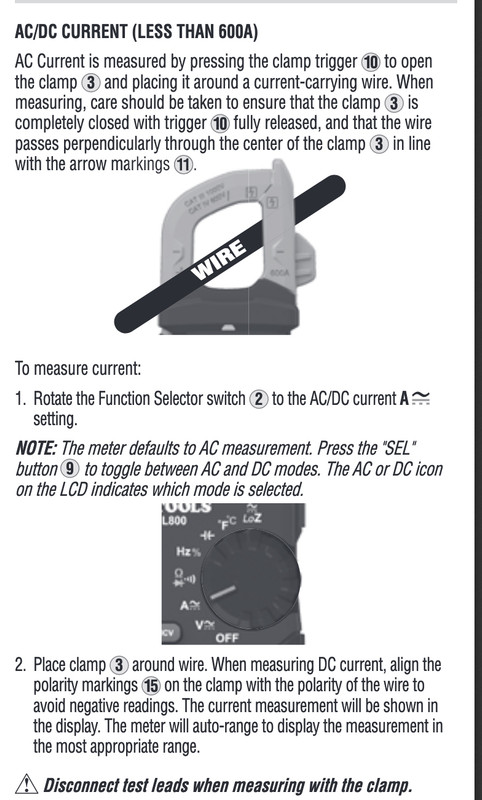 |
|
|
|
|
texman
Senior Member
Joined: 24 Jul 2014 Location: TeXas Online Status: Offline Posts: 446 |
Posted: 12 Feb 2019 at 9:49am |
|
installation and instruction manual : |
|
|
|
|
offgrid
Senior Member
Joined: 23 Jul 2018 Online Status: Offline Posts: 5290 |
Posted: 12 Feb 2019 at 11:50am |
|
+1 to GlueGuy on getting the clamp on centered and perpendicular, and also well away from any other current carrying conductors or magnets. Also, hall effect DC current sensors are also notorious for getting out of calibration and needing to be zeroed out. Be sure it reads zero amps when not clamped on or near a wire.
2A with everything off is too much. If it was and the current meter is set to zero before being clamped on then there is a parasitic load somewhere I think. I only get maybe 100 milliamps IIRC. Did you try pulling the 40A fuses? Haven't looked at your meter manual but I don't think it shouldn't matter what the sequence is for the red and yellow wires. The yellow is probably a voltage sense wire that they are keeping it separate from meter power to get an accurate voltage measurement. |
|
|
1994 Chinook Concourse
1995 RV6A Experimental Aircraft 2015 Rpod 179 - sold |
|
|
|
|
GlueGuy
Senior Member
Joined: 15 May 2017 Location: N. California Online Status: Offline Posts: 2629 |
Posted: 12 Feb 2019 at 12:16pm |
|
The two "-" markings on either side of the loop are about where you want the wire to pass through. And the wire should be close to perpendicular to the plane of the loop. The picture they provide is misleading, as it "looks" like the wire is going through at a 45 degree angle instead of a 90 degree angle.
I'm also agreeing with offgrid that a 2 amp parasitic is too high. Normally, I would expect the parasitic load to be in the neighborhood of a 1/2 amp or less. I think I measured ours at around 1/3 amp (don't quote me on that, it's been a while, but I do remember it being milliamps, and not amps). Now if you have your R-pod connected to shore power, you could be measuring charge or float current. If you want to measure parasitic load, you need to be disconnected from shore power to get the converter out of the equation.
|
|
|
bp
2017 R-Pod 179 Hood River 2015 Ford F150 SuperCrew 4WD 3.5L Ecoboost |
|
|
|
|
Motor7
Senior Member
Joined: 09 Jan 2019 Location: E. TN Online Status: Offline Posts: 196 |
Posted: 12 Feb 2019 at 4:18pm |
|
Is the fridge on?
Look at the fridge for the parasitic load. There was a thread over on IRV2 about the reefers having a defrost heater that runs quite a bit which sucks a ton of juice. The older fridges had a switch to turn that off, but it has been deleted on the newer one's.
I am not sure if our model fridges have a defroster/heater, so it might be worth investigating. |
|
|
2016 R-Pod 176T
|
|
|
|
|
Post Reply
|
Page <1 1920212223 33> |
| Forum Jump | Forum Permissions You cannot post new topics in this forum You cannot reply to topics in this forum You cannot delete your posts in this forum You cannot edit your posts in this forum You cannot create polls in this forum You cannot vote in polls in this forum |


 Texman 182g Mods