
|
|
Post Reply 
|
Page 12> |
| Author |
 Printable Version Printable Version Google Google Delicious Delicious Digg Digg StumbleUpon StumbleUpon Windows Live Windows Live Yahoo Bookmarks Yahoo Bookmarks reddit reddit Facebook Facebook MySpace MySpace Newsvine Newsvine Furl Furl Topic Search Topic Search  Topic Options Topic Options
|
voisj 
Senior Member 

Joined: 19 Jul 2016 Location: San Luis Obispo Online Status: Offline Posts: 471 |
 Topic: My 1st 180 Podmod, Light switches Topic: My 1st 180 Podmod, Light switchesPosted: 13 Oct 2016 at 10:57pm |
|
Did my first mod today,
I did not like having to climb into my 2016 180 Rpod to push the little button on a light in the dark to turn on one light and then wander around turning on other lights and sometimes knocking the covers off. I discovered that i could easily add a 4 gang RV switch just inside the door and control all the lights in the pod as i go in or out the door. Installing the switch took all of 45 minutes, all the wires for the lights are in the cabinet under the seat. I bought the black 4 gang switch on ebay for $14 with free shipping. I can still turn any light off and on with the button on each light for less or more light. If anyone wants more info let me know and i'll add a step by step pictorial. Here's a link to a video showing how it works. I added a step by step pictorial a few comments down d 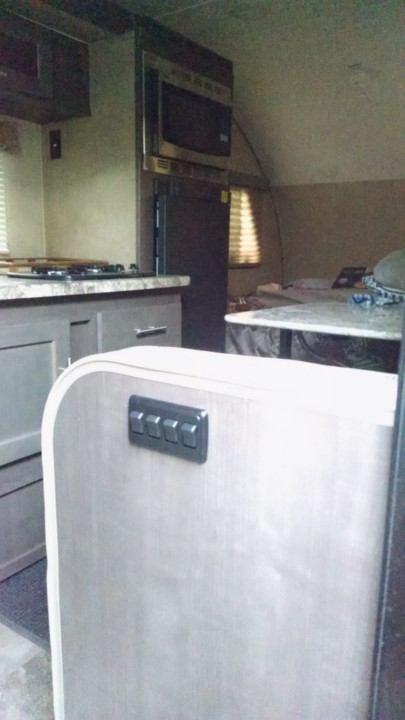 |
|
 |
|
|
JScottHouse
Newbie 

Joined: 09 Aug 2016 Location: Maidens VA Online Status: Offline Posts: 12 |
Posted: 14 Oct 2016 at 12:16am |
|
Very nice!
|
|
|
2016 RP-180
2013 Ford Explorer 4WD |
|
|
|
|
Bcmckean
Newbie
Joined: 16 May 2016 Online Status: Offline Posts: 13 |
Posted: 14 Oct 2016 at 1:33am |
|
Looks great, I wouldn't mind seeing the step by step if it's not too much trouble. Thanks!
|
|
|
|
|
dr2428
Groupie 
Joined: 13 Aug 2016 Location: Nebraska Online Status: Offline Posts: 70 |
Posted: 14 Oct 2016 at 7:43am |
|
That is absolutely awesome. I'm still amazed at what I see on this forum, I have been on paid forms with less useful info than I find here. I have the same dislike for the lights but still love my pod, and have thought of trying this. I would also like to see the step by step if possible. I hope a more seasoned podder can weigh in on this possibility for the 179, I'm sure the wires can't be too hard to find. Also curious if anyone thinks this would void a warranty.
Thanks for a great post. |
|
|
2017 RPod 179
2018 Chevy Colorado Z71 4x4 |
|
|
|
|
voisj
Senior Member
Joined: 19 Jul 2016 Location: San Luis Obispo Online Status: Offline Posts: 471 |
Posted: 14 Oct 2016 at 12:20pm |
|
2428,
Thanks for the kind words! I'll take some pictures and put together a step by step. Did the video link work? I can't figure out out how to do a proper hyperlink. It was so inexpensive and easy I can't believe forest river did not do this from the factory! I'm not sure, but i think the electrical panel on a 179 is just inside the door to the right below the pantry door? The closer to the panel the easier the job is. The switch panel may fit between the pantry door and the panel or next to the panel sideways, or maybe on the wall facing the dinette, that would be the logical place for it. Either way it is a pretty easy project, low cost/high reward! Send a picture of the panel and walls around it and can let you know what i would do. |
|
|
|
|
StephenH
podders Helping podders - pHp

Joined: 29 Nov 2015 Location: Wake Forest, NC Online Status: Offline Posts: 6288 |
Posted: 14 Oct 2016 at 2:36pm |
Inserting a hyperlink is not difficult. At the top of the editing window, there are two rows of icons. There is one that looks like a globe with a chain link. If you click on that, it opens a dialog where you can type or paste the link. If you paste it, be sure to delete the http:// or https:// and use the drop-down menu to specify which it is. Otherwise you will end up with the http duplicated. Here's an example: https://goo.gl/photos/jsGXcxVsBDUruso56 Now if you don't want the URL to show but a verbal link, create one such as, "Video step-by-step link." Highlight it and then click on the link button above the editing window. It will open the dialog with the highlighted text in the box. Delete the text and type or paste your link into the box instead. Adjust the http: or https://. When you click okay, your link will be present. Here is an example: Video step-by-step link Hope this helps. I am interested in trying this mod myself. |
|
|
StephenH
Happy is the man that findeth wisdom,... ouR escaPOD mods Former RPod 179 Current Cherokee Grey Wolf 24 JS |
|
|
|
|
dr2428
Groupie
Joined: 13 Aug 2016 Location: Nebraska Online Status: Offline Posts: 70 |
Posted: 14 Oct 2016 at 6:08pm |
|
Video did work. Thanks again for posting the mod. I should thank everyone who posts mods, they are all very cool and useful. My only mod so far is using the wood sink cover as a base under my CPAP on the dinette seat. I'll come up with something cool eventually, maybe a jacuzzi in the bath? Most campgrounds won't let me have a portable hot tub so it would have to be inside. Ideas?
|
|
|
2017 RPod 179
2018 Chevy Colorado Z71 4x4 |
|
|
|
|
Donnie
podders Helping podders - pHp
Joined: 03 Oct 2016 Location: Deep Run NC Online Status: Offline Posts: 42 |
Posted: 14 Oct 2016 at 10:02pm |
|
I would like to see the details as well, also, where did you get your switches? Did you reroute the wire from the light to the breaker to the switch and then run a new wire from the switch to the breaker/fuse?
|
|
|
Donnie & Tina Hill
2016 R-Pod 180 "STAR POD" sold 2018 Ford F-150 STX 2013 Ford F-150 Eco-Boost 2020 R-Pod 192 “STAR POD 2” 2020 Coachmen Apex 265RBSS Deep Run, NC |
|
|
|
|
this_is_nascar
Senior Member

Joined: 24 Jan 2010 Location: NJ Online Status: Offline Posts: 466 |
Posted: 15 Oct 2016 at 6:59am |
|
Awesome job.
|
|
|
"Ray & Connie"
- 2017 R-Pod RP-180 - 2007 Toyota Tacoma TRD-Off Road |
|
|
|
|
voisj
Senior Member
Joined: 19 Jul 2016 Location: San Luis Obispo Online Status: Offline Posts: 471 |
Posted: 15 Oct 2016 at 4:34pm |
|
This morning I went out and took pics for a step by step on the switch install, And discovered a few things you may want to know.
Turns out the lighting fuses also run a few other things, so when you turn off the switch you may also turn off the power to a few other things, none of which are a deal breaker to me. I don't mind turning off a few puck lights occasionally to still use these other things when i need that. Fuse #4 - The Bathroom lights and Main cabin ceiling fan, (just turn off the puck lights and run the fan) Fuse #5 - Two rear main cabin lights and dinette lights. Fuse #6 - Sink light ( There MUST be something else but I cant find it). Fuse #7 - Front cabin light, bed lights, outdoor lights (2) AND the slide-out motor. (I turn on the switch when I need to move the slideout, or use outside lights) For instance when you turn off the Bed area lights using the switch you installed, it turns off the power the slide-out and the porch light and front utility light. In which case I turn on the switch when I need to move the slideout, or use outside lights. Same with the Bathroom lights switch, turning off the bath light switch also turns off the power to the Fantastic fan in the main cabin, so I just turn off the puck lights and run the fan. You could just install a single switch on fuse #5 or #6 just to light the place up when you go in. Here's the main electrical panel. 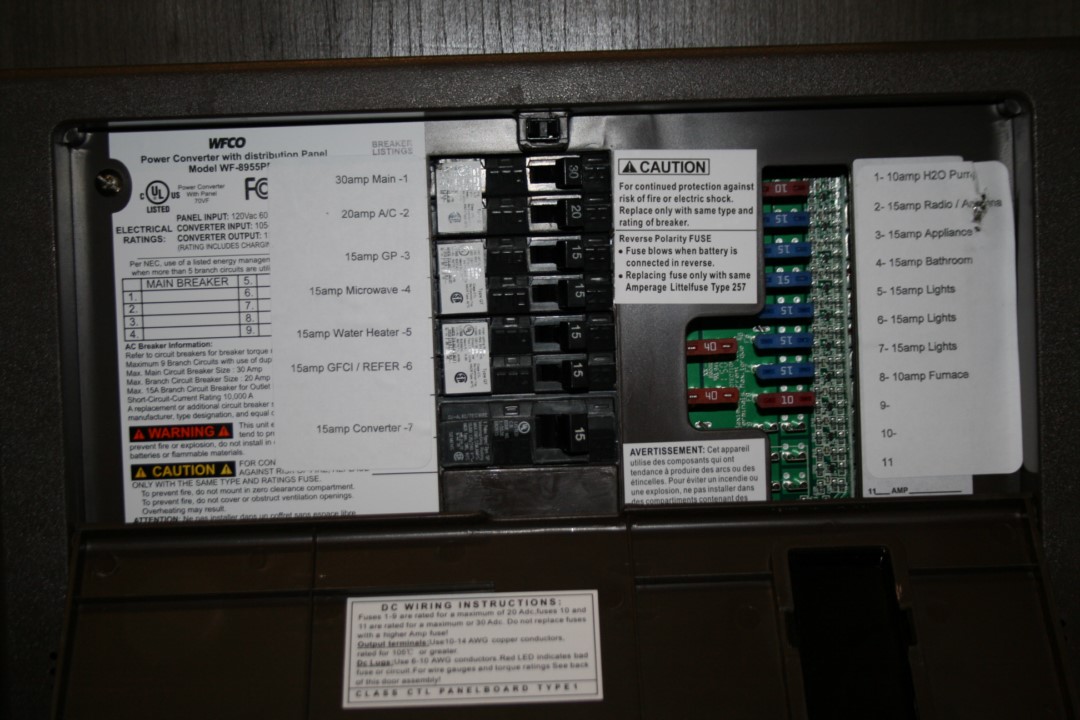 Take off the two upper screws to remove the cover. and remove wires off fuses 4,5,6,7. 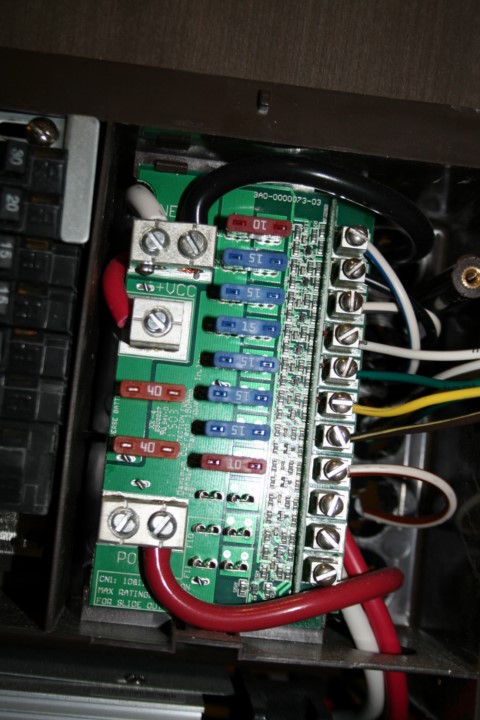 You can see I used a 4 wire trailer wire, white, yellow, green,and brown (had it laying around). I removed the original wires from the screw terminals and pulled them out the back of the elec panel. and ran the new 4' long trailer wire through the same hole.  I then drilled a 1/2" hole up thru the seat back, there is a 3/4' piece of wood you can feel up under the lip, this piece of wood lines up with the hollow gap between the 1/8" seat back and entry way panels. if I had to it again, i would drill this hole in the middle of the seat area and not near the front for the sake of wire pulling ease. 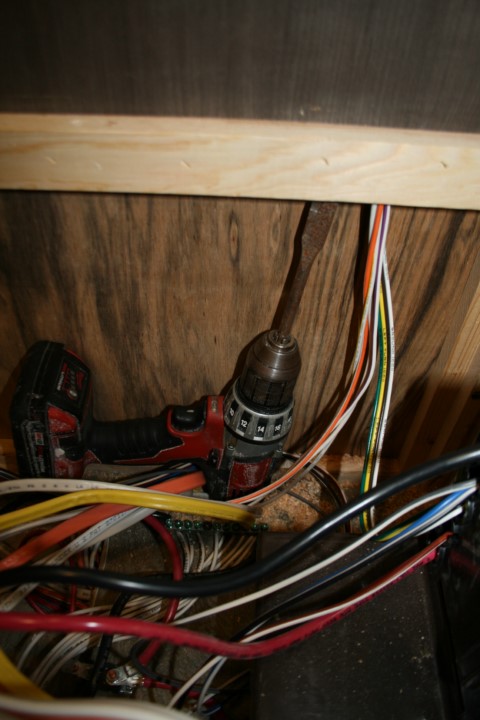 I then cut the switch hole on the entry side. You can feel the area where there are no wood braces. I first drilled a 1/2" inspection hole and then marked the cutout 1/2 inch away from the wood braces knowing i needed space for connectors. I used a mini sawsall blade, but you can see it scored the wood behind it. I ended up using a utility knife to finish the hole, and would recommend you do it with a utility knife (cuts like butter). I then crimped terminals on and plugged them all into the switch and main panel. I tested everything and just moved wires around until i had everything where I wanted it, Bath lights on the left / entry lights on the right. You can see i bent the pins over on the back of the switches so it all would fit in the empty space, next time i would just buy angled terminals. 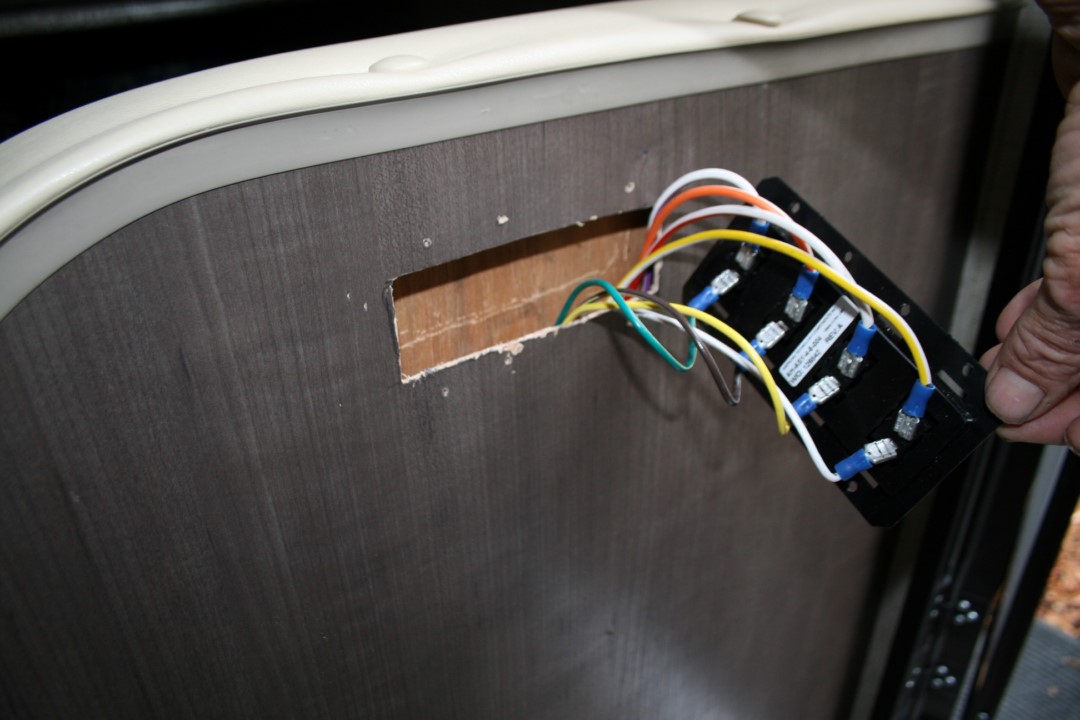 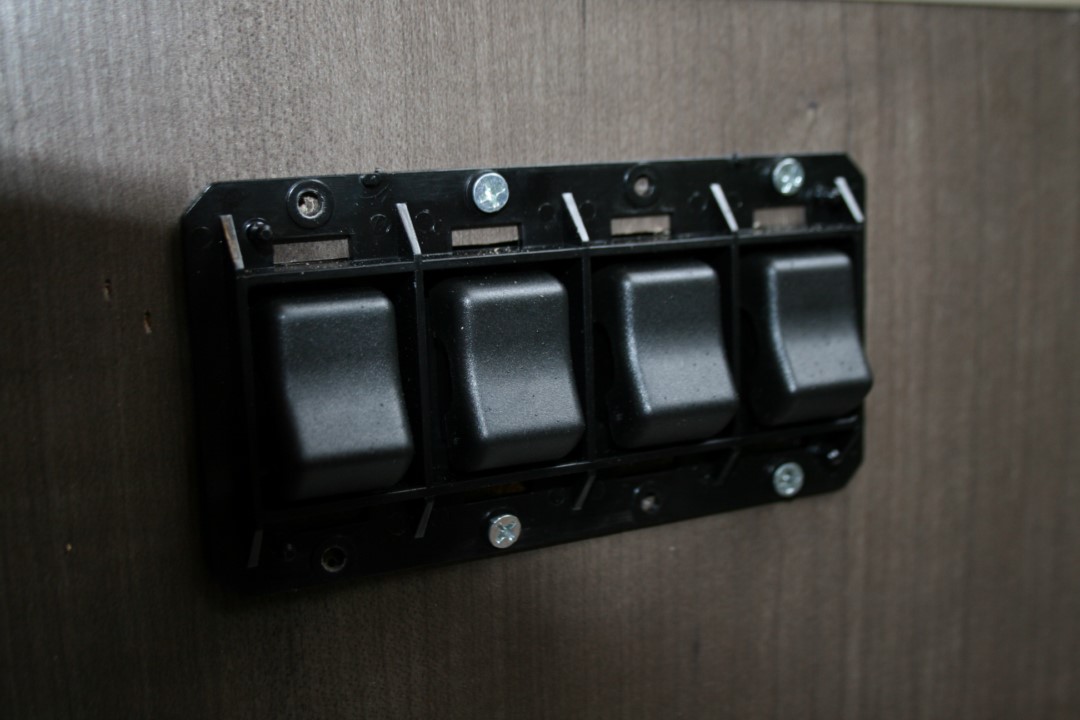 I screwed in the switches and snapped on the cover. Hope this all makes sense, and I helped! Today i'm also Installing a shelf over the bedroom window. Because i found this at Home Depot, almost a perfect match!  Cheers, John |
|
|
|
|
Post Reply
|
Page 12> |
| Forum Jump | Forum Permissions You cannot post new topics in this forum You cannot reply to topics in this forum You cannot delete your posts in this forum You cannot edit your posts in this forum You cannot create polls in this forum You cannot vote in polls in this forum |


 My 1st 180 Podmod, Light switches