
|
List Your Mods: |
Post Reply 
|
Page <1 3738394041 77> |
| Author |
 Printable Version Printable Version Google Google Delicious Delicious Digg Digg StumbleUpon StumbleUpon Windows Live Windows Live Yahoo Bookmarks Yahoo Bookmarks reddit reddit Facebook Facebook MySpace MySpace Newsvine Newsvine Furl Furl Topic Search Topic Search  Topic Options Topic Options
|
David D 
Newbie 
Joined: 27 Apr 2015 Location: San Jose, CA Online Status: Offline Posts: 26 |
 Post Options Post Options
 Quote Reply Quote Reply
 Topic: List Your Mods: Topic: List Your Mods:Posted: 20 Jun 2015 at 12:17pm |
|
Hi There,
Great TV mount mod to your rPod! Wondering if you could respond with Amazon part number. Thanks, David
|
|
|
2015 R-Pod 179
|
|
 |
|
|
JandL
Senior Member 

Joined: 29 Mar 2014 Location: California Online Status: Offline Posts: 364 |
Post Options
Quote Reply
Posted: 04 Jul 2015 at 4:49pm |
|
Fender table and jack spacer
I made a small table for my fender to hold my radio and drinks. My first attempt was the thin aluminum pieces with the bend it. It was made from a sheet of 1/16” thick 5052 aluminum I picked up at a scrap yard. I wanted a soft aluminum I could easily bend by clamping it to a table and then tapping on it with a rubber mallet to bend it. I then used the top part of my belt sander to smooth out the radius cut so it fits flush with the fender. You are limited to what the yard has in sizes and so I bent it and mounted it with 2 screws thru the fender and some adhesive sealant on the underside edges next to the wall. It worked great but it only was big enough to hold the radio. I went thru my scraps and found a sheet of 1/8” that I cut down to attach to the angled piece. The only thing holding it on are the 2 flat head screws and a dabs of adhesive on the corners. It is now big enough to hold everything. The spacer for the jack is ¾” oak flooring with a clear urethane coating. I wanted to have a little more clearance when exiting driveways. 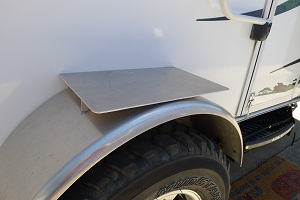 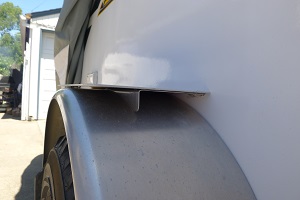

|
|
|
JandL
2013 Honda Ridgeline 2012 177 2 Paynes in a Pod |
|
|
|
|
Bluesme
Newbie
Joined: 15 Jun 2015 Location: Mims, Florida Online Status: Offline Posts: 6 |
Post Options
Quote Reply
Posted: 05 Jul 2015 at 6:13pm |
|
I would like to post pictures, but when I do, they are huge. Please help!
|
|
|
|
|
johnmaci
Senior Member

Joined: 17 Jun 2014 Location: MD Online Status: Offline Posts: 202 |
Post Options
Quote Reply
Posted: 05 Jul 2015 at 7:01pm |
|
You can right click on picture and open with Paint. Go to resize, pixels, then select something appropriate (i.e. 800x660 or 640x480, or smaller) then save it with a new file name so you don't overwrite your original . Not sure what the preferred size of attachments is on this forum.....
|
|
|
|
|
JandL
Senior Member
Joined: 29 Mar 2014 Location: California Online Status: Offline Posts: 364 |
Post Options
Quote Reply
Posted: 05 Jul 2015 at 7:16pm |
|
Any picture I’m going to post, I make a copy of it and put it in a new file on my computer, that’s so I always have the untouched original. My pictures are stored in Windows Pictures library so my direction is based on that photo program. I do a left mouse click on the picture I want to post and I get a drop down menu, I them pick edit. That opens the picture up in Windows Paint. On the upper part you have a box called “Image” click on Resize. You they get a new box which is called Resize and Skew. Click on the button that says Pixels. You can resize by picking a smaller number. I just change the number in the Horizontal box, the Vertical will change automatically. The pictures I just posted about the Fender Table and Jack Spacer are 300 Pixels wide. You can also crop your picture by checking the button that says “Select” and then “Rectangle Selection” and drag a box around the picture you want to show. Them save your picture. If you and look at pictures others have posted put your mouse pointer on a picture and do a left mouse click and at the bottom of the drop down menu pick “Properties”. A box will open up with the basic information about the picture and in the middle is Dimensions in pixels. That way you can get an idea on how big the pictures are that others have posted and what size you may need. You may have another photo editor on your computer that will be different than the directions for Windows Paint, but they should have a way to edit picture size in Pixels.
|
|
|
JandL
2013 Honda Ridgeline 2012 177 2 Paynes in a Pod |
|
|
|
|
sailor323
Senior Member
Joined: 11 Jun 2015 Location: S Central KY Online Status: Offline Posts: 281 |
Post Options
Quote Reply
Posted: 05 Jul 2015 at 7:43pm |
|
In Windows Live Photo Gallery, in the upper left hand corner, click on "organize, edit or share" Choose edit and then choose the size--medium works well for sharing on FB. Click that and save.
|
|
|
|
|
JandL
Senior Member
Joined: 29 Mar 2014 Location: California Online Status: Offline Posts: 364 |
Post Options
Quote Reply
Posted: 02 Aug 2015 at 9:31pm |
|
Solar Panel
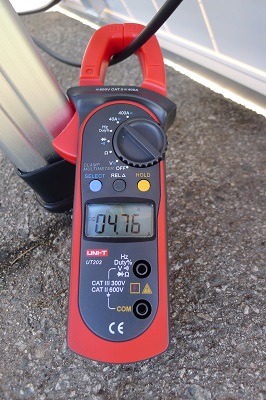
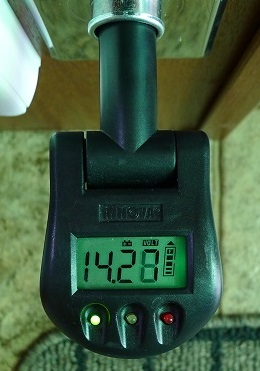
I purchased a Grape Solar “GS-Star-100W”, 100 watt panel from Costco and a group 27 battery. I had to get a new battery box to hold the bigger battery and to also mount the charge controller and circuit breaker. The charge controller is a Morningstar “SK-12 SunKeeper” 12 Amp PWM Charge Controller. They make a 6 amp model but someday I may want to add a second panel so I got the 12 amp. To hook it up to the panel and battery I used an Solar Panel Cable - 30ft long, 12 AWG wire, with Mc4 connectors. I cut the cable in half and attached it to the Anderson multipole power connector, SB50 series, 50 amps, 10-12 gauge wire contacts and added a dust cover along with a Bussmann 10 amp panel mount circuit breaker “25510-B-2”. I carry a step ladder in my rear pass thru hung from a wood slats. I need the ladder to install the panel. The solar panel travels in my bathroom strapped to the wall; it’s not a problem if it gets wet. I haul everything out to the side of the trailer and extend the 2 legs that are attached to the panel with hinges. The panel weighs 20 pounds so it helps to have some hand it up to you. I have installed foam strips to the frame of the panel so it won’t damage the roof or edge molding. I use 2 Irwin Quick Grip Handi Clamps to attach the legs to the slide out frame. I trimmed off the ends of 2 Camco Party Light Holders and super glued them together to so I could attach the cam from a “Parent Units 2 Pack Topple Stop Furniture Straps” I got from Amazon. The straps I attached to the side of the solar panel. I put a lock on the Handi Clamp to make it harder to remove the panel; the back tube on the lock was to increase the diameter so you can’t operate the release mechanisms on the clamps. I route the wire down the side of the trailer to clips, I have replaced most of the plastic ones with metal one because the plastic ones snapped off. If shade is covering the top of the trailer I can position the panel on the ground. Group 27 battery and charge controller wiring  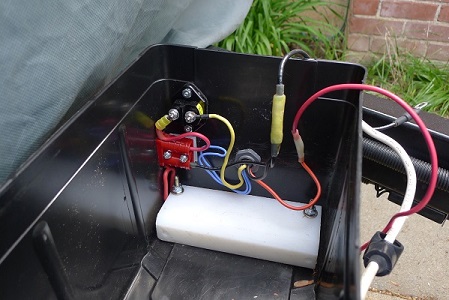
Charge controller, Anderson connector and circuit breaker 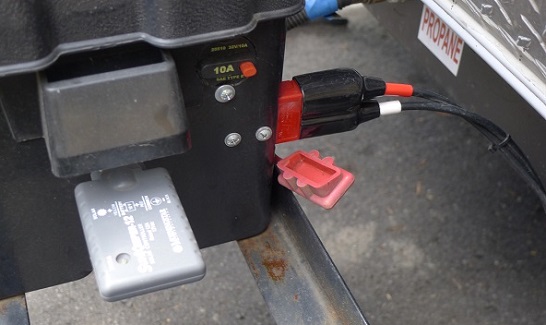
Ladder storage  
Secured in the bathroom for travel 
All the parts and the installation 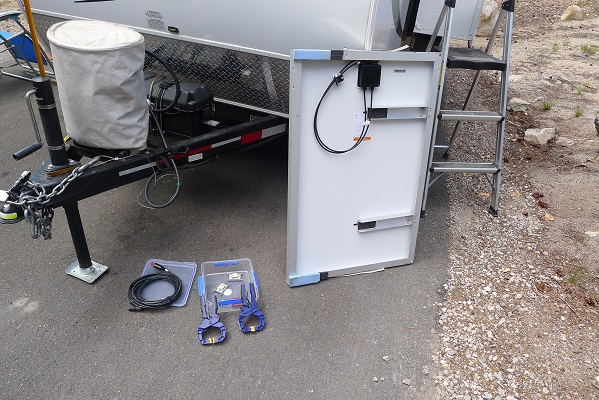 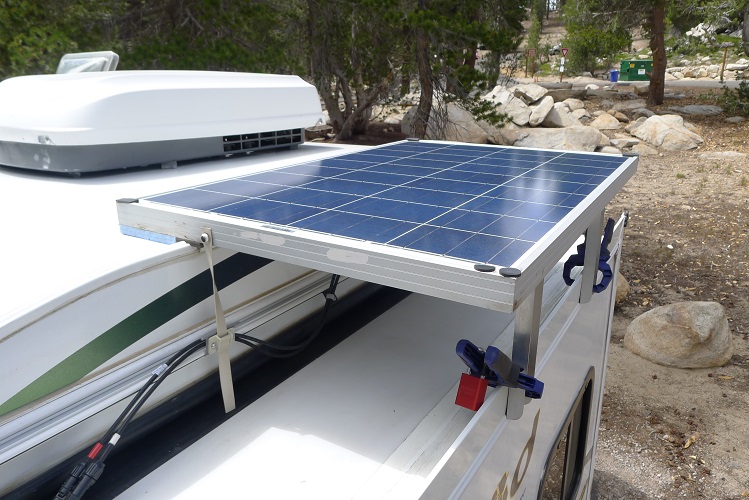
Lock to make it harder to remove and straps to help hold it in place if there is wind 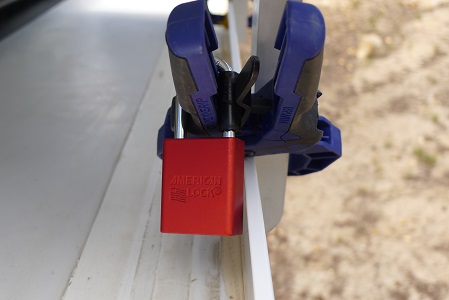 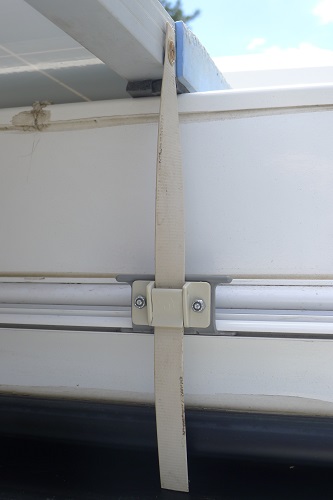
Because it is not bolted to the roof I can move it to get the best sun 
Warning label so you do not run the slideout 
Mt. Rose Campground last Thursday had good sun so the battery's charged, on Friday their was over cast so it didn't charge as well 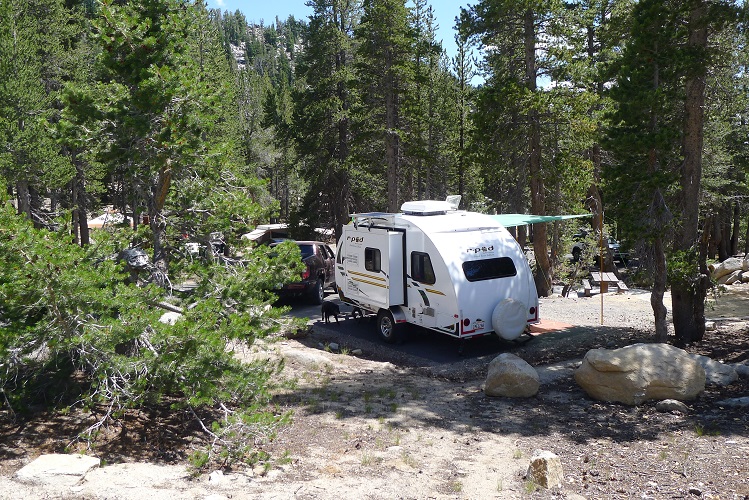
|
|
|
JandL
2013 Honda Ridgeline 2012 177 2 Paynes in a Pod |
|
|
|
|
techntrek
Admin Group - pHp 
Joined: 29 Jul 2009 Location: MD Online Status: Offline Posts: 9059 |
Post Options
Quote Reply
Posted: 02 Aug 2015 at 10:11pm |
|
Looks good. I like the reminder tag, I do the same when I put the jack down at truck stops and Wal-Marts so I don't forget.
|
|
|
|
|
Falcmerlin
Newbie
Joined: 26 May 2015 Location: UP Online Status: Offline Posts: 3 |
Post Options
Quote Reply
Posted: 05 Aug 2015 at 2:08pm |
|
great idea thank you
|
|
|
|
|
Tri-Pod
Senior Member

Joined: 17 May 2011 Location: Liberty Hill Online Status: Offline Posts: 112 |
Post Options
Quote Reply
Posted: 05 Aug 2015 at 2:36pm |
|
What a well thought out plan and you seem to have thought of everything. Great explanation on your project anyone here could do the same by following your instructions. wOW. I couldn't handle the engineering and broke down and bought a Honda eu3000s. Which keeps the wife happy when the AC is running but the we are in Southeast Texas where to day it is 97 feels like 105 with the humidity. But back to your project so nice thanks for sharing it with us.
|
|
|
2010 PR 176 sold 2012 replaced with
2013 SP 240 w outside kitchen 2012 Toyota Tundra Crew Max 4x2 5.7L V8 Me, My Honey, and Max our GSP |
|
|
|
|
Post Reply
|
Page <1 3738394041 77> |
| Forum Jump | Forum Permissions You cannot post new topics in this forum You cannot reply to topics in this forum You cannot delete your posts in this forum You cannot edit your posts in this forum You cannot create polls in this forum You cannot vote in polls in this forum |


