
|
ouR escaPOD mods |
Post Reply 
|
Page <1 89101112 58> |
| Author |
 Printable Version Printable Version Google Google Delicious Delicious Digg Digg StumbleUpon StumbleUpon Windows Live Windows Live Yahoo Bookmarks Yahoo Bookmarks reddit reddit Facebook Facebook MySpace MySpace Newsvine Newsvine Furl Furl Topic Search Topic Search  Topic Options Topic Options
|
GlueGuy 
Senior Member 

Joined: 15 May 2017 Location: N. California Online Status: Offline Posts: 2630 |
 Post Options Post Options
 Quote Reply Quote Reply
 Topic: ouR escaPOD mods Topic: ouR escaPOD modsPosted: 02 Jul 2021 at 9:59am |
|
The installation looks very nice Stephen; good job!
I do have a couple of questions though. The interior looks pretty roomy. What is the volume comparison between the old absorption fridge and this one? Do you have a delta on the energy cost difference?
|
|
|
bp
2017 R-Pod 179 Hood River 2015 Ford F150 SuperCrew 4WD 3.5L Ecoboost |
|
 |
|
|
StephenH
podders Helping podders - pHp

Joined: 29 Nov 2015 Location: Wake Forest, NC Online Status: Offline Posts: 6289 |
Post Options
Quote Reply
Posted: 02 Jul 2021 at 8:52am |
|
Why did I forego gas? Simple. Too many times I have had inadequate cooling with the absorption refrigerator. Gas isn't an option with a compressor refrigerator. I considered the trade-off of shorter boondocking time to be acceptable given our travel experience. It is not often that we would need multiple days of boondocking. For those times, I have a solar panel and the dual-fuel generator to help recharge the LiFePO4 battery.
|
|
|
StephenH
Happy is the man that findeth wisdom,... ouR escaPOD mods Former RPod 179 Current Cherokee Grey Wolf 24 JS |
|
|
|
|
Ben Herman
Senior Member
Joined: 26 Apr 2018 Location: Gr Junction, CO Online Status: Offline Posts: 355 |
Post Options
Quote Reply
Posted: 02 Jul 2021 at 8:20am |
|
Looks good! Just curious, why did you decide to forgo gas as an option?
|
|
|
|
|
StephenH
podders Helping podders - pHp
Joined: 29 Nov 2015 Location: Wake Forest, NC Online Status: Offline Posts: 6289 |
Post Options
Quote Reply
Posted: 02 Jul 2021 at 8:15am |
|
Okay, I now feel I can do an effective write-up on our new refrigerator. See the link for some pictures of the unit and specifications.
The back story: Three days into a month-long trip, our RM-8501 refrigerator died. It had 110V (when plugged in), 12V, and propane. I do know enough to check the basics. :) After checking every conceivable thing I could, I came to the conclusion that the electronic controls died a sudden death. Since this model is discontinued and I could not even find parts, I came to the conclusion that a replacement was in order. I considered getting another absorption 3-way refrigerator, but had experienced enough problems with the one that I decided to look at high-efficiency AC/DC refrigerators. There are not too many brands out there. I looked on Dometic's site and found the CRX1110 listed for over $1700. That was a non-starter. I continued to look and found a much better price at Boat and RV Accessories. It was significantly less and had free shipping. It arrived, and the first step was to remove the old refrigerator. I bought a plug for the gas line since I would no longer be using it. It is still there. I left the end visible so leak checks could be done. I unplugged the 120V plug and disconnected the 12V line. I recommend pulling the fuse for the 12V side and turning the breaker off before starting. The hardest part was breaking loose the sealant that had been applied around the rubber seal. I removed the fan from the back as I had a use for it that I will describe later. While the refrigerator is the same width as the old one, the flange that came with it is a little wider. I had to do a little cutting to make the opening wide enough. The other difference is the new refrigerator is not as tall since it does not have an eyebrow board that sits above the refrigerator. The controls are on the wall inside. There were two potential ways to handle the gap that would be there. One would be to simply add a filler at the top. I opted for the more complicated route of building a platform to raise the refrigerator so that it was at the top of the opening instead of the bottom. It would have been simpler to go with option 1 as I found that I needed to raise the slanted panel and remove some filler boards. Some pictures which I will post later will make it more clear. I finally got the refrigerator installed and connected. I re-used the rubber seal. I also added insulation to the compartment and since the compressor and condensor coil are at the top back, in the area where the burner and plumbing for the old refrigerator sat. Since it would still generate heat, I sealed around the top, sides, and bottom so there would not be air moving from inside to outside and the reverse. First impressions: This thing cools fast! No more waiting 24 hours for the refrigerator to reach a proper temperature. The down side is more energy use. It is a fraction of the 12V power demand of the RM8501, but it is still significant. I'm glad I did the LiFePO4 battery conversion earlier. I don't need to worry about killing the battery overnight. However, it will mean that there won't be any multi-day boondocking adventures unless I connect my solar panel or fire up the generator to recharge. Still, my use of the Free Piston Sterling Cooler gave me an idea of what the power demand would be like. It is acceptable to me to have the reliability of a compressor refrigerator rather than an absorption refrigerator which failed to cool adequately many times. Now for some pictures: Front view of completed installation:  Detail view of support platform below refrigerator: The stain was ebony with a little gray mixed in. It isn't quite a match, but it is good enough. I finished it with polyurethane spray. 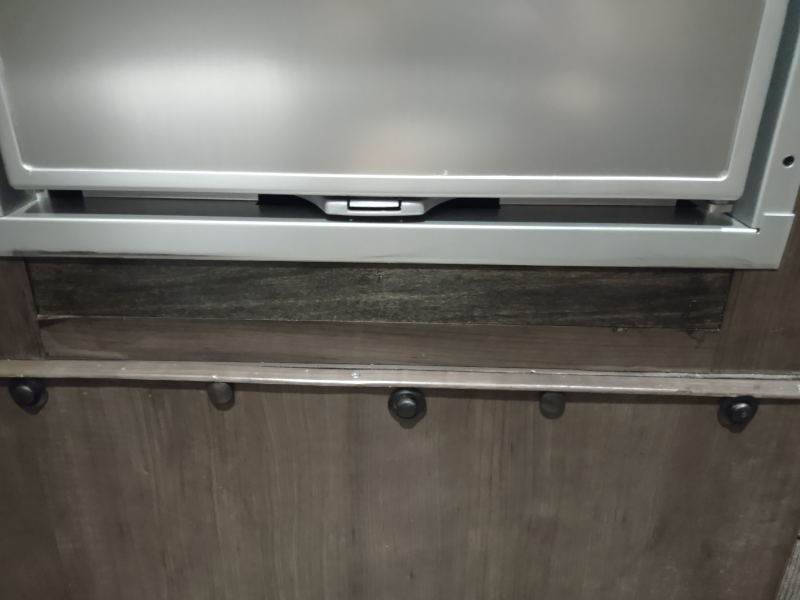 This is a view of the base from the back side. Note the insulation bats around the base and sides. What is not visible is the layers of insulation I put in behind the panels. That was the pink foam from Home Depot cut to fit the spaces. This was finished with ebony stain and polyurethane spray. 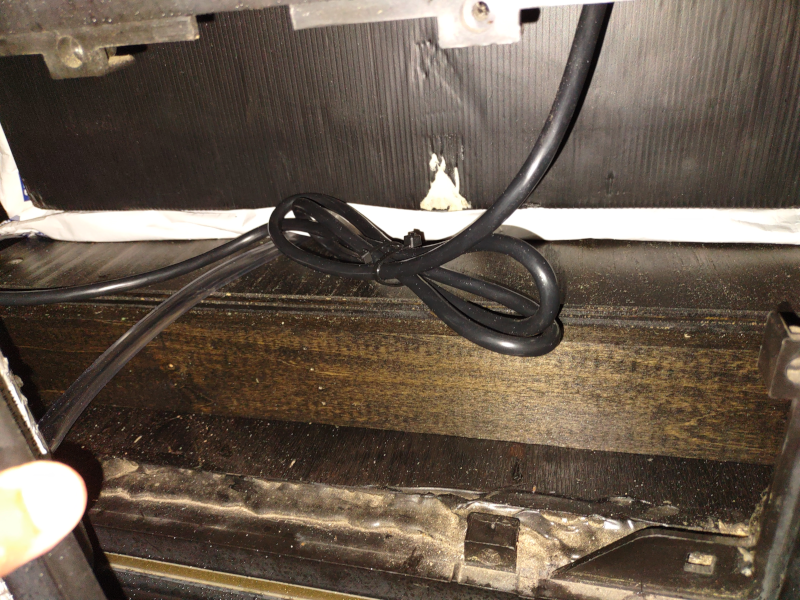 This is a picture of what makes this work. The compressor is tiny as is the condenser and fan when compared with one that would be in a house. It is also variable speed which contributes toward it being energy efficient. I added a thermostat and wired in the fan removed from the old refrigerator. I intended to use the old thermostat, but the start temperature of that was too high. I ordered a new one that starts at 100F and cuts off at 85F. It is wired to the 12V line that supplies the refrigerator, so it is not modifying the refrigerator in any way. I strapped it to the compressor with heavy wire ties that were rated for a higher temperature than I could anticipate the compressor reaching. Note that the top of the compartment had to be raised to allow the unit to slide into place. I did not realize it when I built the platform that this would be needed. I could have saved some work if I had not built the platform but just made a filler for the top end instead. However, having the refrigerator sitting a little bit higher is nice for accessing the interior. 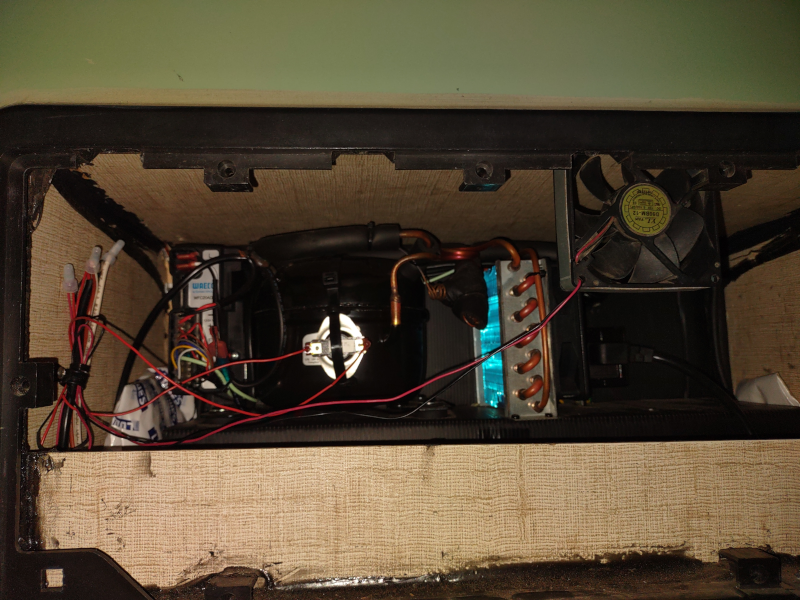 I installed the fan to help exhaust heat from the compartment. It is likely not needed, but it can't hurt. The additional insulation should also help to reduce energy use. I will likely add insulation to the back of the refrigerator as well below the compressor. And, a shot of the inside. 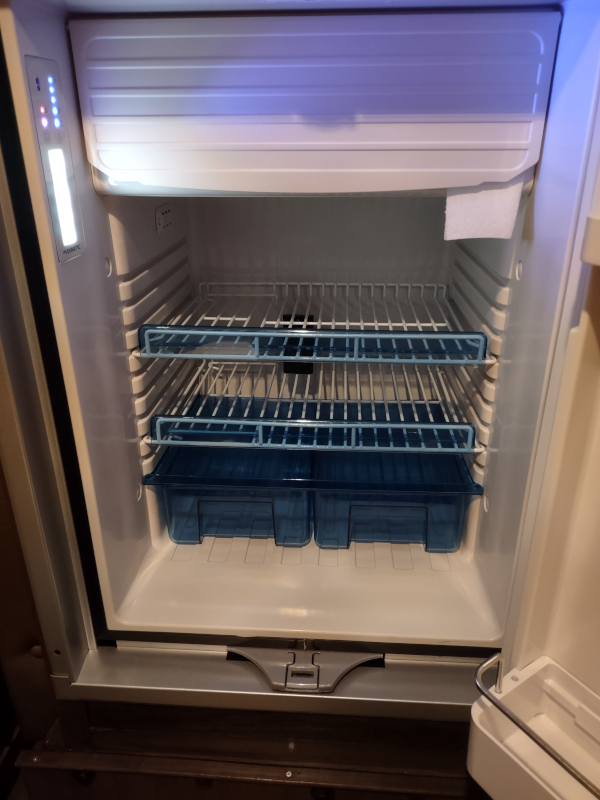 Unlike the old refrigerator, the controls are built into a panel on the inside with no wires or controls to have moisture intrude. The lighting is LED. The freezer is different in that it opens from the bottom up intead of the top down and the compartment is not removable. The freezer does work very well and should be suitable for ice cream and any other items that need to stay frozen. The shelves go all the way to the back and have a lip on both the front and back to help keep things in place. The crisper bins are rectangular and not rounded like the old refrigerator. They are not on a track so they can be removed and replaced easily. The shelves are deeper as well and will allow for larger items to fit. The door shelves are not as wide though. The bottom shelf is deep enough but the top two shelves are narrow. They can be removed, but they can't be adjusted since there are not other mounting points. Still, the deeper shelves are a huge plus over the old one and there are no intruding fins in ether the refrigerator or freezer compartments. The refrigerator comes with a two year warranty. I expect it to be reliable and I should not have any issues with it keeping the food cold. I will have to update as time goes on and we have more use to see whether it was a good move or whether I should have gone for another absorption unit. As it is, I think the price ended up being comparable. I should not need to carry the FPSC cooler unless we have a need to have more capacity. However, with the increased usable space in this, I don't think it will be necessary very often.
|
|
|
StephenH
Happy is the man that findeth wisdom,... ouR escaPOD mods Former RPod 179 Current Cherokee Grey Wolf 24 JS |
|
|
|
|
StephenH
podders Helping podders - pHp
Joined: 29 Nov 2015 Location: Wake Forest, NC Online Status: Offline Posts: 6289 |
Post Options
Quote Reply
Posted: 18 May 2021 at 11:20am |
|
I'm pretty sure that is the reason. That is why it took so long to address the black water tank drain suspension situation or the sagging wall situation.
|
|
|
StephenH
Happy is the man that findeth wisdom,... ouR escaPOD mods Former RPod 179 Current Cherokee Grey Wolf 24 JS |
|
|
|
|
offgrid
Senior Member
Joined: 23 Jul 2018 Online Status: Offline Posts: 5290 |
Post Options
Quote Reply
Posted: 18 May 2021 at 10:44am |
|
Only if the changes reduce cost or the marketing and sales depts think it will sell more trailers.
The stupid undermount sink is a good example of a sales driven design change that degrades practicality and reliability. I'm certain the design and engineering folks knew that, it's pretty dang obvious, but they were overruled by sales and marketing and told to do it anyway. Oh and by the way you can't increase manufacturing cost doing it. |
|
|
1994 Chinook Concourse
1995 RV6A Experimental Aircraft 2015 Rpod 179 - sold |
|
|
|
|
GlueGuy
Senior Member
Joined: 15 May 2017 Location: N. California Online Status: Offline Posts: 2630 |
Post Options
Quote Reply
Posted: 18 May 2021 at 10:34am |
Darn good question. My suspicion is that they (and other manufacturers) are riding the wave of demand currently underway. Make hay while the sun shines and all that. Come 2023, the bottom may very well drop out.
|
|
|
bp
2017 R-Pod 179 Hood River 2015 Ford F150 SuperCrew 4WD 3.5L Ecoboost |
|
|
|
|
lostagain
Senior Member

Joined: 06 Sep 2016 Location: Quaker Hill, CT Online Status: Offline Posts: 2587 |
Post Options
Quote Reply
Posted: 18 May 2021 at 9:05am |
|
It is ironic that most of the mods are efforts to fix the poor design and craftsmanship of the original manufacturing. I wonder if FR ever takes these mods into consideration when they design their products?
|
|
|
Never leave footprints behind.
Fred & Maria Kearney Sonoma 167RB Our Pod 172 2019 Ford F-150 4x4 2.7 EcoBoost |
|
|
|
|
StephenH
podders Helping podders - pHp
Joined: 29 Nov 2015 Location: Wake Forest, NC Online Status: Offline Posts: 6289 |
Post Options
Quote Reply
Posted: 17 May 2021 at 8:57pm |
|
The CO/LP detector in our RPod finally reached its end of life. Since we could not have it beeping loudly every minute or so, it was time to replace it. One thing about the model installed was that it was possibly the worst choice of units to install. I lost count of how many times I knocked it off the wall bracket. The model was SAFE-T-ALERT 25-741. I was looking at replacing it with the same model when I came across the SAFE-T-ALERT Model 35-742-BL Flush Mount. I ordered it and it arrived today.
The original had the wires running through a hole in the wall. The 35-742 requires a rectangular hole. The majority of the unit sits in this hole and only the face plate is there. It is not flush, but it is nearly so since it only sits about 1/8" out from the wall. I made a template for placement and traced the shape after verifying that there were not objects that would be damaged when I cut the hole. A multi-tool made short work of that and after connecting the wires, the unit started up. After the 10 minute warm-up, I tested it and it is functioning normally. I really like that I do not need to worry about knocking this one off the wall. It also looks much better. If anyone is needing to replace the CO/LP detector, I would recommend you consider this unit. It costs more than the surface-mount unit, but having it out from under foot is well worth the additional cost. |
|
|
StephenH
Happy is the man that findeth wisdom,... ouR escaPOD mods Former RPod 179 Current Cherokee Grey Wolf 24 JS |
|
|
|
|
StephenH
podders Helping podders - pHp
Joined: 29 Nov 2015 Location: Wake Forest, NC Online Status: Offline Posts: 6289 |
Post Options
Quote Reply
Posted: 05 May 2021 at 10:52am |
|
Update on the axle modification: Adding the angle iron to the axle does appear to have been successful in helping keep the axle from losing camber. We have not had long trips due to SAARS-CoV2 but we are going to be making one soon. It will be a real test over about a month and many miles. I saw the topic of axle reinforcements come up so I thought I would provide this update. Another will follow our upcoming trip.
Also, the floor reinforcement seems to be doing the job. Even though it does not have the arms some have used, just having that one bar across is making the floor feel much more solid.
|
|
|
StephenH
Happy is the man that findeth wisdom,... ouR escaPOD mods Former RPod 179 Current Cherokee Grey Wolf 24 JS |
|
|
|
|
Post Reply
|
Page <1 89101112 58> |
| Forum Jump | Forum Permissions You cannot post new topics in this forum You cannot reply to topics in this forum You cannot delete your posts in this forum You cannot edit your posts in this forum You cannot create polls in this forum You cannot vote in polls in this forum |


