
|
ouR escaPOD mods |
Post Reply 
|
Page <1 55565758> |
| Author |
 Printable Version Printable Version Google Google Delicious Delicious Digg Digg StumbleUpon StumbleUpon Windows Live Windows Live Yahoo Bookmarks Yahoo Bookmarks reddit reddit Facebook Facebook MySpace MySpace Newsvine Newsvine Furl Furl Topic Search Topic Search  Topic Options Topic Options
|
StephenH 
podders Helping podders - pHp 

Joined: 29 Nov 2015 Location: Wake Forest, NC Online Status: Offline Posts: 6288 |
 Post Options Post Options
 Quote Reply Quote Reply
 Topic: ouR escaPOD mods Topic: ouR escaPOD modsPosted: 16 Apr 2016 at 9:45pm |
|
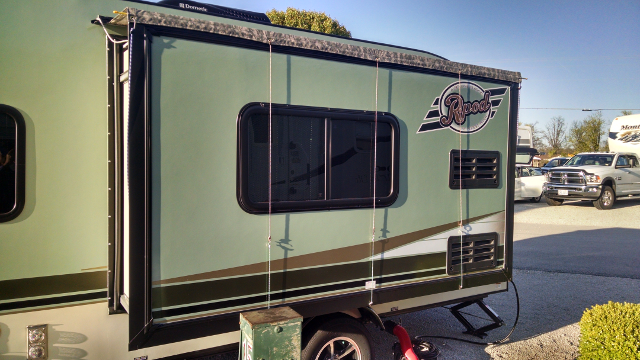
Thank you. When I saw the camo fabric, I thought it would complement the colors of the Rpod. I have enough fabric to try to make a small awning for the other side. I'm not looking to make an R-Dome or a Visor clone. I just want something big enough to allow me to open the door when it is raining and not get soaked. I have not yet decided if I am going to try to make it full-length or just have a short one that goes from the back to just in front of the wheel well.
Then again, I may go to Mill Outlet Village again and see if they still have the roll. If so, I may get enough to construct a wider, full-length awning. Edit: Mill Outlet Village still had the fabric and it was still $3.95/yard.  I bought 6 yards, which will be more than enough for the awning. I had forgotten to take a measurement before we went, so I wanted to be sure to have enough. I should have enough left over for a couple of other projects. I bought 6 yards, which will be more than enough for the awning. I had forgotten to take a measurement before we went, so I wanted to be sure to have enough. I should have enough left over for a couple of other projects.I'm glad we got the industrial type Juki sewing machine. I don't think my wife would take too kindly to me using her Pfaff for projects like this.  |
|
|
StephenH
Happy is the man that findeth wisdom,... ouR escaPOD mods Former RPod 179 Current Cherokee Grey Wolf 24 JS |
|
 |
|
|
Retroactive
Senior Member

Joined: 15 Mar 2016 Location: Bolton, MA Online Status: Offline Posts: 270 |
Post Options
Quote Reply
Posted: 16 Apr 2016 at 5:06pm |
|
I like the touch o' camo. The one you picked fits in nice with those current gen colors you and I have on the out pods.
|
|
|
|
|
Leo B
podders Helping podders - pHp
Joined: 13 Jan 2012 Location: Lyndonville, VT Online Status: Offline Posts: 4508 |
Post Options
Quote Reply
Posted: 16 Apr 2016 at 2:45pm |
|
Really nice work!
|
|
|
Leo & Melissa Bachand
2017 Ford F150 2021 Vista Cruiser 19 csk Previously owned 2015 Rpod 179 2010 Rpod 171 |
|
|
|
|
StephenH
podders Helping podders - pHp
Joined: 29 Nov 2015 Location: Wake Forest, NC Online Status: Offline Posts: 6288 |
Post Options
Quote Reply
Posted: 16 Apr 2016 at 2:27pm |
|
Here is the promised picture of the improved slide-out cover which shows how adding the fiberglass rod stiffens the end and makes the cover lie flatter and more secure. It also shows the parachute cord and short bungee cords used to secure it by the three center grommets. The two ends are still secured by long bungee cords.
 |
|
|
StephenH
Happy is the man that findeth wisdom,... ouR escaPOD mods Former RPod 179 Current Cherokee Grey Wolf 24 JS |
|
|
|
|
StephenH
podders Helping podders - pHp
Joined: 29 Nov 2015 Location: Wake Forest, NC Online Status: Offline Posts: 6288 |
Post Options
Quote Reply
Posted: 11 Apr 2016 at 11:37pm |
For now, I am having to remove each time. Eventually, as soon as I can figure out a way to do so, I will make a way to stow in place. I switched the three middle ones from straight bungee cords to parachute cord for most of the length and small bungees at the bottom. It looks much better. I will post updated pictures as soon as I can. I did not have time to do so as I had to get ready to leave on a trip. |
|
|
StephenH
Happy is the man that findeth wisdom,... ouR escaPOD mods Former RPod 179 Current Cherokee Grey Wolf 24 JS |
|
|
|
|
Appocalexx
Groupie 

Joined: 01 May 2015 Location: AK Online Status: Offline Posts: 77 |
Post Options
Quote Reply
Posted: 11 Apr 2016 at 5:08am |
|
I really like that slide out cover.
Are you planning on having to install and remove each time you set up and pack up or are you going to make a storage above the railing to fold it into? Also do you plan on securing it to the slide out a different way than the bungee cords? It looks great but those bungee cords are an eye sore and may even rub some nasty marks into your slide out on a windy camp trip over time. Subdidid keep up the good work. |
|
|
|
|
StephenH
podders Helping podders - pHp
Joined: 29 Nov 2015 Location: Wake Forest, NC Online Status: Offline Posts: 6288 |
Post Options
Quote Reply
Posted: 10 Apr 2016 at 8:39pm |
|
This is one that I just finished. I was looking at commercial slide-out covers, and decided I did not want to pay that much. Since my wife has a lot of sewing equipment, including an industrial strength Juki, I thought I would try my hand at making one.
The first step was to figure out what I could use for the rail to attach it. I remembered how my parents' trailer had an awning that used a rope. I looked at what I had on hand, and after a couple of attempts, I found some that was of a good quality and the correct diameter to slide into the rail. The next step was to find some suitable fabric. We have a store called "Mill Outlet Village" near us. I found some urethane coated rip-stop fabric that seemed heavy-duty enough for the task. I purchased enough of it for the length of the slide-out plus a little extra. Third was to cut the fabric. I found a place to lay it out and used a rotary cutter to cut the length I wanted and cut the width wide enough to allow for both the rope to be sewn in and to allow for a double-folded seam on the outer edge, wide enough for grommets to be installed plus a little extra. It was good that I did, as I later needed that extra space. The fabric was cut and the rope sewn in to the distance between the rain gutter ends. The cut allowed the installation, but extra fabric was left for folding the side seams. It turns out I had left a little too much, so I later had to undo some stitching and re-cut and re-fold one end to get the length right. After installing grommets, I used rope and bungee cords to attach the cover to the slide-out. Initally, the outer edge was not stiff enough. I solved that by getting some fiberglass marker poles and copper tubing. The poles were cut so that end-to-end, they are a little wider than the cover. The copper tube was cut and glued to the middle segment on both ends. The two outer pieces slide into the other end of the tube to make one long, strong, flexible pole that fits in the folded fabric with the grommets. Now for a couple of pictures. 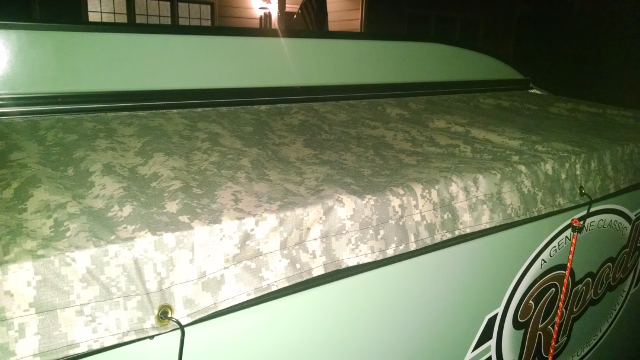 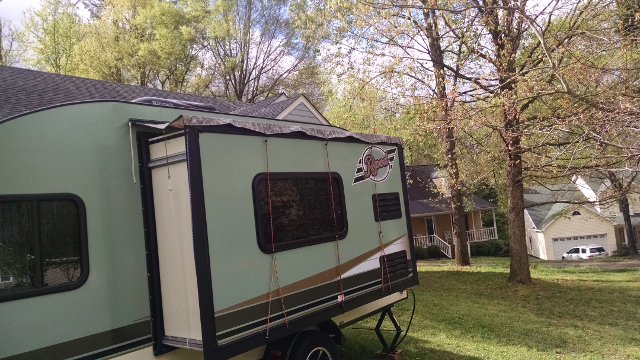 The fiberglass pole was added after this picture was taken. I will have to get a good shot of it to post later. I also realized with this short a slide-out, the bungee cords and rope on the two ends was not needed, as this isn't wide enough for wind to be a problem. Edit: Here is a shot with the poles inserted. The poles are 3 solid fiberglass marking stakes like those used for driveways, etc. I got them at Lowes. The end two are full-length. The center one is cut to a suitable length. Copper tubing is glued to both ends of the center rod. The two end rods slide into this ferrule to make one longer stiff rod which was fed through an opening in each end. It really makes a difference, keeping the cover tight and allowing any water to drain better. |
|
|
StephenH
Happy is the man that findeth wisdom,... ouR escaPOD mods Former RPod 179 Current Cherokee Grey Wolf 24 JS |
|
|
|
|
StephenH
podders Helping podders - pHp
Joined: 29 Nov 2015 Location: Wake Forest, NC Online Status: Offline Posts: 6288 |
Post Options
Quote Reply
Posted: 09 Apr 2016 at 7:26pm |
|
This one is the door window. It is this one:
Door Window  It took a lot of measuring and re-measuring before I got up the nerve to cut the opening. I still had to file out a bit more as I was trying not to make the opening too big. Before cutting, I covered the area to be cut with masking tape. The marks were made on the tape so I would not have to try to remove marks from the door when finished. I cut from the inside, figuring that the jigsaw blade would be less likely to chip the outside if the cut were made from the inside. I was right. The hardest part was getting the screws that fasten the trim ring to the window started. A power driver helped greatly. I am still glad that extra screws were provided as I did have problems with a few of them. Given that the window had a rubber gasket all the way around, I did not use additional sealant. So far, it seems to be working quite well. I have not noticed any leakage. I did remove an aluminum clip that held the seam of the trim ring. The plain aluminum color did not look good against the black trim ring. I had to touch up the trim ring with some black paint. I also used black silicone sealant to fill the small gap at the trim ring seam. The clip was thick enough that it would have prevented the trim ring from sitting flat against the door at that point. I did not like that. My review of the product addressed that issue. If there had to be a clip, at least it could have matched the trim ring. |
|
|
StephenH
Happy is the man that findeth wisdom,... ouR escaPOD mods Former RPod 179 Current Cherokee Grey Wolf 24 JS |
|
|
|
|
StephenH
podders Helping podders - pHp
Joined: 29 Nov 2015 Location: Wake Forest, NC Online Status: Offline Posts: 6288 |
Post Options
Quote Reply
Posted: 09 Apr 2016 at 7:11pm |
|
This is a simple one. The panels in the kitchen cabinet closest to the door of the 179 hide wasted space. There is an outlet and the gas line for the stove. However, the panels cover much more space than needed. For the top shelf, simply trimming the length of the panel allowed me to move it closer to the cabinet wall. I needed to strap up the wires and gas line better, but once having done so, I recovered usable space.
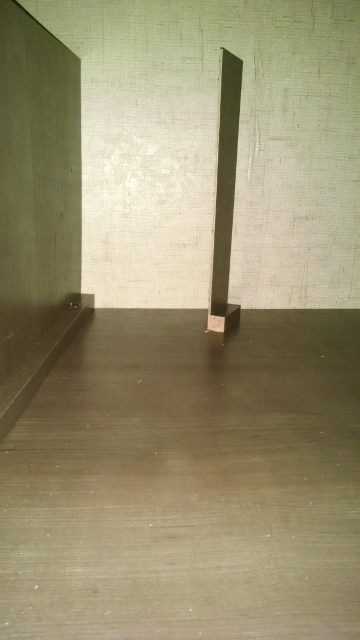 The partial piece is at the original location. The bottom shelf was trickier. I could not really gain much there until I thought to split the panel cut a reinforcing piece to hold the two parts at an angle, and then install it. After doing so, I also gained space on the bottom. 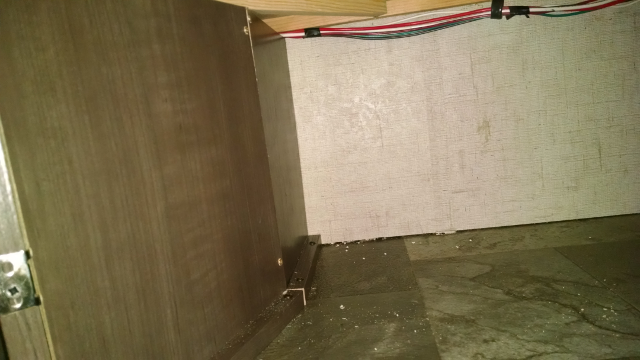 Another modification was to fabricate locking brackets for my batteries. I have dual six Volt batteries. The material is anodized strap aluminum purchased from Lowe's. Since I don't have a proper bending brake, I used a vice and a rubber mallet to bend them. They go around the case and under the welded-on battery cross-members. I probably could have figured out a way to lock it with one lock on each one, but I was working fast to get this done before our first big trip. After I returned, I redid the starboard battery because it had a tendency to rub against the trailer. That is why you will see a rubber bumper. On the port side, it was not needed. That was the second one I made with the experience from making the first one.  A shot of the underside:  |
|
|
StephenH
Happy is the man that findeth wisdom,... ouR escaPOD mods Former RPod 179 Current Cherokee Grey Wolf 24 JS |
|
|
|
|
Retroactive
Senior Member
Joined: 15 Mar 2016 Location: Bolton, MA Online Status: Offline Posts: 270 |
Post Options
Quote Reply
Posted: 08 Apr 2016 at 10:38am |
|
Thanks. Insulation is key up in our area, weather is too unpredictable in MA as it has a mind of it own. We either get the warm weather pushing up from your way, or we get the frigid weather from Montreal. Having a shift from 72F to 32F can happen in less than 24 hours in MA, during the Spring and Fall seasons. It's why a lot of the "Pilgrims" who landed in MA didn't survive the first winter, they all starved or froze to death. I can only imagine them heading out to hunt on a 60F day in March, after the first spring thaw, only to be met with a 20F night while they were 5 miles from the village...
|
|
|
|
|
Post Reply
|
Page <1 55565758> |
| Forum Jump | Forum Permissions You cannot post new topics in this forum You cannot reply to topics in this forum You cannot delete your posts in this forum You cannot edit your posts in this forum You cannot create polls in this forum You cannot vote in polls in this forum |


