
|
|
Post Reply 
|
Page 12> |
| Author |
 Printable Version Printable Version Google Google Delicious Delicious Digg Digg StumbleUpon StumbleUpon Windows Live Windows Live Yahoo Bookmarks Yahoo Bookmarks reddit reddit Facebook Facebook MySpace MySpace Newsvine Newsvine Furl Furl Topic Search Topic Search  Topic Options Topic Options
|
marwayne 
Senior Member 

Joined: 25 Oct 2011 Location: Edmonton AB Can Online Status: Offline Posts: 1002 |
 Calendar Event: Installing additional wall cabinets Calendar Event: Installing additional wall cabinetsPosted: 06 Nov 2014 at 11:47pm |
|
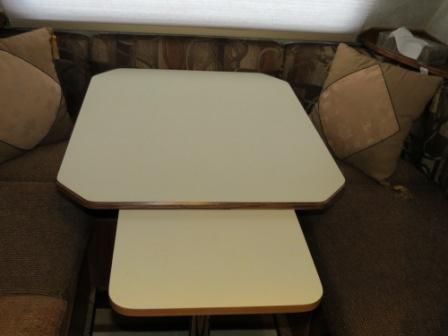
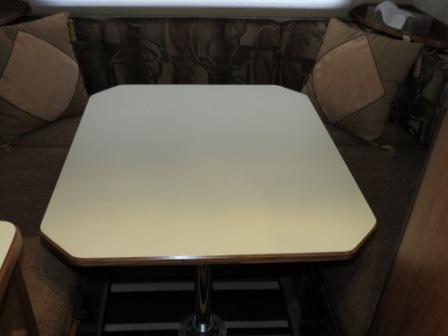
No this is a new tabletop made of 3/4" birch plywood with solid oak edging and almond laminate, and I did the same with the countertop.
|
|
|
If you want something done right, do it yourself.
2011 RP172, 2016 Tundra 5.7 Litre, Ltd. |
|
 |
|
|
Luv2Q
Senior Member

Joined: 30 Aug 2014 Location: Central TX Online Status: Offline Posts: 309 |
Posted: 06 Nov 2014 at 10:35pm |
Is that the original (particleboard?) table? Or did you replace it with plywood or ______ ??
|
|
|
John & Teri
Tundra 5.7L V8 / RP 180 E2 WDH / Integrated controller (POS) replaced by Tekonsha P3 |
|
|
|
|
marwayne
Senior Member
Joined: 25 Oct 2011 Location: Edmonton AB Can Online Status: Offline Posts: 1002 |
Posted: 06 Nov 2014 at 10:11pm |
|
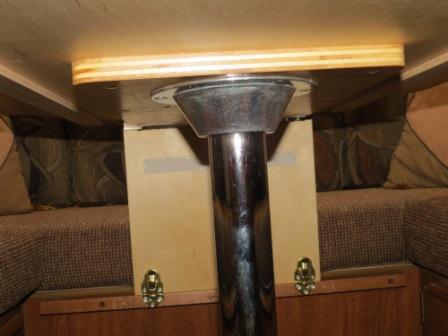
Podster, the base of the pedestal is screwed into the floor with No;12 screws it only has to hold up the pipe, the table is attached at the far end to the bench.
|
|
|
If you want something done right, do it yourself.
2011 RP172, 2016 Tundra 5.7 Litre, Ltd. |
|
|
|
|
marwayne
Senior Member
Joined: 25 Oct 2011 Location: Edmonton AB Can Online Status: Offline Posts: 1002 |
Posted: 06 Nov 2014 at 9:55pm |
|
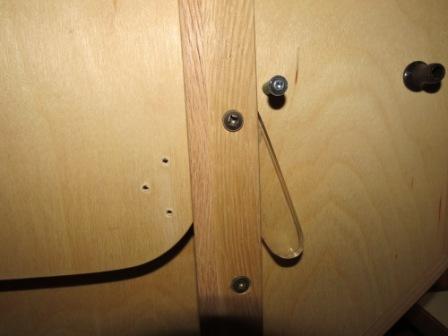
Here is how you put your backing for the front of your corner cabinet on the ceiling.
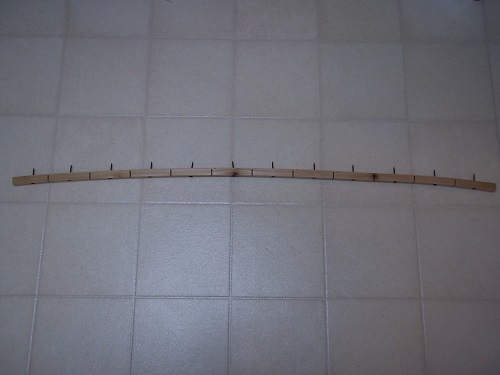 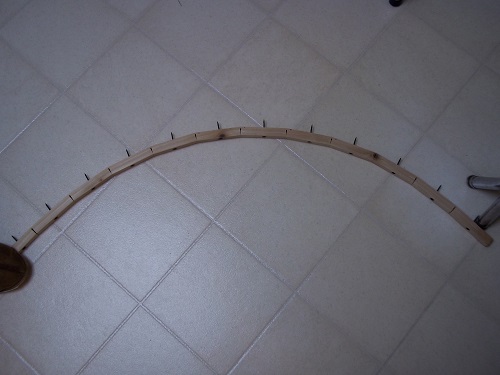
Take your backing strip put cuts in every 3 to 4" and a screw between the cuts, the cuts should almost go right through then screw it to the ceiling. |
|
|
If you want something done right, do it yourself.
2011 RP172, 2016 Tundra 5.7 Litre, Ltd. |
|
|
|
|
Larry158
Groupie 
Joined: 01 Oct 2014 Location: Old Forge NY Online Status: Offline Posts: 45 |
Posted: 06 Nov 2014 at 8:41pm |
|
Marwane, I am in your debt for sharing your expertise & knowledge with a "newbie". Thank you for your help. I really appreciate it. Last time I was up your way was for the Calgary winter olympics. Really had a great time. Thanks Larry158 |
|
|
|
|
marwayne
Senior Member
Joined: 25 Oct 2011 Location: Edmonton AB Can Online Status: Offline Posts: 1002 |
Posted: 06 Nov 2014 at 7:20pm |
|
Solid backing in ceiling, every strip of burlap molding has solid backing, then there is another solid strip of backing in between the burlap moldings. 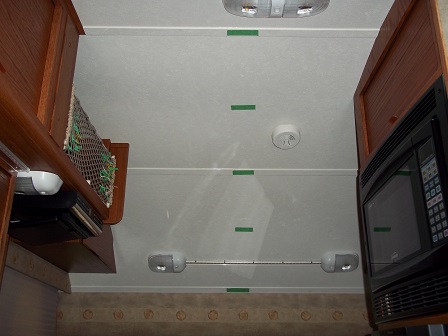 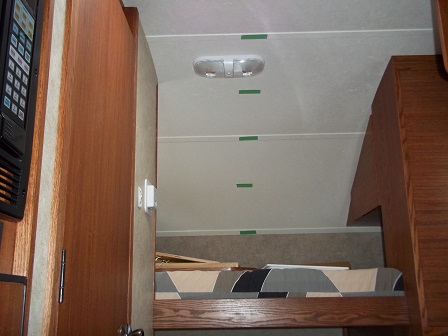
The meaning of my tagline? I build my own stuff so I know it's done right. |
|
|
If you want something done right, do it yourself.
2011 RP172, 2016 Tundra 5.7 Litre, Ltd. |
|
|
|
|
Larry158
Groupie
Joined: 01 Oct 2014 Location: Old Forge NY Online Status: Offline Posts: 45 |
Posted: 06 Nov 2014 at 4:43pm |
|
Marwane,
Thank you for that lead on cabinets page 24. I saw what you did, but how did you do it? I suffer from the condition of being over tooled & under knowledged. How did you figure out where to put the ceiling support wood. Is there any support behind/up in roof to srew into? What does the tag line mean? Thanks again Larry158
|
|
|
|
|
marwayne
Senior Member
Joined: 25 Oct 2011 Location: Edmonton AB Can Online Status: Offline Posts: 1002 |
Posted: 06 Nov 2014 at 11:20am |
|
Larry, to answer ? no 1 check my tagline.
Check under mods, Cabinets page 24 and New table part 1 and 2 page 65. I don't know how to put a link to it. |
|
|
If you want something done right, do it yourself.
2011 RP172, 2016 Tundra 5.7 Litre, Ltd. |
|
|
|
|
JStrube
Groupie
Joined: 11 Aug 2014 Location: Atwater, CA Online Status: Offline Posts: 90 |
Posted: 06 Nov 2014 at 10:57am |
|
Yeah, my biggest question with modding the pod, how do you find mount points. Like in the garage of my 181G, the track is only mounted in the corners. Not too sturdy, want to add more support in the center, don't know the structure, or where it is. Would hate to use metal screws into wood, or just screw to thin board.
|
|
|
2012 181G
|
|
|
|
|
Luv2Q
Senior Member
Joined: 30 Aug 2014 Location: Central TX Online Status: Offline Posts: 309 |
Posted: 06 Nov 2014 at 10:26am |
|
Beautiful workmanship. I'm envious. Sadly, I've learned that having tools hasn't made me a craftsman.
 And, yes, I'd also like to know more about that pedestal table. Surely, that heavy particleboard can be replaced with a sheet of cabinet-grade ply, yes? And, yes, I'd also like to know more about that pedestal table. Surely, that heavy particleboard can be replaced with a sheet of cabinet-grade ply, yes?
|
|
|
John & Teri
Tundra 5.7L V8 / RP 180 E2 WDH / Integrated controller (POS) replaced by Tekonsha P3 |
|
|
|
|
Post Reply
|
Page 12> |
| Forum Jump | Forum Permissions You cannot post new topics in this forum You cannot reply to topics in this forum You cannot delete your posts in this forum You cannot edit your posts in this forum You cannot create polls in this forum You cannot vote in polls in this forum |


 Installing additional wall cabinets - Event Date: 05 Nov 2014