
|
|
Post Reply 
|
Page 123 14> |
| Author |
 Printable Version Printable Version Google Google Delicious Delicious Digg Digg StumbleUpon StumbleUpon Windows Live Windows Live Yahoo Bookmarks Yahoo Bookmarks reddit reddit Facebook Facebook MySpace MySpace Newsvine Newsvine Furl Furl Topic Search Topic Search  Topic Options Topic Options
|
WillThrill 
Senior Member 

Joined: 04 Jul 2014 Online Status: Offline Posts: 298 |
 Topic: Connecting a 100 watt solar panel to Zamp port Topic: Connecting a 100 watt solar panel to Zamp portPosted: 22 Jul 2014 at 10:04pm |
|
I recently purchased a Renogy 100 watt solar panel through Amazon to provide a non-generator power source for dry camping. We love the Yamaha 2400iSHC for running the air conditioner or whatever else we need, but generators aren't the greatest way to recharge batteries if you're using a smart charger (which you should be).
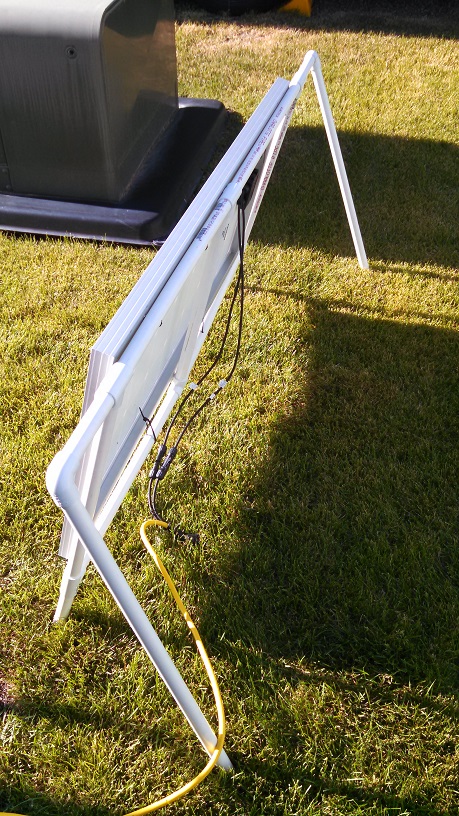
The reason for this is after your batteries reach about 80% state-of-charge (SOC), your smart charger begins stepping down the amperage flowing to the batteries. This is both for battery health and to minimize the use of unnecessary electrical power (for reasons beyond the scope of this post). Since the minimum output that a generator like mine can provide is about 500 watts (1/4 of its continuous rated output), that's about 40 amps of 12 volt current. That's way too much current for recharging batteries for the Pod, and the electrical power that doesn't go into the batteries or get used elsewhere is wasted. However, a solar panel with a smart charge controller (NEVER use a solar trickle charger with a solar panel rated above 15 watts; it will eventually and literally cook your batteries) will do a great job of recharging your batteries from a solar panel. It will step down the current flowing to the batteries as the batteries are recharged, the way it should. So enough about the technical stuff. Here are the pictures! This is my Renogy 100 watt solar panel from Amazon. They're $149.99 and get outstanding reviews. They produce solar power significantly better than older panels and are designed for outdoor use already. I made a little stand for it out of PVC pipe and connectors. I attached the panel to the stand with heavy duty zip ties running through holes drilled through the PVC. I didn't glue in anything yet because I wanted the setup to be flexible. To adjust the tilt of the panel, I just twist the two pipes at the back. 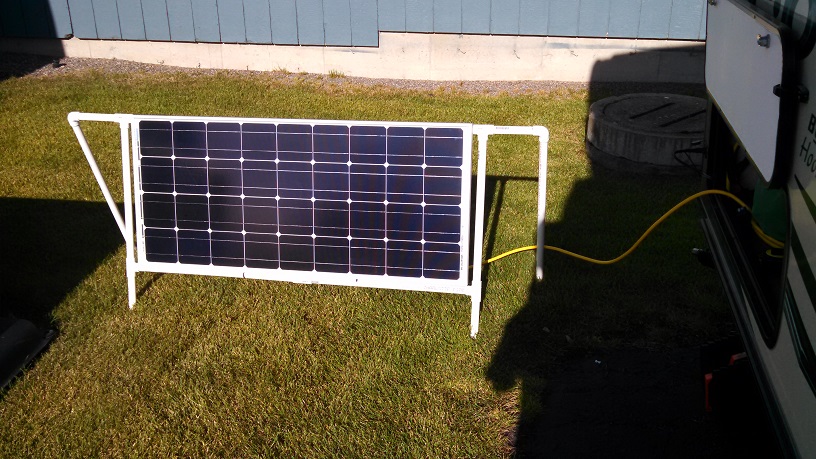
This is a 10 amp Sunforce solar charge controller. It adjusts the current flowing to the batteries depending on their SOC. I screwed it into the back wall of the exterior storage so it wouldn't get bumped around. 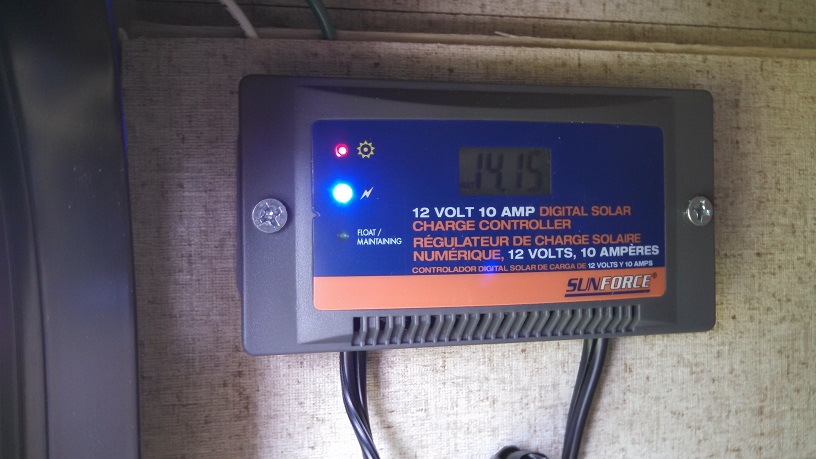
The MC4 connectors provided with the solar panel are only about 18 inches long, far too short to adjust the panel appropriately, and getting extensions are expensive. So I got a 15 foot 12 gauge extension cord so I can move the panel to either side of the Pod easily. Getting a 12 gauge cord is necessary to handle the current coming from the panel. I cut off the ends of the extension cord and connected to the MC4 connectors on the solar panel and the charge controller with wire nut connectors which I then wrapped heavily with electrical tape and two zip ties so they won't be pulled apart. Where the extension cord comes up to the charge controller, I attached the cord to the back wall with zip ties and screws so it won't pull on the charge controller. 
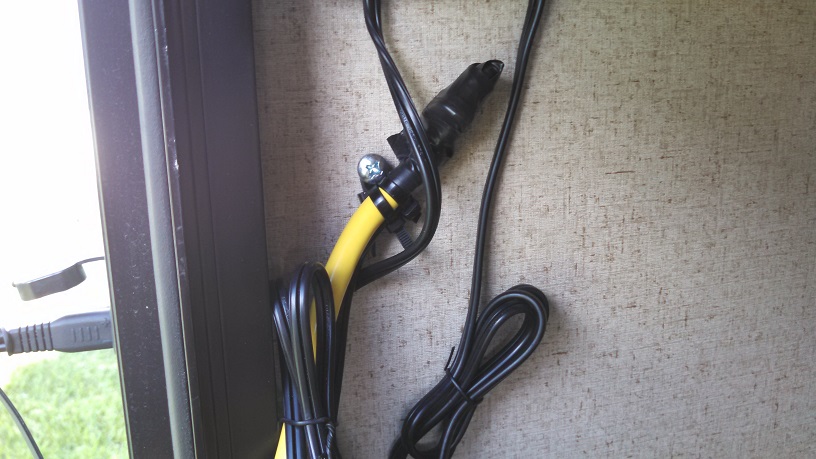
I connect the charge controller to the Zamp port with a Battery Tender ring terminal harness. This already has an inline fuse holder that a 10 amp automotive fuse can be placed into. 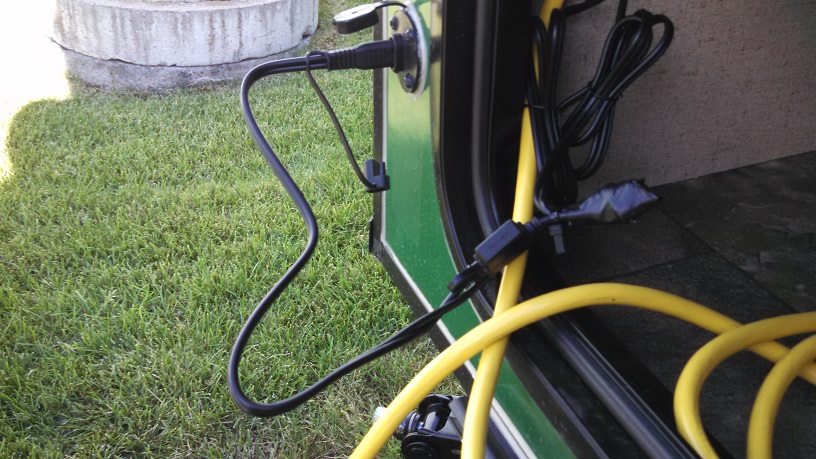
If you have a Pod that doesn't have the Zamp port, you could run 16 gauge (yes, it's sufficient for the amperage and distance) wire under the Pod up to the batteries without much difficulty. But the Zamp port makes this very easy. |
|
|
"Not all those who wander are lost." Tolkien
2014 Hood River 177 2005 GMC Envoy XL |
|
 |
|
|
RPodWeGo
Senior Member

Joined: 10 Jul 2012 Location: Salt Lake City Online Status: Offline Posts: 112 |
Posted: 22 Jul 2014 at 10:37pm |
|
WillThrill, I like your setup in fact I have the Renogy 100watt foldable on my Amazon. One of our members recommened this for the battery box in the event you have an older Pod without thevZamp connector http://www.solarcapitalist.com/sae2pinsurfacemount.aspx
Maybe Santa will notice my Amazon Wish List.
|
|
|
RPodWeGo
RPod 177 04 v8 Toyota 4Runner |
|
|
|
|
WillThrill
Senior Member
Joined: 04 Jul 2014 Online Status: Offline Posts: 298 |
Posted: 22 Jul 2014 at 10:59pm |
I looked at the foldable panel too. It is a bit more convenient, but it is a bit pricier than buying a fixed panel and the Sunforce charge controller. With my 177, I can easily slide the panel in across the width of the panel in the exterior storage. |
|
|
"Not all those who wander are lost." Tolkien
2014 Hood River 177 2005 GMC Envoy XL |
|
|
|
|
GingerPod
Groupie 

Joined: 09 Jul 2014 Location: Pinehurst NC Online Status: Offline Posts: 67 |
Posted: 23 Jul 2014 at 8:42pm |
|
Looks good my friend!
You might remember I commented on the same Company (Renogy Solar) as being a well reviewed outfit as well. I recently obtained their 50 watt system and improved upon what they sent me to mimic the much higher priced Zamp system,primarily to have it fold up for storage and only need to plug it into the Zamp port to make it operational. 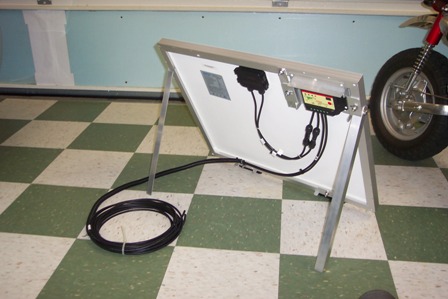 I think that is why the Zamp system is much more expensive.I highly doubt the system is more efficient the than Renogy,just more user friendly,I/E plug and play. That being said,I kinda copied their design  .........I made simple folding legs and mounted the controller to the back of the panel using the supplied roof mount brackets and aluminum stock. .........I made simple folding legs and mounted the controller to the back of the panel using the supplied roof mount brackets and aluminum stock. 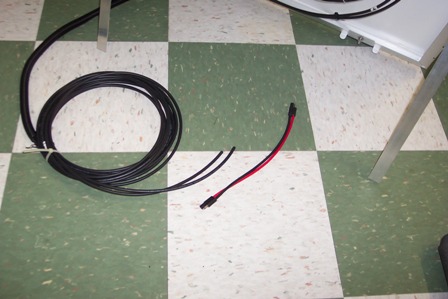 Utilizing the included wires intending to run to the interior mounted controller,which is now mounted to the panel itself,only 6" of wire is needed. So I can now use the remaining length of wire to plug directly into the Zamp port.This allows me to place the panels in the sun up to 20' away from the Rpod. So to set up all I have to do is plug into the Zamp port and the storage hatch can remain closed,just like the Zamp system intended. 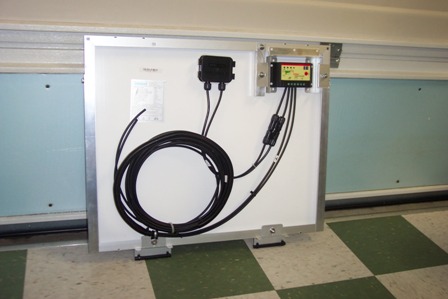 Our controllers are NOT waterproof like the Zamp is so that must be considered.But with the arms angled all the way back so the panel is at a 45* angle,it is protected from rain anyway. I have yet to solder up and shrink wrap the 10ga.connector.After speaking with customer service at Renogy they had no problem with this set up,but recommend covering the solar panel with a towel or facing it away from the sun BEFORE plugging it in.This is to reduce the chance of sparking and sudden loads on the controller,which is good practice methods when dealing with any kind of Solar system. I enjoy seeing how people make things that work for them as well as inspiring fellow RV'ers to do the same/ |
|
|
FOUND OUR NEW-RETRO TEARDROP!!!
|
|
|
|
|
WillThrill
Senior Member
Joined: 04 Jul 2014 Online Status: Offline Posts: 298 |
Posted: 25 Jul 2014 at 9:31pm |
|
Gingerpod, I really like your setup as well. Twenty feet of cable should be more than sufficient to set up your panel in a good spot. The folding legs look really great, very professional.
Everything I've heard about Renogy panels (not necessarily their charge controllers, which are still very good) has been outstanding. It seems to be one of the few brands of panels that will actually output what they are supposed to. I will be interested to hear from you how long it will take to recharge your batteries with the 50 watt panel. It was really cloudy on the only full day that I had to experiment with the panel so far. |
|
|
"Not all those who wander are lost." Tolkien
2014 Hood River 177 2005 GMC Envoy XL |
|
|
|
|
GingerPod
Groupie
Joined: 09 Jul 2014 Location: Pinehurst NC Online Status: Offline Posts: 67 |
Posted: 25 Jul 2014 at 10:03pm |
|
Well,I have yet to test the 50 watt system out.I have read that from a full discharge state it will take about 3 hours to charge 1 battery.
Just today I purchased a 2nd battery,so I plan on running 2 since we will be dry camping most of the time. My plan is too keep the solar panel plugged in all the time while Camping so each battery will continuously receive a charge.This way neither battery will get very low at all,especially since I now have double the Amp Hours available for use. The use of double batteries should negate the uncertainty of occasional cloud cover.That being said,the Renogy panels still put out some energy,but just not as much. I will definitely post my results once I try it out...At that time I might also start a "Solar" only thread as I see this route as a viable option to generator power,given the HUGE price drop in Solar energy options in recent years. |
|
|
FOUND OUR NEW-RETRO TEARDROP!!!
|
|
|
|
|
WillThrill
Senior Member
Joined: 04 Jul 2014 Online Status: Offline Posts: 298 |
Posted: 26 Jul 2014 at 2:24am |
|
Ginger, you must be running small batteries if a 50 watt panel can recharge them from 100% depth-of-discharge (0% charge, completely dead) in only 3 hours. A 50 watt panel at full capacity can only produce about 4 amps of power. So in 3 hours, you will have produced 12 amps. The smallest deep-cycle batteries I've seen used in TTs are about 75 amp hours, so it would take about 38 hours of full solar panel output to recharge that battery. And that's not taking into account that once the batteries reach 80-85% charge, the charge controller will begin slowing down the charge.
Such long charging times were why I went with the 100 watt panel. If you're not using much power in dry camping, then you'll probably be okay for 3-4 days with 2 batteries. Given the long charging times, the solar panel might buy you an extra day of battery power. |
|
|
"Not all those who wander are lost." Tolkien
2014 Hood River 177 2005 GMC Envoy XL |
|
|
|
|
GingerPod
Groupie
Joined: 09 Jul 2014 Location: Pinehurst NC Online Status: Offline Posts: 67 |
Posted: 26 Jul 2014 at 2:04pm |
|
Love the discussion as I'm trying to educate myself in this field...
From what I have interpreted from reading stuff of which most is way over my head..  ...increasing the AMP hour capacity is key when dry camping.Also never allowing the batteries to fall below 10.5 volts as well as keeping a constant supply of recharge current,no matter how small. ...increasing the AMP hour capacity is key when dry camping.Also never allowing the batteries to fall below 10.5 volts as well as keeping a constant supply of recharge current,no matter how small.So yes in reality it would take around 30 hrs to recharge a 100 AH battery at 3amps if FULLY discharged. The 3A is what drives the chemical storage reaction and regardless of terminal voltage when the battery is discharged, you will not get more than 3Ah out for any 3Ah put in, and in practice will get less. I believe this will keep my batteries happy as there is only 2 of us.We don't really use much power at all between us. In any case I don't think you can go wrong anywhere except with the so called Solar trickle chargers which in most cases put out less than 1 amp,which would do nothing for use trying to keep our batteries at a acceptable level while dry camping. |
|
|
FOUND OUR NEW-RETRO TEARDROP!!!
|
|
|
|
|
WillThrill
Senior Member
Joined: 04 Jul 2014 Online Status: Offline Posts: 298 |
Posted: 27 Jul 2014 at 2:45am |
|
Well it seems that you do have a good grasp of the basics of dealing with batteries. I would just give you a couple of tips I've picked up after spending literally hundreds of hours researching battery banks for homes and RVs.
First, invest a few dollars in a voltmeter you can use to monitor your batteries. The onboard battery meter is nowhere nearly as sensitive as you really need. There are several ways to use a voltmeter, some more complicated than others. The simplest way is to use an ordinary voltmeter than you pick up from a hardware store, place it to the 20V DC setting, and test the battery directly. But this isn't so great for a quick check. For me, I installed a 12V socket inside our Pod right next to the converter box. It took only a few minutes to wire it. If you've ever installed a wall socket in a house, you can easily put in a 12V socket. Otherwise, you might want a handy friend to help you. Just be sure to get the polarity right! I didn't the first time.  Once you have the socket, you can plug in a voltmeter (I like the Innova voltmeter on Amazon for $15) to easily monitor your battery's state-of-charge. Once you have the socket, you can plug in a voltmeter (I like the Innova voltmeter on Amazon for $15) to easily monitor your battery's state-of-charge.
Second, it's doubtful that you could ever get 12 volt batteries down to only 10.5 volts unless they were low on acid. Generally, at 11.9 volts, the batteries are virtually completely dead. In practice, you don't want to regularly go below a 50% state-of-charge since doing so begins to damage the battery. A 50% state-of-charge equates to about 12.2 volts. So when your voltmeter drops to 12.2 volts, you need to think about recharging your batteries somehow (i.e. connect to your vehicle if you have a power line connection there, generator, solar panel, etc.). And yes, for dry camping, multiple deep-cycle batteries are a MUST. Golf cart batteries (which must be wired in series to give you 12 volts) generally give you more amp hours than marine batteries do and are made for greater abuse. Remember, they design these batteries for frequent jolts and bumps in a small vehicle usually driven by half-drunks going off-roading! 
|
|
|
"Not all those who wander are lost." Tolkien
2014 Hood River 177 2005 GMC Envoy XL |
|
|
|
|
Budward
Senior Member
Joined: 21 Apr 2014 Location: SC/NC Online Status: Offline Posts: 438 |
Posted: 27 Jul 2014 at 3:38am |
Not so. It is entirely possible, even easy, to get to that or below on even a new battery. Problem is- it is very damaging to the battery to do so, IOW it will never be as "good as it was" if it is allowed to get too low. It is important to monitor the voltage as you stated and make sure this doesn't happen, unless you like buying batteries.  |
|
|
2014 179
Towed by a 2015 Ford Transit Diesel Supervised by a German/Aussie mix and a Labradoodle! |
|
|
|
|
Post Reply
|
Page 123 14> |
| Forum Jump | Forum Permissions You cannot post new topics in this forum You cannot reply to topics in this forum You cannot delete your posts in this forum You cannot edit your posts in this forum You cannot create polls in this forum You cannot vote in polls in this forum |


 Connecting a 100 watt solar panel to Zamp port