
|
|
Post Reply 
|
| Author |
 Printable Version Printable Version Google Google Delicious Delicious Digg Digg StumbleUpon StumbleUpon Windows Live Windows Live Yahoo Bookmarks Yahoo Bookmarks reddit reddit Facebook Facebook MySpace MySpace Newsvine Newsvine Furl Furl Topic Search Topic Search  Topic Options Topic Options
|
FISHTAIL 
podders Helping podders - pHp 
Joined: 08 Jun 2011 Location: La Plata, MD Online Status: Offline Posts: 130 |
 Topic: R-Pod Child Gate DIY (R-Pod 176) Topic: R-Pod Child Gate DIY (R-Pod 176)Posted: 11 Jul 2011 at 12:13am |
|
Ok guys and gals, here is my attempt at a writeup on how to build a child gate in the lower bunk for an R-Pod 176.
Unfortunately, I forgot my camera while I was doing this, so the only picture I have is the finished shot before stain, but hopefully someone will find this helpful anyway. And I appologize, because I know pictures would help make some of these concepts a little clearer to understand for the first timer, or for someone having trouble following my explination. Tools Needed: Drill 1 1/8" hole saw Saw (power saw helps) Sand paper (power sander helps) Tape Measure Carpenters Square Level Pencil Supplies: Screws Wood Glue 1 8' 2x4 2 8' 2x3's 4 4' 1 1/8" dowels 2 brass hinges 2 sliding brass gate locks DISCLAIMER: My measurements my be slightly different from yours, so please double check that they will work in your camper. Cliff's for folks comfortable building stuff: 2x4's are 40 1/4" in length dowels (8) are 20" gate ends are 17" gate is 33 1/2" long Ok, what we are going to build is a childs gate for the lower bunk, and my goal here was not just child saftey, but also making as few permanent marks in the camper as possible. So lets gets started. First, cut your 2x4 into 2 40 1/4" peices. These will be your gate "posts". Check them by placeing them up against the bunk rails, 3 1/2" side flat. With one end on the floor, the other should be dead even with the rail on your top bunk. At this point, don't secure the "posts" yet, but set them in place so you can double check the rest of the measurements to come. We'll secure these later, after we are sure everything will fit. Remember, it's easy to make changes to the parts you are building, BEFORE, you screw them into your camper. So, now what we need to do is construct the gate. For me, after placing the 'posts', I had a opening with a width that just exceeded 33 1/2", and a height of 22 1/2". I decided, somewhat arbitrarily, that a 2" opening up top was what I wanted, and a 1/2" on the bottom. The bottom gap has a purpose though...to avoid interference with the board that supports the bottom of the bed. Since what you are measuring from when you check the opening height is the frame the bed support rests on, you'll need to add 1/4" to get the actual bed bottom height. Then add another 1/4" to give yourself some clearance. The rest of this tutorial will continue based on those assumptions. To build the gate (with 3 1/2" spaceing between dowel centers): First, cut one of your 2x3's into 2, 33 1/2" sections (these will be the top and bottom rails of the gate). Then cut what's left of that 2x3 and the start of the next into 2 17" sections (these will be the gate ends). Next, cut your dowels into 8 20" lengths. The reason for differing lengths between the dowels and the gate ends will become clear shortly. This next step is the trickiest part of this project, and it's also the reason I had you buy 2 8' 2x3's...if you screw it up, you'll have enough wood to try one more time. First, lay your two 33 1/2" sections flat on top of one another. Make sure you have them pressed together with the 2 1/2" sides touching. Now, line them up so they are completely square with one another...it helps to set them on a flat and level surface and butt them up against a wall that's a good 90. If you don't have one, just use your square to ensure they are even. Now what you'll do is grab two wood screws (long enough to penetrate both boards, 2 1/2" should do) and screw the boards together. Do this inside of 1 1/2" from the ends, so we can hide the holes later..and be careful not to split the wood. Once your two boards are secured together, it's time to mark off where the dowels will go. First, measure in 1 1/2" from each end and make a mark. Then take your square and draw a line across the width of the board (not the length). This will mark the inner edge of your gate ends that you cut earlier. Now it's time to mark the dowel positions. Starting at the line you just drew, measure 3 1/2" and make a mark. Then make another mark 3 1/2" from that one, until you reach the line on the other end of the board. You should draw 8 marks total, and the easiest way to do this is to lay the tape measure down on the board and make all your marks by adding as you go. Now that you have all your dowel spacing done, take your square back out and draw lines width wise across each mark. This will show you your dowel positions, and now is a good time to make sure your measurements are where you want them. Next, we need to mark the center of each of those lines..so break your tape measure back out, and make a mark at 1 1/4" from the end of each line. This should net you 8 marks, 3 1/2" apart, all dead center of the board. Make sure you are happy with where those marks are, because the next step is to drill. What I did here to make things easier was to take a bit that was one size smaller than the one on my hole saw, and drill a pilot hole. I drilled 8 holes, all of them straight down, on the marks we'd just made above. Then I followed suit with my hole saw, careful to keep it perpendicular to the board. You'll find that you can only drill one board at a time, so its safe to leave the two attached boards on the ground for now. Once you have all 8 holes half drilled, you'll need to find something you can prop the board up against to avoid drilling into the ground. I just used a nearby step, and this didn't cause me any issues because I already had a nice straight hole to guide the rest of my drilling. Go ahead and drill out the bottom board now, but do it from the hole you've already drilled...don't flip the boards over. Once you are done drilling all of the dowel holes, but before you take the two boards apart, slip all of your cut dowels in, and make sure they are all straight. If not, you can try to correct them if they are only off by a little bit, but otherwise you'll be starting over on the extra 2x3 you have laying around. Now that your happy with your dowel alignment, go ahead and seperate the boards. Using your square, attach your 2 17" gate ends to one of the boards we just drilled out. Make sure you setup the gate end so that it will go between the two long boards, and not on the outside. The reason we cut the dowels to different lenghts, was because 3" of each dowel will be taken up inside of the top and bottom boards of the gate...leaving the exposed section 17" long. Once you have your gate ends secured, go ahead and set that board flat, so that the gate ends are pointed up. Slide your dowels in, and slip on your top board. Make sure everything fits, and lines up nice and straight. If your happy with how everything looks together, take your top board back off, and remove all the dowels. Now we are ready to make it permanent. Put some wood glue on the ends of each dowel, and slip it into the bottom board. Wipe off any excess. Then put some glue on the top of each dowel, and slip on the top board, again, wipe off any excess glue. Now you can go ahead and screw in your gate ends on the top board affixing everything together. Congrats, you've now got all of your basic components together. Now go back into the camper and make sure everything fits. At this point, you could secure the gate 'posts' if your happy with how it all fits. Personally, I had my wife hold the gate where I wanted it, then I marked it's position on the post that I was going to use for the hinges. I then took the whole assembly outside, and secured the hinges with everything flat on the ground. I did this so I could make extra sure all my clearances were correct, but it's an un-necessary step. All that's really critical here is that your posts are square with the camper walls and floor. You can always clearance the gate. To secure the 'posts' to the camper, I did the following; Each post (3 1/2" side flat against the bunks) got 6 screws. Two into the top bunk rail, two into the top of the bottom bunk frame, and then two more (4" screws this time) at an angle through the bottom of the 2x4 such that I caught the bottom peice of framing under the lower bunk, and probably some floor. For the top screws, make sure you screw in about 1 1/2" down from the top of the 2x4. This should get you into the framing of the top bunk, and not just the rail. Next it's time to attach the gate. If your measurements are the same as mine, setting it up so you have a 2" gap up top, will give you just about 1/4" above the bottom of the bed. Originally, I had planned on securing a second set of 2x4's, sandwitched against the inside of the first, but it proved un-necissary. Secured as I have described it, it's easy to shake the entire camper by yanking on the 2x4's, with no indication that ANYTHING is loose. Now, for the gate attachment, a helper is pretty much required. Make sure your top gap stays at an even 2" or it'll look pretty nasty when your done. I also setup mine with the hinges to the right, so that if we are all inside during a rain storm, we can leave the gate open and still sit on the bottom bunk, without having to constantly move the gate door. Once you have it all assembled, it'll be time to break out the sand paper. Round all your corners, on the gate ends, 2x4 ends, etc. This will prevent spinters. Then just hit the top, sides, and bottom of the gate to make sure there aren't any little burrs waiting to find their way into tiny fingers. If the last bit is a bit vague, it's because I don't have a hard and fast method to get the gate to fit exactly right...you (or at least I) had to fuss with it a bit to get it to open/close properly and be square with the bunks. If you get here, and need some help, just PM me and I'll be happy to offer some advice, or answer any questions. When you are done (but before you stain) you should have something that looks like this: 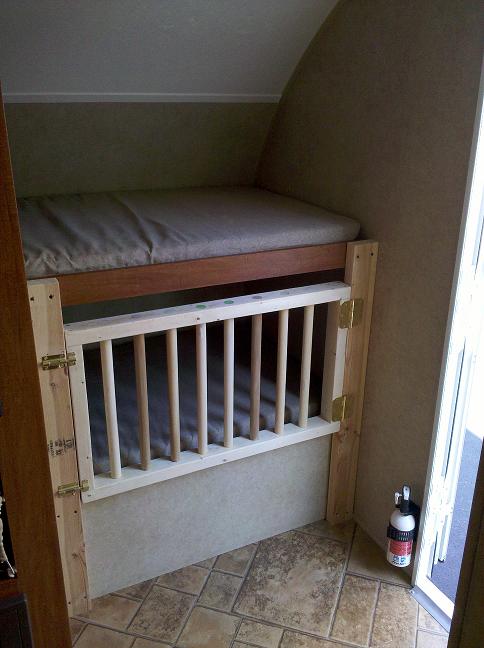 |
|
 |
|
|
FISHTAIL
podders Helping podders - pHp
Joined: 08 Jun 2011 Location: La Plata, MD Online Status: Offline Posts: 130 |
Posted: 11 Jul 2011 at 12:15am |
|
If people really want some additional photos of some of the concepts above, please post what you are having trouble following, and I'll re-produce what I was talking about with some scrap wood and snap pictures.
|
|
|
|
|
Snowbound
Senior Member

Joined: 17 Apr 2011 Location: Edmonton, AB Online Status: Offline Posts: 270 |
Posted: 13 Jul 2011 at 11:55am |
|
Wow! That looks sturdy enough to keep in lions and tigers!
B
|
|
|
Tom and Bette
in our 177 "The Gastropod" |
|
|
|
|
FISHTAIL
podders Helping podders - pHp
Joined: 08 Jun 2011 Location: La Plata, MD Online Status: Offline Posts: 130 |
Posted: 13 Jul 2011 at 12:23pm |
LOL, you obviously haven't spent any time around my 14 month old...he's a little monster. It's super sturdy though, you can shake the entire camper with it easily. I had intended to do the writeup from the get-go, since the other person who did something similar didn't leave any instructions...but it was so daggon miserable outside that I got focused on working and forgot about taking pictures. If nothing else, it would have broken up the text some. It was actually a pretty simple job, but I wanted to take some time to write up a good step by step for anyone who's not comfortable building things themselves. Otherwise, just general measurements would be enough for most folks, which is why I put that at the top. In a stroke of luck, Sherwan williams called me today, and they think they have the stain color matched. So with a little bit of free time, it should even be stained to match before I give the camper it's first trial run Friday.
|
|
|
|
|
Snowbound
Senior Member
Joined: 17 Apr 2011 Location: Edmonton, AB Online Status: Offline Posts: 270 |
Posted: 13 Jul 2011 at 12:36pm |
|
IMO your final picture is enough to give anyone an idea of what they are trying to build. I really like that you started with your list of tools and parts list. Too many people forget that not everyone has a garage full of every sort of tool imaginable. (I know, I know. Then you get to go buy something, right, boys?)
Just needs a "Do not feed the animals" plaque underneath...
|
|
|
Tom and Bette
in our 177 "The Gastropod" |
|
|
|
|
FISHTAIL
podders Helping podders - pHp
Joined: 08 Jun 2011 Location: La Plata, MD Online Status: Offline Posts: 130 |
Posted: 13 Jul 2011 at 1:37pm |
Thanks. And yes, new projects get new tools:). It's a man rule..lol. Btw, I LOVE the plaque idea..definitely buying one of those.
|
|
|
|
|
Podsible Dream
podders Helping podders - pHp

Joined: 03 Dec 2010 Location: Hightstown, NJ Online Status: Offline Posts: 571 |
Posted: 13 Jul 2011 at 6:05pm |
|
Guess you folks aren't a family that doesn't believe in playpens!!

|
|
|
Chris and Walt
'10 RP-171 'Free Spirit' '13 Dodge Durango Crew 5.7 L Hemi V8 |
|
|
|
|
techntrek
Admin Group - pHp 
Joined: 29 Jul 2009 Location: MD Online Status: Offline Posts: 9059 |
Posted: 13 Jul 2011 at 10:40pm |
|
If you DO get a matching stain, let us know, nobody has found the holy grail yet. Just "close".
|
|
|
|
|
FISHTAIL
podders Helping podders - pHp
Joined: 08 Jun 2011 Location: La Plata, MD Online Status: Offline Posts: 130 |
Posted: 13 Jul 2011 at 10:40pm |
Oh we haul pack-n-plays everywhere, but I didn't want to waste a ton of space in the camper with one, then have to scoot around it when I go to bed, which is usually 2-3 hours after the kid. If we had a bigger camper, I would have probably gone that route, but as it is, it made more sense to me to use existing space for his playpen. He can't quite stand up in there, but he can crawl all around and he likes it. |
|
|
|
|
FISHTAIL
podders Helping podders - pHp
Joined: 08 Jun 2011 Location: La Plata, MD Online Status: Offline Posts: 130 |
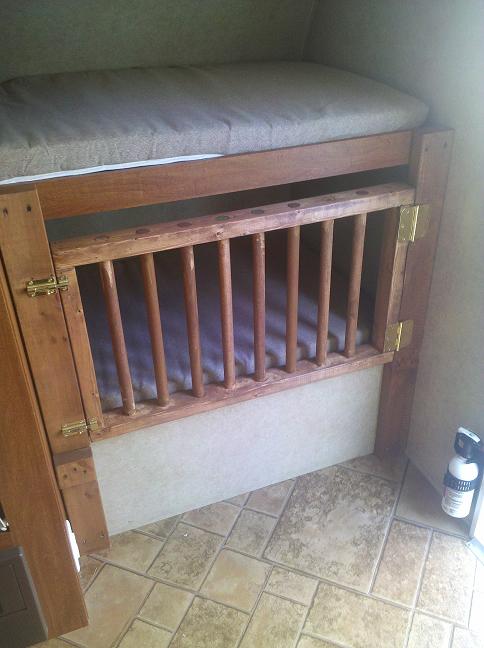
Posted: 14 Jul 2011 at 9:29pm |
|
Completed with stain, not an exact match, but close enough for now:
 |
|
|
|
|
Post Reply
|
| Forum Jump | Forum Permissions You cannot post new topics in this forum You cannot reply to topics in this forum You cannot delete your posts in this forum You cannot edit your posts in this forum You cannot create polls in this forum You cannot vote in polls in this forum |


")


 R-Pod Child Gate DIY (R-Pod 176)