
|
|
Post Reply 
|
Page 12> |
| Author |
 Printable Version Printable Version Google Google Delicious Delicious Digg Digg StumbleUpon StumbleUpon Windows Live Windows Live Yahoo Bookmarks Yahoo Bookmarks reddit reddit Facebook Facebook MySpace MySpace Newsvine Newsvine Furl Furl Topic Search Topic Search  Topic Options Topic Options
|
Grant177 
Groupie 
Joined: 15 Mar 2020 Location: Edmonton, AB Online Status: Offline Posts: 65 |
 Topic: 10 year old R-Pod Maintenance Topic: 10 year old R-Pod MaintenancePosted: 03 Jun 2020 at 9:38am |
|
So, the history of my R-Pod is a bit of an unknown and I'm looking for suggestions for anything else I should be "testing" before heading out on a real camping trip. It is a 2011, but is literally brand new. I bought it at an auction last fall and never had a chance to touch it before winter hit, so this spring is the first we've used it and we are getting ready to go on our first camp next week. Interestingly, there was not a single sign of wear or use anywhere. The steps, tires - everything...not the slightest scuff mark etc. Looked like a brand new, 10 year old trailer. I could not even get the safety pin in the hitch...paint was still in the hole. So, in reality, it looks like someone purchased it, then never used it, and it sat for 10 years....really hard to say. As you may have seen in my water pump "help" thread, doing an at-home "test" run exposed a problem withe water pump system which seems to be resolved now. Anyways, so far, I've done the following:
We'll test the AC when we go camping next week (though we will not need it here) as I don't have 30A power at home to turn it on. Some things I've noticed (which I am not sure I can do anything about)
What else should I be looking for or doing? |
|
|
Grant
2011 R-Pod 177 |
|
 |
|
|
StephenH
podders Helping podders - pHp 

Joined: 29 Nov 2015 Location: Wake Forest, NC Online Status: Offline Posts: 6289 |
Posted: 03 Jun 2020 at 10:18am |
|
I'll start in reverse order. Slide-out seals need to be conditioned. Protect-All Slide-Out Rubber Seal Treatment is what I use. It provides UV protection as well as reducing friction. Also, you can look at the inside lip of the slide-out to see where the gaps are. You might be able to install some weatherstripping to help close up the gaps. I seem to be very attractive to mosquitoes so I like to keep them out also. I have a small bug-zapper flyswatter that is useful for those few that do get in regardless of all attempts I make to keep them out. Window seals: Addressed in the other post. Refrigerator: Is your RPod level (or very nearly level)? This type of refrigerator needs to be close to level for it to work properly. Are you running it on AC? DC? Propane? That would help in the diagnosis. What setting do you have it on? The lights are reverse of what you might think. The setting is more bars = cooler and less bars = warmer. Also, these take a long time to cool. It can take a day or longer for it to get down to proper temperature. If the ambient temperature is very high, don't expect it to be able to overcome that easily. If the sun is shining on that side of the trailer, it will not help at all. Check the refrigerator's burner if you are using propane. Is it a clear, steady flame? Is the flue clear? Even if it was not used much, the jet may need to be cleaned and/or the burner itself may need to be cleaned. Make sure no spiders or wasps have been building webs/nests in there. Have you taken a thermometer and put it inside the refrigerator? The freezer compartment to get actual temperatures? "Not that cold" is not very precise. It helps to know if it is reaching proper freezing and refrigerator temperatures. Putting an ice tray in the freezer can let you know if it is getting cold enough to at least freeze the water. If the refrigerator is getting down to below 40F, that is not too bad.
|
|
|
StephenH
Happy is the man that findeth wisdom,... ouR escaPOD mods Former RPod 179 Current Cherokee Grey Wolf 24 JS |
|
|
|
|
Grant177
Groupie
Joined: 15 Mar 2020 Location: Edmonton, AB Online Status: Offline Posts: 65 |
Posted: 03 Jun 2020 at 10:34am |
|
Thanks for the comments Stephen...
The gaps in the slide are really only underneath where the mechanical track is....I'll try take a picture later today. Yes, the R-Pod is perfectly level. It was on AC at the time (though I have tested the propane as well), and running all the lights on the temperature....(the "bigger" snow flake) which I am sure is more cold. I'll try get a temperature and/or make some ice cubes as a test later on. I'll report back...
|
|
|
Grant
2011 R-Pod 177 |
|
|
|
|
offgrid
Senior Member
Joined: 23 Jul 2018 Online Status: Offline Posts: 5290 |
Posted: 03 Jun 2020 at 11:10am |
|
Grant, you should be able to run the air conditioner at home on a 15A or 20A circuit to test it, as long as nothing else is on in the trailer, including shutting off the battery charger/converter using its circuit breaker. Also be sure the water heater element is shut off. There are two ways to do that, there is a switch hidden toward the bottom left inside the outside water heater access door and there is a dedicated breaker for it in the panel.
Since you can burn the element out if there is no water in the water heater its best to always leave it off unless you are actually going to use it. Have you tested it and the gas water heating? They are independent systems so can be used either separately or together, but test them separately.
A couple other suggestions for a 10 year old unused trailer to be sure things are working: Have you confirmed that the battery charger/converter works and charges the battery when its on and plugged in? You can best do that with a voltmeter, it should show a battery voltage over 13 if the battery is fully charged and the converter is working. Have you set up the brakes on your brake controller and know they are working correctly on both sides? If you use your controller (not your tow vehicle brakes to gently stop the rig a few times from around 35 to 40 mph both drums should be hot but not smoking hot. Vent fan works and cover opens and closes OK? No water leaks anywhere inside or out? Outside shower works? As StephenH says. be patient with these absorption fridges. They have ammonia in them as the refrigerant and will slowly corrode from the inside even when not being used. They have a useful life of around 10 years give or take a few, so you might want to budget for a new fridge before too long. |
|
|
1994 Chinook Concourse
1995 RV6A Experimental Aircraft 2015 Rpod 179 - sold |
|
|
|
|
jato
Senior Member

Joined: 23 Feb 2012 Location: Kewadin, MI Online Status: Offline Posts: 3227 |
Posted: 03 Jun 2020 at 2:09pm |
|
One thing I found out about the fridge on our 2011 177 after 3 years of ownership was that the bi-metal switch on the rear of the fridge was located too low/far away from the cooling stack. By moving it up and closer to the cooling stack, the 2 muffin fans come on much sooner and run longer resulting in a fridge that will be much colder inside. To locate the bi-metal switch on the rear of the fridge look for the 2 red wires that come together at the switch, it is held in place by a clip, easy to move.
|
|
|
God's pod
'11 model 177 '17 Ford F-150 4WD 3.5 Ecoboost Jim and Diane by beautiful Torch Lake "...and you will know the Truth and the Truth will set you free." |
|
|
|
|
Grant177
Groupie
Joined: 15 Mar 2020 Location: Edmonton, AB Online Status: Offline Posts: 65 |
Posted: 04 Jun 2020 at 9:54am |
Is this easily accessible from outside the trailer? I am not familiar with accessing that area.
|
|
|
Grant
2011 R-Pod 177 |
|
|
|
|
marwayne
Senior Member

Joined: 25 Oct 2011 Location: Edmonton AB Can Online Status: Offline Posts: 1002 |
Posted: 04 Jun 2020 at 10:35am |

|
|
|
If you want something done right, do it yourself.
2011 RP172, 2016 Tundra 5.7 Litre, Ltd. |
|
|
|
|
Grant177
Groupie
Joined: 15 Mar 2020 Location: Edmonton, AB Online Status: Offline Posts: 65 |
Posted: 06 Jun 2020 at 5:25pm |
|
OK....so that looks exactly the same as mine....I think....so I am not sure what you mean by "moving it up"....
This is mine... 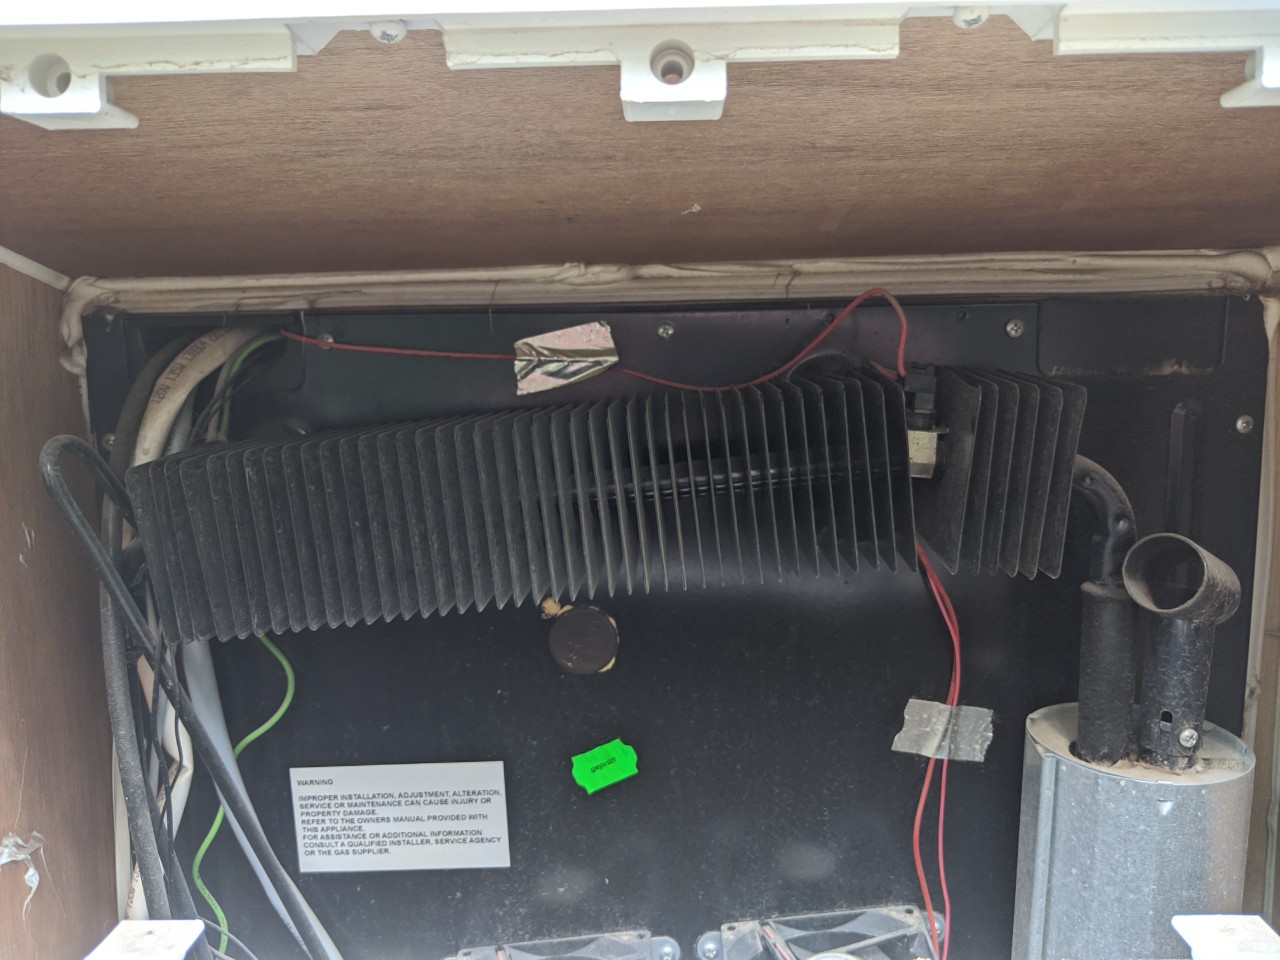 |
|
|
Grant
2011 R-Pod 177 |
|
|
|
|
jato
Senior Member
Joined: 23 Feb 2012 Location: Kewadin, MI Online Status: Offline Posts: 3227 |
Posted: 06 Jun 2020 at 7:53pm |
|
Looking at Marwayne's excellent shot you will see 6 or 7 fins to the right of the bi-metal switch. Move the switch to the right of those 6-7 fins closer to the cooling/heat stack. Mine was originally placed lower down but in this case, as marwayne's picture shows, just move yours closer to the stack. Mine is 1.5" away from the top of the stack.
|
|
|
God's pod
'11 model 177 '17 Ford F-150 4WD 3.5 Ecoboost Jim and Diane by beautiful Torch Lake "...and you will know the Truth and the Truth will set you free." |
|
|
|
|
Pod People
Senior Member
Joined: 22 Sep 2011 Location: Chapel Hill,NC Online Status: Offline Posts: 1067 |
Posted: 06 Jun 2020 at 8:17pm |
|
Grant177- I think your sensor is on the left side of the cooling fins--it needs to be on the right side to make the fans come on sooner. Marwayne's picture is showing it located about 5-6 fins into the fin structure at the small break in the upper fins --which obviously works for him. My sensor is also on the far right, but is just before the very first fin band before the tube begins it's vertical drop. I have it as close to the first fin as possible. My fans stay on longer since this is the hottest area. Try it and see which way works for the way you use the refrigerator /freezer. The whole idea is to turn the fans on in order to evacuate as much generated heat as possible in order for the fins to be more efficient and make the refrigerator more responsive and efficient. Vann
|
|
|
Vann & Laura 2015 RPod 179 
|
|
|
|
|
Post Reply
|
Page 12> |
| Forum Jump | Forum Permissions You cannot post new topics in this forum You cannot reply to topics in this forum You cannot delete your posts in this forum You cannot edit your posts in this forum You cannot create polls in this forum You cannot vote in polls in this forum |


 10 year old R-Pod Maintenance