
|
|
Post Reply 
|
| Author |
 Printable Version Printable Version Google Google Delicious Delicious Digg Digg StumbleUpon StumbleUpon Windows Live Windows Live Yahoo Bookmarks Yahoo Bookmarks reddit reddit Facebook Facebook MySpace MySpace Newsvine Newsvine Furl Furl Topic Search Topic Search  Topic Options Topic Options
|
Blender Bob 
Groupie 

Joined: 11 Mar 2018 Location: Colorado Online Status: Offline Posts: 48 |
 Calendar Event: My 110V Inverter installation - 178HRE Calendar Event: My 110V Inverter installation - 178HREPosted: 14 Oct 2018 at 2:39pm |
|
Earlier this summer I installed a Whistler Pro-1200 watt inverter to get more out our dry camping in my 2018 R-pod 178 HRE. Based in Colorado, I camp mostly where A/C is not needed, but I would like to have the laptop, TV, microwave, TIVO box, exterior lights (red Xmas light to keep night vision), blender and other creature comforts while being off the grid and remote. As you can see by this list, I need some 110V but do not want to have the trouble and noise of a generator. After a bunch of calcs and a few failed starts, I got’r done! I did not want to compromise the R-pod with holes by having the solution inside the TT. Having tested my inverter, I plan to use the std 30A cable with a 30A to 20A plug converter, without ground, into my inverter. To keep cables short, I elected to build a box for on top of the two battery cases. I first failed to find a right sized box and then failed to also build one out of PVC. So, I went to fabricating with wood using construction (not deck) screws, some simple hinges and sash closures. I got some really tight weather joints with this technique. I started with a fir 2x10(actually 9”) to make a 9”x16” base to mount the inverter. I notched the end to have power cable inside the edge and mounted the inverter with room on all sides for air circulation, yet away from the edge to avoid wet weather. I also made notches for the power cables. Then, I built a 3-sided tunnel out of clear 1x8 pine. Sides are 7.5”x16”, the top made 1x8 pieces. The tunnel fits over and is screwed into the side of the 2” base. I added OSB doors opening up for more weather protection and use removeable boards to slide in and hold them open during operation. Door closures are on the bottom. Coated everything with outdoor house paint. Finally, the Inverter is connected to the battery with some 18” x 6AWG cables. When all closed up, it looks pretty disguised. The base board between the frame and the box is another 2x10. I cut a 27” board with 3.25” notches in from the sides, 2.5” from the bottom to create a “T” that sits right behind the propane tanks. Metal strapping connects the box to the base. Two 1200lb straps tie the whole thing to the R-pod Frame. After a couple of trips, it works great! I get about 15 -20 min of microware before getting to 50%. I have my blender going, party lights, watch movies on a rainy day, and more. My 120W solar panels puts about 30 to 45Ah back into the batteries per fun-sun day. Below are some pics and additional commentary. Note: Angle is not square to let doors fully open, a bit a plastic to avoid vibration damage to Rpod  Added block, center, behind board to stabilize against frame 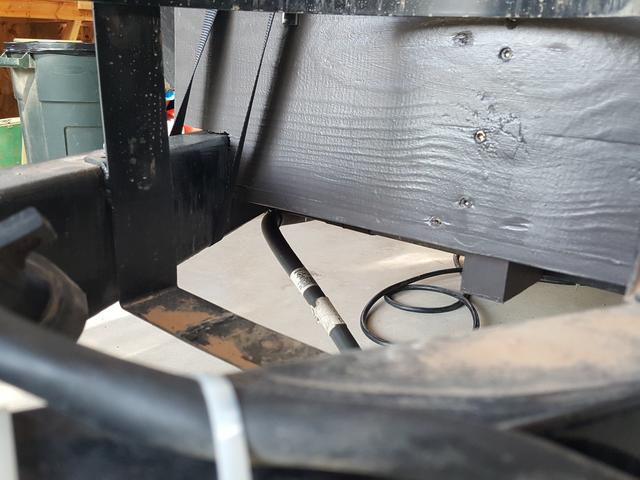 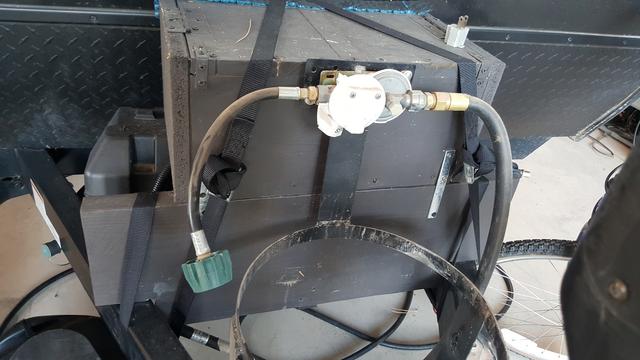   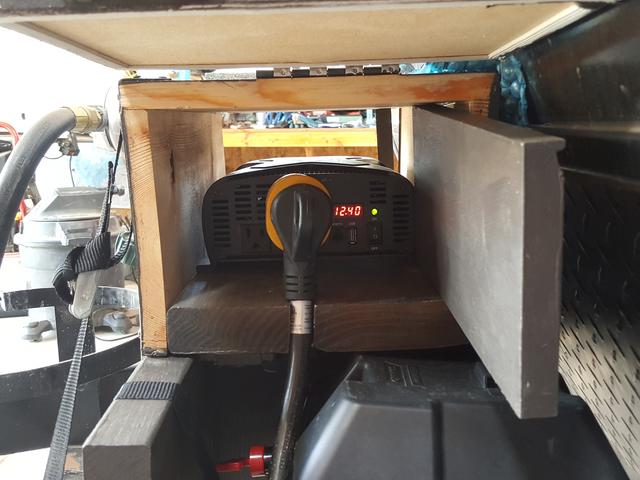   |
|
|
Bob
2015 Chevy Colorado Z71 2018 178 R-pod Hood River Edition |
|
 |
|
|
Post Reply
|
| Forum Jump | Forum Permissions You cannot post new topics in this forum You cannot reply to topics in this forum You cannot delete your posts in this forum You cannot edit your posts in this forum You cannot create polls in this forum You cannot vote in polls in this forum |


 My 110V Inverter installation - 178HRE - Event Date: 14 Oct 2018