
|
|
Post Reply 
|
Page 12> |
| Author |
 Printable Version Printable Version Google Google Delicious Delicious Digg Digg StumbleUpon StumbleUpon Windows Live Windows Live Yahoo Bookmarks Yahoo Bookmarks reddit reddit Facebook Facebook MySpace MySpace Newsvine Newsvine Furl Furl Topic Search Topic Search  Topic Options Topic Options
|
GlueGuy 
Senior Member 

Joined: 15 May 2017 Location: N. California Online Status: Offline Posts: 2630 |
 Topic: First few mods to 179 - this is fun! Topic: First few mods to 179 - this is fun!Posted: 14 May 2018 at 7:18pm |
|
|
|
bp
2017 R-Pod 179 Hood River 2015 Ford F150 SuperCrew 4WD 3.5L Ecoboost |
|
 |
|
|
TheBum
Senior Member
Joined: 26 Feb 2016 Location: Texas Online Status: Offline Posts: 1407 |
Posted: 14 May 2018 at 3:01pm |
|
Does nobody else have problems extending the top drawer under the sink? I tried it once, but the extension hit the drain trap and wouldn't allow the drawer to close.
|
|
|
Alan
2022 R-Pod 196 "RaptoRPod" 2022 Ram 1500 Lone Star 4x4 Three cats |
|
|
|
|
Ben Herman
Senior Member
Joined: 26 Apr 2018 Location: Gr Junction, CO Online Status: Offline Posts: 355 |
Posted: 10 May 2018 at 1:41pm |
No problem, if you need more info let me know - I'm a newbie but have already gotten so much help from other forum members.
|
|
|
|
|
DavMar
Senior Member

Joined: 04 Aug 2017 Location: Lexington, NC Online Status: Offline Posts: 592 |
Posted: 10 May 2018 at 9:23am |
|
Got it Ben Herman, thanks! If need be I want to know my options for attachment when I do the same shelf mod so much appreciated.
|
|
|
Dave & Marlene J with Zoey the
wonder dog. 2017 Rpod 180 2016 Toyota Tacoma SR5 4x4 Lexington, NC |
|
|
|
|
Subzilla
Senior Member

Joined: 23 Jan 2017 Location: Concord, NC Online Status: Offline Posts: 302 |
Posted: 10 May 2018 at 8:11am |
|
And according to the experts here, our wall thickness is 1-5/16" thick so a 1" bolt is good.
|
|
|
Mark
Concord, NC 2017 RP 179 "Podzilla" 2011 Silverado 1500 4X4 |
|
|
|
|
Ben Herman
Senior Member
Joined: 26 Apr 2018 Location: Gr Junction, CO Online Status: Offline Posts: 355 |
Posted: 09 May 2018 at 10:38pm |
This is the type of anchor that I used: 1 inch long. I think that 1 1/8" might punch through. I can get them at my local True Value hardware. 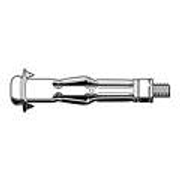 |
|
|
|
|
DavMar
Senior Member
Joined: 04 Aug 2017 Location: Lexington, NC Online Status: Offline Posts: 592 |
Posted: 09 May 2018 at 10:20pm |
|
Ben Herman, thanks for the photos and explanations I really like seeing how you did your shelf and ran the wiring. I have some questions though like what is a "molly bolt" for hallow core doors? Also I believe our Pod walls are only about 1" thick and you said you used these molly bolts that are 1" long so it makes me wonder how you avoid punching through the wall? I know these might be stupid questions but it has me scratching my head because I believe when I used a 1 1/8" screw to replace the awning support bracket screws the tips poked through the wall into the interior and I had to replace them with 1" screws if I remember correctly.
|
|
|
Dave & Marlene J with Zoey the
wonder dog. 2017 Rpod 180 2016 Toyota Tacoma SR5 4x4 Lexington, NC |
|
|
|
|
Subzilla
Senior Member
Joined: 23 Jan 2017 Location: Concord, NC Online Status: Offline Posts: 302 |
Posted: 09 May 2018 at 2:55pm |
|
Very nice! Never thought about doing something with the sink insert. Cool idea!
|
|
|
Mark
Concord, NC 2017 RP 179 "Podzilla" 2011 Silverado 1500 4X4 |
|
|
|
|
Ben Herman
Senior Member
Joined: 26 Apr 2018 Location: Gr Junction, CO Online Status: Offline Posts: 355 |
Posted: 09 May 2018 at 10:43am |
|
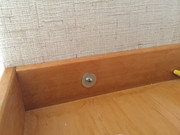
DavMar - here's a few more photos to show you how I attached the sides to the RPod walls. Basically three 1 inch molly bolts (made for hollow-core doors) per side. It was definitely a 2-person job; got my son to help. Pre-drilled the holes in the shelf ends, got it into position and marked the holes with an awl. Then removed the shelf, drilled pilot holes and installed the anchors into the walls. Removed bolts from anchors, re-positioned shelf, then got bolts into anchors. Yes, there were some choice 4-letter words involved in the process, getting everything lined up. Once the anchors are in, there's very little tolerance.
  here are some images showing how the plywood is inserted into the shelf frame. Basically, its a groove that is just a hair wider than the plywood. Just like drawer construction. I only use glue on the fame pieces and let the plywood float. Just a 1/2" pin brad every 6 inches to keep the plywood from pulling out of the groove. 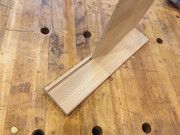 |
|
|
|
|
Ben Herman
Senior Member
Joined: 26 Apr 2018 Location: Gr Junction, CO Online Status: Offline Posts: 355 |
Posted: 08 May 2018 at 9:29pm |
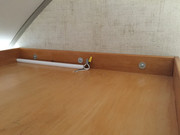
I pulled the led light above the bed and ran a wire from it in a plastic channel along the ceiling to the back of the shelf. Word to the wise - if planning to do this, install the lights and wiring on the shelf before installing the shelf; unless you enjoy working on your back on the bed, that is.
|
|
|
|
|
Post Reply
|
Page 12> |
| Forum Jump | Forum Permissions You cannot post new topics in this forum You cannot reply to topics in this forum You cannot delete your posts in this forum You cannot edit your posts in this forum You cannot create polls in this forum You cannot vote in polls in this forum |


 First few mods to 179 - this is fun!