
|
|
Post Reply 
|
Page <12 |
| Author |
 Printable Version Printable Version Google Google Delicious Delicious Digg Digg StumbleUpon StumbleUpon Windows Live Windows Live Yahoo Bookmarks Yahoo Bookmarks reddit reddit Facebook Facebook MySpace MySpace Newsvine Newsvine Furl Furl Topic Search Topic Search  Topic Options Topic Options
|
DavMar 
Senior Member 

Joined: 04 Aug 2017 Location: Lexington, NC Online Status: Offline Posts: 592 |
 Topic: First few mods to 179 - this is fun! Topic: First few mods to 179 - this is fun!Posted: 08 May 2018 at 9:25pm |
|
Sorry about the head bump Ben Herman. Look forward to more detailed photos and if I may ask how did you wire up the puck lights, where did you find a 12 Vdc wire to splice in for power?
|
|
|
Dave & Marlene J with Zoey the
wonder dog. 2017 Rpod 180 2016 Toyota Tacoma SR5 4x4 Lexington, NC |
|
 |
|
|
Ben Herman
Senior Member
Joined: 26 Apr 2018 Location: Gr Junction, CO Online Status: Offline Posts: 355 |
Posted: 08 May 2018 at 9:06pm |
thx, pretty happy with it. For glue, I just used Titebond wood glue (my go-to for all things wood). I'll post a photo of how I attach the plywood to the frame; basically, I cut a 3/16" groove into the sides of the frame and the plywood is recessed into it. Pretty easy to do with a table saw. I'll also post close-ups of wall attachment tomorrow, with better light. With 3 mollys on each side, its pretty darn sturdy; already bonked my head on it once (when getting underneath the mattress to check the water heater) and it didn't budge it a bit. Made a pretty good gash in my head, though...
|
|
|
|
|
DavMar
Senior Member
Joined: 04 Aug 2017 Location: Lexington, NC Online Status: Offline Posts: 592 |
Posted: 08 May 2018 at 8:50pm |
|
Ben Herman, one word....impressive! Great job but I'd really like to see a detail photo or drawing on how you attached the shelf over the bed. Also did you use contact cement to glue the lauan to the plywood? Again very nice!
|
|
|
Dave & Marlene J with Zoey the
wonder dog. 2017 Rpod 180 2016 Toyota Tacoma SR5 4x4 Lexington, NC |
|
|
|
|
Leo B
podders Helping podders - pHp
Joined: 13 Jan 2012 Location: Lyndonville, VT Online Status: Offline Posts: 4508 |
Posted: 08 May 2018 at 2:38pm |
|
Nice work! It is really fun doing projects!
|
|
|
Leo & Melissa Bachand
2017 Ford F150 2021 Vista Cruiser 19 csk Previously owned 2015 Rpod 179 2010 Rpod 171 |
|
|
|
|
Ben Herman
Senior Member
Joined: 26 Apr 2018 Location: Gr Junction, CO Online Status: Offline Posts: 355 |
Posted: 08 May 2018 at 2:23pm |
|
Forgot to mention - I purchased two 4 1/2" LED puck lights to match the others in the pod from Amazon:
Wired them into the light above the bed. I put one on each end as reading lights.
|
|
|
|
|
Ben Herman
Senior Member
Joined: 26 Apr 2018 Location: Gr Junction, CO Online Status: Offline Posts: 355 |
Posted: 08 May 2018 at 2:18pm |
|
Hi all - finished my first few mods to new (to me) 179. The first thing that I did was to resize the drawers to maximum depth; plenty of other posts about that mod, so no photos here unless anyone want to see them. Used 3/8" plywood for sides and 3/16" underlay plywood for drawer bottoms. Reused all original hardware and drawer faces.
First up is a replacement for the sink insert. It's a cutting board made from a 1/2" hdpe cutting board I purchased at the local restaurant supply store for $12. I used the formica insert as a template, using double-sided tape to hold the two together, than a router template bit w/bearing to cut out the shape. Used a rounding-over bit to profile the edge on both sides, and shes done!  Second mod was a small shelf above the sink. Used similar material but 3/8" thick. Cut to size on table saw (3 1/4" width), secured the edge to a small mounting board of the same material using Loctite Plastic Bonding Glue; attached to wall with an anchor on one side and into a 1x2 next to the sink on the other side. Sorry for the bad photo; light coming in through the skylight makes it tough to manage.  Last one was the biggest, and one that I'm most excited about. I built a shelf above the bed, and partitioned it to hold plastic storage bind that we purchased from Kohls. They look like this: They're 11x13x8" high, and the shelf unit holds 6 of them. We use them to hold our clothes. Its a simple but effective system; take the baskets in the house, load them up, stack them and carry them out to the trailer. I built the shelf using 3/16" lauan underlayment plywood and 1/2" hemlock lumber, both from Lowes. Plywood is inset into grooves in the hemlock, glued and pin-nailed. The unit is attached to the walls on each end with 3 - 1" molly bolts. I removed the valances and mounted them just above the mini blinds. Finished with a coat of shellac and 3 coats of satin finish polyurethane. Thought about trying to match the trim stain but decide to go with natural wood look. 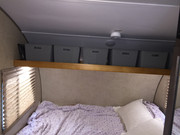 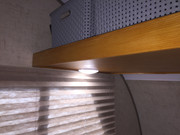 I'll try to take better photos when the light is better. On to the next project! |
|
|
|
|
Post Reply
|
Page <12 |
| Forum Jump | Forum Permissions You cannot post new topics in this forum You cannot reply to topics in this forum You cannot delete your posts in this forum You cannot edit your posts in this forum You cannot create polls in this forum You cannot vote in polls in this forum |


 First few mods to 179 - this is fun!