
|
|
Post Reply 
|
Page <1234 10> |
| Author |
 Printable Version Printable Version Google Google Delicious Delicious Digg Digg StumbleUpon StumbleUpon Windows Live Windows Live Yahoo Bookmarks Yahoo Bookmarks reddit reddit Facebook Facebook MySpace MySpace Newsvine Newsvine Furl Furl Topic Search Topic Search  Topic Options Topic Options
|
StephenH 
podders Helping podders - pHp 

Joined: 29 Nov 2015 Location: Wake Forest, NC Online Status: Offline Posts: 6453 |
 Topic: SLO-Pod 180 mods, John&Sue Topic: SLO-Pod 180 mods, John&SuePosted: 05 Mar 2017 at 9:45pm |
|
How hard is the Pakari? Does the thermal modification harden it to be more resistant to dents, etc. than the original pine would be? This is the first I've heard of it. I have not seen it on the east coast.
|
|
|
StephenH
Happy is the man that findeth wisdom,... ouR escaPOD mods Former RPod 179 Current Cherokee Grey Wolf 24 JS |
|
 |
|
|
voisj
Senior Member

Joined: 19 Jul 2016 Location: San Luis Obispo Online Status: Offline Posts: 471 |
Posted: 05 Mar 2017 at 10:25pm |
|
Stephan & Texman,
Here's a link to the Kelleher & pakari sites, it's Radiata Pine. I'm told there are a few companies making it, just search for thermally modified wood. They sell it mostly for decking in 1 1/2" buy 5 1/2", I buy the 5/8 x 8 " skirting material for siding and outdoor table tops, mostly because it's very stable when sealed, and very light. As far as hardness goes it's not near as hard as teak or other south american hardwoods but harder than redwood and will dent if hit hard. Drills really easy, to easy, so,ya it's soft. Just pulled this from the website. "Although
Pakari TMD looks like a high-priced hardwood, it is still
a softwood like redwood and cedar, and therefor can
dent, scratch and check." You can see in the pictures that i ripped it to 1-1/4" wide and used wood spacers to give it that boat swim step look. I drilled through each section and ran a 1/8"all thread front to back with a cap nut on each side, hoping it wouldn't tweak in the weather. I made it in November and It's been on the pod for three trips and three weeks with rain and still is flat as can be.  |
|
|
|
|
fonseca179
Newbie 
Joined: 19 May 2015 Location: United States Online Status: Offline Posts: 38 |
Posted: 06 Mar 2017 at 7:50am |
|
Which slideout cover is that? Was the install simple?
|
|
|
|
|
texman
Senior Member
Joined: 24 Jul 2014 Location: TeXas Online Status: Offline Posts: 446 |
Posted: 06 Mar 2017 at 8:35am |
|
John
Thanks, that would be great if you have some pics. i really like that table and am currently out of mods on my list, for now.  |
|
|
|
|
StephenH
podders Helping podders - pHp
Joined: 29 Nov 2015 Location: Wake Forest, NC Online Status: Offline Posts: 6453 |
Posted: 06 Mar 2017 at 8:43am |
|
Thank you for the information. I'll look into it and see what is available near me.
|
|
|
StephenH
Happy is the man that findeth wisdom,... ouR escaPOD mods Former RPod 179 Current Cherokee Grey Wolf 24 JS |
|
|
|
|
voisj
Senior Member
Joined: 19 Jul 2016 Location: San Luis Obispo Online Status: Offline Posts: 471 |
Posted: 06 Mar 2017 at 10:26am |
|
mike, The cover is a Carefree brand. The website explains how to measure and you can order direct from them, The dealer sells it for a few dollars less and they take responsibility for measuring. There are 2 versions, one with a metal cover for when it's closed to protect the fabric $$$, and 1 without $$. I got the one without the cover because the dealer had it sitting in the warehouse collecting dust and sold it to me at cost to move it. Since I keep the pod covered when I store it, it not really a problem. Here's what came in the tube. Looks daunting to install but wasn't really that bad. Took about an hour to install I used the stock rail that came on the pod instead of putting on new one that came with the kit, and i just cut the drip edge off of one side, it only slopes about 3/4" but works perfect. It's literally just slide fabric into kedder rail and set spring/fabric roll on roof, Mount brackets, insert spring, tighten a few screws, and pull spring pin. then install travel tension pin.     1 |
|
|
|
|
voisj
Senior Member
Joined: 19 Jul 2016 Location: San Luis Obispo Online Status: Offline Posts: 471 |
Posted: 06 Mar 2017 at 12:41pm |
|
Texman,
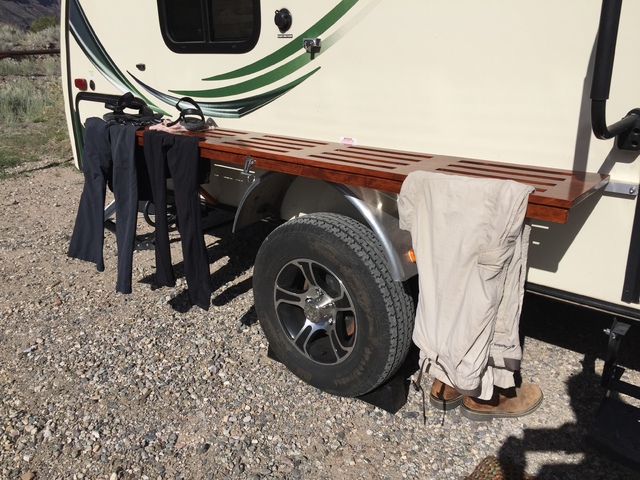
The table was a fun project and comes in handy when camping. Here's a brief step by step. The table is 78" long by 13" wide, (enough for a plate, she said). This length made it so the table would not interfere with the storage door, and the width so it wouldn't interfere with the windows when folded up. I used a 1/8" allthread at each spacer to help keep it flat and stable. First i ripped the wood into 7, 1-1/4" wide pieces, and 2, 3/4" wide pieces. then cut the 3/4" pieces into 25 center spacers( 1-1/2") and 10 end spacers (2-1/2"). I then laid out all the spacers and marked for drilling for a 1/8" allthread at each spacer location, and did a bunch of drilling, made a jig for this.   Next I put the allthread in, put a nut on one end of each allthread, and glued each section using waterproof glue starting from the back. And put clamps on it and put nuts on each allthread and tightened everything up. After it dried I sanded,rounded corners and clear coated it.  The extra Ripped piece of wood I added to the table with hinges. This piece mounts directly to the pod, the metal strap loops over the hinges are just insurance.  Then I mounted it to the pod using this nutzert tool I bought in a kit from harbor Freight. I drilled into 3 of the aluminum studs and set the 1/4-20 threads. I used stainless steel 1/4-20 pan head allen bolts with small rubber washers and had to hog out a small indent on the back of the mounted piece so it fit nice and flush   Here it is mounted. I used webbing strap to told it up and just adjust it until the shelf is level and to hold it to the wall during travel. There is a small rubber bump stop just below the upper strap mount to hold it off the wall so it doesn't rub the paint. The two metal strap loops near the middle were for shelf supports I welded up but turned out to not be necessary. I added small D rings at each end so i had a place to leash up the dog when we first hit he campground.   Let me know if you need any other info. rgds John
|
|
|
|
|
texman
Senior Member
Joined: 24 Jul 2014 Location: TeXas Online Status: Offline Posts: 446 |
Posted: 06 Mar 2017 at 1:45pm |
|
thanks again! need to do some measuring and may need a new tool. I have not used the nutsert, but a perfect tool for this.
|
|
|
|
|
jimandclare
Groupie 
Joined: 13 Apr 2016 Location: Erie, MI Online Status: Offline Posts: 96 |
Posted: 06 Mar 2017 at 2:46pm |
|
Yup, every project deserves a new tool! This just went on my mod to-do list - along with the lighting in the storage compartments. Thanks for sharing.
|
|
|
Jim & Clare
2016 R-pod 178 2014 Ford Edge |
|
|
|
|
fonseca179
Newbie
Joined: 19 May 2015 Location: United States Online Status: Offline Posts: 38 |
Posted: 07 Mar 2017 at 7:31am |
|
Thanks for the information. I think I will install one on my 179 this summer.
|
|
|
|
|
Post Reply
|
Page <1234 10> |
| Forum Jump | Forum Permissions You cannot post new topics in this forum You cannot reply to topics in this forum You cannot delete your posts in this forum You cannot edit your posts in this forum You cannot create polls in this forum You cannot vote in polls in this forum |


 SLO-Pod 180 mods, John&Sue