
|
ouR escaPOD mods |
Post Reply 
|
Page <1 678910 58> |
| Author |
 Printable Version Printable Version Google Google Delicious Delicious Digg Digg StumbleUpon StumbleUpon Windows Live Windows Live Yahoo Bookmarks Yahoo Bookmarks reddit reddit Facebook Facebook MySpace MySpace Newsvine Newsvine Furl Furl Topic Search Topic Search  Topic Options Topic Options
|
|
Patriot Dave 
Senior Member 
Joined: 06 Feb 2016 Location: LaSalle, Mi. 48 Online Status: Offline Posts: 206 |
 Post Options Post Options
 Quote Reply Quote Reply
 Topic: ouR escaPOD mods Topic: ouR escaPOD modsPosted: 26 Sep 2016 at 5:32am |
|
|
||
|
Dave & Joyce
Never Forget, In God We Trust; This Our National Motto. Member; Patriot Guard Riders, Michigan Chapter Retired; So Every Day is Saturday.... Except Sunday |
||
 |
||
|
StephenH
podders Helping podders - pHp

Joined: 29 Nov 2015 Location: Wake Forest, NC Online Status: Offline Posts: 6423 |
Post Options
Quote Reply
Posted: 26 Sep 2016 at 1:32pm |
|
I only used a partial tube for the Ultrabreeze installation. I did not remove the old sealant all the way around, just where the brackets needed to be. That reduced the amount of sealant needed. I did follow the instructions I saw to clean the area with denatured alcohol. It was surprising the amount of old dirt that came off of the old sealant. Proper preparation should ensure a good seal. |
||
|
StephenH
Happy is the man that findeth wisdom,... ouR escaPOD mods Former RPod 179 Current Cherokee Grey Wolf 24 JS |
||
|
||
|
Patriot Dave
Senior Member
Joined: 06 Feb 2016 Location: LaSalle, Mi. 48 Online Status: Offline Posts: 206 |
Post Options
Quote Reply
Posted: 26 Sep 2016 at 2:44pm |
|
Thanks Stephen for the tips. I will be installing mine this week......that is if I can get a day or two without rain. |
||
|
Dave & Joyce
Never Forget, In God We Trust; This Our National Motto. Member; Patriot Guard Riders, Michigan Chapter Retired; So Every Day is Saturday.... Except Sunday |
||
|
||
|
StephenH
podders Helping podders - pHp
Joined: 29 Nov 2015 Location: Wake Forest, NC Online Status: Offline Posts: 6423 |
Post Options
Quote Reply
Posted: 27 Sep 2016 at 10:24pm |
|
|
One thing that made me scratch my head, wondering what the designers were thinking were the drawers for the RP-179 wardrobe. When I looked, there was easily six inches of wasted space behind the drawers. In addition, the drawers are shallow. There is a big opening and a little drawer. I decided to do something about it.
First a trip to Lowe's again to purchase materials. I got 1/2" birch plywood for the frame and 1/4" birch plywood for the bottom. I cut the framework so that it would retain the same width as the original drawer when finished. I cut the length six inches longer and the height 1-1/2" higher. I cut a notch for the bottom and assembled with glue and used a nailer to fasten the corners. I verified that the drawers were square. Then I sanded them to smooth the edges with 80 grit sandpaper on a power sander followed by 220 grit to smooth it out in preparation for the finish. I used 3 coats of satin polyurethane which I got in the spray can to seal and protect them. I used the old front of the drawer to help guide me for drilling holes to fasten the faceplate. After I got it assembled and the sliders from the old drawer attached, I took it out for a test fit. While the additional 1-1/2" on the sides works well, it didn't work so well for the front and back due to the catch. Only adding 1" to the front and back panels would have worked. Since I have them built, I decided to make a notch for the catch both on the front and back panels. Once I did that, it fit well with just enough space top and bottom to clear the original opening without rubbing. I still need to transfer the faceplate and sliders for the other two drawers. I hope to get that done tomorrow. Until then, here is a picture to show the difference between the old and new drawers. 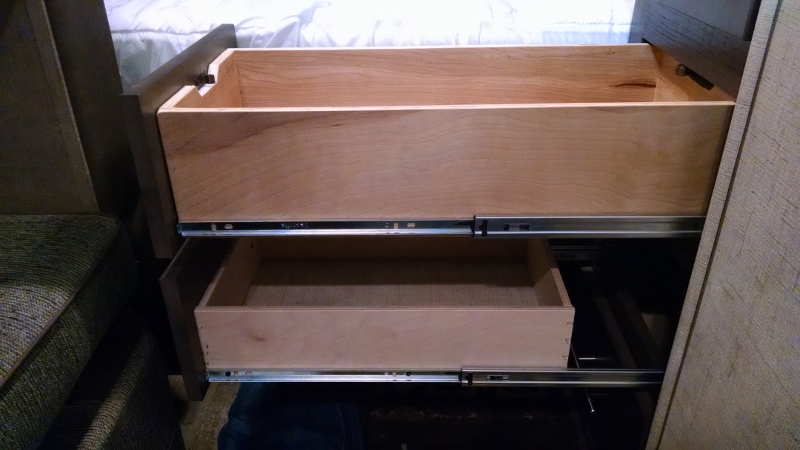 Edit: I would have liked to use the 3/8" plywood like the original drawers, but I could not find 3/8" birch plywood at either Lowe's or Home Depot. The only place I could find 3/8" birch plywood was at our local Michael's store. They would not have had enough to build all three drawers. For anyone interested, I used a table saw to do all of the cuts except the notch for the catch. That was done with a jigsaw and a clean-cut blade. |
||
|
StephenH
Happy is the man that findeth wisdom,... ouR escaPOD mods Former RPod 179 Current Cherokee Grey Wolf 24 JS |
||
|
||
|
Patriot Dave
Senior Member
Joined: 06 Feb 2016 Location: LaSalle, Mi. 48 Online Status: Offline Posts: 206 |
Post Options
Quote Reply
Posted: 28 Sep 2016 at 5:47am |
|
|
||
|
Dave & Joyce
Never Forget, In God We Trust; This Our National Motto. Member; Patriot Guard Riders, Michigan Chapter Retired; So Every Day is Saturday.... Except Sunday |
||
|
||
|
Shelpod
Groupie 
Joined: 14 Sep 2015 Location: Arizona Online Status: Offline Posts: 74 |
Post Options
Quote Reply
Posted: 28 Sep 2016 at 12:16pm |
|
|
Nice work. That is on my list to do some time soon. So I take it the original drawer slides still worked for the new drawers. That should make it all easier. Thanks for the write-up
|
||
|
Pod: 2013 178
TV: 2014 Explorer Limited with tow package |
||
|
||
|
StephenH
podders Helping podders - pHp
Joined: 29 Nov 2015 Location: Wake Forest, NC Online Status: Offline Posts: 6423 |
Post Options
Quote Reply
Posted: 28 Sep 2016 at 12:23pm |
|
|
The original slides work great. I put the bottom edge of the slide 1/4" from the bottom edge of the drawer. There was now also room to put a third screw in each side also, which should help make it more stable too. I did have to adjust the bottom drawer's catch as it was not positioned correctly. I saw that it had been in one position and moved by whoever installed it. Thus, I have extra holes there, but they aren't visible unless one looks there. I may fill the extra holes when I get a chance.The final position is very close to the original set of holes before it was moved by the installer. It is a very minor fit-and-finish item.
Here's a picture of the completed project: 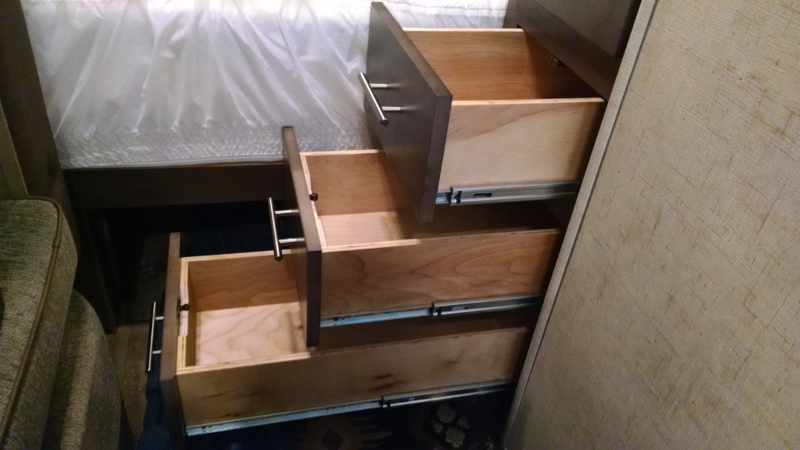 |
||
|
StephenH
Happy is the man that findeth wisdom,... ouR escaPOD mods Former RPod 179 Current Cherokee Grey Wolf 24 JS |
||
|
||
|
StephenH
podders Helping podders - pHp
Joined: 29 Nov 2015 Location: Wake Forest, NC Online Status: Offline Posts: 6423 |
Post Options
Quote Reply
Posted: 09 Oct 2016 at 8:58pm |
|
|
This is one instance of one upgrade requiring another one. I noticed that the vinyl tank cover was deteriorating. It was less than a year old, and I had already repaired it once, patching with black silicone sealant one area where the vinyl had split, showing the underlying padding. Not only was that splitting again, but other areas on the cover, such as the binding with the elastic were splitting. When I looked at replacements, I was not happy to see what another one of the same type would cost. When I saw that the 2017 R-Pods now have a hard cover, I decided that I would go that route also.
I purchased the Camco 40578 Black Heavy Duty Single Propane Tank Cover (20lb). It arrived and I assembled it. One thing I did not like was the way the parts were in a bag that was hot-glued inside one of the half-sections of the cover and the lid hardware in a bag hot-glued to the inside of the cover. This was not glue that would peel off. The glue was stronger than the bags the parts were in. I ended up scraping some of the glue off, using hot water to help soften it a little. When I write my review of this cover on Amazon, I will address this. Once it was assembled, I removed the old cover so I could install this one. The new cover has two tabs, one on each half. These are to fasten a bungee cord to help ensure the cover stays on. However, the bracket for the regulator is in the way, preventing access to the tab. I took my tools, including drill, jigsaw, and Dremel tool and cut a notch in the metal after bending the bracket a little to give more clearance between it and the cover. I also had to adjust my generator mount to allow an inch more space between the front support leg and the tank. Once I did these two things, the cover dropped on with some maneuvering and I was able to both get it into position and attach a bungee cord. This is where the 2nd mod became necessary. The original propane hose was not long enough to reach the valve unless a hole were cut into the cover. Since I did not want to do that, I purchased a longer propane hose. The problem is that the stock 24" hose came with a 1/4" male NPT thread fitting for the regulator. The longest hose I could find with a 1/4" male NPT fitting was 24", which was way too short. I ended up getting a Mr. Heater 3-foot Propane Hose Assembly and a Camco 59953 Propane Fitting. I already had purchased Slik-Tite PTFE Gas Line Pipe Thread Tape so I had that on hand. This is a heavy, yellow-colored tape, not the thin, white tape used for water plumbing. I used the PTFE tape to wrap the male NPT threads of the fitting and attached it to the regulator. I had read that for the 1/4" inverted male flare fitting, no pipe thread or sealant should be used, so I did not use any. After attaching the hose to the fitting and making sure all was tight, I threaded the hose under the bottom of the cover and up to the valve. After I attached the hose and turned the gas valve on, the first thing I did was to use some soapy water to test for leaks. There were no leaks. The 3' hose allowed enough slack so that there is no stress being put on the hose or fittings. The new cover looks good, and it should last much longer than the vinyl cover it replaced. 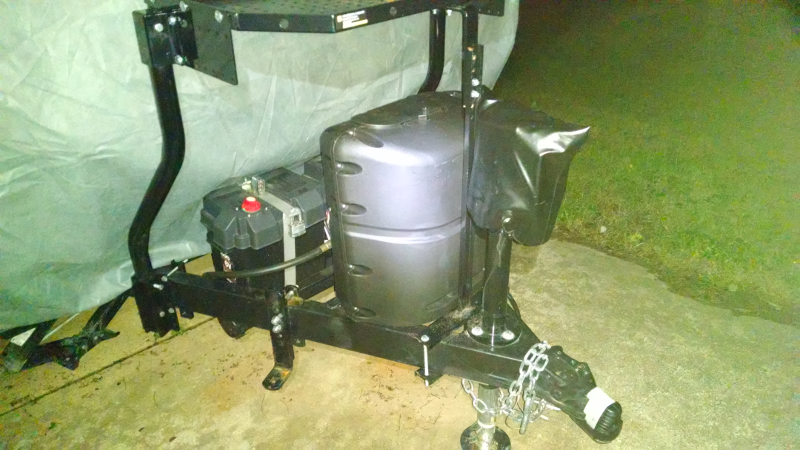 I had previously replaced the propane hose. The original one started leaking where the hose was crimped on to the fitting for the regulator. Sine I could not find one from the same maker, and since I needed it quickly, I had replaced the original one with a 20" Mr. Heater hose since it had the correct male NPT fitting. I did find that while it fit, the extra 4" was needed as the 20" hose did not have any slack once it was attached. The longer hoses all came with the inverted male fitting. I had written the manufacturer of the original hose, but never heard anything back. I hope the Mr. Heater hose will hold up better than the original one. |
||
|
StephenH
Happy is the man that findeth wisdom,... ouR escaPOD mods Former RPod 179 Current Cherokee Grey Wolf 24 JS |
||
|
||
|
jglynn55
Newbie 

Joined: 15 Mar 2016 Location: nashville tn Online Status: Offline Posts: 22 |
Post Options
Quote Reply
Posted: 14 Oct 2016 at 9:11am |
|
|
I can't figure out how to take the kitchen drawers off in my 179.
|
||
|
||
|
StephenH
podders Helping podders - pHp
Joined: 29 Nov 2015 Location: Wake Forest, NC Online Status: Offline Posts: 6423 |
Post Options
Quote Reply
Posted: 14 Oct 2016 at 10:30am |
|
|
Pull the drawer out all the way. On each side, there is a little black, plastic lever in the middle of the track. Press it up or down depending on which side it is to release the inner track from the outer track and ball-bearing race. You can then pull the drawer and inner slide out and remove it.
Edit: To reinsert the drawer and slides, align the inner slide attached to the drawer with the outer slide. I find it easier to then pull the outer slide over the inner slide, keeping it aligned. The inner slide's locking lever will click into place. Do this for both sides. You can then push the drawer in. |
||
|
StephenH
Happy is the man that findeth wisdom,... ouR escaPOD mods Former RPod 179 Current Cherokee Grey Wolf 24 JS |
||
|
||
|
Post Reply
|
Page <1 678910 58> |
| Forum Jump | Forum Permissions You cannot post new topics in this forum You cannot reply to topics in this forum You cannot delete your posts in this forum You cannot edit your posts in this forum You cannot create polls in this forum You cannot vote in polls in this forum |


 I don't feel bad about leaving the fan's lid open now. I don't have to worry about rain getting in, even when I don't have the CA cover installed.