
|
ouR escaPOD mods |
Post Reply 
|
Page <1 5152535455 58> |
| Author |
 Printable Version Printable Version Google Google Delicious Delicious Digg Digg StumbleUpon StumbleUpon Windows Live Windows Live Yahoo Bookmarks Yahoo Bookmarks reddit reddit Facebook Facebook MySpace MySpace Newsvine Newsvine Furl Furl Topic Search Topic Search  Topic Options Topic Options
|
StephenH 
podders Helping podders - pHp 

Joined: 29 Nov 2015 Location: Wake Forest, NC Online Status: Offline Posts: 6452 |
 Post Options Post Options
 Quote Reply Quote Reply
 Topic: ouR escaPOD mods Topic: ouR escaPOD modsPosted: 30 Aug 2016 at 8:54pm |
|
Time for another mod posting. I wanted to be able to use the hitch on the back for something other than the spare tire, but with the generator rack and generator on the front already, I did not want to add yet more weight. The question became one of if I can't put it three, where can I put it?
BAL has the answer in their Hide-A-Spare. This device lets one move the tire to mount beneath the R-Pod. In the case of the 179, the space between the steps and the rear stabilizer is the perfect spot to mount the spare. I was able to find the 28210 model, which is a little shorter than the 28215 model in the link. However, I still ended up having to cut the bars and drill new holes, so it isn't worth the hassle of trying to locate the 28210 model. In addidtion, the people from whom I ordered it sent it without some of the necessary hardware. BAL did make good, but not before I had to spend the money for the bolts, nuts, and washers needed anyway since the parts did not arrive until after we left on our most recent trip. I also didn't save much over what I would have paid Amazon. Here are a couple of pictures:   |
|
|
StephenH
Happy is the man that findeth wisdom,... ouR escaPOD mods Former RPod 179 Current Cherokee Grey Wolf 24 JS |
|
 |
|
|
StephenH
podders Helping podders - pHp
Joined: 29 Nov 2015 Location: Wake Forest, NC Online Status: Offline Posts: 6452 |
Post Options
Quote Reply
Posted: 19 Jul 2016 at 10:27am |
|
Dana,
The Stromberg-Carlson Trailer Tray specifications are on the eTrailer web site. The weight of the tray is 65 lbs. The generator would be additional, but that would vary by what generator you purchase. The cover was simply a household plastic bin (Sterilite) with a separate lid. I don't have a part number for it. I simply chose one that would have sufficient length, width, and depth to cover the generator. I do not use the lid that came with it. I do need to modify it a little since it has an indentation in the bottom (now top) that holds water. I will take a heat gun and carefully heat and mold it to create a couple of drain channels. I don't want to make holes to drain it as it would defeat the purpose of keeping the generator dry. |
|
|
StephenH
Happy is the man that findeth wisdom,... ouR escaPOD mods Former RPod 179 Current Cherokee Grey Wolf 24 JS |
|
|
|
|
TheLoneRanger
Newbie 

Joined: 21 Jun 2016 Location: Utah Online Status: Offline Posts: 13 |
Post Options
Quote Reply
Posted: 18 Jul 2016 at 11:17pm |
|
Hello SH,
I am new to this forum. I have enjoyed seeing all the mods you have designed. It is evident you are a "problem solver". I have been trying to find a solution to carry a generator. Your solution is perfect! Would you mind sharing the model/part # for the gen tray and Walmart cover? How much did this add to the tongue weight of your 179? I have a 2016 HRE 177. Your mods are very creative and the details you provide are great! Thanks, Dana - an all American male |
|
|
|
|
StephenH
podders Helping podders - pHp
Joined: 29 Nov 2015 Location: Wake Forest, NC Online Status: Offline Posts: 6452 |
Post Options
Quote Reply
Posted: 18 Jul 2016 at 10:14pm |
|
I had previously mounted a Stromberg-Carlson cargo carrier with the view toward carrying a generator. I purchased a Generac iX2000, which is sufficient to run most of what I need on the R-Pod, including the AC. It is rated at 2000 running Watts and 2200 surge Watts. So far, I have only tested it, and it ran the AC. Unfortunately, the convection microwave must pull one huge surge of power when the microwave part tries to start. The Generac can't run it.
 However, I still want to carry it, so I had to figure out how to tie it down and then how to protect it. For tie-downs, I got some cargo tie-down brackets and attached them to the platform. For one of them, I could use one of the existing bolts for the front leg. For the rest, I drilled and used stainless steel bolts with washers and nylock nuts. This will not make it impossible to steal, just inconvenient. A ratcheting strap and a bicycle lock complete the mount.  Of course, I did not want to leave my nice, shiny generator out in the sun and rain. I also wanted to protect it while traveling from road dirt and rain. Enter a plastic bin from Wal-Mart. It got inverted with a few holes drilled in the rim to drain water (got to keep from creating a mosquito breeding pond). Some bungee cords keep it in place.  We tested this on our most recent trip from North Carolina to western New York State and return. It rode well with no issues and the generator stayed clean and dry. My next project will be to move the spare tire so I can mount a small platform in order to carry my spare propane tank and a gasoline container outside of the R-Pod and TV. |
|
|
StephenH
Happy is the man that findeth wisdom,... ouR escaPOD mods Former RPod 179 Current Cherokee Grey Wolf 24 JS |
|
|
|
|
StephenH
podders Helping podders - pHp
Joined: 29 Nov 2015 Location: Wake Forest, NC Online Status: Offline Posts: 6452 |
Post Options
Quote Reply
Posted: 18 Jul 2016 at 9:56pm |
|
This is one I just did. I got tired of cranking the jack for hitching and unhitching the R-Pod. My wife was watching me do it last time, and agreed to let me do something about it. After a lot of searching and reading reviews, I decided to give Jack Quick model JQ-3500B a try. It was easy to mount, only requiring the removal of three bolts (after suitably bracing the tongue on a jack stand) to remove the manual jack. Installation was easy as the R-Pod already has a bottom plate which is required. The same bolts and washers are used with the addition of a star washer between the tongue and flat washer to ensure good electrical contact. The wire was run to the battery box and wired to the positive terminal through the included breaker. The connection terminals were not included, which is the only irritant since the only way I could get the one ring terminal I needed in the correct size was to purchase a kit. Hopefully, I'll find use for more of the terminals in the future.
Anyway, here's a picture of the installed jack With the Husky foot I had been using on the manual jack. I did not even have to drill any holes for it as the jack already had the proper size hole for the bolt needed in the correct location.  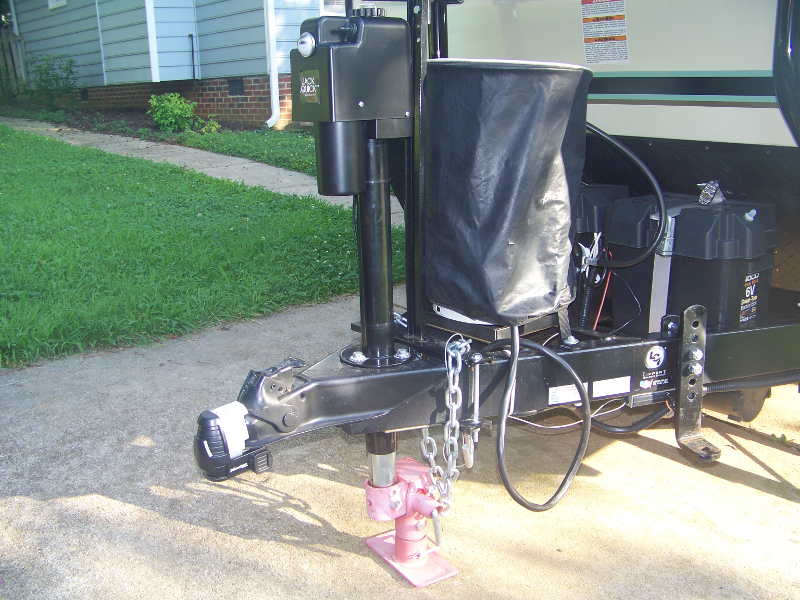 Edit: I ended up removing the Husky Brute foot and installing the adjustable foot that came with the jack. It has a round foot and adjusts by removing a pin. Since I would have to get down and adjust it or get down and swivel the Husky foot (plus install or remove it if I did not want to leave it on while traveling), I was not saving much time. The stock adjustable foot should save a couple of pounds also. |
|
|
StephenH
Happy is the man that findeth wisdom,... ouR escaPOD mods Former RPod 179 Current Cherokee Grey Wolf 24 JS |
|
|
|
|
StephenH
podders Helping podders - pHp
Joined: 29 Nov 2015 Location: Wake Forest, NC Online Status: Offline Posts: 6452 |
Post Options
Quote Reply
Posted: 18 Jul 2016 at 6:52pm |
|
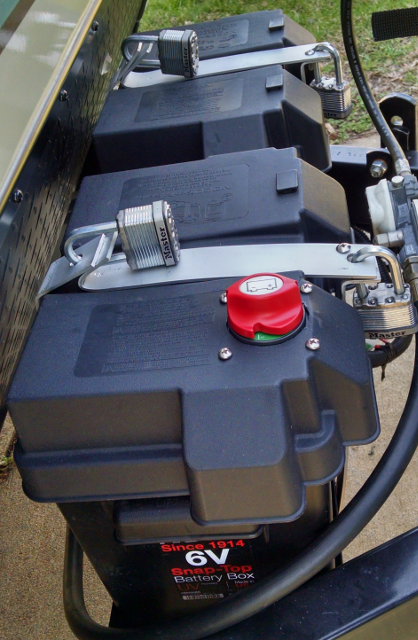
Well, I need to remedy an oversight. I thought I had posted a picture of the battery cut-off switch here. I had posted it elsewhere instead. Here it is:
 |
|
|
StephenH
Happy is the man that findeth wisdom,... ouR escaPOD mods Former RPod 179 Current Cherokee Grey Wolf 24 JS |
|
|
|
|
StephenH
podders Helping podders - pHp
Joined: 29 Nov 2015 Location: Wake Forest, NC Online Status: Offline Posts: 6452 |
Post Options
Quote Reply
Posted: 08 Jul 2016 at 6:06pm |
|
I'll suggest that to my wife. It might work better for us also.
|
|
|
StephenH
Happy is the man that findeth wisdom,... ouR escaPOD mods Former RPod 179 Current Cherokee Grey Wolf 24 JS |
|
|
|
|
sailor323
Senior Member
Joined: 11 Jun 2015 Location: S Central KY Online Status: Offline Posts: 281 |
Post Options
Quote Reply
Posted: 08 Jul 2016 at 9:20am |
Yeah, that is a problem. We sleep with our heads on the closet side in order to make it easier to get in and out of bed easier. |
|
|
|
|
StephenH
podders Helping podders - pHp
Joined: 29 Nov 2015 Location: Wake Forest, NC Online Status: Offline Posts: 6452 |
Post Options
Quote Reply
Posted: 08 Jul 2016 at 1:07am |
|
Some people use washers instead of the shims I made. I just wanted something more solid.
I really don't have a problem hitting my head on the shelf. It sits high enough and back far enough so that it has not been a problem. The bigger problem is crawling over my wife if she gets into bed first or if I have to get up during the night. I hope my ideas have been useful for you. |
|
|
StephenH
Happy is the man that findeth wisdom,... ouR escaPOD mods Former RPod 179 Current Cherokee Grey Wolf 24 JS |
|
|
|
|
nsl
Newbie
Joined: 05 Jul 2016 Location: Arizona Online Status: Offline Posts: 6 |
Post Options
Quote Reply
Posted: 07 Jul 2016 at 6:07pm |
|
Good afternoon. After trying different step stools,etc. with our r-pod, I knew we needed a double step. Jayco's pod style camper comes with a double step. (Smart)
After doing some research, I found the pod forum and was really glad to see that other people wanted to double step too! I ordered one from Camping World and it should be here early next week. I do not have the capability to fabricate the metal things you did but there are 3 metal fabricators in my area. That should do the trick. Also, I use a CPAP machine too. After looking at the shelf you built above the bed (I have a model 180) is there any problem with hitting your head as you get into/out of the bed? Just wondered.  Thanks for you ideas!! NSL
|
|
|
|
|
Post Reply
|
Page <1 5152535455 58> |
| Forum Jump | Forum Permissions You cannot post new topics in this forum You cannot reply to topics in this forum You cannot delete your posts in this forum You cannot edit your posts in this forum You cannot create polls in this forum You cannot vote in polls in this forum |


